리소스 관리
이 기능은 Gantt PRO 에디션에만 포함되어 있습니다.
Gantt는 리소스 부하를 시각화할 수 있는 사전 정의된 리소스 뷰, 작업별로 프로젝트를 분해하여 작업 부하를 균형 있게 조정할 수 있는 도구, 그리고 작업 및 리소스에 맞춤화된 캘린더를 제공합니다.
Gantt 자체적으로 리소스 부하를 계산하거나 내장된 방법을 제공하지는 않지만, 필요한 모든 맞춤 기능을 생성할 수 있도록 public API를 제공합니다.
리소스 뷰 패널
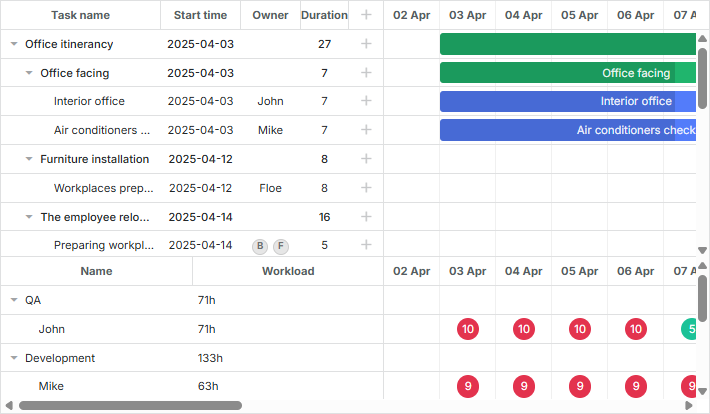
dhtmlxGantt는 리소스 부하를 표시하기 위해 두 가지 사전 정의된 레이아웃 뷰를 제공합니다: 리소스 부하 다이어그램과 리소스 히스토그램입니다.
리소스 부하 다이어그램
이 다이어그램에는 "resourceGrid"와 "resourceTimeline"이라는 그리드와 타임라인 전용 뷰가 포함되어 있습니다.
gantt.config.layout = {
    css: "gantt_container",
    rows: [
      {
        // 기본 Grid 및 Timeline 레이아웃
        cols: [
          {view: "grid", group:"grids", scrollY: "scrollVer"},
          {resizer: true, width: 1},
          {view: "timeline", scrollX: "scrollHor", scrollY: "scrollVer"},
          {view: "scrollbar", id: "scrollVer", group:"vertical"}
        ],
        gravity:2
      },
      { resizer: true, width: 1},
      {
        // 리소스 패널의 Grid 및 Timeline 레이아웃
        config: resourceConfig, // Grid 및 Timeline용 config
        cols: [
          {view: "resourceGrid", group:"grids", width: 435, scrollY:"resourceVScroll"},
          {resizer: true, width: 1},
          {view: "resourceTimeline", scrollX: "scrollHor", scrollY:"resourceVScroll"},
          {view: "scrollbar", id: "resourceVScroll", group:"vertical"}
        ],
        gravity:1
       },
       {view: "scrollbar", id: "scrollHor"}
    ]
};
설정 후 resourceGrid는 기본 grid 뷰처럼 동작하지만 읽기 전용입니다. resourceTimeline은 기본 타임라인과 동일한 스케일 설정을 사용하며, 두 개의 레이어가 있습니다:
- 배경 행: task_row_class 및 timeline_cell_class에서 제공하는 템플릿을 사용합니다. 이들은 레이아웃 수준에서 사용자 정의할 수 있습니다.
- 리소스 레이어: resourceTimeline에만 존재하며, 리소스가 할당된 작업이 있는 셀에 블록을 보여줍니다. 이 블록의 스타일과 내용은 resource_cell_class 및 resource_cell_value 템플릿으로 사용자 정의할 수 있습니다.
gantt.templates.resource_cell_value = function(start_date, end_date, resource, tasks,
    assignments){
    var html = "<div>" +  tasks.length * 8 + "h</div>";
        return html;
};
Templates of the Resource diagram
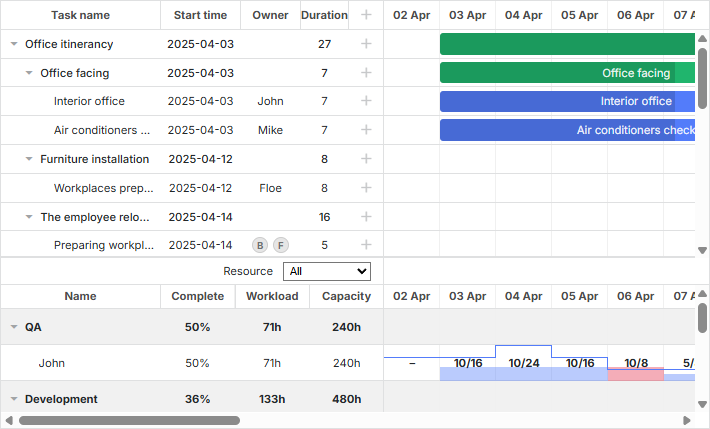
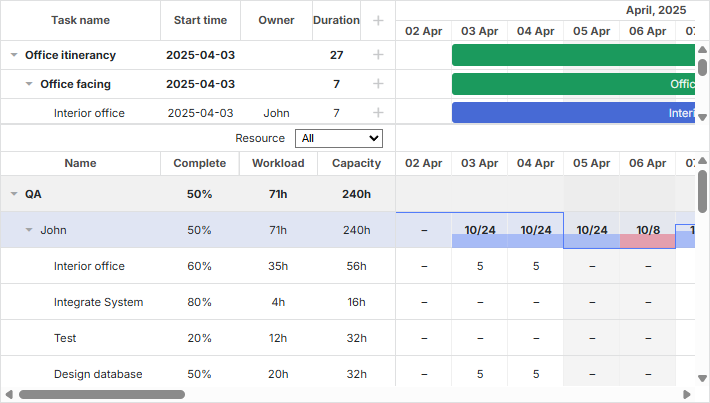
리소스 히스토그램
이 리소스 부하 레이아웃 뷰는 그리드와 타임라인에 각각 "resourceGrid"와 "resourceHistogram" 뷰를 포함합니다.
gantt.config.layout = {
    css: "gantt_container",
    rows: [
        {
            // 기본 Grid 및 Timeline 레이아웃
            gravity: 2,
            cols: [
                {view: "grid", group:"grids", scrollY: "scrollVer"},
                {resizer: true, width: 1},
                {view: "timeline", scrollX: "scrollHor", scrollY: "scrollVer"},
                {view: "scrollbar", id: "scrollVer", group:"vertical"}
            ]
        },
        { resizer: true, width: 1, next: "resources"},
        {
            // 리소스 패널의 Grid 및 Timeline 레이아웃
            gravity:1,
            id: "resources",
            config: resourceConfig, // Grid 및 Timeline용 config
            templates: resourceTemplates, // Grid 및 Timeline용 templates
            cols: [
                { view: "resourceGrid", group:"grids", scrollY: "resourceVScroll" },
                { resizer: true, width: 1},
                { view: "resourceHistogram", capacity:24, scrollX: "scrollHor",
                    scrollY: "resourceVScroll"},
                { view: "scrollbar", id: "resourceVScroll", group:"vertical"}
            ]
        },
        {view: "scrollbar", id: "scrollHor"}
    ]
};
리소스 부하 다이어그램과 마찬가지로 resourceGrid는 기본 grid 뷰와 유사하게 동작하지만 읽기 전용입니다. resourceHistogram은 여러 추가 템플릿을 제공합니다:
- histogram_cell_class - 리소스 패널 셀에 적용되는 CSS 클래스
gantt.templates.histogram_cell_class="function(start_date,end_date,resource,tasks,"
    assignments){
    return "";
};
- histogram_cell_label - 셀 내부에 표시되는 라벨
gantt.templates.histogram_cell_label="function(start_date,end_date,resource,tasks,"
    assignments){
     return tasks.length * 8;
};
- histogram_cell_allocated - 히스토그램에서 채워진 영역의 높이 (0 ~ maxCapacity)
gantt.templates.histogram_cell_allocated="function(start_date,end_date,resource,tasks,"
    assignments){
     return tasks.length * 8;
};
- histogram_cell_capacity - 리소스의 사용 가능 용량을 나타내는 선의 높이 (-1 ~ maxCapacity, 0 미만이면 선이 숨겨짐)
gantt.templates.histogram_cell_capacity="function(start_date,end_date,resource,tasks,"
    assignments){
     return 24;
};
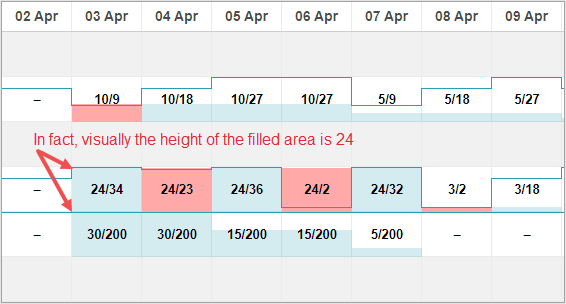
maxCapacity 이해하기
각 히스토그램 행은 막대그래프처럼 작동하며, maxCapacity는 Y축의 스케일 높이를 의미합니다. 아래 예시에서 maxCapacity는 24입니다.
따라서 histogram_cell_allocated 또는 histogram_cell_capacity를 24로 설정하면 행의 맨 위에 도달합니다.
기본적으로 maxCapacity는 모든 리소스에 대해 24로 설정되어 있습니다. histogram_cell_capacity에서 24보다 큰 값을 반환해도 계산은 올바르게 처리되지만, 리소스 패널 셀에서 채워진 영역이 예상과 다르게 보일 수 있습니다.
maxCapacity는 전체 히스토그램 또는 리소스별로 개별적으로 설정할 수 있습니다. 예시는 다음과 같습니다:
Related example: maxCapacity 설정 ��예시
maxCapacity는 히스토그램 수준에서 설정할 수 있습니다:
{ view: "resourceHistogram", capacity:24, scrollX: "scrollHor",
    scrollY: "resourceVScroll"}
또는 각 리��소스별로 개별 지정할 수 있습니다:
resourcesStore.parse([
    {id: 1, text: "John", capacity:8},
    {id: 2, text: "Mike", capacity:4},
    {id: 3, text: "Anna", capacity:8},
    {id: 4, text: "Bill", capacity:8},
    {id: 5, text: "Floe", capacity:8}
]);
리소스별로 설정된 capacity는 해당 리소스에 대해 히스토그램의 전역 capacity를 덮어씁니다.
리소스 뷰 패널 사용하기
�기본적으로 두 뷰("resourceGrid"와 "resourceTimeline" 또는 "resourceGrid"와 "resourceHistogram") 모두 gantt.config.resource_store 설정에서 지정한 데이터 스토어와 연결됩니다.
데이터 스토어 자동 생성
v8.0부터 리소스 데이터 스토어는 gantt가 초기화될 때 자동으로 생성되며, "onGanttReady" 이벤트가 발생할 때까지 준비됩니다. 이 스토어에 접근하려면 getDatastore 메서드를 사용하세요.
리소스 스토어를 사용자 정의하려면 gantt.config.resources 옵션을 사용할 수 있습니다:
gantt.config.resources = {
    resource_store: {
        type: "treeDataStore",
        fetchTasks: true,
        initItem: function(item) {
            item.parent = item.parent || gantt.config.root_id;
            item[gantt.config.resource_property] = item.parent;
            item.open = true;
            return item;
        }
    },
}
resource_store 내부의 설정은 기본 리소스 데이터스토어를 생성하는 데 사용됩니다. 이미 코드에 리소스 데이터스토어가 있다면 gantt는 기존 스토어를 사용합니다.
리소스를 로드하려면, 여기에서 설명한 대로 gantt.parse()/**gantt.load()**를 사용하거나, **datastore.parse()**를 통해 직접 데이터스토어를 채울 수 있습니다:
gantt.attachEvent("onGanttReady", function(){
    const store = gantt.getDatastore(gantt.config.resource_store);
    store.parse([
       {id: 6, text: "John"},
       {id: 7, text: "Mike"},
       {id: 8, text: "Anna"},
       {id: 9, text: "Bill"},
    ])
});
라이트박스의 리소스 컨트롤은 자동으로 리소스 목록에 연결됩니다:
gantt.config.lightbox = {
    sections: [
        ...,
        { name: "resources", type: "resources", map_to: "auto", default_value: 8}
    ]
};
데이터 스토어 수동 생성
createDatastore 메서드를 사용하여 데이터 스토어를 수동으로 생성할 수도 있습니다:
var resourcesStore = gantt.createDatastore({
  name: gantt.config.resource_store,
  // 리소스가 계층적(예: 직원/부서)인 경우 treeDatastore 사용,
  // 평면 구조라면 "type" 생략
  type: "treeDatastore",
  initItem: function (item) {
    item.parent = item.parent || gantt.config.root_id;
    item[gantt.config.resource_property] = item.parent;
    item.open = true;
    return item;
  }
});
데이터 스토어를 채우려면 datastore.parse 메서드를 사용하세요:
resourcesStore.parse([
    {id: 1, text: "QA", parent:null},
      {id: 2, text: "Development", parent:null},
    {id: 3, text: "Sales", parent:null},
    {id: 4, text: "Other", parent:null},
    {id: 5, text: "Unassigned", parent:4},
    {id: 6, text: "John", parent:1},
    {id: 7, text: "Mike", parent:2},
    {id: 8, text: "Anna", parent:2},
    {id: 9, text: "Bill", parent:3},
    {id: 10, text: "Floe", parent:3}
]);
라이트박스에서 리소스를 사용하려면, 데이터 스토어의 onParse 이벤트에서 serverList 메서드를 통해 다음과 같이 처리하는 것이 유용합니다:
resourcesStore.attachEvent("onParse", function(){
  var people = [];
  resourcesStore.eachItem(function(res){
    if(!resourcesStore.hasChild(res.id)){
        var copy = gantt.copy(res);
        copy.key = res.id;
        copy.label = res.text;
        people.push(copy);
    }
  });
  gantt.updateCollection("resourceOptions", people);
});
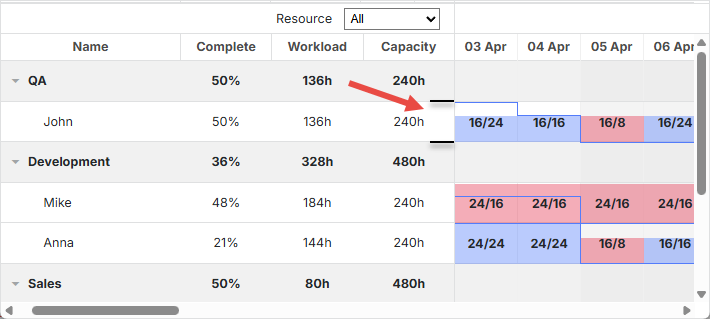
리소스 패널 확장
데이터스토어 초기화 시 fetchTasks 속성을 활성화하면 특정 리소스에 할당된 모든 작업을 리소스 패널에서 볼 수 있습니다:
gantt.config.resources = {
    resource_store: {
        type: "treeDataStore",
        fetchTasks: true, /*!*/
        initItem: function (item) {
             item.parent = item.parent || gantt.config.root_id;
             item[gantt.config.resource_property] = item.parent;
             if(!item.parent){
                 item.open = true;
             }else{
                 item.open = false;
             }
             return item;
         }
    },
};
또는
gantt.$resourcesStore = gantt.createDatastore({
     name: gantt.config.resource_store,
    type: "treeDatastore",
     fetchTasks: true, /*!*/
     initItem: function (item) {
         item.parent = item.parent || gantt.config.root_id;
         item[gantt.config.resource_property] = item.parent;
         if(!item.parent){
             item.open = true;
         }else{
             item.open = false;
         }
         return item;
     }
});
Show all assigned tasks in the resource panel
fetchTasks가 true로 설정되면, Gantt는 리소스 뷰 패널에서 해당 리소스에 연결된 모든 작업을 표시합니다. 이 기능은 리소스 다이어그램과 리소스 히스토그�램 레이아웃 모두에 적용됩니다.
특정 리소스에 할당된 모든 작업을 빠르게 얻으려면 getResourceAssignments를 참조하세요.
gantt.getResourceAssignments("6");
리소스 할당
작업에 리소스 연결하기
리소스와 작업 간의 연결은 resource_property 설정으로 제어됩니다:
gantt.config.resource_property = "user_id";
// task.user_id <-> resource.id
리소스는 여러 가지 방식으로 작업 객체의 속성을 통해 연결할 수 있습니다:
- 단일 리소스를 작업에 할당하기
{
    id: 1, text: "Task #1", start_date: "02-04-2018", duration: 8, progress: 0.6,
    user_id: 5 // 5는 리소스 id입니다.
}
- 여러 리소스를 작업에 할당하기
{
    id: 1, text: "Task #1", start_date: "02-04-2018", duration: 8, progress: 0.6,
    users: [2, 3] // 2와 3은 리소스 id입니다.
}
이 형식은 커스텀 멀티셀렉트 컨트롤과 잘 호환됩니다.
- 수량을 지정하여 여러 리소스를 할당하기
{
    id: 1, text: "Task #1", start_date: "02-04-2018", duration: 8, progress: 0.6,
    users: [{resource_id:2, value:8}, {resource_id:3, value:4}]
}
여기서 id="2인" 리소스는 8 단위, id="3인" 리소스는 4 단위가 할당됩니다. 이 형식은 리소스 컨트롤의 lightbox에서 지원됩니다.
v8.0부터는 리소스 할당을 별도의 리스트로도 불러올 수 있으며, Gantt가 이를 자동으로 작업에 연결합니다:
gantt.parse({
       tasks: [...],
       links: [...],
       resources: [...],
       assignments: [{id:1, resource_id:2, task_id: 5, value: 8}, ...]
});
데이터 형식에 대한 자세한 내용은 여기에서 확인할 수 있습니다.
서버로 데이터를 전송할 때 DataProcessor는 이러한 속성을 JSON으로 직렬화합니다. 서버에서 이러한 레코드를 효율적으로 처리하려면 "REST_JSON" dataprocessor 모드를 사용하는 것이 좋습니다.
Resource Assignments의 변경 사항을 작업과 별도로 저장하려면 다음 설정을 활성화하세요:
gantt.config.resources = {
    dataprocessor_assignments: true,
    dataprocessor_resources: true,
};
자세한 내용은 전용 문서를 참고하세요.
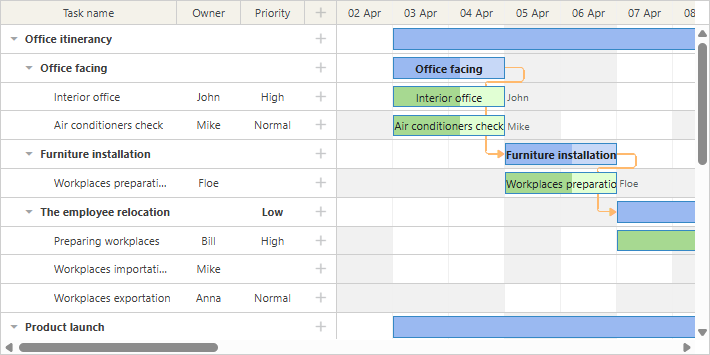
리소스 할당 시간 설정하기
기본적으로 리소스는 작업의 전체 기간에 할당됩니다.
v7.1부터는 리소스 할당 객체에 추가적인 선택적 파라미터를 포함하여 할당 날짜를 작업 내에서 지정할 수 있습니다.
이 추가 속성들은 다음과 같습니다:
- id - (string|number) 할당 id
- start_date - (Date|string) 할당 시작 날짜
- end_date - (Date|string) 할당 종료 날짜
- delay - (number) 할당 시작과 작업 시작 간의 오프셋
- duration - (number) 할당 기간
- mode - (string) 할당 시간 계산 방식: "default"|"fixedDates"|"fixedDuration"
{
    id: 5, text: "Interior office", type: "task", start_date: "03-04-2019 00:00",
    duration: 7, parent: "2", progress: 0.6, priority: 1,
    users: [{
        resource_id: "3",
        value: 8,
        delay: 1 /*!*/
    },{
        resource_id: "6",
        value: 3,
        start_date: "03-04-2019 00:00", /*!*/
        end_date: "05-04-2019 00:00", /*!*/
        mode: "fixedDates" /*!*/
    },{
        resource_id: "7",
        value: 3,
        delay: 1, /*!*/
        duration: 2, /*!*/
        mode: "fixedDuration" /*!*/
    }
    ]
}
Assign resource values to specific days
-
리소스 할당의 시작 및 종료 날짜는 리소스 히스토그램과 다이어그램에 표시됩니다.
-
할당 객체에 선택적으로 id를 추가할 수 있습니다:
{
    id: 1, text: "Task #1", start_date: "02-04-2018", duration: 8, progress: 0.6,
    users: [{
        id: 5,
        resource_id: 2, value: 8,
        delay: 1
    }]
}
이 id를 사용하여 gantt API로 할당에 접근할 수 있습니다:
var assignment = gantt.getDatastore("resourceAssignments").getItem(5);
"resourceAssignments" datastore는 process_resource_assignments 설정이 활성화되어 있을 때만 사용할 수 있습니다.
- 다른 속성의 동작은 mode 값에 따라 달라집니다:
- "default" 모드
{
    id: 1, text: "Task #1", start_date: "02-04-2018", duration: 8, progress: 0.6,
    users: [
        { resource_id: 2, value: 8, delay: 1},
        { resource_id: 3, value: 6},
    ]
}
mode가 없거나 "default"로 설정된 경우, 할당의 start_date와 end_date는 작업의 날짜에서 파생됩니다. 기본적으로 할당은 작업의 시작 날짜에 시작하고, 작업이 끝날 때 종료됩니다.
delay 속성은 MS Project의 Delay 필드와 유사하게 동작합니다.
delay가 설정되면 할당의 start_date는
gantt.calculateEndDate((start_date:task.start_date, duration:assignment.delay, task:task))로 계산됩니다.
즉, 할당은 작업 시작 후 지정된 delay만큼 지난 후 시작하여 작업과 함께 종료됩니다. 작업이 변경되면 이 날짜들도 자동으로 갱신됩니다.
- "fixedDuration" 모드
{
    id: 1, text: "Task #1", start_date: "02-04-2018", duration: 8, progress: 0.6,
    users: [
        {resource_id:2, value:8, duration: 1, delay:0, mode: "fixedDuration"},
        {resource_id:2, value:2, duration: 1, delay:1, mode: "fixedDuration"},
        {resource_id:2, value:3, delay:2, mode: "default"}
    ]
}
여기서 start_date는 default 모드와 동일하게 계산됩니다.
하지만 end_date는 더 이상 작업 종료 날짜에 묶이지 않고,
gantt.calculateEndDate((start_date:assignment.start_date, duration:assignment.duration, task:task))로 계산됩니다.
작업이 업데이트되면 할당 날짜는 다시 계산되지만, 할당 기간은 고정됩니다.
- "fixedDates" 모드
{
    id: 1, text: "Task #1", start_date: "02-04-2018", duration: 8, progress: 0.6,
    users: [{
        resource_id:2, value:8,
        start_date:"03-04-2018", end_date:"11-04-2018", mode: "fixedDates"
    }]
}
이 모드에서는 할당의 날짜가 지정된 값 그대로 사용되며, 작업이 수정되어도 변경되지 않습니다.
mode가 "fixedDates"일 때는 delay 속성이 영향을 주지 않습니다.
아래는 각 mode별 할당 날짜 계산 방식의 요약입니다:
-
default
- assignment.start_date = task.start_date + assignment.delay
- assignment.end_date = task.end_date
-
fixedDuration
- assignment.start_date = task.start_date + assignment.delay
- assignment.end_date = assignment.start_date + assignment.duration
-
fixedDates
- assignment.start_date = assignment.start_date
- assignment.end_date = assignment.end_date
리소스가 할당된 작업 가져오기
특정 리소스에 할당된 모든 작업을 빠르게 가져오려면 getResourceAssignments에 설명된 메서드를 사용하세요.
gantt.getResourceAssignments("6");
이 메서드는 리소스 id를 받아 해당 리소스에 할당된 작업을 나타내는 객체 배열을 반환합니다:
[
    {task_id: 5, resource_id: "6", value: 5, delay: 0, duration: 7,
        start_date: "03-04-2019 00:00", end_date: "12-04-2019 00:00",
        id: 1617258553240, mode: "default"},
    {task_id: 18, resource_id: "6", value: 2, delay: 0, duration: 2,
        start_date: "05-04-2019 00:00", end_date: "09-04-2019 00:00",
        id: 1617258553250, mode: "default"},
    {task_id: 19, resource_id: "6", value: 3, delay: 0, duration: 4,
        start_date: "09-04-2019 00:00", end_date: "13-04-2019 00:00",
        id: 1617258553251, mode: "default"},
    {task_id: 21, resource_id: "6", value: 5, delay: 0, duration: 4,
        start_date: "03-04-2019 00:00", end_date: "09-04-2019 00:00",
        id: 1617258553254, mode: "default"}
]
각 객체에는 다음 속성이 포함되어 있습니다:
- task_id - 작업 식별자
- resource_id - 리소스 식별자
- value - 작업에 할당된 리소스 수량
- delay - 할당 시작과 작업 시작 간의 오프셋
- duration - 할당 기간
- start_date - 할당 시작 날짜
- end_date - 할당 종료 날짜
- id - 할당 식별자
- mode - 할당 시간 계산 방식: "default"|"fixedDates"|"fixedDuration"
작업의 리소스 할당 가져오기
getTaskAssignments 메서드는 특정 작업에 대한 리소스 할당을 데이터스토어에서 가져옵니다:
gantt.getTaskAssignments(5);
이 메서드는 작업 id를 받아 해당 작업의 리소스 할당을 나타내는 객체 배열을 반환합니다:
[
    {task_id: 5, id: 1617254693938, delay: 0, duration: 2,
        start_date: "03-04-2019 00:00", end_date: "05-04-2019 00:00",
        mode: "fixedDuration", resource_id: 6, value: 3},
    {task_id: 5, id: 1617254693946, delay: 3, duration: 1,
        start_date: "06-04-2019 00:00", end_date: "07-04-2019 00:00",
        mode: "fixedDuration", resource_id: 6, value: 6}
]
반환된 객체의 속성은 getResourceAssignments 메서드의 결과와 동일합니다.
Lightbox를 통한 연결 설정
리소스는 내장된 lightbox 기능을 사용하여 작업 객체의 임의의 속성에 연결할 수 있습니다.
gantt.serverList("people", [
    {key: 1, label: "John"},
    {key: 2, label: "Mike"},
    {key: 3, label: "Anna"},
    {key: 4, label: "Bill"},
    {key: 7, label: "Floe"}
]);

gantt.locale.labels.section_owner = "Owner";

gantt.config.lightbox.sections = [
  {name:"description", height:38, map_to:"text", type:"textarea", focus:true},
  {name:"owner", map_to:"owner_id", type:"select", options:gantt.serverList("people")},
  {name:"time", type:"duration", map_to: "auto"}
];
lightbox에서 리소스 컨트롤을 설정하는 방법에 대한 더 자세한 내용은 Resources Control 문서를 참고하세요.
컬렉션 불러오기
서버 리스트로 정의된 컬렉션은 gantt가 초기화된 후에도 동적으로 불러오거나 갱신할 수 있습니다:
// 빈 컬렉션으로 라이트박스 초기화
gantt.locale.labels.section_owner = "Owner";

gantt.config.lightbox.sections = [
  {name:"description", height:38, map_to:"text", type:"textarea", focus:true},
  {name:"owner", map_to:"owner_id", type:"select", options:gantt.serverList("people")},
  {name:"time", type:"duration", map_to: "auto"}
];

// 옵션이 로드된 후 갱신
gantt.updateCollection("people", [
    {key: 1, label: "John"},
    {key: 2, label: "Mike"},
    {key: 3, label: "Anna"},
    {key: 4, label: "Bill"},
    {key: 7, label: "Floe"}
]);
serverList 컬렉션을 통해 리소스를 정의할 때, 다른 데이터와 함께 불러올 수 �있습니다. 그렇지 않으면 수동으로 로드해야 합니다.
라이트박스에서 리소스 컨트롤을 구성하는 방법에 대한 추가 안내는 Resources Control 문서를 참고하세요.
리소스 및 리소스 할당 불러오기
v8.0부터는 gantt.parse() 또는 gantt.load() 메서드를 사용해 리소스와 리소스 할당을 gantt에 불러올 수 있습니다:
gantt.parse({
    tasks: [
        ...,
        {
            id: 5,
            text: "Interior office",
            type: "task",
            start_date: "03-04-2024 00:00",
            duration: 7,
            parent: "2",
            owner: [
                {
                    resource_id: "6",
                    value: 3,
                    start_date: "03-04-2024 00:00",
                    end_date: "05-04-2024 00:00",
                }
            ]
        },
        ...
    ],
    links: [],
    resources: [
        {id: 6, text: "John", unit: "hours/day" },
        {id: 7, text: "Mike", unit: "hours/day" },
        {id: 8, text: "Anna", unit: "hours/day" },
        {id: 9, text: "Bill", unit: "hours/day" },
        {id: 10, text: "Floe", unit: "hours/day" }
    ]
});
리소스 할당은 작업과 별도로 제공할 수도 있습니다:
gantt.parse({
    tasks: [
        ...,
        {
            id: 5,
            text: "Interior office",
            type: "task",
            start_date: "03-04-2024 00:00",
            duration: 7,
            parent: "2",
            priority: 1
        },
        ...
    ],
    links: [],
    assignments: [
        {
            id: 1, task_id: 5, resource_id: 6, value: 3,
            start_date: "03-04-2024 00:00",
            end_date: "05-04-2024 00:00"
        }
    ],
    resources: [
        {id: 6, text: "John", unit: "hours/day" },
        {id: 7, text: "Mike", unit: "hours/day" },
        {id: 8, text: "Anna", unit: "hours/day" },
        {id: 9, text: "Bill", unit: "hours/day" },
        {id: 10, text: "Floe", unit: "hours/day" }
    ]
});
리소스 할당 관리
리소스 할당 파싱
v7.1부터 리소스 할당은 데이터 스토어 내 객체로 처리할 수 있습니다.
process_resource_assignments 속성은 작업의 gantt.config.resource_property에서 값을 내부 리소스 할당 객체로 파싱하는 기능을 제어합니다. 이를 통해 DataStore API를 사용해 할당 객체를 조회하거나 갱신할 수 있습니다.
참고: 이 기능은 리소스에 대한 원하는 기간 및 타이밍을 지정해야 할 때, 특히 리소스 다이어그램과 히스토그램을 사용할 때 필요합니다.
이 과정을 활성화하면 성능에 영향을 줄 수 있으므로, 대규모 프로젝트에서는 주의가 필요합니다. 타이밍이나 기간 정보가 필요 없다면 파싱을 비활성화할 수 있습니다:
gantt.config.process_resource_assignments = false;
비활성화 시, gantt.getDatastore("resourceAssignments")는 사용할 수 없으며, 할당 객체는 동적 속성을 갖지 않습니다. 이 경우 리소스 다이어그램과 히스토그램은 리소스가 전체 작업 기간에 할당된 것으로 간주합니다.
리소스 할당 갱신
리소스 할당은 자동으로 생성되는 data store에 저장됩니다.
기본적으로 이 스토어는 작업 객체를 기반으로 채워집니다. 즉, 작업의 리소스 속성(예: task.users)을 수정하면 데이터 스토어가 자동으로 갱신됩니다:
task[gantt.config.resource_property] = [
    {
        resource_id: "6",
        value: 3,
        start_date: "03-04-2019 00:00",
        end_date: "05-04-2019 00:00",
    }
];
gantt.updateTask(taskId);
하지만 때때로 데이터 스토어 API로 리소스 할당을 변경한 뒤, 작업 객체도 갱신해야 할 필요가 있습니다. 변경 사항을 작업 객체에 반영하려면 gantt.updateTaskAssignments() 메서드를 사용하세요:
var assignmentStore = gantt.getDatastore(gantt.config.resource_assignment_store);

assignmentStore.addItem({
    resource_id: 5,
    task_id: 2,
    value: 4
});
assignmentStore.removeItem(assignment.id);
assignmentStore.updateItem(assignment.id);

// 데이터스토어에서 할당을 업데이트한 후, `updateTaskAssignments`를 호출해 작업 객체와 동기화:
gantt.updateTaskAssignments(taskId);
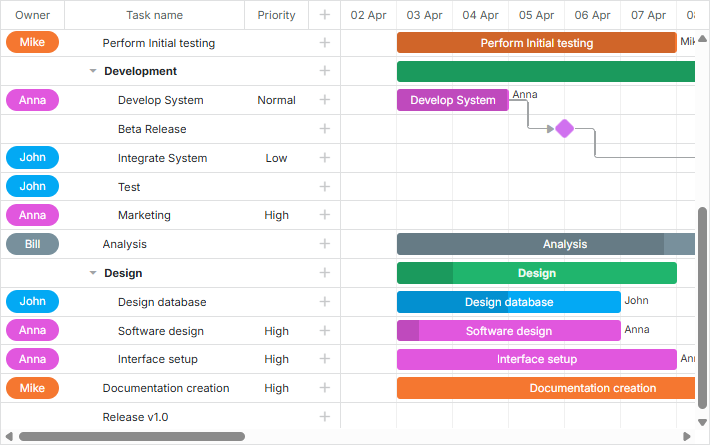
작업 리소스 표시
리소스 이름은 작업 설명이나 그리드 셀의 라벨로 표시할 수 있습니다. gantt는 id로 서버 리스트에서 항목을 가져오는 내장 메서드를 제공하지 않으므로, 간단한 헬퍼 함수를 사용할 수 있습니다:
function byId(list, id) {
    for (var i = 0; i < list.length; i++) {
        if (list[i].key == id)
            return list[i].label || "";
    }
    return "";
}
이 헬퍼는 템플릿에서 리소스 이름을 표시할 때 사용할 수 있습니다:
gantt.config.columns = [
    {name: "owner", width: 80, align: "center", template: function (item) {
        return byId(gantt.serverList('people'), item.owner_id)}},
    {name: "text", label: "Task name", tree: true, width: '*'},
    {name: "add", width: 40}
];

gantt.templates.rightside_text = function(start, end, task){
    return byId(gantt.serverList('people'), task.owner_id);
};
편집 가능한 리소스 다이어그램
리소스 다이어그램에서 직접 리소스 할당을 편집하려면 다음 설정을 사용하세요:
gantt.config.resources = {
    editable_resource_diagram: true
};
Assign resource values to specific days
editable_resource_diagram이 활성화되면, gantt는 gantt.templates.resource_cell_value 및 gantt.templates.resource_cell_class 템플릿을 자동으로 할당하여 리소스 할당 편집을 지원합니다.
이 템플릿에 사용자 정의 함수를 제공하면, gantt는 해당 함수를 사용합니다.
기본 구현은 gantt.ext.resources에 있습니다:
gantt.templates.resource_cell_value = gantt.ext.resources.editableResourceCellTemplate;
gantt.templates.resource_cell_class = gantt.ext.resources.editableResourceCellClass;
일반적으로 이 템플릿을 수동으로 할당할 필요는 없으며, 편집 가능한 다이어그램이 활성화되면 gantt가 이를 처리합니다.
아래는 편집 가능한 셀을 가진 템플릿 예시로, 필요에 따라 커스터마이즈할 수 있습니다:
Related example: Customizable resource diagram template
리소스의 커스텀 스타일 적용
색상을 적용하려면 다음과 같은 템플릿을 주로 사용합니다:
- gantt.templates.grid_row_class - 왼쪽 그리드의 행에 대한 CSS 클래스
- gantt.templates.task_row_class - 타임라인의 배경 행 (스마트 렌더링이 활성화된 경우 사용되지 않음)
- gantt.templates.task_class - 작업 바 요소의 CSS 클래스
상황에 따라 아래와 같이 사용할 수 있습니다:
- 각 리소스에 대한 미리 정의된 클래스를 사용하거나,
- 배경 및 텍스트 색상과 같은 스타일 정보를 리소스와 함께 불러와 페이지에서 동적으로 CSS를 생성할 수 있습니다.
리소스 캘린더
Gantt는 특정 리소스에 연결할 수 있는 커스텀 근무 시간 캘린더를 지원합니다.
이러한 캘린더는 일대일로 작업에 매핑됩니다:
// 리소스 값은 `task.resource_id` 속성에서 가져옵니다
gantt.config.resource_property = "resource_id";

gantt.config.resource_calendars = {
    "resource1" : "calendarId1",
    "resource2" : "calendarId2",
    "resource3" : "calendarId3"
};
어떤 속성이든 리소스에 캘린더를 할당하는 데 사용할 수 있습니다. 리소스 속성이 동적으로 변경되면 gantt가 자동으로 최신 캘린더로 작업 타이밍을 다시 계산합니다.
여러 리소스가 하나의 작업에 할당된 경우, gantt는 할당된 모든 리소스를 위한 통합 캘린더를 자동으로 생성할 수 있습니다.
자세한 내용은 리소스에 캘린더 할당 관련 문서를 참고하세요.
리소스 부하 균형 맞추기
grouping extension을 사용하면 resource 속성별로 전체 프로젝트를 분류할 수 있습니다.

이 기능은 캘린더 내에서 리소스 부하를 균형 있게 분배하는 데 도움이 됩니다.
작업 그룹화에 대한 추가 정보는 관련 문서에서 확인할 수 있습니다.
여러 리소스별 작업 그룹화
작업에 여러 리소스가 할당된 경우, 해당 작업은 할당된 리소스별로 그룹화됩니다. 즉, 각 인원별로 작업이 여러 번 표시되는 것이 아�니라, 한 번만 표시되고 모든 할당된 인원이 함께 나열됩니다. 그룹화된 작업은 시작일 기준으로 정렬됩니다.
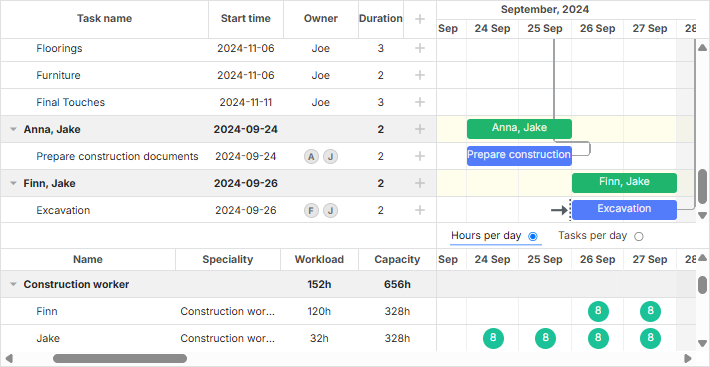
- 데이터셋의 작업에 여러 리소스가 할당된 경우, Gantt는 자동으로 그룹을 생성합니다.
- 리소스가 할당되지 않은 작업은 Not assigned라는 기본 그룹에 배치됩니다. 이 그룹이 이미 groupBy() 메서드에 전달된 데이터에 존재한다면, 중복 기본 그룹 생성을 방지하기 위해 default:true 구성을 포함해야 합니다.
여러 리소스별로 그룹화된 작업은 드래그할 수 없습니다.