资源管理
此功能仅在 PRO 版本中可用。
Gantt 提供用于突出显示资源负载的预定义资源视图、用于按资源对项目进行分解以实现负载均衡的方法、以及面向任务和资源的工作时间日历。
尽管 Gantt 本身并不计算资源负载,也没有可以开箱即用的方法,Gantt 为实现任意自定义行为提供了公开 API。
Resource view panel
dhtmlxGantt 有两种用于显示甘特图资源负载的预定义布局视图:资源负载图和资源直方图。
Resource load diagram
它包括网格和时间线的对应视图:"resourceGrid" 和 "resourceTimeline"。
gantt.config.layout = {
    css: "gantt_container",
    rows: [
        {
           // 默认网格和时间线的布局
            cols: [
                { view: "grid", group: "grids", scrollY: "scrollVer" },
                { resizer: true, width: 1 },
                { view: "timeline", scrollX: "scrollHor", scrollY: "scrollVer" },
                { view: "scrollbar", id: "scrollVer", group: "vertical" }
            ],
            gravity: 2
        },
        { resizer: true, width: 1 },
        {
            // 资源面板的网格和时间线布局
            config: resourceConfig, // 网格和时间线的配置
            cols: [
                { view: "resourceGrid", group: "grids", width: 435,
                    scrollY: "resourceVScroll"
                },
                { resizer: true, width: 1 },
                { view: "resourceTimeline", scrollX: "scrollHor",
                    scrollY: "resourceVScroll"
                },
                { view: "scrollbar", id: "resourceVScroll", group: "vertical" }
            ],
            gravity: 1
        },
        { view: "scrollbar", id: "scrollHor" }
    ]
};
相关示例: Resource load diagram
一旦初始化,resourceGrid 将像默认网格视图一样工作,但为只读。resourceTimeline 将从默认时间线继承刻度配置,并将具有两层:
- 背景行,继承 task_row_class 和 timeline_cell_class。resourceTimeline 的模板可以在布局级重新定义。
- 资源层 - 专用于 resourceTimeline 的一层。它将在资源有任务分配的单元格中显示块。块的样式和内容可使用 resource_cell_class 和 resource_cell_value 模板进行模板化:
gantt.templates.resource_cell_value = (startDate, endDate, resource, tasks, assignments) =>
    `<div>${tasks.length * 8}h</div>`;
相关示例: Templates of the Resource diagram
Resource histogram
此类型的布局视图用于显示甘特图资源负载,网格和时间线分别包含 "resourceGrid" 和 "resourceHistogram" 视图。

gantt.config.layout = {
    css: "gantt_container",
    rows: [
        {
            // 默认网格和时间线的布局
            gravity: 2,
            cols: [
                { view: "grid", group: "grids", scrollY: "scrollVer" },
                { resizer: true, width: 1 },
                { view: "timeline", scrollX: "scrollHor", scrollY: "scrollVer" },
                { view: "scrollbar", id: "scrollVer", group: "vertical" }
            ]
        },
        { resizer: true, width: 1, next: "resources" },
        {
            // 资源面板的网格和时间线布局
            gravity:1,
            id: "resources",
            config: resourceConfig, // 网格和时间线的配置
            templates: resourceTemplates, // 网格和时间线的模板
            cols: [
                { view: "resourceGrid", group: "grids", scrollY: "resourceVScroll" },
                { resizer: true, width: 1 },
                {
                    view: "resourceHistogram",
                    capacity: 24,
                    scrollX: "scrollHor",
                    scrollY: "resourceVScroll"
                },
                { view: "scrollbar", id: "resourceVScroll", group: "vertical" }
            ]
        },
        { view: "scrollbar", id: "scrollHor" }
    ]
};
相关示例: Resource histogram
同样地,resourceGrid 将像默认网格视图一样工作,但为只读。resourceHistogram 还具有以下额外模板:
- histogram_cell_class - 应用于资源面板单元格的 CSS 类
gantt.templates.histogram_cell_class =
    (start_date, end_date, resource, tasks, assignments) => "";
- histogram_cell_label - 单元格内的标签
gantt.templates.histogram_cell_label =
    (start_date, end_date, resource, tasks, assignments) => tasks.length * 8;
- histogram_cell_allocated - 填充区域在直方图中的高度。其值可以设为 0 到 maxCapacity 之间。
gantt.templates.histogram_cell_allocated =
    (start_date, end_date, resource, tasks, assignments) => tasks.length * 8;
- histogram_cell_capacity - 定义资源可用容量的线条高度。其值可以设为 -1 到 maxCapacity 之间。小于 0 的值将不渲染该线。
gantt.templates.histogram_cell_capacity =
    (start_date, end_date, resource, tasks, assignments) => 24;
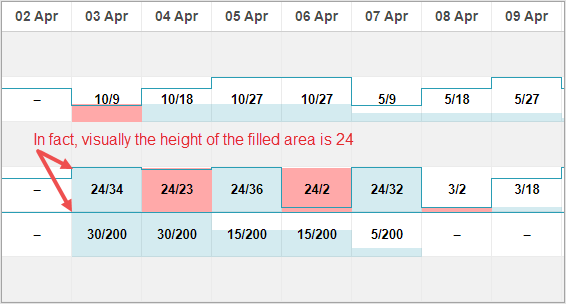
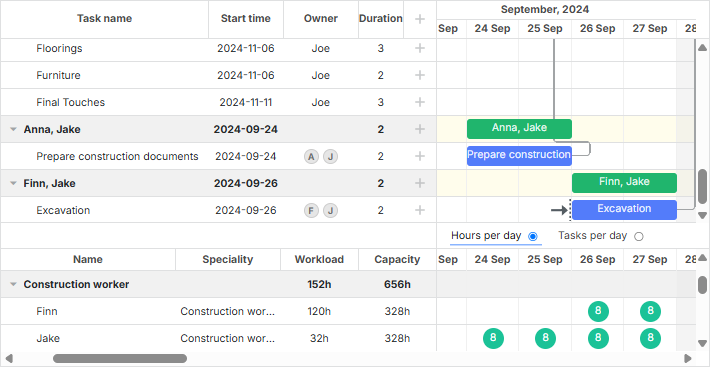
maxCapacity 是什么
如果将直方图的每一行视为柱状图,则 maxCapacity 是该图的 Y 轴高度。下图中 maxCapacity = 24:

因此,如果将模板 histogram_cell_allocated 或 histogram_cell_capacity 设置为 24,表示该行的最高点。
默认情况下,所有资源的 maxCapacity 均为 24。这意味着如果在 histogram_cell_capacity 模板中返回的值大于 24,数值会正确计算,但资源面板单元格的填充区域可能不会按你期望的那样填充。
但你可以一次性为所有直方图配置 maxCapacity,也可以对每个资源单独配置。请看下例:
相关示例: Configuring maxCapacity
maxCapacity 可以在直方图层级定义:
{ view: "resourceHistogram", capacity: 24, scrollX: "scrollHor", scrollY: "resourceVScroll" }
或针对每个资源单独定义:
resourcesStore.parse([
    { id: 1, text: "John", capacity: 8 },
    { id: 2, text: "Mike", capacity: 4 },
    { id: 3, text: "Anna", capacity: 8 },
    { id: 4, text: "Bill", capacity: 8 },
    { id: 5, text: "Floe", capacity: 8 }
]);
在资源层定义的容量会覆盖给定资源的全局直方图容量。
Working with resource view panel
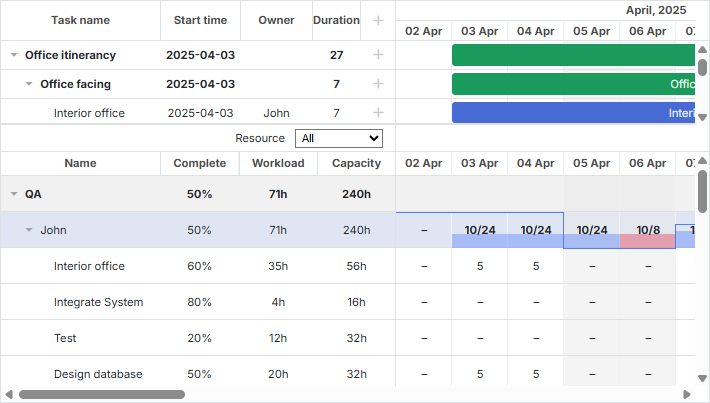
默认情况下,两种视图(无论是 "resourceGrid" 与 "resourceTimeline" 还是 "resourceGrid" 与 "resourceHistogram")都将绑定到由配置选项 gantt.config.resource_store 指定的数据存储。
Auto creation of data store
自 8.0 版本起,资源的数据存储在初始化 Gantt 时自动创建,并且在调用 "onGanttReady" 时就可用。要使用 Gantt 创建的数据存储,请使用 gantt.getDatastore 方法。
如果你需要为资源存储提供额外的配置,可以使用新的 gantt.config.resources 选项:
gantt.config.resources = {
    resource_store: {
        type: "treeDataStore",
        fetchTasks: true,
        initItem: item => {
            item.parent = item.parent || gantt.config.root_id;
            item[gantt.config.resource_property] = item.parent;
            item.open = true;
            return item;
        }
    }
};
传递给 resource_store 的设置将被 Gantt �用来创建默认的资源数据存储。如果你的代码中已经创建了资源数据存储,Gantt 将使用你自己的存储。
若要加载资源,你可以将资源传递给 gantt.parse()/gantt.load() 方法,如此处所述,或你也可以访问数据存储并使用 datastore.parse() 方法进行填充:
gantt.attachEvent("onGanttReady", () => {
    const store = gantt.getDatastore(gantt.config.resource_store);
    store.parse([
        { id: 6, text: "John" },
        { id: 7, text: "Mike" },
        { id: 8, text: "Anna" },
        { id: 9, text: "Bill" }
    ]);
});
资源的控制在自动弹出层(lightbox)中将自动连接到资源列表:
gantt.config.lightbox = {
    sections: [
        ...,
        { name: "resource_selector", label: "Resources", type: "resource_selector", map_to: "auto" }
    ]
};
Manual creation of data store
也可以使用 createDatastore 方法手动初始化数据存储:
const resourcesStore = gantt.createDatastore({
    name: gantt.config.resource_store,
    // 如果你有分层资源(例如员工/部门),请使用 treeDatastore,
    // flat 结构可以省略 "type"
    type: "treeDatastore",
    initItem: item => {
        item.parent = item.parent || gantt.config.root_id;
        item[gantt.config.resource_property] = item.parent;
        item.open = true;
        return item;
    }
});
若要填充数据存储,请使用 datastore.parse 方法:
resourcesStore.parse([
    { id: 1, text: "QA", parent: null },
    { id: 2, text: "Development", parent: null },
    { id: 3, text: "Sales", parent: null },
    { id: 4, text: "Other", parent: null },
    { id: 5, text: "Unassigned", parent: 4 },
    { id: 6, text: "John", parent: 1 },
    { id: 7, text: "Mike", parent: 2 },
    { id: 8, text: "Anna", parent: 2 },
    { id: 9, text: "Bill", parent: 3 },
    { id: 10, text: "Floe", parent: 3 }
]);
如果你想在弹出层中使用资源,最好通过数据存储的 onParse 事件使用 serverList 方法加载它们,然后将它们与任务自动连接:
resourcesStore.attachEvent("onParse", () => {
    const people = [];
    resourcesStore.eachItem(res => {
        if (!resourcesStore.hasChild(res.id)) {
            const copy = gantt.copy(res);
            copy.key = res.id;
            copy.label = res.text;
            people.push(copy);
        }
    });
    gantt.updateCollection("resourceOptions", people);
});
Expanding resources panel
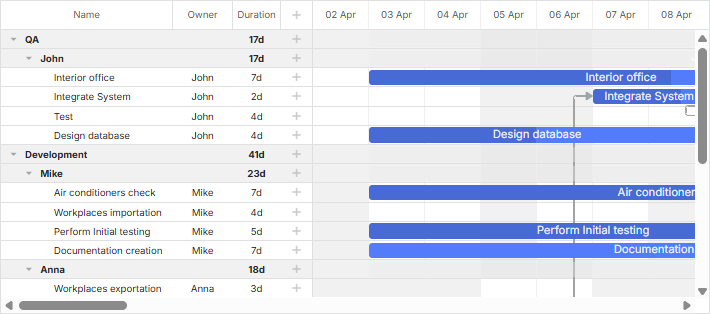
通过在数据存储初始化阶段启用 fetchTasks 属性,可以扩展资源面板以显示分配给特定资源的所有任务:
gantt.config.resources = {
    resource_store: {
        type: "treeDataStore",
        fetchTasks: true, /*!*/
        initItem: item => {
            item.parent = item.parent || gantt.config.root_id;
            item[gantt.config.resource_property] = item.parent;
            item.open = !item.parent;
            return item;
        }
    }
};
或
gantt.$resourcesStore = gantt.createDatastore({
    name: gantt.config.resource_store,
    type: "treeDatastore",
    fetchTasks: true, /*!*/
    initItem: item => {
        item.parent = item.parent || gantt.config.root_id;
        item[gantt.config.resource_property] = item.parent;
        item.open = !item.parent;
        return item;
    }
});
相关示例: Show all assigned tasks in the resource panel
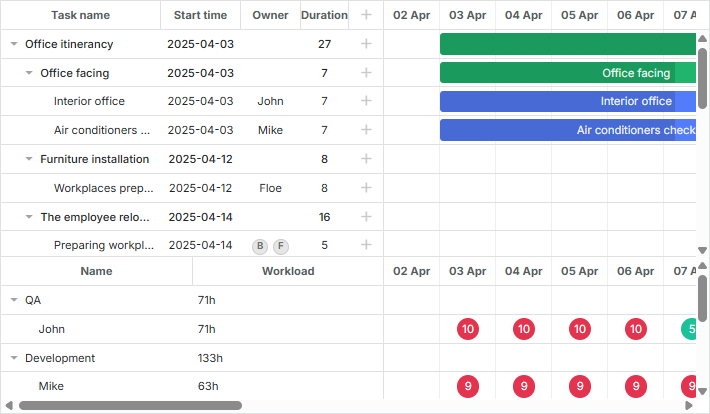
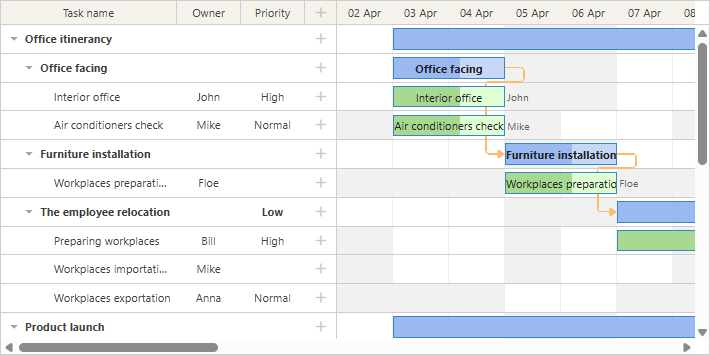
设置了 fetchTasks 属性为 true 时,Gantt 将在资源视图面板中显示分配给某资源的所有任务。此功能同样适用于资源图 diagram 与直方图 histogram 两种布局类型。
获取分配给某资源的所有任务有一个简写方法 - getResourceAssignments:
gantt.getResourceAssignments("6");
将资源分配给任务
将资源连接到任务
资源关系由 resource_property 配置选项定义:
gantt.config.resource_property = "user_id";
// task.user_id <-> resource.id
资源可以通过任务对象的属性以以下任一方式连接到任务:
- 为单个任务分配一个资源
{
    id: 1, text: "Task #1", start_date: "02-04-2018", duration: 8, progress: 0.6,
    user_id: 5 // 5 是资源的 id
}
- 为一个任务分配多个资源
{
    id: 1, text: "Task #1", start_date: "02-04-2018", duration: 8, progress: 0.6,
    users: [2, 3] // 2 与 3 是资源的 id
}
你可�以在 自定义多选控件 中使用此格式。
- 指定数量的多个资源分配
{
    id: 1, text: "Task #1", start_date: "02-04-2025", duration: 8, progress: 0.6,
    users: [{resource_id: 2, value: 8}, {resource_id: 3, value: 4}]
}
这些资源将按如下方式分配给 Task1:id="2" 的资源将分配 8 个单位,id="3" 的资源将分配 4 个单位。这种格式受 Resources Control 与 Resource Assignments control 的弹出层支持。
从 v8.0 开始,你也可以将资源分配作为单独的列表加载,Gantt 将自动把它们连接到任务:
gantt.parse({
    tasks: [...],
    links: [...],
    resources: [...],
    assignments: [{id: 1, resource_id: 2, task_id: 5, value: 8}, ...]
});
你可以在此处了解更多数据格式信息 here。
将数据发送到服务器时,DataProcessor 会将所描述属性的值序列化为 JSON。为了便于在服务器上处理此类记录,请使用 "REST_JSON" dataprocessor 模式。
在某些情况下,您可能希望将资源分配的更改与任务对象分开保存。在这种情况下,可以启用以下配置:
gantt.config.resources = {
    dataprocessor_assignments: true,
    dataprocessor_resources: true,
};
更多信息请参阅独立文章 servers-side 资源 CRUD。
设置资源分配的时间
默认情况下,资源被认为是在整个任务持续时间内分配。
自 v7.1 起,资源分配对象可以接受额外的可选参数,允许在任务内指定分配的日期。
附加属性为:
- id - (string|number) 分配的标识
- start_date - (Date|string) 分配计划开始的日期
- end_date - (Date|string) 分配计划完成的日期
- delay - (number) 分配开始日期与任务开始日期之间的差值
- duration - (number) 分配的持续时间
- mode - (string) 资源分配时间的计算模式:“default”|"fixedDates"|"fixedDuration"
{
    id: 5, text: "Interior office", type: "task", start_date: "03-04-2025 00:00",
    duration: 7, parent: "2", progress: 0.6, priority: 1,
    users: [
        {
            resource_id: "3",
            value: 8,
            delay: 1
        },
        {
            resource_id: "6",
            value: 3,
            start_date: "03-04-2025 00:00",
            end_date: "05-04-2025 00:00",
            mode: "fixedDates"
        },
        {
            resource_id: "7",
            value: 3,
            delay: 1,
            duration: 2,
            mode: "fixedDuration"
        }
    ]
}
相关示例: Assign resource values to specific days
-
资源分配的开始日期和结束日期将反映在资源直方图和图 Diagram 中。
-
分配对象的可选 id 属性可以添加到资源分配对象中:
{
    id: 1, text: "Task #1", start_date: "02-04-2025", duration: 8, progress: 0.6,
    users: [{
        id: 5,
        resource_id: 2,
        value: 8,
        delay: 1
    }]
}
该分配对象将通过此 id 可供 gantt API 访问:
const assignment = gantt.getDatastore("resourceAssignments").getItem(5);
只有在启用 process_resource_assignments 配置时,才可以使用 "resourceAssignments" 数据存储。
- 其余属性的处理取决于 mode 属性的值:
- 默认模式("default")
{
    id: 1, text: "Task #1", start_date: "02-04-2025", duration: 8, progress: 0.6,
    users: [
        { resource_id: 2, value: 8, delay: 1},
        { resource_id: 3, value: 6},
    ]
}
如果未指定 mode 或将其设为 "default",则分配的 start_date 和 end_date 将从任务的日期中计算。默认情况下,分配的开始日期与任务的开始日期相同。相同的方式也应用于结束日期。
delay 属性的工作方式类似于 MS Project 的 Delay 属性。
如果指定了 delay,分配的 start_date 将计算为
gantt.calculateEndDate({start_date:task.start_date, duration:assignment.delay, task:task})。
分配将从任务开始的指定延迟时间开始。分配的结束日期将与任务的结束日期相匹配。
每当任务对象更新,分配的开始/结束日期也会相应更新。
- 固定持续时间模式("fixedDuration")
{
    id: 1, text: "Task #1", start_date: "02-04-2025", duration: 8, progress: 0.6,
    users: [
        { resource_id: 2, value: 8, duration: 1, delay: 0, mode: "fixedDuration" },
        { resource_id: 2, value: 2, duration: 1, delay: 1, mode: "fixedDuration" },
        { resource_id: 2, value: 3, delay: 2, mode: "default" }
    ]
}
分配的 start_date 的计算方式与在 "default" 模式中计算的方式相同。
end_date 不再与任务的结束日期相关联。相反,它被计算为
gantt.calculateEndDate({start_date:assignment.start_date, duration:assignment.delay, task:task}).
当任务对象更新时,分配的日期将重新计算,分配的持续时间保持不变。
- 固定日期("fixedDates")模式
{
    id: 1, text: "Task #1", start_date: "02-04-2025", duration: 8, progress: 0.6,
    users: [{
        resource_id: 2, value: 8,
        start_date: "03-04-2025", end_date: "11-04-2025", mode: "fixedDates"
    }]
}
在此模式下,资源分配的日期与数据中指定的值完全相同,并在修改任务时不会更改。
使用 "fixedDates" 模式时,delay 字段不会影响分配的日期。
以下是各模式下分配日期计算的简要汇总:
-
default
- assignment.start_date = task.start_date + assignment.delay
- assignment.end_date = task.end_date
-
fixedDuration
- assignment.start_date = task.start_date + assignment.delay
- assignment.end_date = assignment.start_date + assignment.duration
-
fixedDates
- assignment.start_date = assignment.start_date
- assignment.end_date = assignment.end_date
获取资源被分配到的任务
获取分配给某资源的所有任务有一个简写方法 - getResourceAssignments:
gantt.getResourceAssignments("6");
该方法的参数是资源的 id,返回一个包含分配给该资源的任务对象数组:
[
    { task_id: 5, resource_id: "6", value: 5, delay: 0, duration: 7,
        start_date: "03-04-2025 00:00", end_date: "12-04-2025 00:00",
        id: 1617258553240, mode: "default" },
    { task_id: 18, resource_id: "6", value: 2, delay: 0, duration: 2,
        start_date: "05-04-2025 00:00", end_date: "09-04-2025 00:00",
        id: 1617258553250, mode: "default" },
    { task_id: 19, resource_id: "6", value: 3, delay: 0, duration: 4,
        start_date: "09-04-2025 00:00", end_date: "13-04-2025 00:00",
        id: 1617258553251, mode: "default" },
    { task_id: 21, resource_id: "6", value: 5, delay: 0, duration: 4,
        start_date: "03-04-2025 00:00", end_date: "09-04-2025 00:00",
        id: 1617258553254, mode: "default" }
]
每个对象包含以下属性:
- task_id - 任务的 id
- resource_id - 资源的 id
- value - 分配给任务的资源数量
- delay - 分配开始日期与任务开始日期之间的差值
- duration - 分配的持续时间
- start_date - 分配计划开始的日期
- end_date - 分配计划完成的日期
- id - 分配的标识
- mode - 资源分配时间的计算模式:"default"|"fixedDates"|"fixedDuration"
获取任务被分配到的资源分配
getTaskAssignments 方法允许从数据存储中获取特定任务的解析后的资源分配:
gantt.getTaskAssignments(5);
该方法的参数是任务的 id,返回一个包含该任务资源分配的对象数组:
[
    { task_id: 5, id: 1617254693938, delay: 0, duration: 2,
        start_date: "03-04-2025 00:00", end_date: "05-04-2025 00:00",
        mode: "fixedDuration", resource_id: 6, value: 3 },
    { task_id: 5, id: 1617254693946, delay: 3, duration: 1,
        start_date: "06-04-2025 00:00", end_date: "07-04-2025 00:00",
        mode: "fixedDuration", resource_id: 6, value: 6 }
]
返回对象包含与 getResourceAssignments 方法返回对象相同的属性列表。
通过弹出层设置连接
资源可以通过内置的弹出层被分配到任务对象的任一属性。
gantt.serverList("people", [
    { key: 1, label: "John" },
    { key: 2, label: "Mike" },
    { key: 3, label: "Anna" },
    { key: 4, label: "Bill" },
    { key: 7, label: "Floe" }
]);

gantt.locale.labels.section_owner = "Owner";

gantt.config.lightbox.sections = [
    { name: "description", height: 38, map_to: "text", type: "textarea", focus: true },
    { name: "owner", map_to: "owner_id", type: "select",
        options: gantt.serverList("people") },
    { name: "time", type: "duration", map_to: "auto" }
];
请参阅 Resources Control 与 Resource Assignments control 文章,了解如何配置弹出层中的资源控制。
加载集合
以服务器列表形式指定的集合可以在初始化 Gantt 之后动态加载和更新:
// 使用一个空集合初始化弹出层
gantt.locale.labels.section_owner = "Owner";

gantt.config.lightbox.sections = [
    { name: "description", height: 38, map_to: "text", type: "textarea", focus: true },
    { name: "owner", map_to: "owner_id", type: "select",
        options: gantt.serverList("people") },
    { name: "time", type: "duration", map_to: "auto" }
];

// 选项加载后
gantt.updateCollection("people", [
    { key: 1, label: "John" },
    { key: 2, label: "Mike" },
    { key: 3, label: "Anna" },
    { key: 4, label: "Bill" },
    { key: 7, label: "Floe" }
]);
相关示例: Assigning owners to tasks
如果你通过 serverList 集合定义资源,它们可以与其他数据一起加载,否则你需要手动加载它们。
请参阅 Resources control 与 Resource Assignments control 文章,了解如何配置弹出层中的资源控制。
加载资源和资源分配
从 v8.0 起,可以使用 gantt.parse() 或 gantt.load() 方法将资源和资源分配加载到甘特图中:
gantt.parse({
    tasks: [
        ...,
        {
            id: 5,
            text: "Interior office",
            type: "task",
            start_date: "03-04-2025 00:00",
            duration: 7,
            parent: "2",
            owner: [
                {
                    resource_id: "6",
                    value: 3,
                    start_date: "03-04-2025 00:00",
                    end_date: "05-04-2025 00:00",
                }
            ]
        },
        ...
    ],
    links: [],
    resources: [
        { id: 6, text: "John", unit: "hours/day" },
        { id: 7, text: "Mike", unit: "hours/day" },
        { id: 8, text: "Anna", unit: "hours/day" },
        { id: 9, text: "Bill", unit: "hours/day" },
        { id: 10, text: "Floe", unit: "hours/day" }
    ]
});
资源分配也可以作为单独的参数传入,与任务分开:
gantt.parse({
    tasks: [
        ...,
        {
            id: 5,
            text: "Interior office",
            type: "task",
            start_date: "03-04-2025 00:00",
            duration: 7,
            parent: "2",
            priority: 1
        },
        ...
    ],
    links: [],
    assignments: [
        {
            id: 1,
            task_id: 5,
            resource_id: 6,
            value: 3,
            start_date: "03-04-2025 00:00",
            end_date: "05-04-2025 00:00"
        }
    ],
    resources: [
        { id: 6, text: "John", unit: "hours/day" },
        { id: 7, text: "Mike", unit: "hours/day" },
        { id: 8, text: "Anna", unit: "hours/day" },
        { id: 9, text: "Bill", unit: "hours/day" },
        { id: 10, text: "Floe", unit: "hours/day" }
    ]
});
管理资源分配
解析资源分配
从 v7.1 开始,你可以像处理数据存储对象一样处理 资源分配 。
新的 process_resource_assignments 属性启用将任务的 gantt.config.resource_property 中的值解析为资源分配的内部对象的过程。因此,你可以通过 DataStore 对象来操作资源分配。例如,你可以获取所需的分配对象或更新它。
注意,如果你希望在构建资源图 Diagram 和直方图 Histogram 时指定资源的期望时长和时间,这个功能是必需的。
该过程可能带来明显的性能开销,较大项目可能会变慢。 因此,如果你不需要设置分配的时间或持续时间,可以通过以下配置禁用解析资源分配:
gantt.config.process_resource_assignments = false;
当配置被禁用时,gantt.getDatastore("resourceAssignments") 数据存储将不可用,分配对象也不会有任何动态属性。资源图和直方图将把资源视为在整个任务持续时间内已分配。
更新资源分配
资源分配存储在自动创建的 数据存储 中。
默认情况下,分配的存储是由任务对象填充的。这意味着如果你修改了任务对象的资源属性(例如 task.users),更改将自动反映到数据存储中。
task[gantt.config.resource_property] = [
    {
        resource_id: "6",
        value: 3,
        start_date: "03-04-2025 00:00",
        end_date: "05-04-2025 00:00",
    }
];

gantt.updateTask(taskId);
但你可能需要在资源分配通过数据存储 API 修改之后,刷新到任务对象中。也就是说,你可能需要在数据存储中更新值后,将更改写回到任务对象中,使用 gantt.updateTaskAssignments() 方法:
const assignmentStore = gantt.getDatastore(gantt.config.resource_assignment_store);

assignmentStore.addItem({
    resource_id: 5,
    task_id: 2,
    value: 4
});

assignmentStore.removeItem(assignment.id);
assignmentStore.updateItem(assignment.id);

// 在数据存储中的分配更新后,你需要调用
// `updateTaskAssignments` 将更改写回到任务对象:
gantt.updateTaskAssignments(taskId);
在任务拖动过程中重新渲染资源分配
拖动任务时,资源面板会重新渲染,但资源分配不会被修改。仅受任务拖动影响的资源面板单元格会重新渲染(默认情况下只在任务日期范围内的单元格)。
要在所有单元格中更新资源分配,你需要禁用 process_resource_assignments 配置选项,或在数据存储 API 修改分配后手动更新任务对象中的所有资源分配,如下所示:
gantt.attachEvent("onTaskDrag", (id, mode, task, original) => {
    const assignments = gantt.getTaskAssignments(id);
    assignments.forEach(assignment => {
        if (assignment.mode === "default") {
            assignment.start_date = task.start_date;
            assignment.end_date = task.end_date;
        }
    });
});
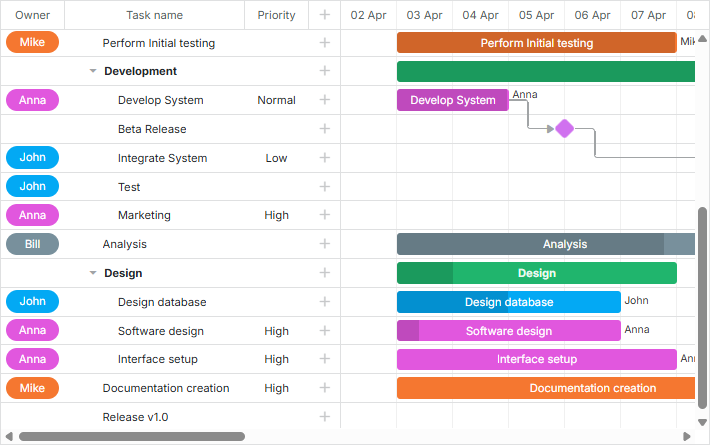
显示任务资源
资源名称可以显示在任务描述的一部分或网格单元格标签中。 Gantt 不提供直接通过服务器列表按 id 获取项的就绪方法,因此你需要实现一个小工具来完成此事:
const byId = (list, id) => {
    const item = list.find(item => item.key === id);
    return item ? item.label || "" : "";
};
之后你可以在模板中使用资源名称:
gantt.config.columns = [
    { name: "owner", width: 80, align: "center",
        template: (item) => byId(gantt.serverList('people'), item.owner_id) },
    { name: "text", label: "Task name", tree: true, width: '*' },
    { name: "add", width: 40 }
];

gantt.templates.rightside_text =
    (start, end, task) => byId(gantt.serverList('people'), task.owner_id);
相关示例: Assigning owners to tasks
可编辑的资源图 Diagram
为了使资源分配在资源图中可编辑,可以使用以下配置:
gantt.config.resources = {
    editable_resource_diagram: true
};
相关示例: Assign resource values to specific days
当启用 editable_resource_diagram 属性时,Gantt 将自动为 gantt.templates.resource_cell_value 和 gantt.templates.resource_cell_class 模板赋值,以使资源分配在 Gantt 中可编辑。
如果你为这些模板分配自定义函数,Gantt 将使用你自定义的模板。
模板的默认实现可在 gantt.ext.resources 对象中找到。
gantt.templates.resource_cell_value = gantt.ext.resources.editableResourceCellTemplate;
gantt.templates.resource_cell_class = gantt.ext.resources.editableResourceCellClass;
通常你不需要手动为可编辑的图表分配这些模板,Gantt 应该会处理。
下面的示例提供了一个带有可编辑单元格的模板。如果需要,你可以对其进行自定义:
相关示例: Customizable resource diagram template
资源的自定义样式
在着色时通常需要以下模板:
- gantt.templates.grid_row_class - 左侧网格中一行的 CSS
- gantt.templates.task_row_class - 时间线中的背景行(启用 smart_rendering 时不会被调用)
- gantt.templates.task_class - 任务条元素的 CSS 类
根据你的场景,你可以
- 要么为每个资源定义预定义的类
- 要么加载样式,例如与资源一起加载的背景色和文本颜色设置。在这种情况下,你需要在页面上动态生成 CSS
相关示例: Assigning owners to tasks
资源日历
Gantt 支持自定义工作时间日历功能。工作时间日历可以与特定资源相关联。
它们通过一一对应的属性值映射到任务:
// 资源值将从 `task.resource_id` 属性中获取
gantt.config.resource_property = "resource_id";

gantt.config.resource_calendars = {
    "resource1" : "calendarId1",
    "resource2" : "calendarId2",
    "resource3" : "calendarId3"
};
你可以使用任何属性来为资源分配日历。如果资源属性动态改变,Gantt 将自动重新计算使用新日历的任务时间。
相关示例: Resource calendars
如果一个任务可以分配给多位资源,Gantt 可以自动为所有分配的资源生成一个通用日历。
你可以在相关文档中了解更多信息:guides/working-time.md#assigningcalendartoresource
平衡资源负载
你可以使用 grouping 扩展 将整个项目按 resource(资源) 属性拆解。
此特性可用于日历中的资源负载平衡。
相关示例: Break down by resources
更多关于任务分组的内容,请参阅相关文档。
按多资源对任务进行分组
如果你给一个任务分配了若干资源,任务将按分配的资源进行分组。这意味着分配给两个人的同一任务不会为这两个人各自显示两次,而是渲染�为一次并将两个人都分配给它。请注意,分组后的任务将按开始日期排序。
相关示例: Group by multiple resources
- 如果加载的数据集中某些任务分配了多位资源,Gantt 将自动为它们创建分组。
- 对于没有分配资源的任务,Gantt 将创建默认分组 Not assigned。如果传入 groupBy() 方法的数据集中存在这样的分组,则应在该分组上指定 default:true 配置,以防止自动创建这种分组。
请注意,对按多资源分组的任务进行拖动是不可行的。