Plain JS/HTML 中的 dhtmlxGantt
在使用 dhtmlxGantt 开发应用程序时,第一步通常是初始化,简单来说,就是在页面上显示甘特图。
本指南介绍在纯 JS/HTML 中初始化 dhtmlxGantt 的方法。你也可以查看与前端框架集成的指南:
 |  |  |  |
| Angular | React | Svelte | Vue.js |
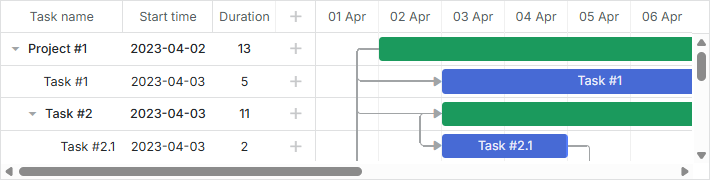
创建基本甘特图
要在页面上显示一个基本的甘特图,请按照以下 3 个步骤:
- 将 dhtmlxGantt 代码文件 引入到页面中。
- 在页面上创建一个 DIV 容器。
- 在新创建的容器中,使用 [init] 方法初始化 dhtmlxGantt。该方法的参数是将要在其中显示甘特图的 HTML 容器(或其 id)。
<!DOCTYPE html>
<html>
<head>
    <script src="codebase/dhtmlxgantt.js"></script>
    <link href="codebase/dhtmlxgantt.css" rel="stylesheet">
</head>
<body>
    <div id="gantt_here" style='width:1000px; height:400px;'></div>
    <script type="text/javascript">
        gantt.init("gantt_here");
    </script>
</body>
</html>
相关示例: Basic initialization
如何将 Gantt 源文件添加到项目中
你可以将 Gantt 代码文件以多种方式添加到你的项目中,具体取决于你创建的应用类型:
- 通过 <script> 标签引入文件
- 将文件导入到 ES6/7 与 TypeScript 应用中
- 在 Vite 中使用 Gantt
- Svelte 生产构建
- 将文件包含到基于 RequireJS 的应用中
通过 <script> 标签包含文件
dhtmlxGantt 需要在页面中包含 2 个代码文件:
- dhtmlxgantt.js
- dhtmlxgantt.css
<script src="codebase/dhtmlxgantt.js"></script>
<link href="codebase/dhtmlxgantt.css" rel="stylesheet">
让我们快速了解 dhtmlxGantt 包的结构,找出文件所在的位置。
组成 dhtmlxGantt 包的主要文件夹和文件有:
- sources - 库的源代码文件。文件未进行压缩,易于阅读。该包主要用于调试组件。
- samples - 代码示例
- codebase - 库的打包代码文件。这些文件体积较小,适用于生产环境。 在你的应用中需要使用此文件夹中的文件
将文件导入到 ES6/7 与 TypeScript 应用
使用以下命令导入文件:
import { gantt } from 'dhtmlx-gantt';
对于 Commercial、Enterprise 或 Ultimate 版本,命令如下:
import { gantt, Gantt } from 'dhtmlx-gantt';
在 Vite 中使用 Gantt
如果你在项目中使用 Vite,以下设置是为确保 Gantt 正确被应用包含在应用中的必要配置,应用于 vite.config.js 文件:
optimizeDeps: {
    include: [
        'dhtmlx-gantt',
    ]
}
Svelte 生产构建
如果你在 Svelte 应用中使用 Gantt,你需要在生产构建时向 vite.config.js 文件添加以下设置, 将 gantt_9.0.14_evaluation 文件夹替换为你自己的 Gantt 文件夹路径:
build: {
    commonjsOptions: {
        include: [
            "node_modules",
            "gantt_9.0.14_evaluation/codebase/dhtmlxgantt.js"
        ]
    },
}
将文件包含到基于 RequireJS 的应用中
要将 dhtmlxGantt 文件包含到基于 RequireJS 的应用中,你需要遵循下列示例所示的逻辑:
requirejs(["codebase/dhtmlxgantt"], (dhx) => {
    const gantt = dhx.gantt;
    const Gantt = dhx.Gantt; // for Enterprise builds

    gantt.init("gantt_here");
    gantt.parse({
        tasks: [
            { id: 1, text: "Project #2", start_date: "01-04-2025", duration: 18, progress: 0.4, open: true },
            { id: 2, text: "Task #1", start_date: "02-04-2025", duration: 8, progress: 0.6, parent: 1 },
            { id: 3, text: "Task #2", start_date: "11-04-2025", duration: 8, progress: 0.6, parent: 1 }
            ],
        links: [
            { id: 1, source: 1, target: 2, type: "1" },
            { id: 2, source: 2, target: 3, type: "0" }
        ]
    });
});
dhtmlxGantt 库将返回一个包含字段 gantt 和 Gantt 的对象(在 Commercial、Enterprise 或 Ultimate 版本中)——有关 gantt 与 Gantt 对象的描述,请参阅 此处。
在 RequireJS 中使用带自定义扩展的 Gantt 时�,你应为 RequireJS 指定 shim 配置,并在其中直接从 Gantt 设置扩展的依赖项。
下示例展示了如何正确设置自定义扩展文件 custom_tooltip_plugin.js:
requirejs.config({
    paths: {
        "dhtmlxgantt": "../../codebase/dhtmlxgantt",
        "ext/dhtmlxgantt_custom_tooltip": "../custom_tooltip_plugin"
    },
    shim: {
        "ext/dhtmlxgantt_custom_tooltip": ["dhtmlxgantt"]
    }
});

requirejs(["dhtmlxgantt"], (dhx) => {
    const gantt = dhx.gantt;

    const date_to_str = gantt.date.date_to_str(gantt.config.task_date);
    const today = new Date();

    gantt.addMarker({
        start_date: today,
        css: "today",
        text: "Today",
        title: `Today: ${date_to_str(today)}`
    });

    gantt.init("gantt_here");
    gantt.parse({
        tasks: [
            { id: 1, text: "Project #2", start_date: "01-04-2025", duration: 18, progress: 0.4, open: true },
            { id: 2, text: "Task #1", start_date: "02-04-2025", duration: 8, progress: 0.6, parent: 1 },
            { id: 3, text: "Task #2", start_date: "11-04-2025", duration: 8, progress: 0.6, parent: 1 }
        ],
        links: [
            { id: 1, source: 1, target: 2, type: "1" },
            { id: 2, source: 2, target: 3, type: "0" }
        ]
    });
});
请检查包内任意文件的模块名是否以“codebase”文件夹内的相对路径,外加“文件名”的形式指定,例如:
核心库:
- "dhtmlxgantt": "./vendor/dhtmlxgantt/dhtmlxgantt"
全屏模式
要在不同浏览器中正确显示全屏模式下的甘特图,请在页面上定义以下样式:
<style type="text/css" media="screen">
    html, body {
        margin: 0;
        padding: 0;
        height: 100%;
        overflow: hidden;
    }
</style>