리소스 관리
이 기능은 PRO 에디션에서만 사용할 수 있습니다.
Gantt는 리소스 부하를 강조하기 위한 미리 정의된 리소스 뷰를 제공하고, 부하 균등화를 위한 리소스별 프로젝트 분해 방법, 작업 및 리소스별 작업 시간 달력 등을 제공합니다.
Gantt 자체가 리소스 부하를 계산하지 않으며 즉시 사용할 수 있는 ��메서드가 있는 것도 아니지만, Gantt는 사용자가 원하는 동작을 구현하기 위한 공개 API를 제공합니다.
Resource view panel
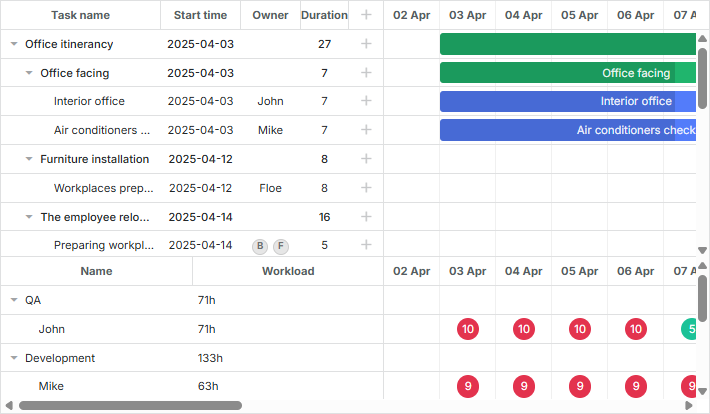
dhtmlxGantt는 자원 부하를 표시하기 위한 두 가지 유형의 미리 정의된 레이아웃 뷰를 제공합니다: 자원 부하 다이어그램과 자원 히스토그램.
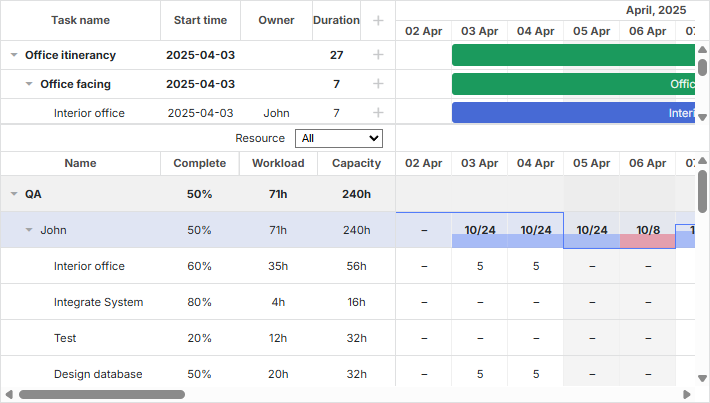
Resource load diagram
그리드(grid)와 타임라인(timeline)에 해당하는 뷰를 포함합니다: "resourceGrid"와 "resourceTimeline".
gantt.config.layout = {
    css: "gantt_container",
    rows: [
        {
            // layout for default Grid and Timeline
            cols: [
                { view: "grid", group: "grids", scrollY: "scrollVer" },
                { resizer: true, width: 1 },
                { view: "timeline", scrollX: "scrollHor", scrollY: "scrollVer" },
                { view: "scrollbar", id: "scrollVer", group: "vertical" }
            ],
            gravity: 2
        },
        { resizer: true, width: 1 },
        {
            // layout for Grid and Timeline of resource panel
            config: resourceConfig, // config for Grid and Timeline
            cols: [
                { view: "resourceGrid", group: "grids", width: 435,
                    scrollY: "resourceVScroll"
                },
                { resizer: true, width: 1 },
                { view: "resourceTimeline", scrollX: "scrollHor",
                    scrollY: "resourceVScroll"
                },
                { view: "scrollbar", id: "resourceVScroll", group: "vertical" }
            ],
            gravity: 1
        },
        { view: "scrollbar", id: "scrollHor" }
    ]
};
Related sample: Resource load diagram
일단 초기화되면, resourceGrid는 기본 그리드 뷰와 동일한 방식으로 작동하되 읽기 전용입니다. resourceTimeline은 기본 타임라인의 축 구성(configuration)을 상속받아 두 계층을 갖습니다:
- 배경 행: task_row_class과 timeline_cell_class를 상속합니다. resourceTimeline의 템플릿은 레이아웃 수준에서 재정의될 수 있습니다.
- 리소스 계층: resourceTimeline에 특화된 계층으로, 자원에 할당된 작업이 있는 셀에 블록을 표시합니다. 블록의 스타일과 내용은 resource_cell_class 및 resource_cell_value 템플릿으로 템플레이션할 수 있습니다:
gantt.templates.resource_cell_value = (startDate, endDate, resource, tasks, assignments) =>
    `<div>${tasks.length * 8}h</div>`;
Related sample: Templates of the Resource diagram
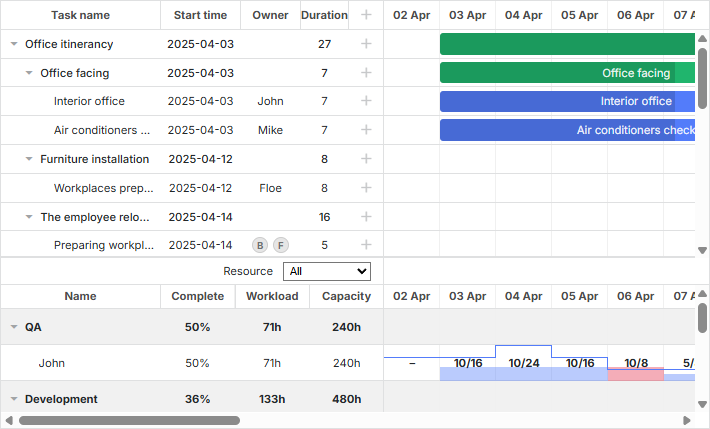
Resource histogram
이 레이아웃 뷰 유형은 간트 차트의 자원 부하를 표시하기 위해 그리드와 타임라인에 대해 "resourceGrid"와 "resourceHistogram" 뷰를 각각 제공합니다.
gantt.config.layout = {
    css: "gantt_container",
    rows: [
        {
            // layout for default Grid and Timeline
            gravity: 2,
            cols: [
                { view: "grid", group: "grids", scrollY: "scrollVer" },
                { resizer: true, width: 1 },
                { view: "timeline", scrollX: "scrollHor", scrollY: "scrollVer" },
                { view: "scrollbar", id: "scrollVer", group: "vertical" }
            ]
        },
        { resizer: true, width: 1, next: "resources" },
        {
            // layout for Grid and Timeline of resource panel
            gravity: 1,
            id: "resources",
            config: resourceConfig, // config for Grid and Timeline
            templates: resourceTemplates, // templates for Grid and Timeline
            cols: [
                { view: "resourceGrid", group: "grids", scrollY: "resourceVScroll" },
                { resizer: true, width: 1 },
                {
                    view: "resourceHistogram",
                    capacity: 24,
                    scrollX: "scrollHor",
                    scrollY: "resourceVScroll"
                },
                { view: "scrollbar", id: "resourceVScroll", group: "vertical" }
            ]
        },
        { view: "scrollbar", id: "scrollHor" }
    ]
};
Related sample: Resource histogram
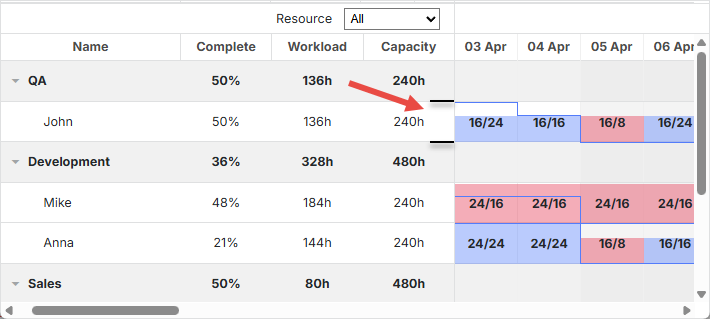
자원 로드 다이어그램과 마찬가지로, resourceGrid는 기본 그리드 뷰와 동일하게 작동하되 읽기 전용입니다. resourceHistogram에는 다음과 같은 추가 템플릿이 있습니다:
- histogram_cell_class - 자원 패널의 셀에 적용되는 CSS 클래스
gantt.templates.histogram_cell_class =
    (start_date, end_date, resource, tasks, assignments) => "";
- histogram_cell_label - 셀 내부의 레이블
gantt.templates.histogram_cell_label =
    (start_date, end_date, resource, tasks, assignments) => tasks.length * 8;
- histogram_cell_allocated - 히스토그램에서 채워진 영역의 높이. 값은 0에서 maxCapacity 사이로 설정할 수 있습니다.
gantt.templates.histogram_cell_allocated =
    (start_date, end_date, resource, tasks, assignments) => tasks.length * 8;
- histogram_cell_capacity - 자원이 사용할 수 있는 용량의 높이. 값은 -1에서 maxCapacity 사이로 설정할 수 있습니다. 0 미만의 값은 선을 렌더링하지 않습니다.
gantt.templates.histogram_cell_capacity =
    (start_date, end_date, resource, tasks, assignments) => 24;
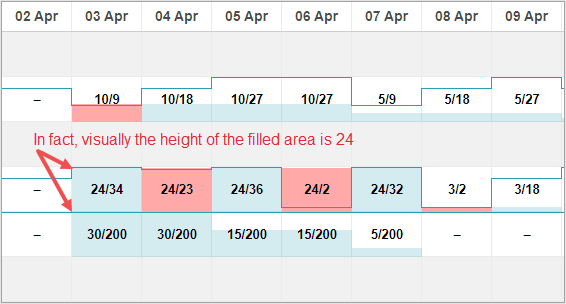
maxCapacity가 무엇인지
히스토그램의 각 행이 막대 차트로 간주될 때, maxCapacity는 이 차트의 Y축 스케일의 높이입니다. 아래 그림에서 maxCapacity = 24입니다:
따라서 템플릿 histogram_cell_allocated나 histogram_cell_capacity를 값 24로 설정하면 행의 최고점이 표시되지만, 자원 패널 셀의 면적이 예상대로 채워지지 않을 수 있습니다.
다만, 모든 히스토그램에 대해 한 번에 또는 자원별로 maxCapacity를 구성할 수 있는 기능이 있습니다. 아래 예를 확인해 보세요:
Related sample: Configuring maxCapacity
maxCapacity는 히스토그램 레벨에서 정의되거나(예:)
{ view: "resourceHistogram", capacity: 24, scrollX: "scrollHor", scrollY: "resourceVScroll" }
또는 자원별로 개별 정의할 수 있습니다:
resourcesStore.parse([
    { id: 1, text: "John", capacity: 8 },
    { id: 2, text: "Mike", capacity: 4 },
    { id: 3, text: "Anna", capacity: 8 },
    { id: 4, text: "Bill", capacity: 8 },
    { id: 5, text: "Floe", capacity: 8 }
]);
리소스 수준에서 정의된 용량은 주어진 자원에 대한 히스토그램의 글로벌 용량을 재정의합니다.
Working with resource view panel
기본적으로 두 뷰 모두 데이터 저장소에 바인딩됩니다. 저장소 이름은 설정 옵션의 gantt.config.resource_store와 일치합니다.
Auto creation of data store
v8.0부터 리소스용 데이터 저장소는 간트 초기화 중 자동으로 생성되며, "onGanttReady"가 호출될 때까지 사용할 수 있습니다. 간트가 생성한 데이터 저장소를 사용하려면 gantt.getDatastore 메서드를 적용합니다.
리소스 저장소에 추가 구성을 제공해야 하는 경우, 새로운 gantt.config.resources 옵션을 사용할 수 있습니다:
gantt.config.resources = {
    resource_store: {
        type: "treeDataStore",
        fetchTasks: true,
        initItem: item => {
            item.parent = item.parent || gantt.config.root_id;
            item[gantt.config.resource_property] = item.parent;
            item.open = true;
            return item;
        }
    }
};
resource_store에 전달된 설정은 간트가 기본 리소스 데이터 저장소를 생성하는 데 사용됩니다. 이미 코드에서 리소스 데이터 저장소를 생성한 경우, 간트는 저장소를 대신 사용합니다.
리소스를 로드하려면, [gantt.parse()]/[gantt.load()] 메서드로 리소스를 전달하거나(여기서 설명된 방법 참조) 데이터 저장소에 접근하여 [datastore.parse()](처리 방식)로 채울 수 있습니다:
gantt.attachEvent("onGanttReady", () => {
    const store = gantt.getDatastore(gantt.config.resource_store);
    store.parse([
        { id: 6, text: "John" },
        { id: 7, text: "Mike" },
        { id: 8, text: "Anna" },
        { id: 9, text: "Bill" }
    ]);
});
라이트박스의 리소스 컨트롤은 자동으로 리소스 목록에 연결됩니다:
gantt.config.lightbox = {
    sections: [
        ...,
        { name: "resource_selector", label: "Resources", type: "resource_selector", map_to: "auto" }
    ]
};
Manual creation of data store
데이터 저장소를 수동으로 초기화하는 것도 가능합니다. createDatastore 메서드를 사용합니다:
const resourcesStore = gantt.createDatastore({
    name: gantt.config.resource_store,
    // 계층적 리소스가 있는 경우 treeDatastore를 사용
    // 플랫 구조인 경우는 "type"을 생략
    type: "treeDatastore",
    initItem: item => {
        item.parent = item.parent || gantt.config.root_id;
        item[gantt.config.resource_property] = item.parent;
        item.open = true;
        return item;
    }
});
데이터 저장소를 채우려면 datastore.parse 메서드를 사용합니다:
resourcesStore.parse([
    { id: 1, text: "QA", parent: null },
    { id: 2, text: "Development", parent: null },
    { id: 3, text: "Sales", parent: null },
    { id: 4, text: "Other", parent: null },
    { id: 5, text: "Unassigned", parent: 4 },
    { id: 6, text: "John", parent: 1 },
    { id: 7, text: "Mike", parent: 2 },
    { id: 8, text: "Anna", parent: 2 },
    { id: 9, text: "Bill", parent: 3 },
    { id: 10, text: "Floe", parent: 3 }
]);
만약 라이트박스에서 리소스를 사용하려면, onParse 이벤트의 데이터 저장소에서 serverList 메서드를 통해 로드하는 것이 좋습니다:
resourcesStore.attachEvent("onParse", () => {
    const people = [];
    resourcesStore.eachItem(res => {
        if (!resourcesStore.hasChild(res.id)) {
            const copy = gantt.copy(res);
            copy.key = res.id;
            copy.label = res.text;
            people.push(copy);
        }
    });
    gantt.updateCollection("resourceOptions", people);
});
Expanding resources panel
특정 리소스에 할당된 모든 작업을 표시하도록 리소스 패널을 확장하려면 저장소 데이터 저장소 초기화 시 fetchTasks 속성을 활성화하면 됩니다:
gantt.config.resources = {
    resource_store: {
        type: "treeDataStore",
        fetchTasks: true, /*!*/
        initItem: item => {
            item.parent = item.parent || gantt.config.root_id;
            item[gantt.config.resource_property] = item.parent;
            item.open = !item.parent;
            return item;
        }
    }
};
또는
gantt.$resourcesStore = gantt.createDatastore({
    name: gantt.config.resource_store,
    type: "treeDatastore",
    fetchTasks: true, /*!*/
    initItem: item => {
        item.parent = item.parent || gantt.config.root_id;
        item[gantt.config.resource_property] = item.parent;
        item.open = !item.parent;
        return item;
    }
});
Related sample: Show all assigned tasks in the resource panel
With the fetchTasks property set to true, Gantt renders all tasks assigned to a certain resource in the resource view panel. This functionality works both for the resource diagram and resource histogram types of layout.
There is a shorthand for getting all tasks assigned to a resource - getResourceAssignments.
gantt.getResourceAssignments("6");
Assigning resources
Connecting resources to tasks
The resource relation is defined by the resource_property configuration option:
gantt.config.resource_property = "user_id";
// task.user_id <-> resource.id
Resources can be connected to tasks via the properties of the task object in one of the following ways:
- assigning one resource to one task
{
    id: 1, text: "Task #1", start_date: "02-04-2018", duration: 8, progress: 0.6,
    user_id: 5 // 5 is the id of the resource
}
- assigning multiple resources to one task
{
    id: 1, text: "Task #1", start_date: "02-04-2018", duration: 8, progress: 0.6,
    users: [2, 3] // 2 and 3 are the ids of resources
}
You can use this format with the custom multiselect control.
- assigning multiple resources and specifying their quantity
{
    id: 1, text: "Task #1", start_date: "02-04-2025", duration: 8, progress: 0.6,
    users: [{resource_id: 2, value: 8}, {resource_id: 3, value: 4}]
}
리소스는 Task1에 다음과 같이 할당됩니다: id="2"인 리소스의 수량은 8단위, id="3"인 리소스의 수량은 4단위입니다. 이 형식은 Lightbox의 Resources Control 및 Resource Assignments control에서 지원됩니다.
v8.0부터 리소스 할당을 별도의 목록으로 로드할 수 있으며, 간트가 작업에 자동으로 연결합니다:
gantt.parse({
    tasks: [...],
    links: [...],
    resources: [...],
    assignments: [{id: 1, resource_id: 2, task_id: 5, value: 8}, ...]
});
리소스 관리에 대한 데이터 형식에 관한 자세한 내용은 여기를 참조하세요.
서버로 데이터를 보낼 때, DataProcessor는 설명된 속성의 값을 JSON으로 직렬화합니다. 서버에서 이러한 레코드를 쉽게 처리하려면 "REST_JSON" 데이터프로세서 모드를 사용하세요.
경우에 따라 작업 객체에서 리소스 할당의 변경 내용을 따로 �저장하고 싶을 수 있습니다. 이 경우 다음 구성을 활성화할 수 있습니다:
gantt.config.resources = {
    dataprocessor_assignments: true,
    dataprocessor_resources: true,
};
자세한 내용은 별도의 문서(서버 측 문서)를 참조하세요.
Setting the time of the resource assignments
기본적으로 리소스는 작업의 전체 기간 동안 할당된 것으로 간주됩니다.
v7.1부터는 리소스 할당 객체가 추가적인 선택적 매개변수를 받아 작업 내에서의 할당 날짜를 지정할 수 있습니다.
추가 속성은 다음과 같습니다:
- id - (string|number) 할당의 아이디
- start_date - (Date|string) 할당이 시작되도록 예정된 날짜
- end_date - (Date|string) 할당이 완료될 예정인 날짜
- delay - (number) 할당 시작일과 작업 시작일의 차이
- duration - (number) 할당의 지속 시간
- mode - (string) 리소스 할당 시간의 계산 모드: "default"|"fixedDates"|"fixedDuration"
{
    id: 5, text: "Interior office", type: "task", start_date: "03-04-2025 00:00",
    duration: 7, parent: "2", progress: 0.6, priority: 1,
    users: [
        {
            resource_id: "3",
            value: 8,
            delay: 1
        },
        {
            resource_id: "6",
            value: 3,
            start_date: "03-04-2025 00:00",
            end_date: "05-04-2025 00:00",
            mode: "fixedDates"
        },
        {
            resource_id: "7",
            value: 3,
            delay: 1,
            duration: 2,
            mode: "fixedDuration"
        }
    ]
}
Related sample: Assign resource values to specific days
-
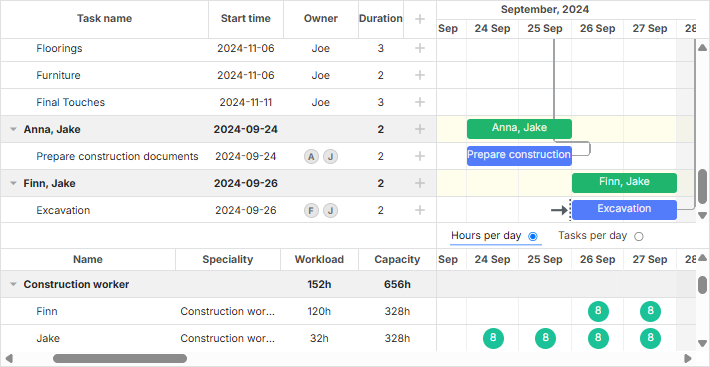
리소스 할당의 start 및 end 날짜는 리소스 히스토그램 및 다이어그램에 반영됩니다.
-
선택적 id 속성은 리소스 할당 객체에 추가될 수 있습니다:
{
    id: 1, text: "Task #1", start_date: "02-04-2025", duration: 8, progress: 0.6,
    users: [{
        id: 5,
        resource_id: 2,
        value: 8,
        delay: 1
    }]
}
할당 객체는 간트 API를 통해 이 ID로 접근할 수 있습니다:
const assignment = gantt.getDatastore("resourceAssignments").getItem(5);
"resourceAssignments" 데이터스토어는 process_resource_assignments 구성이 활성화될 때만 사용할 수 있습니다.
- 나머지 속성의 작업은 mode 속성의 값에 의해 정의됩니다:
- the "default" mode
{
    id: 1, text: "Task #1", start_date: "02-04-2025", duration: 8, progress: 0.6,
    users: [
        { resource_id: 2, value: 8, delay: 1},
        { resource_id: 3, value: 6},
    ]
}
모드가 명시되지 않았거나 "default" 값으로 설정되면, 할당의 start_date와 end_date는 작업의 날짜에서 계산됩니다. 기본적으로 할당의 시작일은 작업의 시작일과 일치합니다. 끝 날짜에도 동일한 방식이 적용됩니다.
delay 속성은 MS Project의 Delay 속성과 유사하게 작동합니다.
지연이 지정되면 할당의 start_date는
gantt.calculateEndDate({start_date:task.start_date, duration:assignment.delay, task:task})로 계산됩니다.
할당은 작업 시작으로부터 지정된 지연으로 시작하고, 끝 날짜는 �작업의 종료 날짜와 일치합니다.
작업 객체가 업데이트될 때마다, 할당의 시작/종료 날짜도 그에 따라 업데이트됩니다.
- the "fixedDuration" mode
{
    id: 1, text: "Task #1", start_date: "02-04-2025", duration: 8, progress: 0.6,
    users: [
        { resource_id: 2, value: 8, duration: 1, delay: 0, mode: "fixedDuration" },
        { resource_id: 2, value: 2, duration: 1, delay: 1, mode: "fixedDuration" },
        { resource_id: 2, value: 3, delay: 2, mode: "default" }
    ]
}
할당의 start_date는 기본 모드에서 계산되는 방식과 같이 계산됩니다.
end_date는 더 이상 작업의 종료일과 연결되지 않습니다. 대신 다음과 같이 계산됩니다:
gantt.calculateEndDate({start_date:assignment.start_date, duration:assignment.delay, task:task}).
작업 객체가 업데이트될 때마다 할당의 날짜가 재계산되며, 할당의 지속 시간은 변경되지 않습니다.
- the "fixedDates" mode
{
    id: 1, text: "Task #1", start_date: "02-04-2025", duration: 8, progress: 0.6,
    users: [{
        resource_id: 2, value: 8,
        start_date: "03-04-2025", end_date: "11-04-2025", mode: "fixedDates"
    }]
}
이 모드에서는 리소스 할당의 날짜가 데이터에 명시된 값과 정확히 같으며 작업이 수정될 때 변경되지 않습니다.
delay 필드는 "fixedDates" 모드가 사용될 때 할당 날짜에 영향을 주지 않습니다.
다음은 각 모드에서 할당 날짜가 계산되는 간단한 요약입니다:
-
default
- assignment.start_date = task.start_date + assignment.delay
- assignment.end_date = task.end_date
-
fixedDuration
- assignment.start_date = task.start_date + assignment.delay
- assignment.end_date = assignment.start_date + assignment.duration
-
fixedDates
- assignment.start_date = assignment.start_date
- assignment.end_date = assignment.end_date
Getting tasks a resource is assigned to
리소스에 할당된 모든 작업을 얻기 위한 축약 방법은 - getResourceAssignments입니다.
gantt.getResourceAssignments("6");
이 메서드는 리소스의 ID를 매개변수로 받아 해당 리소스에 할당된 작업들의 객체 배열을 반환합니다:
[
    { task_id: 5, resource_id: "6", value: 5, delay: 0, duration: 7,
        start_date: "03-04-2025 00:00", end_date: "12-04-2025 00:00",
        id: 1617258553240, mode: "default" },
    { task_id: 18, resource_id: "6", value: 2, delay: 0, duration: 2,
        start_date: "05-04-2025 00:00", end_date: "09-04-2025 00:00",
        id: 1617258553250, mode: "default" },
    { task_id: 19, resource_id: "6", value: 3, delay: 0, duration: 4,
        start_date: "09-04-2025 00:00", end_date: "13-04-2025 00:00",
        id: 1617258553251, mode: "default" },
    { task_id: 21, resource_id: "6", value: 5, delay: 0, duration: 4,
        start_date: "03-04-2025 00:00", end_date: "09-04-2025 00:00",
        id: 1617258553254, mode: "default" }
]
각 객체는 다음 속성들을 포함합니다:
- task_id - 작업의 ID
- resource_id - 리소스의 ID
- value - 작업에 할당된 리소스의 수량
- delay - 할당 시작일과 작업 시작일의 차이
- duration - 할당의 지속 시간
- start_date - 할당이 시작될 예정인 날짜
- end_date - 할당이 완료될 예정인 날짜
- id - 할당의 ID
- mode - 리소스 할당 시간의 계산 모드: "default"|"fixedDates"|"fixedDuration"
Getting resource assignments of a task
특정 작업의 파싱된 리소스 할당 정보를 얻으려면 getTaskAssignments 메서드를 사용합니다:
gantt.getTaskAssignments(5);
이 메서드는 작업의 ID를 매개변수로 받아 해당 작업의 리소스 할당 정보를 담은 객체 배열을 반환합니다:
[
    { task_id: 5, id: 1617254693938, delay: 0, duration: 2,
        start_date: "03-04-2025 00:00", end_date: "05-04-2025 00:00",
        mode: "fixedDuration", resource_id: 6, value: 3 },
    { task_id: 5, id: 1617254693946, delay: 3, duration: 1,
        start_date: "06-04-2025 00:00", end_date: "07-04-2025 00:00",
        mode: "fixedDuration", resource_id: 6, value: 6 }
]
반환 객체는 getResourceAssignments 메서드의 반환 객체와 동일한 속성 목록을 포함합니다.
Setting connection via lightbox
리소스는 빌트인 라이트박스를 사용하여 작업 객체의 어떤 속성에도 할당될 수 있습니다.
gantt.serverList("people", [
    { key: 1, label: "John" },
    { key: 2, label: "Mike" },
    { key: 3, label: "Anna" },
    { key: 4, label: "Bill" },
    { key: 7, label: "Floe" }
]);

gantt.locale.labels.section_owner = "Owner";

gantt.config.lightbox.sections = [
    { name: "description", height: 38, map_to: "text", type: "textarea", focus: true },
    { name: "owner", map_to: "owner_id", type: "select",
        options: gantt.serverList("people") },
    { name: "time", type: "duration", map_to: "auto" }
];
리소스 컨트롤의 라이트박스 구성 방법은 Resources Control 및 Resource Assignments control 문서를 참조하세요.
Loading collections
서버 목록으로 지정된 컬렉션은 간트가 초기화된 후 동적으로 로드 및 업데이트될 수 있습니다:
// init lightbox with an empty collection
gantt.locale.labels.section_owner = "Owner";

gantt.config.lightbox.sections = [
    { name: "description", height: 38, map_to: "text", type: "textarea", focus: true },
    { name: "owner", map_to: "owner_id", type: "select",
        options: gantt.serverList("people") },
    { name: "time", type: "duration", map_to: "auto" }
];

// 옵션이 로드된 후
gantt.updateCollection("people", [
    { key: 1, label: "John" },
    { key: 2, label: "Mike" },
    { key: 3, label: "Anna" },
    { key: 4, label: "Bill" },
    { key: 7, label: "Floe" }
]);
Related sample: Assigning owners to tasks
서버 목록(collection)을 통해 리소스를 정의하면, 다른 데이터와 함께 로드될 수 있습니다(json 형식의 컬렉션 로드 참조), 그렇지 않으면 수동으로 로드해야 합니다.
라이트박스의 리소스 컨트롤 구성 방법에 대한 자세한 내용은 Resources control 및 Resource Assignments control 문서를 참조하세요.
Loading resources and resource assignments
v8.0부터 리소스와 리소스 할당은 gantt.parse() 또는 gantt.load() 메서드를 사용하여 간트에 로드할 수 있습니다:
gantt.parse({
    tasks: [
        ...,
        {
            id: 5,
            text: "Interior office",
            type: "task",
            start_date: "03-04-2025 00:00",
            duration: 7,
            parent: "2",
            owner: [
                {
                    resource_id: "6",
                    value: 3,
                    start_date: "03-04-2025 00:00",
                    end_date: "05-04-2025 00:00",
                }
            ]
        },
        ...
    ],
    links: [],
    resources: [
        { id: 6, text: "John", unit: "hours/day" },
        { id: 7, text: "Mike", unit: "hours/day" },
        { id: 8, text: "Anna", unit: "hours/day" },
        { id: 9, text: "Bill", unit: "hours/day" },
        { id: 10, text: "Floe", unit: "hours/day" }
    ]
});
리소스 할당은 작업과는 별도로 메서드에 전달될 수 있습니다:
gantt.parse({
    tasks: [
        ...,
        {
            id: 5,
            text: "Interior office",
            type: "task",
            start_date: "03-04-2025 00:00",
            duration: 7,
            parent: "2",
            priority: 1
        },
        ...
    ],
    links: [],
    assignments: [
        {
            id: 1,
            task_id: 5,
            resource_id: 6,
            value: 3,
            start_date: "03-04-2025 00:00",
            end_date: "05-04-2025 00:00"
        }
    ],
    resources: [
        { id: 6, text: "John", unit: "hours/day" },
        { id: 7, text: "Mike", unit: "hours/day" },
        { id: 8, text: "Anna", unit: "hours/day" },
        { id: 9, text: "Bill", unit: "hours/day" },
        { id: 10, text: "Floe", unit: "hours/day" }
    ]
});
Managing resource assignments
Parsing resource assignments
v7.1부터 리소스 할당은 데이터 저장소의 객체처럼 다룰 수 있습니다.
새로운 process_resource_assignments 속성은 작업의 gantt.config.resource_property로부터 값의 파싱 과정을 리소스 할당의 내부 객체로 가능하게 해 줍니다. 그 결과 데이터 저장소 객체를 통해 리소스 할당을 조작할 수 있습니다. 예를 들어 필요한 할당 객체를 얻거나 업데이트할 수 있습니다.
참고: 간트 다이어그램과 히스토그램을 구성할 때 리소스의 필요 기간과 시간대를 지정하려면 이 기능이 필요합니다.
이 과정은 성능에 영향을 줄 수 있으며 큰 프로젝트의 경우 성능이 느려질 수 있습니다. 따라서 할당의 시간이나 지속 시간을 설정할 필요가 없다면, 구성에서 리소스 할당의 파싱을 비활성화할 수 있습니다:
gantt.config.process_resource_assignments = false;
구성이 비활성화되면 gantt.getDatastore("resourceAssignments") 데이터스토어가 사용 가능하지 않으며, 할당 객체는 동적 속성을 가지지 않습니다. 자원 다이어그램과 히스토그램은 자원이 작업의 전체 기간 동안 할당된 것으로 간주합니다.
Updating resource assignments
리소스 할당은 자동으로 생성되는 data store에 저장됩니다. 기본적으로 할당 저장소의 내용은 작업 객체에서 채워집니다. 예를 들어 작업 객체의 리소스 속성(task.users)을 수정하면, 저장소에도 자동으로 반영됩니다.
task[gantt.config.resource_property] = [
    {
        resource_id: "6",
        value: 3,
        start_date: "03-04-2025 00:00",
        end_date: "05-04-2025 00:00",
    }
];

gantt.updateTask(taskId);
하지만 때로는 저장소 API를 통해 리소스 할당을 수정한 후 작업 객체에 반영해야 할 필요가 있습니다. 이 경우 저장소의 값으로 작업 객체의 리소스 속성을 업데이트한 다음, 변경 내용을 작업 객체에 반영하도록 gantt.updateTaskAssignments() 메서드를 호출해야 합니다:
const assignmentStore = gantt.getDatastore(gantt.config.resource_assignment_store);

assignmentStore.addItem({
    resource_id: 5,
    task_id: 2,
    value: 4
});

assignmentStore.removeItem(assignment.id);
assignmentStore.updateItem(assignment.id);

// 저장소에서 할당이 업데이트된 후, 작업 객체에 변경 내용을 반영하려면
// updateTaskAssignments를 호출해야 합니다:
gantt.updateTaskAssignments(taskId);
Re-rendering resource assignments during task drag
작업을 드래그하는 동안 리소스 패널은 다시 렌더링되지만 리소스 할당은 변경되지 않습니다. 기본적으로 작업 날짜 내부의 셀만 다시 렌더링됩니다.
모든 셀의 리소스 할당을 업데이트하려면 process_resource_assignments 구성을 비활성화하거나, 아래 예제처럼 작업의 모든 리소스 할당을 수동으로 업데이트해야 합니다:
gantt.attachEvent("onTaskDrag", (id, mode, task, original) => {
    const assignments = gantt.getTaskAssignments(id);
    assignments.forEach(assignment => {
        if (assignment.mode === "default") {
            assignment.start_date = task.start_date;
            assignment.end_date = task.end_date;
        }
    });
});
Showing task resource
리소스 이름은 작업 설명의 일부 또는 그리드 셀 중 하나의 레이블로 표시될 수 있습니다. Gantt는 서버 목록에서 특정 ID를 가진 항목을 얻기 위한 준비된 메서드를 제공하지 않으므로, 이를 위한 작은 도우미를 구현해 두는 것이 좋습니다:
const byId = (list, id) => {
    const item = list.find(item => item.key === id);
    return item ? item.label || "" : "";
};
이 후 템플릿에서 리소스 이름을 사용할 수 있습니다:
gantt.config.columns = [
    { name: "owner", width: 80, align: "center",
        template: (item) => byId(gantt.serverList('people'), item.owner_id) },
    { name: "text", label: "Task name", tree: true, width: '*' },
    { name: "add", width: 40 }
];

gantt.templates.rightside_text =
    (start, end, task) => byId(gantt.serverList('people'), task.owner_id);
Related sample: Assigning owners to tasks
Editable resource diagram
리소스 다이어그램에서 리소스 할당을 편집 가능하도록 만들려면 다음 구성을 사용할 수 있습니다:
gantt.config.resources = {
    editable_resource_diagram: true
};
Related sample: Assign resource values to specific days
editable_resource_diagram 속성이 활성화되면 간트는 자동으로 gantt.templates.resource_cell_value 및 gantt.templates.resource_cell_class 템플릿을 할당하여 간트에서 리소스 할��당을 편집 가능하게 만듭니다.
직접 템플릿 함수를 할당하면, 간트는 사용자가 정의한 템플릿을 사용합니다.
템플릿의 기본 구현은 gantt.ext.resources 객체에서 사용할 수 있습니다.
gantt.templates.resource_cell_value = gantt.ext.resources.editableResourceCellTemplate;
gantt.templates.resource_cell_class = gantt.ext.resources.editableResourceCellClass;
일반적으로는 편집 가능한 다이어그램에 대해 이러한 템플릿을 수동으로 할당할 필요가 없으며, Gantt가 처리하는 것이 기대됩니다.
다음 예제에는 편집 가능한 셀을 가진 템플릿이 제공됩니다. 필요에 따라 이를 커스터마이즈할 수 있습니다:
Related sample: Customizable resource diagram template
Custom styling of resources
스타일링을 위한 템플릿은 보통 다음과 같습니다:
- gantt.templates.grid_row_class - 왼쪽 그리드의 행 CSS
- gantt.templates.task_row_class - 타임라인의 배경 행 CSS(smart_rendering가 활성화된 경우 호출되지 않음)
- gantt.templates.task_class - 작업 막대 요소의 CSS 클래스
상황에 따라 다음 중 하나를 선택할 수 있습니다:
- 각 리소스에 대한 미리 정의된 클래스 사용하기
- 또는 리소스와 함께 배경 및 텍스트 색상 설정 등 스타일링을 함께 로드하기. 이 경우 페이지에서 동적으로 CSS를 생성해야 할 수 있습니다.
위와 같은 방법으로 스타일링을 적용할 수 있습니다.
Related sample: Assigning owners to tasks
Resource calendars
Gantt는 사용자 지정 작업 시간 캘린더 기능을 지원합니다. 작업에 특정 자원을 연관시키는 작업 시간 달력이 있을 수 있습니다.
달력은 작업과 일대일 관계의 속성 값을 통해 작업에 매핑됩니다:
// 자원 값은 `task.resource_id` 속성에서 가져옵니다
gantt.config.resource_property = "resource_id";

gantt.config.resource_calendars = {
    "resource1" : "calendarId1",
    "resource2" : "calendarId2",
    "resource3" : "calendarId3"
};
리소스 속성은 임의의 속성으로 달력을 리소스에 할당하는 데 사용할 수 있으며, 리소스 속성이 동적으로 변경되면 간트가 새로운 달력을 사용해 작업 시간을 자동으로 재계산합니다.
Related sample: Resource calendars
다중 리소스가 단일 작업에 할당될 수 있는 경우 간트는 모든 할당된 리소스를 위한 공통 달력을 자동으로 생성할 수 있습니다(api/config/dynamic_resource_calendars.md).
리소스에 달력을 연결하는 방법에 대한 자세한 내용은 관련 문서(guides/working-time.md#assigningcalendartoresource)를 참조하십시오.
Balancing resource load
팀의 리소스 속성을 기준으로 프로젝트를 전체적으로 분해하기 위해 그룹화 확장 기능을 사용할 수 있습니다.

이 기능은 달력에서의 리소스 부하를 균형 있게 맞추는 데 사용할 수 있습니다.
Related sample: Break down by resources
작업 그룹화에 대한 자세한 내용은 관련 기사를 참조하십시오.
Grouping tasks by multiple resources
작업에 여러 리소스가 할당된 경우, 작업은 할당된 리소스별로 그룹화됩니다. 이는 두 명의 사람에게 할당된 작업이 각자에 대해 중복되어 렌더링되지 않는다는 것을 의미합니다. 대신 두 명의 사람이 모두 할당된 한 번의 작업으로 렌더링됩니다. 그룹화된 작업은 시작 날짜로 정렬됩니다.
Related sample: Group by multiple resources
- 로드된 데이터 세트의 작업에 여러 리소스가 할당된 경우, 간트는 자동으로 해당 작업에 대한 그룹을 만듭니다.
- 할당된 리소스가 없는 작업의 경우 기본 그룹 Not assigned를 생성합니다. 만약 데이터 세트에 이와 같은 그룹이 존재하고 이를
groupBy()메서드에 전달했다면, 자동 생성을 방지하기 위해 해당 그룹에 default:true 구성이 필요합니다.
다중 리소스로 그룹화된 작업을 드래그하는 것은 불가능하니 주의하십시오.