Salesforce LWC와 함께하는 dhtmlxGantt
이 튜토리얼은 Salesforce Lightning Web Component에 dhtmlxGantt를 추가하는 방법을 설명합니다.
Salesforce LWC와의 DHTMLX 컴포넌트 통합 데모를 онлайн에서 확인해 보세요(로그인: user, 비밀번호: demo). 데모의 소�스 코드는 [GitHub]에 제공됩니다.
다른 기술을 사용하는 경우 아래에 있는 사용 가능한 통합Variants 목록을 확인하십시오:
- ASP.NET Core와 함께하는 dhtmlxGantt
- ASP.NET MVC와 함께하는 dhtmlxGantt
- Node.js와 함께하는 dhtmlxGantt
- Python과 함께하는 dhtmlxGantt
- PHP: Laravel과 함께하는 dhtmlxGantt
- PHP:Slim과 함께하는 dhtmlxGantt
- Ruby on Rails와 함께하는 dhtmlxGantt
우리는 Lightning Web Component를 만들고 조직에 업로드하기 위해 Salesforce CLI를 사용할 것입니다.
또한 개발 조직과 함께 작업하기 위해 Visual Studio Code에 Salesforce Extension Pack"를 설치할 수 있습니다.
이 튜토리얼에서 생성된 데모의 전체 소스 코드는 GitHub에서 확인할 수 있습니다.
Salesforce LWC로 Gantt 차트를 만드는 방법을 보여주는 비디오 가이드를 확인해 볼 수 있습니다.
사전 준비
필요하시면 Salesforce CLI를 설치하세요. 설치 가이드는 이 기사에서 확인할 수 있습니다.
1단계. 프로젝트 생성
무료 개발자 계정이 없다면 가입하여 무료 계정을 �만들어 주세요. 설치 가이드는 이 기사를 참조하십시오.
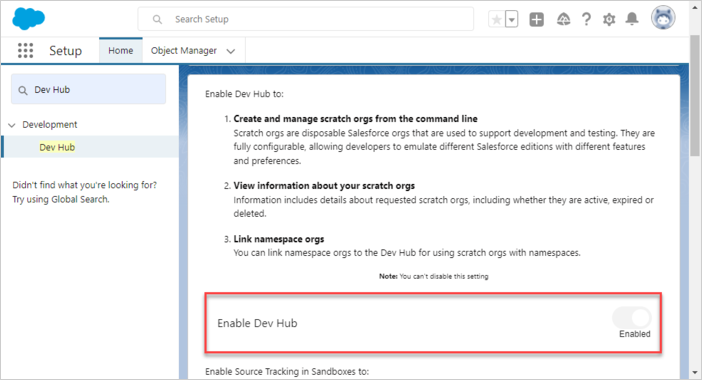
왼쪽의 검색 창에서 Dev Hub를 찾아 선택합니다:

새 설정 창에서 Dev Hub 활성화를 선택합니다:
Salesforce DX 프로젝트의 기본 디렉터리를 만들겠습니다:
$ mkdir ~/salesforce
CLI를 통해 Salesforce DX 프로젝트를 생성합니다:
$ cd ~/salesforce
$ sfdx project generate -n gantt-salesforce-app
    target dir = C:UsersUsersalesforce
        create gantt-salesforce-appconfigproject-scratch-def.json
        create gantt-salesforce-appREADME.md
        create gantt-salesforce-appsfdx-project.json
        create gantt-salesforce-app.huskypre-commit
        create gantt-salesforce-app.vscodeextensions.json
        create gantt-salesforce-app.vscodelaunch.json
        create gantt-salesforce-app.vscodesettings.json
        create gantt-salesforce-appforce-appmaindefaultlwc.eslintrc.json
        create gantt-salesforce-appforce-appmaindefaultaura.eslintrc.json
        create gantt-salesforce-appscriptssoqlaccount.soql
        create gantt-salesforce-appscriptsapexhello.apex
        create gantt-salesforce-app.eslintignore
        create gantt-salesforce-app.forceignore
        create gantt-salesforce-app.gitignore
        create gantt-salesforce-app.prettierignore
        create gantt-salesforce-app.prettierrc
        create gantt-salesforce-appjest.config.js
        create gantt-salesforce-apppackage.json
생성된 프로젝트로 이동합니다:
$ cd gantt-salesforce-app
2단계. 권한 부여
Web Server Flow를 사용하여 Org에 로그인합니다:
$ sfdx org login web -d

Successfully authorized ... with org ID ...
프로젝트 구성 파일(sfdx-project.json)을 업데이트합니다. "sfdcLoginUrl" 매개변수를 자신의 "My Domain URL"로 설정합니다. 조직의 "My Domain URL"은 "My Domain" 설정 페이지에서 확인할 수 있습니다. 예를 들어:
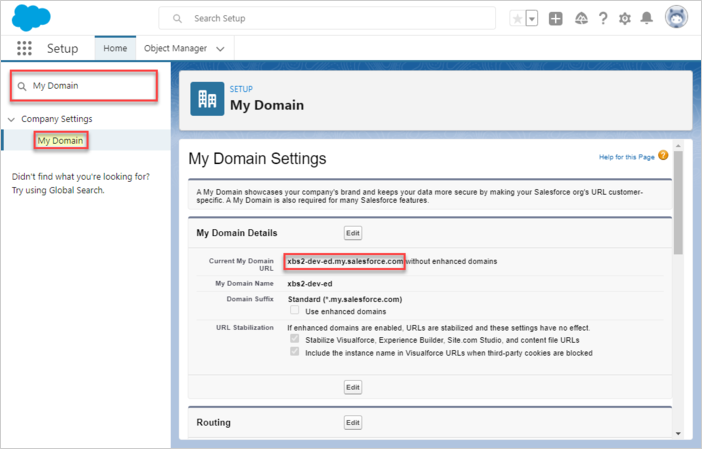
"sfdcLoginUrl" : "https://xbs2-dev-ed.my.salesforce.com"
Scratch Org를 생성합니다:
$ sfdx org create scratch -f config/project-scratch-def.json -d

Creating Scratch Org...
RequestId: 2SR5j0000006JhCGAU
(https://xbsoftware2-dev-ed.my.salesforce.com/2SR5j0000006JhCGAU)
OrgId: 00DH40000000s0D
Username: test-tc0telfqhudt@example.com
✓ Prepare Request
✓ Send Request
✓ Wait For Org
✓ Available
✓ Authenticate
✓ Deploy Settings
Done

Your scratch org is ready.
3단계. Salesforce에 Gantt 추가
라이브러리를 사용하려면 Salesforce에 Static Resource로 업로드해야 합니다. 따라서 scratch org를 엽니다:
$ sfdx org open
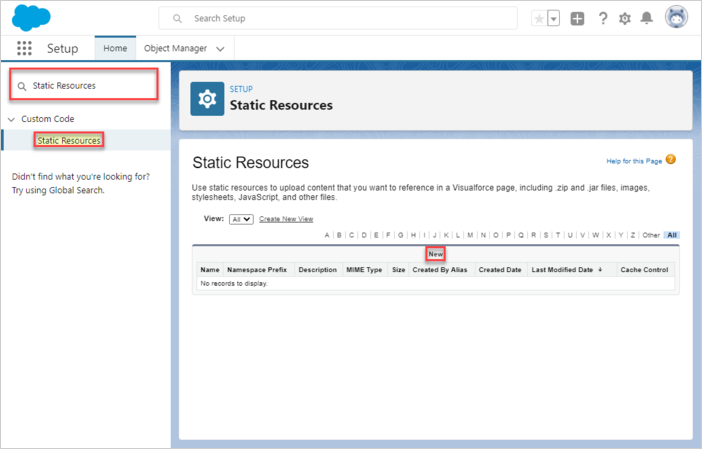
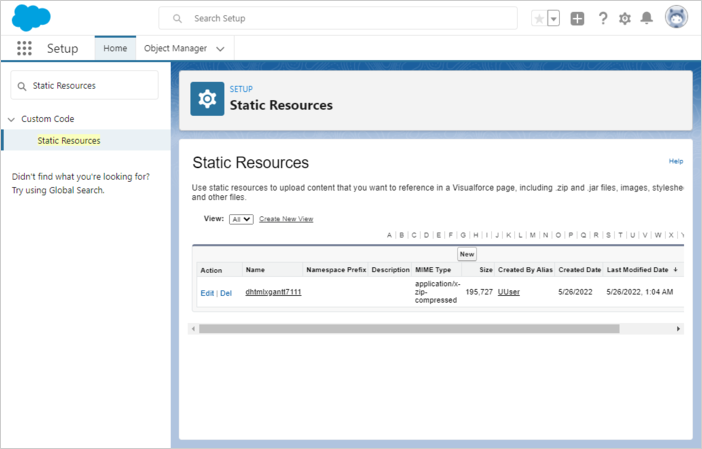
이제 "Static Resources" 탭을 열고 "New" 버튼을 누릅니다
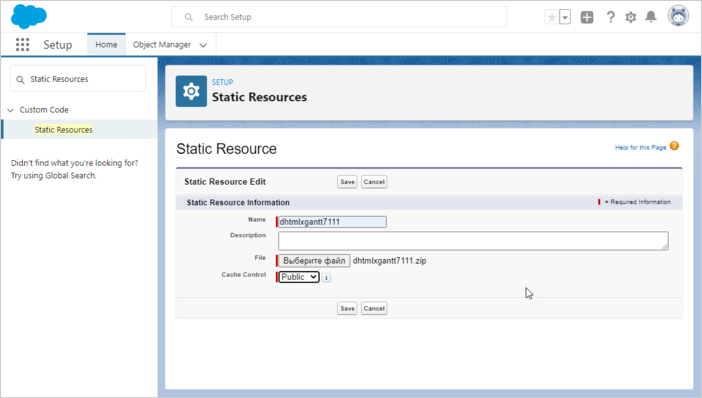
의미 있는 이름을 지정합니다(예: "dhtmlxgantt7111"), 라이브러리 자체가 들어 있는 ZIP 아카이브를 선택합니다(아카이브에는 dhtmlxgantt.js 및 dhtmlxgantt.css 파일이 포함되어야 합니다). 성능 향상을 위해 "Public" 캐시 제어를 선택합니다. "Save" 버튼을 누릅니다.
이제 Salesforce 내부에 dhtmlxGantt가 있습니다.
4단계. 데이터 모델 생성
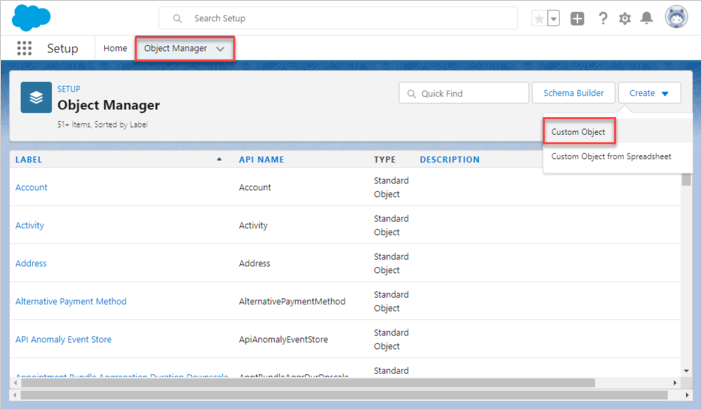
핵심 dhtmlxGantt 엔티티는 Tasks와 Links입니다. dhtmlxGantt 엔티티의 모든 속성을 Salesforce 내부의 일반 JSON으로 저장하는 것이 좋습니다. Tasks와 Links 객체를 생성해 보겠습니다. Object Manager를 열고 "Create"를 선택한 다음 "Custom Object"를 선택합니다:
Task 객체
작업 객체의 이름을 지정합니다. 예를 들어 GanttTask/GanttTasks로 설정합니다.
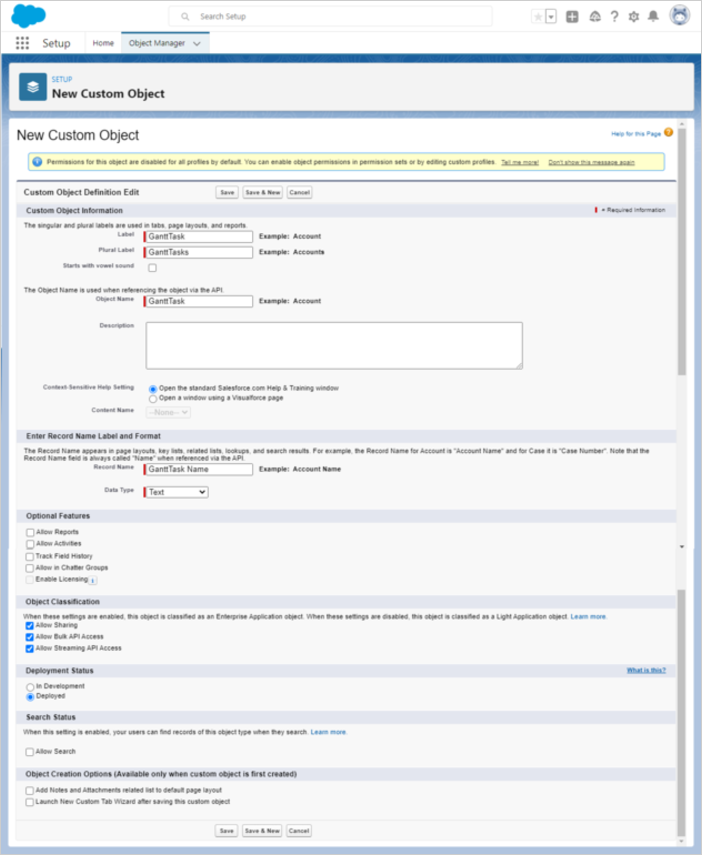
레코드 이름은 객체 이름과 일치해야 합니다. 예: Object Name: GanttTask => Record Name: GanttTask Name
"Save" 버튼을 누릅니다.
객체가 생성되면 "Fields & Relationships" 탭을 열고 "New" 버튼을 누릅니다.

- Duration
데이터 유형으로 "Number"를 선택하고 "Next" 버튼을 누릅니다.
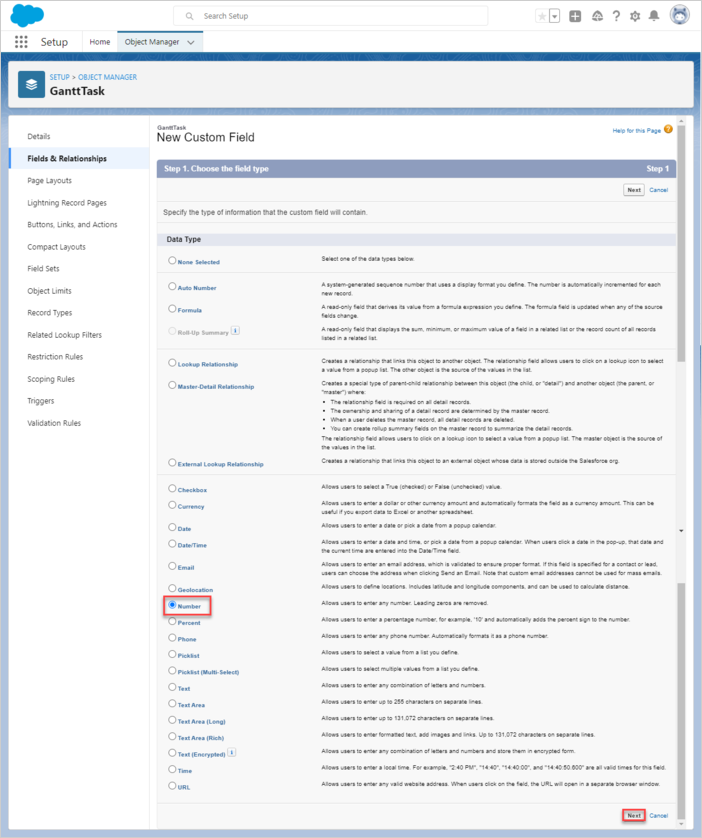
이를 "Duration"으로 명명합니다. 이 컬럼은 JSON으로 직렬화된 Task 속성을 저장합니다. 여러 설정을 기본값으로 두고 "다음" 버튼을 누르다가 "Save & New" 버튼이 활성화되면 클릭합니다.
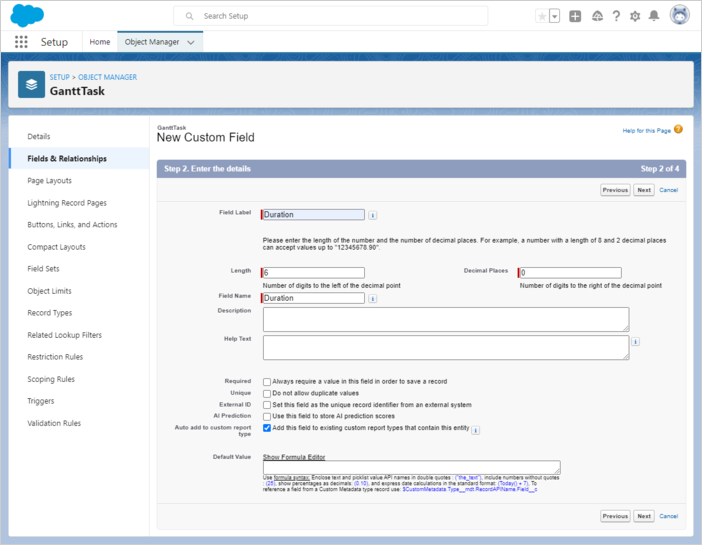
다음 버튼을 눌러 기본 설정을 수락하고 "Save & New" 버튼이 활성화될 때까지 계속합니다.
- Parent
"Parent" 필드를 만듭니다. 데이터 유형으로 "Text"를 선택합니다.

다음 버튼을 눌러 기본 설정을 수락합니다.
- Progress
"Progress" 필드를 만듭니다. 데이터 유형으로 "Number"를 선택합니다.
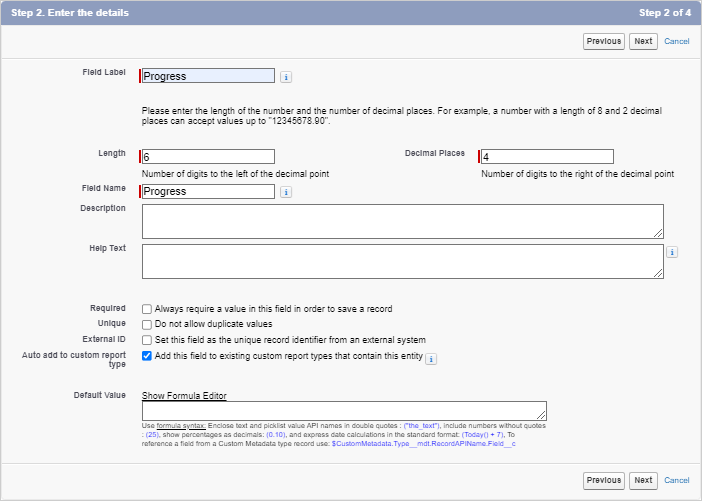
다음 버튼을 눌러 기본 설정을 수락합니다.
- Start date
"Start Date" 필드를 만듭니다. 데이터 유형으로 "Date/Time"을 선택합니다.
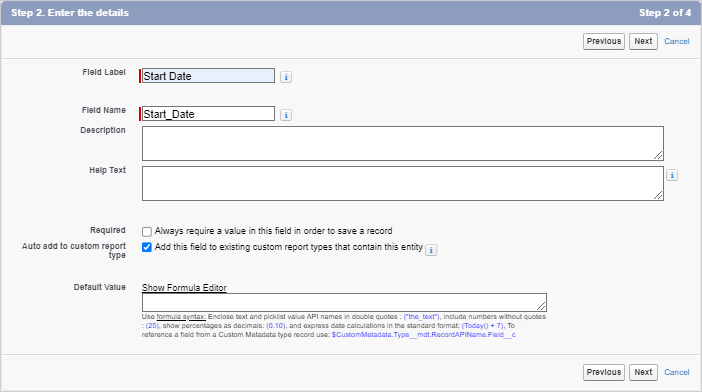
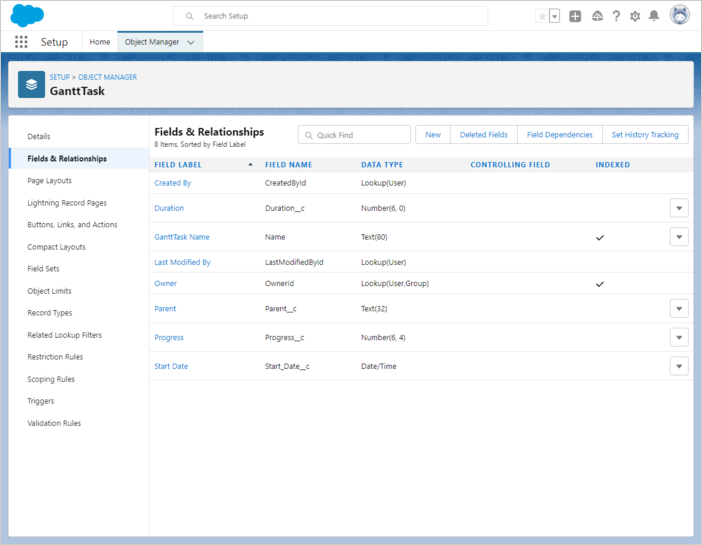
다음 버튼을 눌러 기본 설정을 수락합니다. 마지막으로 "Save" 버튼이 활성화되면 저장합니다.
마지막으로 아래와 같이 보일 것입니다:
Link 객체
Object Manager를 열고 "Create"를 선택한 다음 "Custom Object"를 선택합니다:
링크 객체의 이름을 지정합니다. 예를 들어 GanttLink/GanttLinks로 설정합니다.
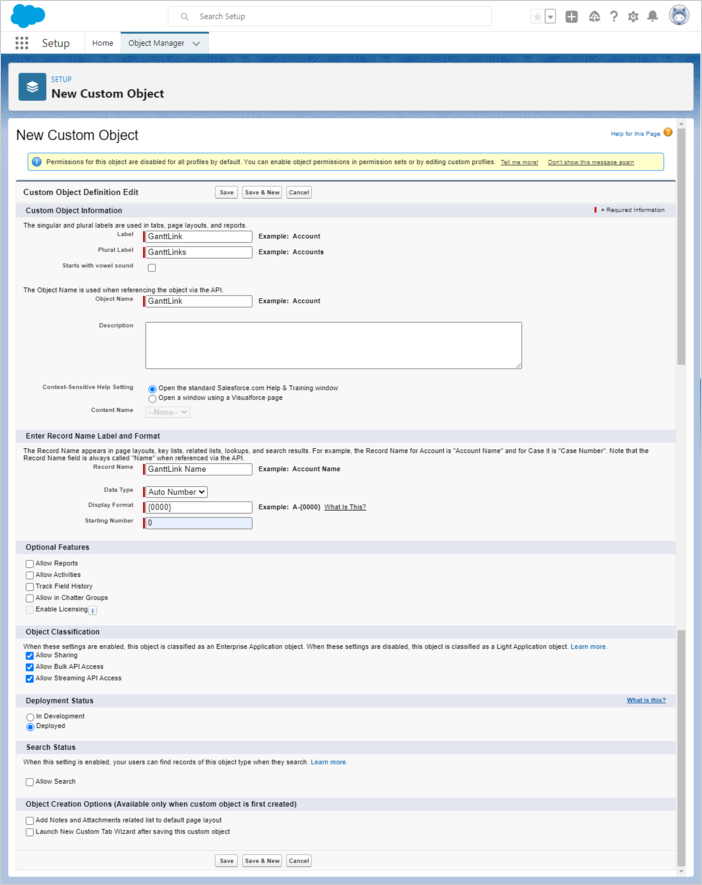
레코드 이름은 객체 이름과 일치해야 합니다. 예: Object Name: GanttLink => Record Name: GanttLink Name
다음으로 필요한 필드를 생성합니다.
- Source
"Source" 필드를 만듭니다. 데이터 유형으로 "Text"를 선택합니다.
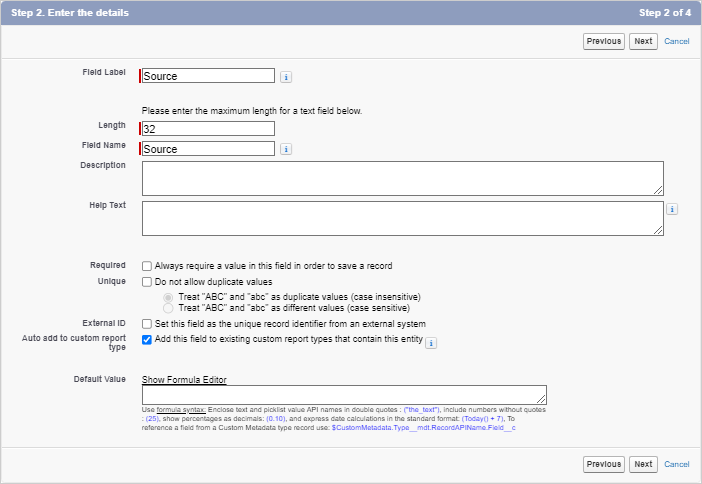
다음 버튼을 눌러 기본 설정을 수락합니다.
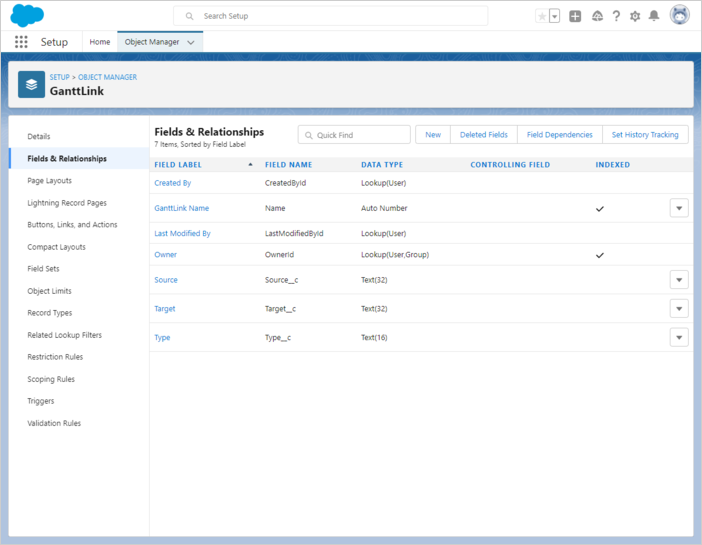
- Target
"Target" 필드를 만듭니다. 데이터 유형으로 "Text"를 선택합니다.

다음 버튼을 눌러 기본 설정을 수락합니다.
- Type
"Type" 필드를 만듭니다. 데이터 유형으로 "Text"를 선택합니다.
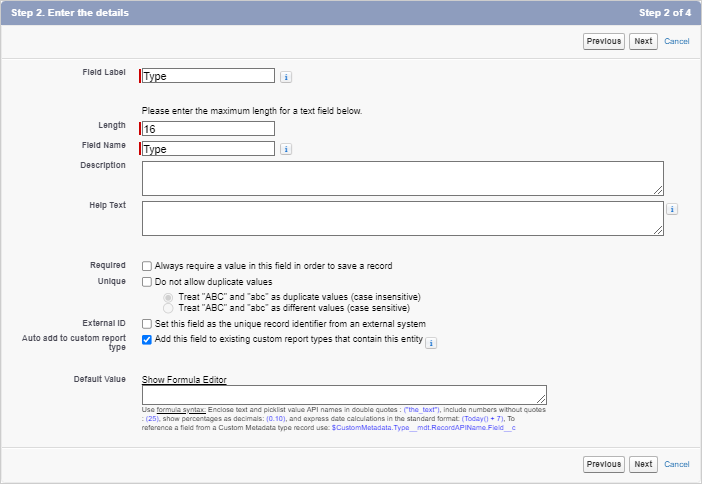
다음 버튼을 눌러 기본 설정을 수락합니다.
마지막으로 아래와 같이 보일 것입니다:
5단계. Lightning Web Component 만들기
Lightning Web Component를 만들려면 다음 명령을 실행합니다:
$ sfdx lightning generate component --type lwc -n gantt -d force-app/main/default/lwc

target dir =
C:UsersUsersourcesalesforcegantt-salesforce-appforce-appmaindefaultlwc
   create force-appmaindefaultlwcganttgantt.js
   create force-appmaindefaultlwcganttgantt.html
   create force-appmaindefaultlwcganttgantt.js-meta.xml
컴포넌트 정의를 gantt.js-meta.xml에서 Lightning App Builder에 노출되도록 변경합니다:
<?xml version="1.0" encoding="UTF-8"?>
<LightningComponentBundle xmlns="http://soap.sforce.com/2006/04/metadata">
    <apiVersion>54.0</apiVersion>
    <isExposed>true</isExposed>
    <targets>
        <target>lightning__AppPage</target>
    </targets>
    <targetConfigs>
        <targetConfig targets="lightning__AppPage">
            <property name="height" label="Height" type="Integer" default="800" />
        </targetConfig>
    </targetConfigs>
</LightningComponentBundle>
Open gantt.html and add the following code into it:
<template>
    <div class="thegantt" lwc:dom="manual" style='width: 100%;'></div>
</template>
Open gantt.js and add the following code into it:
/* eslint-disable guard-for-in */
/* eslint-disable no-undef */
import { LightningElement, api } from "lwc";
import { ShowToastEvent } from "lightning/platformShowToastEvent";
import { loadStyle, loadScript } from "lightning/platformResourceLoader";
import { createRecord, updateRecord, deleteRecord } from "lightning/uiRecordApi";

// Static resources
import GanttFiles from "@salesforce/resourceUrl/dhtmlxgantt7111";

// Controllers
import getTasks from "@salesforce/apex/GanttData.getTasks";

function unwrap(fromSF) {
    const data = fromSF.tasks.map((a) => ({
        id: a.Id,
        text: a.Name,
        start_date: a.Start_Date__c,
        duration: a.Duration__c,
        parent: a.Parent__c,
        progress: a.Progress__c,
        type: a.Task_Type__c,
    }));
    const links = fromSF.links.map((a) => ({
        id: a.Id,
        source: a.Source__c,
        target: a.Target__c,
        type: a.Type__c
    }));
    return { data, links};
}

export default class GanttView extends LightningElement {
    static delegatesFocus = true;

    @api height;
    ganttInitialized = false;

    renderedCallback() {
        if (this.ganttInitialized) {
            return;
        }
        this.ganttInitialized = true;

        Promise.all([
            loadScript(this, GanttFiles + "/dhtmlxgantt.js"),
            loadStyle(this, GanttFiles + "/dhtmlxgantt.css")
        ])
            .then(() => {
                this.initializeUI();
            })
            .catch((error) => {
                this.dispatchEvent(
                    new ShowToastEvent({
                        title: "Error loading Gantt",
                        message: error.message,
                        variant: "error"
                    })
                );
            });
    }

    initializeUI() {
        const root = this.template.querySelector(".thegantt");
        root.style.height = this.height + "px";

        // Enterprise 또는 Ultimate 버전을 사용하는 경우 주석 해제
        //const gantt = window.Gantt.getGanttInstance();
        gantt.templates.parse_date = (date) => new Date(date);
        gantt.templates.format_date = (date) => date.toISOString();

        gantt.init(root);
        getTasks().then((d) => {
            const chartData = unwrap(d);
            gantt.parse({
                tasks: chartData.data,
                links: chartData.links
            });
        });

        ///↓↓↓ 백엔드 SF로의 변경 저장 ↓↓↓
        gantt.createDataProcessor({
            task: {
                create: (data) => {
                    console.log("createTask",data);
                    const insert = {
                        apiName: "GanttTask__c",
                        fields: {
                            Name: data.text,
                            Start_Date__c: data.start_date,
                            Duration__c: data.duration,
                            Parent__c: String(data.parent),
                            Progress__c: data.progress
                        }
                    };
                    gantt.config.readonly = true; // 저장이 완료될 때까지 변경 비활성화
                                                  // until saving is complete
                    return createRecord(insert).then((res) => {
                        gantt.config.readonly = false;
                        return { tid: res.id, ...res };
                    });
                },
                update: (data, id) => {
                    console.log("updateTask",data);
                    const update = {
                        fields: {
                            Id: id,
                            Name: data.text,
                            Start_Date__c: data.start_date,
                            Duration__c: data.duration,
                            Parent__c: String(data.parent),
                            Progress__c: data.progress
                        }
                    };
                    return updateRecord(update).then(() => ({}));
                },
                delete: (id) => {
                    return deleteRecord(id).then(() => ({}));
                }
            },
            link: {
                create: (data) => {
                    const insert = {
                        apiName: "GanttLink__c",
                        fields: {
                            Source__c: data.source,
                            Target__c: data.target,
                            Type__c: data.type
                        }
                    };
                    return createRecord(insert).then((res) => {
                        return { tid: res.id };
                    });
                },
                update: (data, id) => {
                    const update = {
                        apiName: "GanttLink__c",
                        fields: {
                            Id: id,
                            Source__c: data.source,
                            Target__c: data.target,
                            Type__c: data.type
                        }
                    };
                    return updateRecord(update).then(() => ({}));
                },
                delete: (id) => {
                    return deleteRecord(id).then(() => ({}));
                }
            }
        });
    }
}
6단계. Apex 클래스 생성
다음 단계는 Lightning 컴포넌트와 데이터 모델 간의 상호 작용을 가능하게 하는 클래스를 만드는 것입니다.
$ sfdx apex generate class -n GanttData -d force-app/main/default/classes

target dir =
C:UsersUsersalesforcegantt-salesforce-appforce-appmaindefaultclasses
   create force-appmaindefaultclassesGanttData.cls
   create force-appmaindefaultclassesGanttData.cls-meta.xml
생성 후 GanttData.cls를 열고 다음 코드를 추가합니다:
public with sharing class GanttData {

    @RemoteAction
    @AuraEnabled(cacheable="true)"
    public static Map<String, Object> getTasks() {

        // SOQL로 레코드를 가져옵니다
        List<GanttTask__c> Tasks = new List<GanttTask__c>();
        Tasks = [SELECT Id, Name, Start_Date__c, Duration__c,
                    Parent__c FROM GanttTask__c];

        List<GanttLink__c> Links = new List<GanttLink__c>();
        Links = [SELECT Id, Type__c, Source__c, Target__c FROM GanttLink__c];

        Map<String, Object> result = new Map<String, Object>{
            'tasks' => Tasks, 'links' => Links };
        return result;
   }
}
Scratch Org에서 프로젝트로 소스를 가져오기
$ sfdx project retrieve start
그런 다음 Scratch Org로 소스를 푸시합니다
$ sfdx project deploy start
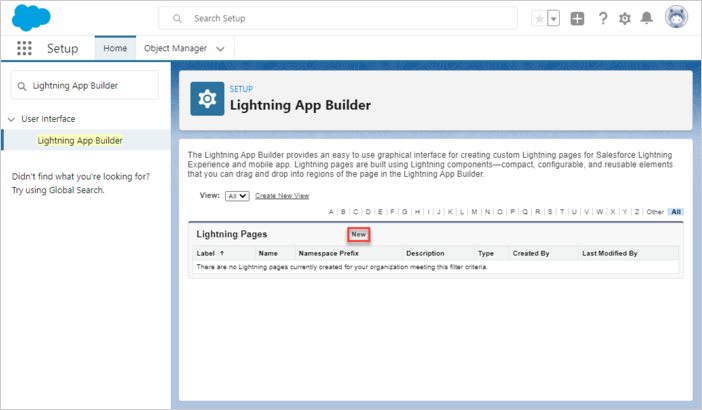
7단계. Lightning 페이지 생성
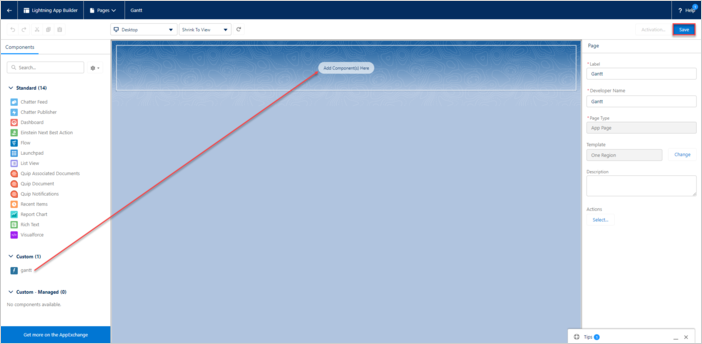
"Lightning App Builder"를 열고 새 Lightning 페이지를 만듭니다.
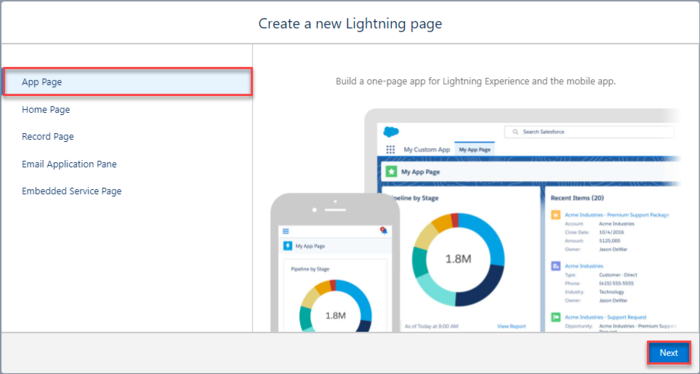
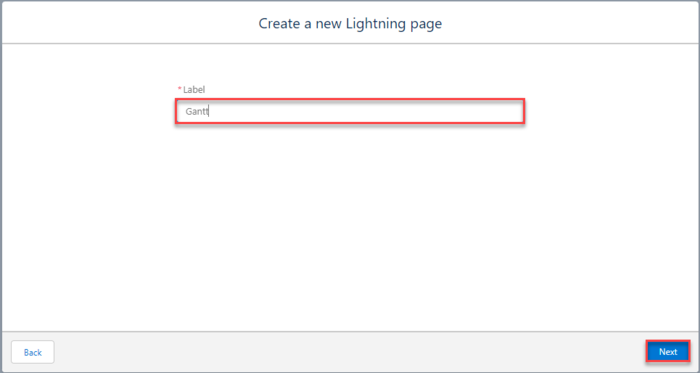
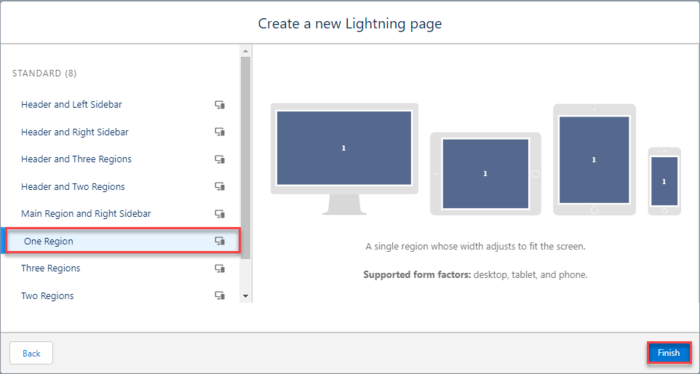
"App Page"를 선택한 후 페이지 이름과 레이아웃을 지정합니다.
새 페이지에서 Gantt 커스텀 컴포넌트가 보이는지 확인합니다. 어떤 영역에든 추가하고 저장합니다.
페이지를 활성화합니다.
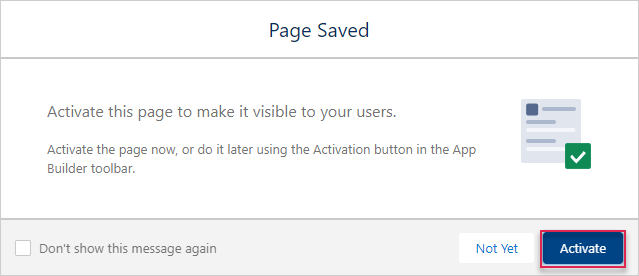
변경 사항을 저장합니다.


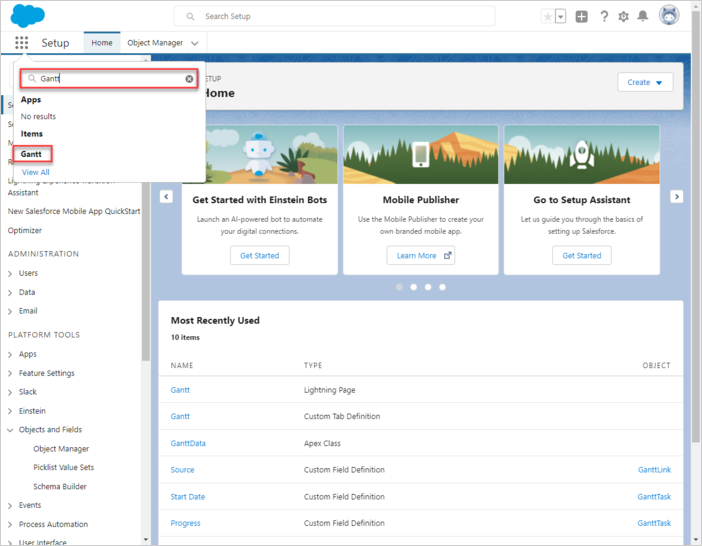
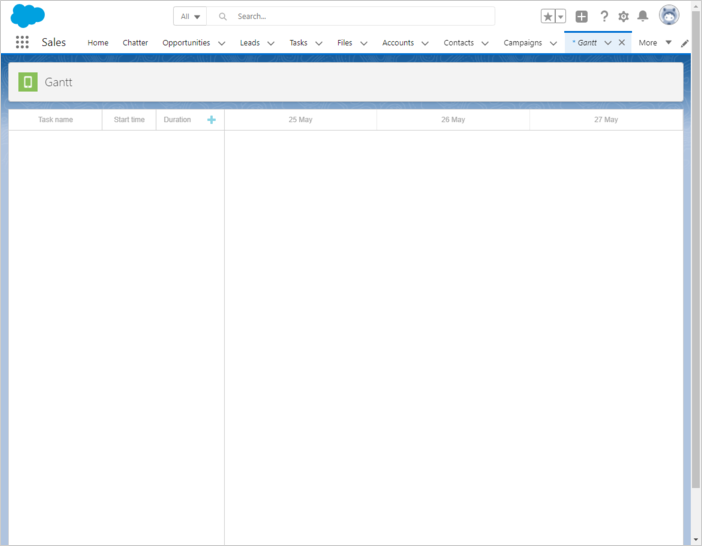
앱 실행 페이지를 열면, 앱 런처에서 클릭하고 Gantt로 검색하면 액세스할 수 있습니다.
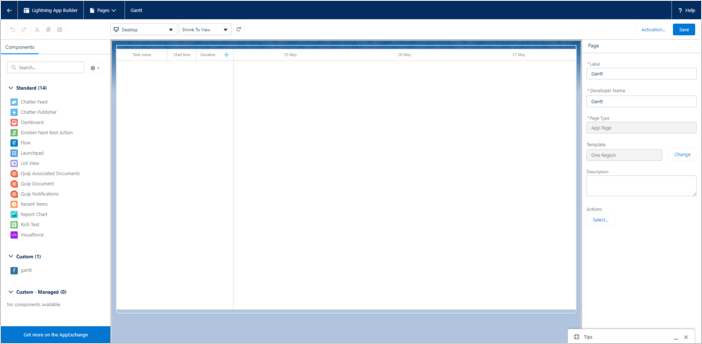
모든 것이 원활하게 작동했다면 Lightning 페이지에서 간단한 간트 데모가 실행되는 것을 볼 수 있습니다.
애플리케이션 보안
Gantt는 SQL 인젝션이나 XSS, CSRF 공격 등 다양한 위협으로부터 애플리케이션을 방지하는 기능을 제공하지 않습니다. 애플리케이션의 안전성을 유지하는 책임은 이를 구현하는 개발자에게 있습니다. 해당 문서의 상세 내용은 [해당 기사]를 참조하십시오. Salesforce는 데이터와 애플리케이션을 보호하기 위해 보안으로 구축되어 있습니다. 조직의 구조와 필요에 맞게 보안 체계를 직접 구현할 수도 있습니다. 자세한 내용은 Salesforce 보안 가이드를 참고하시고, 여기에서 보안을 유지하는 데 필요한 내용을 확인할 수 있습니다.
문제 해결
위의 단계를 따라 Salesforce와의 Gantt 통합을 구현했는데 페이지에서 Gantt의 작업과 연결이 렌더링되지 않는 경우, [리소스 문제 해결 Backend Integration Issues 가이드] 문서를 참고하십시오. 문제의 근본 원인을 식별하는 방법을 설명합니다.
다음 단계
이제 완전히 작동하는 간트를 가지게 되었습니다. 전체 코드를 [GitHub]에서 확인하거나 클론하거나 다운로드하여 프로젝트에 사용할 수 있습니다.
또한 [gantt의 다양한 기능에 대한 가이드]를 확인하거나 [다른 백엔드 프레임워크와의 Gantt 통합 튜토리얼]을 참조해 보세요.