Node.js와 함께하는 dhtmlxGantt
현재 튜토리얼은 서버 측에서 Node.js와 REST API를 사용해 Gantt를 생성하는 것을 목적으로 합니다. 다른 기술을 사용하는 경우, 아래에 나열된 사용 가능한 통합Variants를 확인하십시오:
- dhtmlxGantt with ASP.NET Core
- dhtmlxGantt with ASP.NET MVC
- dhtmlxGantt with Python
- dhtmlxGantt with PHP: Laravel
- dhtmlxGantt with PHP:Slim
- dhtmlxGantt with Salesforce LWC
- dhtmlxGantt with Ruby on Rails
Node.js를 이용한 Gantt 구현은 서버와의 통신에 사용될 REST API를 기반으로 합니다. Node.js에는 이미 완성된 솔루션들이 많아 처음부터 모든 것을 코딩할 필요가 없으며, 데이터 저장소로 MySQL도 사용할 예정입니다.
전체 소스 코드는 GitHub에서 확인할 수 있습니다.
Node.js를 사용해 Gantt 차트를 생성하는 방법을 보여주는 비디오 가이드도 확인하실 수 있습니다.
1단계. 프로젝트 생성
먼저 프로젝트 폴더를 만들고 필요한 의존성을 추가합니다. 다음 모듈들을 사용합니다:
- Express - Node.js용 아주 작은 프레임워크
- body-parser - Node.js 파싱 도구
다음과 같이 프로젝트 폴더의 이름을 "dhx-gantt-app"으로 만들어 봅시다:
mkdir dhx-gantt-app
cd dhx-gantt-app
의존성 추가
이제 package.json 파일을 생성합니다. 다음 명령으로 의존성을 포함시킵니다:
npm init -y
파일이 준비되면 위에 나열된 의존성을 추가합니다. 결과는 다음과 비슷하게 보일 것입니다:
{
  "name": "dhx-gantt-app",
  "version": "1.0.3",
  "description": "",
  "main": "server.js",
  "dependencies": {
    "body-parser": "^2.2.1",
    "express": "^5.2.1"
  },
  "scripts": {
    "test": "echo "Error: no test specified" && exit 1",
    "start": "node server.js"
  },
  "keywords": [],
  "author": "",
  "license": "MIT"
}
마지막으로 아래 명령으로 추가된 의존성을 설치합니다:
npm install
백엔드 준비
다음과 같이 기본적인 express 설정을 따릅니다. 앱 백엔드용으로 하나의 js 파일(예: "server.js"), 정적 파일용 폴더("public"), 단일 HTML 페이지를 만들어 사용합니다.
전체 프로젝트 구조는 아래와 같습니다:
dhx-gantt-app
├── node_modules
├── server.js
├── package.json
└── public
    └── index.html
새 파일 server.js를 만들고 아래 코드를 추가합니다:
const express = require('express');
const bodyParser = require('body-parser');
const path = require('path');

const port = 1337;
const app = express();

app.use(express.static(path.join(__dirname, "public")));
app.use(bodyParser.urlencoded({ extended: true }));

app.listen(port, () =>{
    console.log("Server is running on port "+port+"...");
});
이 코드에서 한 일:
- 정적 파일은 'public' 폴더에서 제공되도록 정의
- 로컬호스트의 1337 포트에 애플리케이션을 연결
다음 단계에서는 "public" 폴더를 생성합니다. 이 폴더에는 애플리케이션의 메인 페이지인 index.html이 들어갈 것입니다.
이 폴더는 dhtmlxGantt의 js/css 파일을 넣기에 적합한 위치이기도 합니다. 다만 이 튜토리얼에서는 CDN에서 gantt를 로드하므로 그곳에 HTML 페이지만 두면 됩니다.
2단계. 페이지에 Gantt 추가
먼저 public 폴더를 만들고 그 안에 index.html 파일을 넣습니다. 그런 ��다음 index.html 파일을 열고 아래 내용을 채워 넣습니다:
<!DOCTYPE html>
<head>
  <meta http-equiv="Content-type" content="text/html; charSet="utf-8"">

  <script src="https://cdn.dhtmlx.com/gantt/edge/dhtmlxgantt.js"></script>
  <link href="https://cdn.dhtmlx.com/gantt/edge/dhtmlxgantt.css" rel="stylesheet">

  <style type="text/css">
    html, body{
      height:100%;
      padding:0px;
      margin:0px;
      overflow: hidden;
    }
  </style>
</head>
<body>
  <div id="gantt_here" style='width:100%; height:100%;'></div>
  <script type="text/javascript">
    gantt.init("gantt_here");
  </script>
</body>
지금까지의 작업 내용을 확인해 봅시다. 프로젝트 폴더로 이동해 명령줄에서 아래 명령을 실행합니다:
node server.js
그런 다음 브라우저에서 (http://127.0.0.1:1337) 를 열면 아래와 같은 빈 Gantt 페이지가 나타납니다:

3단계. 데이터베이스 준비
다음 단계는 데이터베이스를 만드는 것입니다. 작업과 링크를 위한 두 개의 간단한 테이블로 구성된 데이터베이스를 만듭니다:
CREATE TABLE `gantt_links` (
  `id` int(11) NOT NULL AUTO_INCREMENT,
  `source` int(11) NOT NULL,
  `target` int(11) NOT NULL,
  `type` varchar(1) NOT NULL,
  PRIMARY KEY (`id`)
);
CREATE TABLE `gantt_tasks` (
  `id` int(11) NOT NULL AUTO_INCREMENT,
  `text` varchar(255) NOT NULL,
  `start_date` datetime NOT NULL,
  `duration` int(11) NOT NULL,
  `progress` float NOT NULL,
  `parent` int(11) NOT NULL,
  PRIMARY KEY (`id`)
);
그리고 테스트 데이터를 추가합니다:
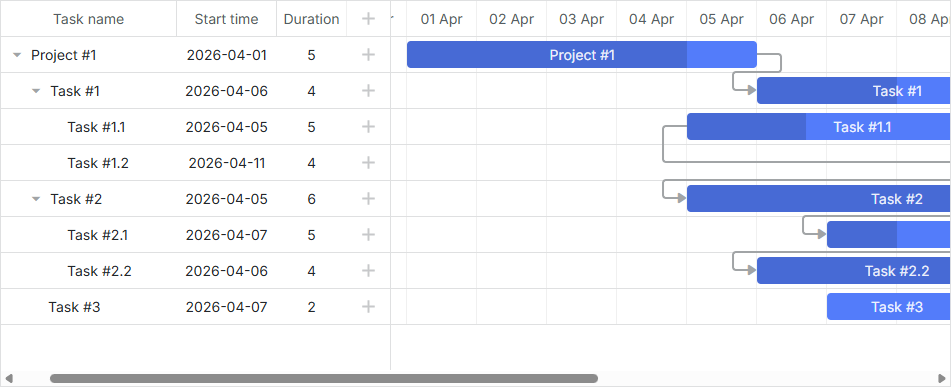
INSERT INTO `gantt_tasks` VALUES ('1', 'Project #1', '2026-04-01 00:00:00',
  '5', '0.8', '0');
INSERT INTO `gantt_tasks` VALUES ('2', 'Task #1', '2026-04-06 00:00:00',
  '4', '0.5', '1');
INSERT INTO `gantt_tasks` VALUES ('3', 'Task #2', '2026-04-05 00:00:00',
  '6', '0.7', '1');
INSERT INTO `gantt_tasks` VALUES ('4', 'Task #3', '2026-04-07 00:00:00',
  '2', '0', '1');
INSERT INTO `gantt_tasks` VALUES ('5', 'Task #1.1', '2026-04-05 00:00:00',
  '5', '0.34', '2');
INSERT INTO `gantt_tasks` VALUES ('6', 'Task #1.2', '2026-04-11 13:22:17',
  '4', '0.5', '2');
INSERT INTO `gantt_tasks` VALUES ('7', 'Task #2.1', '2026-04-07 00:00:00',
  '5', '0.2', '3');
INSERT INTO `gantt_tasks` VALUES ('8', 'Task #2.2', '2026-04-06 00:00:00',
  '4', '0.9', '3');
자세한 예제는 여기를 확인하십시오.
4단계. 데이터 로딩
이제 데이터 로딩을 구현해야 합니다.
MySQL을 사용하므로 접속에 사용할 필요한 모듈들을 설치해야 합니다. 이 튜토리얼에서는 CRUD 연산을 프로미스 방식으로 구현합니다. 따라서 Promise 기반의 promise-mysql과 mbluebird 프로미스 라이브러리를 사용합니다.
다음 명령으로 모듈들을 설치합니다. 서로 호환되지 않는 newer 버전 때문에 특정 버전을 지정해야 합니다:
npm install bluebird@3.7.2 --save
npm install promise-mysql@5.1.0 --save
npm install date-format-lite@17.7.0 --save
다른 적합한 모듈도 선택할 수 있습니다. 코드는 비교적 단순하며 다른 도구 세트를 사용해도 동일한 로직을 구현할 수 있습니다.
클라이언트 측은 데이터를 JSON 형식으로 받길 기대합니다. 따라서 서버에서 이러한 데이터를 반환하는 경로를 만들어야 합니다.
앞서 언급한 대로 데이터에는 날짜 객체로 보관되는 "start_date" 속성이 있습니다. 클라이언트에 올바른 형식으로 전달되어야 하므로 다른 모듈을 사용해 형식을 맞춰 줍니다. 이를 위해 또 다른 모듈인 date-format-lite를 사용할 겁니다.
npm install date-format-lite --save
이제 server.js 파일을 열어 아래 코드로 업데이트합니다:
const express = require('express');
const bodyParser = require('body-parser');
const path = require('path');

const port = 1337;
const app = express();

app.use(express.static(path.join(__dirname, "public")));
app.use(bodyParser.urlencoded({ extended: true }));

app.listen(port, () =>{
    console.log("Server is running on port "+port+"...");
});

const Promise = require('bluebird');
require("date-format-lite");

const mysql = require('promise-mysql');
async function serverСonfig() {
    const db = await mysql.createPool({
        host: 'localhost',
        user: 'root',
        password: '',
        database: 'gantt_howto_node'
    });
    app.get("/data", (req, res) => {
        Promise.all([
            db.query("SELECT * FROM gantt_tasks"),
            db.query("SELECT * FROM gantt_links")
        ]).then(results => {
            let tasks = results[0],
                links = results[1];

            for (let i = 0; i < tasks.length; i++) {
              tasks[i].start_date = tasks[i].start_date.format("YYYY-MM-DD hh:mm:ss");
            }

            res.send({
                data: tasks,
                collections: { links }
            });

        }).catch(error => {
            sendResponse(res, "error", null, error);
        });
    });

    function sendResponse(res, action, tid, error) {

        if (action == "error")
            console.log(error);

        let result = {
            action: action
        };
        if (tid !== undefined && tid !== null)
            result.tid = tid;

        res.send(result);
    }
};
serverСonfig();
이 코드에서 한 일:
- 데이터베이스에 대한 MySql 연결을 열었습니다
- GET /data 요청 시 tasks와 links 테이블에서 데이터를 읽고 클라이언트에서 파싱될 수 있도록 형식화하도록 정의했습니다
다음으로 클라이언트에서 이 경로를 호출합니다:
gantt.config.date_format = "%Y-%m-%d %H:%i:%s";/*!*/
gantt.config.open_tree_initially = true;

gantt.init("gantt_here");

gantt.load("/data");/*!*/
참고로 date_format 설정은 서버로부터 오는 작업의 시작 날��짜(start_date)의 형식을 지정합니다. gantt.config.open_tree_initially 설정은 트리가 처음에 확장되도록 true로 설정됩니다.
이제 (http://127.0.0.1:1337) 을 열어 애플리케이션을 실행해 보십시오. 데이터베이스에 미리 추가해 둔 테스트 데이터로 Gantt가 로드됩니다.

5단계. 변경사항 저장
마지막으로 구현해야 할 것은 데이터 저장입니다. 클라이언트에서 발생하는 업데이트를 다시 서버로 전송하는 코드가 필요합니다. <public/index.html>에 gantt.createDataProcessor을 페이지에 추가합니다:
gantt.config.date_format = "%Y-%m-%d %H:%i:%s";

gantt.init("gantt_here");

gantt.load("/data");

const dp = gantt.createDataProcessor({ /*!*/
  url: '/data', /*!*/
  mode: 'REST', /*!*/
}); /*!*/
이제 이 데이터 프로세서가 어떤 역할을 하는지 더 자세히 살펴봅시다.
요청과 응답
사용자가 작업 추가, 수정 또는 삭제를 할 때마다 DataProcessor는 AJAX 요청을 해당 URL로 보냅니다. 이 요청은 데이터베이스에 변경 내용을 저장하는 데 필요한 모든 매개변수를 포함합니다.
DataProcessor가 REST 모드로 초기화되어 있기 때문에 각 작업 유형에 대해 서로 다른 HTTP 동사를 사용합니다. HTTP 동사와 요청/응답의 상세 내용은 Server-Side Integration 문서에 있습니다.
이제 해야 할 일은 서버 쪽에 필요한 라우트와 핸들러를 추가하여 클라이언트에서 변경된 내용을 데이터베이스에 반영하는 것입니다. 결과 코드는 상당히 방대해질 수 있습니다:
// add a new task
app.post("/data/task", (req, res) => {
    let task = getTask(req.body);
    const { text, start_date, duration, progress, parent } = task;

    db.query("INSERT INTO gantt_tasks(text, start_date, duration, progress, parent)"
        + " VALUES (?,?,?,?,?)",
        [text, start_date, duration, progress, parent])
    .then(result => {
        sendResponse(res, "inserted", result.insertId);
    })
    .catch(error => {
        sendResponse(res, "error", null, error);
    });
});

// update a task
app.put("/data/task/:id", (req, res) => {
    let sid = req.params.id,
        task = getTask(req.body);
    const { text, start_date, duration, progress, parent } = task;

    db.query("UPDATE gantt_tasks SET text = ?, start_date = ?, "
        + "duration = ?, progress = ?, parent = ? WHERE id = ?",
        [text, start_date, duration, progress, parent, sid])
    .then(result => {
        sendResponse(res, "updated");
    })
    .catch(error => {
        sendResponse(res, "error", null, error);
    });
});


// delete a task
app.delete("/data/task/:id", (req, res) => {
    let sid = req.params.id;
    db.query("DELETE FROM gantt_tasks WHERE id = ?", [sid])
    .then(result => {
        sendResponse(res, "deleted");
    })
    .catch(error => {
        sendResponse(res, "error", null, error);
    });
});

// add a link
app.post("/data/link", (req, res) => {
    let link = getLink(req.body);
    const { source, target, type } = link;

    db.query("INSERT INTO gantt_links(source, target, type) VALUES (?,?,?)",
        [source, target, type])
    .then(result => {
        sendResponse(res, "inserted", result.insertId);
    })
    .catch(error => {
        sendResponse(res, "error", null, error);
    });
});

// update a link
app.put("/data/link/:id", (req, res) => {
    let sid = req.params.id,
        link = getLink(req.body);
    const { source, target, type, sid } = link;

    db.query("UPDATE gantt_links SET source = ?, target = ?, type = ? WHERE id = ?",
        [source, target, type, sid])
    .then(result => {
        sendResponse(res, "updated");
    })
    .catch(error => {
        sendResponse(res, "error", null, error);
    });
});

// delete a link
app.delete("/data/link/:id", (req, res) => {
    let sid = req.params.id;
    db.query("DELETE FROM gantt_links WHERE id = ?", [sid])
    .then(result => {
        sendResponse(res, "deleted");
    })
    .catch(error => {
        sendResponse(res, "error", null, error);
    });
});


function getTask(data) {
    return {
        text: data.text,
        start_date: data.start_date.date("YYYY-MM-DD"),
        duration: data.duration,
        progress: data.progress || 0,
        parent: data.parent
    };
}

function getLink(data) {
    return {
        source: data.source,
        target: data.target,
        type: data.type
    };
}
두 집합의 라우트를 만들어 두 가지 엔티티, 즉 tasks 엔티티와 또 다른 하나인 links 엔티티에 대해 각각의 요청을 처리합니다. 따라서 URL의 "/data/task"는 작업과 관련된 요청의 처리를 담당하고, "/data/link"는 링크와 관련된 데이터를 다루기 위한 요청에 사용됩니다.
요청 유형은 아주 간단합니다:
- POST - 데이터베이스에 새로운 항목을 삽입
- PUT - 기존 레코드를 업데이트
- DELETE - 항목 제거
응답은 수행된 작업 유형이나 코드 실행 실패 시 "error"를 포함하는 JSON 객체가 됩니다.
POST 요청의 응답은 새로운 레코드의 데이터베이스 ID도 포함합니다. 이는 클라이언트에서 새로운 항목을 데이터베이스 엔티티와 매핑하는 데 사용됩니다.
이것으로 끝입��니다. (http://127.0.0.1:1337) 를 열어 완전히 동작하는 Gantt 차트를 확인해 보십시오.
작업 순서 저장
클라이언트 측의 Gantt는 Drag and Drop을 사용해 작업을 재정렬할 수 있습니다. 이 기능을 사용하려면 데이터베이스에 이 순서를 저장해야 합니다. 공통 설명은 [guides/server-side.md#storingtheorderoftasks]에서 확인하실 수 있습니다.
이제 이 기능을 애플리케이션에 추가해 봅시다.
클라이언트에서 작업 재정렬 활성화
먼저 사용자가 UI에서 작업의 순서를 변경하도록 허용해야 합니다. "Index" 뷰를 열고 gantt의 설정을 업데이트합니다:
gantt.config.order_branch = true;/*!*/
gantt.config.order_branch_free = true;/*!*/

gantt.init("gantt_here");
다음으로 백엔드에 이러한 변경을 반영합니다. 변경된 순서를 "sortorder" 컬럼에 저장하도록 하고, 업데이트된 gantt_tasks 테이블 선언은 아래와 같이 보일 수 있습니다:
CREATE TABLE `gantt_tasks` (
  `id` int(11) NOT NULL  AUTO_INCREMENT PRIMARY KEY,
  `text` varchar(255) COLLATE utf8_unicode_ci NOT NULL,
  `start_date` datetime NOT NULL,
  `duration` int(11) NOT NULL,
  `progress` float NOT NULL DEFAULT 0,
  `parent` int(11) NOT NULL,
  `sortorder` int(11) NOT NULL /*!*/
) ENGINE="InnoDB" DEFAULT CHARSET="utf8" COLLATE="utf8_unicode_ci;"
또는 이미 생성한 테이블에 열을 추가합니다:
ALTER TABLE `gantt_tasks` ADD COLUMN `sortorder` int(11) NOT NULL;
그 후, server.js 파일을 업데이트합니다:
- GET /data는
sortorder열에 따라 정렬된 작업을 반환해야 합니다:
app.get("/data", (req, res) => {
    Promise.all([
        db.query("SELECT * FROM gantt_tasks ORDER BY sortorder ASC"), /*!*/
        db.query("SELECT * FROM gantt_links")
    ]).then(results => {
        let tasks = results[0],
            links = results[1];

        for (let i = 0; i < tasks.length; i++) {
            tasks[i].start_date = tasks[i].start_date.format("YYYY-MM-DD hh:mm:ss");
            tasks[i].open = true;
        }

        res.send({
            data: tasks,
            collections: { links }
        });

    }).catch(error => {
        sendResponse(res, "error", null, error);
    });
});
- 새로 추가된 작업은 초기 값으로
sortorder를 받아야 합니다:
app.post("/data/task", (req, res) => { // adds new task to database
    let task = getTask(req.body);

    db.query("SELECT MAX(sortorder) AS maxOrder FROM gantt_tasks")
    .then(result => { /*!*/
        // assign max sort order to new task
        let orderIndex = (result[0].maxOrder || 0) + 1; /*!*/
        return db.query("INSERT INTO gantt_tasks(text, start_date, duration,"
          + "progress, parent, sortorder) VALUES (?,?,?,?,?,?)",
          [task.text, task.start_date, task.duration, task.progress, task.parent,
            orderIndex]); /*!*/
    })
    .then(result => {
        sendResponse(res, "inserted", result.insertId);
    })
    .catch(error => {
        sendResponse(res, "error", null, error);
    });
});
- 마지막으로, 사용자가 작업을 재정렬할 때 작업 순서는 업데이트되어야 합니다:
 // update task
app.put("/data/task/:id", (req, res) => {
  let sid = req.params.id,
    target = req.body.target,
    task = getTask(req.body);

  Promise.all([
    db.query("UPDATE gantt_tasks SET text = ?, start_date = ?,"
      + "duration = ?, progress = ?, parent = ? WHERE id = ?",
      [task.text, task.start_date, task.duration, task.progress,
        task.parent, sid]),
    updateOrder(sid, target) /*!*/
  ])
    .then(result => {
      sendResponse(res, "updated");
    })
    .catch(error => {
      sendResponse(res, "error", null, error);
    });
});

function updateOrder(taskId, target) {
  let nextTask = false;
  let targetOrder;

  target = target || "";

  if (target.startsWith("next:")) {
    target = target.substr("next:".length);
    nextTask = true;
  }

  return db.query("SELECT * FROM gantt_tasks WHERE id = ?", [target])
    .then(result => {
      if (!result[0])
        return Promise.resolve();

      targetOrder = result[0].sortorder;
      if (nextTask)
        targetOrder++;

      return db.query("UPDATE gantt_tasks SET sortorder"+
        " = sortorder + 1 WHERE sortorder >= ?", [targetOrder])
      .then(result => {
        return db.query("UPDATE gantt_tasks SET sortorder = ? WHERE id = ?",
          [targetOrder, taskId]);
      });
    });
}
GitHub에서 준비된 데모를 확인하실 수 있습니다: https://github.com/DHTMLX/gantt-howto-node
어플리케이션 보안
Gantt는 SQL 인젝션이나 XSS 및 CSRF 공격과 같은 다양한 위협으로부터 애플리케이션을 방지하는 수단을 제공하지 않습니다. 애플리케이션의 보안을 책임지는 주체는 백엔드를 구현하는 개발자들임이 중요합니다. 관련 내용은 해당 문서의 서브 문서에서 자세히 확인하십시오.
문제 해결
위의 Node.js 통합 단계를 완료했지만 페이지에서 Gantt가 작업과 링크를 렌더링하지 않는 경우, Troubleshooting Backend Integration Issues 문서를 참조하십시오. 문제의 원인을 식별하는 방법에 대해 다룹니다.
다음 단계
이제 완전하게 동작하는 Gantt를 얻었습니다. 전체 코드는 GitHub에서 확인하거나 클론/다운로드하여 프로젝트에 사용할 수 있습니다.
또한 guides on the numerous features of gantt나 다른 백엔드 프레임워크와의 Gantt 통합에 대한 튜토리얼을 확인해 보실 수 있습니다.