Ruby on Rails와 함께하는 dhtmlxGantt
이 문서에서는 Ruby on Rails 백엔드를 사용하는 간트 차트 생성 방법을 배웁니다.
이 애플리케이션을 구현�하기 위해 Ruby 2.4.1, Rails 5.1.3 및 MySQL을 사용할 예정입니다. 이 튜토리얼은 모든 전제 조건이 이미 설치되어 있다고 가정합니다.
그렇지 않으면 먼저 공식 튜토리얼을 방문해 보십시오.
다른 기술을 사용하는 경우 아래의 사용 가능한 통합 변형 목록을 확인하십시오:
- ASP.NET Core와 함께하는 dhtmlxGantt
- ASP.NET MVC와 함께하는 dhtmlxGantt
- Node.js와 함께하는 dhtmlxGantt
- Python과 함께하는 dhtmlxGantt
- PHP: Laravel과 함께하는 dhtmlxGantt
- PHP:Slim과 함께하는 dhtmlxGantt
- Salesforce LWC와 함께하는 dhtmlxGantt
GitHub의 데모도 살펴보세요.
Step 1. 프로젝트 생성
새 프로젝트를 추가하려면 터미널에서 다음 명령을 실행하세요:
rails new gantt-app -d mysql
Step 2. 페이지에 Gantt 추가하기
먼저 애플리케이션용 컨트롤러와 기본 페이지를 생성하는 것으로 시작합니다.
응용 프로그램 폴더로 이동하고 index 액션이 있는 새 컨트롤러를 생성합니다:
cd gantt-app
rails generate controller gantt index
출력 내용에 새 파일이 생성�되었음을 확인하는 메시지가 표시되어야 합니다.
기본 라우트 설정
라우팅 구성을 위해 파일 config/routes.rb(를) 열고 기본 경로를 새 컨트롤러의 "index" 액션으로 변경합니다:
Rails.application.routes.draw do
  root :to => "gantt#index"
end
그 후 명령줄에서 서버를 실행하여 테스트할 수 있습니다:
rails server
브라우저에서 http://localhost:3000/ 을 열면 다음과 같은 결과가 표시되어야 합니다:
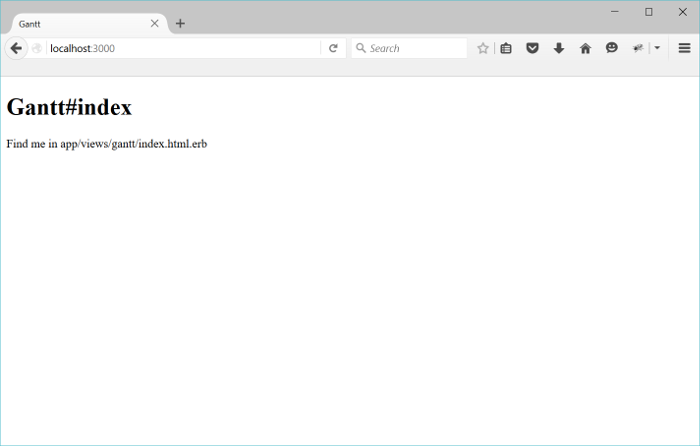
따라서 앱이 작동하고 기본 페이지가 표시되며 이제 Gantt 차트를 추가할 수 있습니다.
View에 Gantt 추가하기
이제 페이지에 Gantt 차트를 추가할 준비가 되었습니다. 레이아웃 페이지를 열어 head 태그에 yield를 추가합니다. 이를 통해 페이지에 dhtmlxgantt 파일을 포함시킬 수 있습니다:
<!DOCTYPE html>
<html>
<head>
  <title>dhtmlxGantt</title>
  (= stylesheet_link_tag 'application', media:'all','data-turbolinks-track' => true )
  (= javascript_include_tag 'application', 'data-turbolinks-track' => true )
  (= yield(:head) ) /*!*/
  (= csrf_meta_tags )
</head>
<body>

    (= yield )

</body>
</html>
그다음 gantt/index 뷰로 이동하여 거기에 Gantt 차트를 추가합니다:
( content_for :head do )
    (= stylesheet_link_tag 'https://cdn.dhtmlx.com/gantt/edge/dhtmlxgantt.css' )
    (= javascript_include_tag 'https://cdn.dhtmlx.com/gantt/edge/dhtmlxgantt.js' )
( end )

<div id="gantt_here" style='width:100%; height:800px;'></div>

<script>
    gantt.init("gantt_here");
</script>
CDN에서 dhtmlxGantt 파일을 사용하도록 설정했습니다. 로컬에서 작업하려면 다운로드 패키지에 포함된 가독 가능한 버전의 소스 코드를 사용하는 것이 좋습니다.
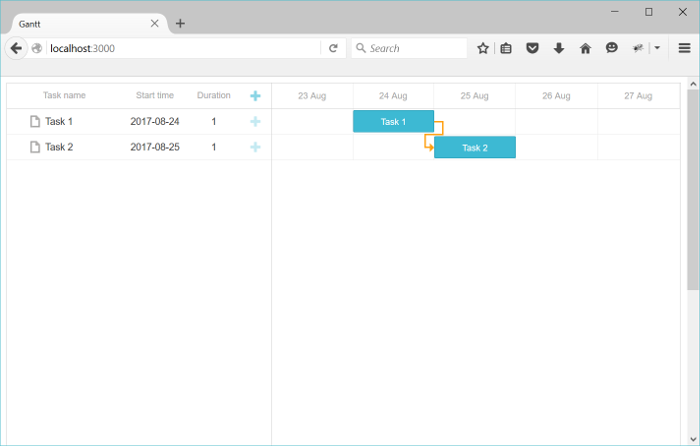
그런 다음 현재 결과를 확인해 보겠습니다. 브라우저에서 http://localhost:3000/ 를 열면 데이터베이스의 작업과 링크로 채워진 간트 차트를 볼 수 있습니다. 다만 변경 사항은 아직 데이터베이스에 저장되지 않습니다. 다음 단계에서 저장 기능을 구현합니다.

이제 작업을 추가하고 수정할 수 있는 Gantt 차트를 얻었지만 저장 기능이 없습니다. 이를 제공하기 위해 모델을 생성해야 합니다.
Step 3. 모델 생성
현재 MySQL을 사용하므로 config/database.yml에 올바른 연결 설정이 있는지 확인합니다. 예시는 다음과 같습니다:
development:
  adapter: mysql2
  encoding: utf8
  host: localhost
  database: gantt-app
  username: root
  password:
Task 모델을 만들려면 작업 속성을 포함하는 명령을 실행합니다:
rails generate model Task
    text:string
    start_date:datetime
    duration:integer
    parent:integer
    progress:decimal
링크(Link) 모델은 비슷하지만 더 짧은 명령을 사용합니다:
rails generate model Link
    source:integer
    target:integer
    link_type:string:limit1
참고로 dhtmlxgantt 링크 객체에는 type이라는 속성이 필요합니다. 이는 관계의 유형(시작-시작, 종료-종료 등)을 저장합니다. 이 속성은 ActiveRecord에서 이미 예약되어 있기 때문에 모델에 추가할 수 없으므로, 이 속성의 이름은 link_type으로 지정하고 컨트롤러에서 필요한 매핑을 수행합니다.
Task 객체와 Link 객체에 대해 필수 및 선택 속성의 전체 목록은 각각 Task object와 Link object에서 확인할 수 있습니다.
그다음 데이터베이스를 업데이트하기 위한 마이그레이션을 실행합니다:
rake db:migrate
여기에서 테스트 데이터를 몇 가지 추가해 보겠습니다:
- Rails 콘솔을 열려면 다음을 실행합니다:
rails c
- 다음과 같이 두 개의 작업(Task) 및 링크를 추��가합니다:
Task.create :text=>"Task 1", :start_date=>"2015-10-25",  :duration=>2, :progress=>0;
Task.create :text=>"Task 2", :start_date=>"2015-10-27",  :duration=>3, :progress=>0.5;
Link.create :source=>1, :target=>2, :link_type=>"0";
- 콘솔을 닫으려면 "exit"를 입력합니다.
다음으로 차트에서 데이터 로딩 및 저장을 컨트롤러의 도움으로 구현합니다.
Step 4. 데이터 로딩
모델 클래스를 생성하고 마이그레이션을 실행한 후 데이터베이스의 데이터를 gantt로 로드할 수 있습니다.
dhtmlxGantt는 JSON 형식의 데이터를 기대하므로 먼저 GanttController에 gantt 데이터를 읽고 형식화한 다음 출력하는 새 액션을 추가합니다:
class GanttController < ApplicationController
  def index
  end

  def data
    tasks = Task.all
    links = Link.all

    render :json=>{
      :data => tasks.map{|task|{
        :id => task.id,
        :text => task.text,
        :start_date => task.start_date.to_formatted_s(:db),
        :duration => task.duration,
        :progress => task.progress,
        :parent => task.parent,
        :open => true
      }},
      :links => links.map{|link|{
        :id => link.id,
        :source => link.source,
        :target => link.target,
        :type => link.link_type
      }}
    }
  end
end
이 액션에 대한 라우트를 routes.rb에 추가합니다:
Rails.application.routes.draw do
  root :to => "gantt#index"

  scope '/api' do/*!*/
    get "/data", :to => "gantt#data"/*!*/
  end/*!*/
end
그리고 클라이언트 측에서 gantt.load 메서드를 사용해 이 액션을 호출합니다:
gantt.config.date_format = "%Y-%m-%d %H:%i:%s";/*!*/

gantt.init("gantt_here");
gantt.load("/api/data");/*!*/
date_format 구성은 서버에서 오는 형식의 날짜들( Task의 start_date)을 지정합니다.
서버를 실행하고 브라우저에서 http://localhost:3000/ 을 열면 데이터베이스의 작업과 링크로 채워진 간트 차트를 볼 수 있습니다. 다만 변경 내용은 데이터베이스로 되돌려지지 않습니다. 다음 단계에서 이를 해결합니다.
Step 5. 변경 사항 저장
dhtmlxGantt는 사용자가 만든 모든 변경 사항을 백엔드의 RESTful API로 전송할 수 있으며, 그곳에서 데이터베이스에 저장될 수 있습니다. 프로토콜의 세부 정보는 여기를 확인하십시오.
이제 데이터 저장을 구현하는 방법은 다음과 같습니다:
먼저 클라이언트에서 변경 내용을 게시하도록 설정합니다:
gantt.config.date_format = "%Y-%m-%d %H:%i:%s";

gantt.init("gantt_here");
gantt.load("/api/data");

var dp = new gantt.dataProcessor("/api");/*!*/
dp.init(gantt);/*!*/
dp.setTransactionMode("REST");/*!*/
그다음 Task용 컨트롤러와 Link용 컨트롤러 두 개를 추가하고 필요한 모든 액션을 구현합니다.
Task 컨트롤러 생성
Tasks용 컨트롤러부터 시작합니다:
rails generate controller task --no-helper --no-assets --no-view-specs
이 컨트롤러는 뷰를 가지지 않으므로 필요하지 않은 파일 생성을 방지하기 위해 --no- 플래그를 사용했습니다.
다음으로 작업 생성, 업데이트 및 삭제를 위한 액션을 구현합니다:
class TaskController < ApplicationController
    protect_from_forgery

    def update
        task = Task.find(params["id"])
        task.text = params["text"]
        task.start_date = params["start_date"]
        task.duration = params["duration"]
        task.progress = params["progress"] || 0
        task.parent = params["parent"]
        task.save

        render :json => {:action => "updated"}
    end

    def add
        task = Task.create(
            :text => params["text"],
            :start_date=> params["start_date"],
            :duration => params["duration"],
            :progress => params["progress"] || 0,
            :parent => params["parent"]
        )

        render :json => {:action => "inserted", :tid => task.id}
    end

    def delete
        Task.find(params["id"]).destroy
        render :json => {:action => "deleted"}
    end
end
이 코드에 관한 몇 가지 주의사항:
- 모든 데이터가 이미 gantt#data에서 로드되므로 get 액션은 필요하지 않습니다.
- progress 속성은 클라이언트에서 기본적으로 초기화되지 않을 수 있으므로 여기에서 기본값을 제공해야 합니다. 필요하다면 모델 클래스에서 기본값을 정의할 수도 있습니다(예: migration).
- 새 항목을 생성하는 액션은 새로 삽입된 레코드의 데이터베이스 ID를 클라이언트로 반환해야 합니다.
그런 다음 구성의 새 라우트를 추가하고 사용자가 간트 차트에서 작업을 조회/생성/수정/삭제할 수 있도록 합니다:
Rails.application.routes.draw do
  root :to => "gantt#index"

  scope '/api' do
    get "/data", :to => "gantt#data"

    post "/task", :to => "task#add"/*!*/
    put "/task/:id", :to => "task#update"/*!*/
    delete "/task/:id", :to => "task#delete"/*!*/
  end
end
이제 Links에 대해서도 동일하게 구성합니다.
Link 컨트롤러 생성
Link 컨트롤러를 생성합니다:
rails generate controller link --no-helper --no-assets --no-view-specs
구현 예시는 다음과 같을 수 있습니다:
class LinkController < ApplicationController
    protect_from_forgery

    def update
        link = Link.find(params["id"])
        link.source = params["source"]
        link.target = params["target"]
        link.link_type = params["type"]
        link.save

        render :json => {:action => "updated"}
    end

    def add
        link = Link.create(
            :source => params["source"],
            :target => params["target"],
            :link_type => params["type"]
        )

        render :json => {:action => "inserted", :tid => link.id}
    end

    def delete
        Link.find(params["id"]).destroy
        render :json => {:action => "deleted"}
    end
end
그런 다음 새로운 액션에 대한 라우트를 추가합니다:
Rails.application.routes.draw do
  root :to => "gantt#index"

  scope '/api' do
    get "/data", :to => "gantt#data"

    post "/task", :to => "task#add"
    put "/task/:id", :to => "task#update"
    delete "/task/:id", :to => "task#delete"

    post "/link", :to => "link#add"/*!*/
    put "/link/:id", :to => "link#update"/*!*/
    delete "/link/:id", :to => "link#delete"/*!*/
  end
end
그게 전부입니다. 지금 애플리케이션을 실행하면 Rails와 MySQL 백엔드�를 사용하는 인터랙티브한 간트 차트를 얻을 수 있습니다:
더 많은 기능에 대해서는 가이드 페이지를 확인해 보세요.
작업 순서 저장
클라이언트 측의 간트 차트는 드래그 앤 드롭으로 작업 재정렬을 지원합니다. 이 기능을 사용하면 데이터베이스에 이 순서를 저장해야 합니다.
여기에서 일반적인 설명을 확인할 수 있습니다.
이제 이 기능을 앱에 추가해 보겠습니다.
클라이언트에서 작업 재정렬 활성화
우선 사용자가 UI에서 작업 순서를 변경할 수 있도록 해야 합니다. Index 뷰를 열고 gantt 구성 설정을 업데이트합니다:
gantt.config.order_branch = true;/*!*/
gantt.config.order_branch_free = true;/*!*/

gantt.init("gantt_here");
이 변경을 백엔드에도 반영해야 합니다. 순서 정보를 모델에 추가해야 하며 이름은 sortorder로 하겠습니다. 업데이트된 모델 선언은 다음과 같을 수 있습니다:
rails generate model Task
    text:string
    start_date:datetime
    duration:integer
    parent:integer
    progress:decimal
    sortorder:integer  /*!*/
또는 기존 모델에 새 속성을 추가할 수 있습니다:
- 마이그레이션 생성:
rails generate migration add_sortorder_to_tasks sortorder:integer
- 생성된 마이그레이션을 열고 "sortorder" 열에 기본값을 추가합니다:
class AddSortorderToTasks < ActiveRecord::Migration[5.1]
  def change
    add_column :tasks, :sortorder, :integer, :default=>0
  end
end
그리고 마이그레이션을 실행합니다:
rake db:migrate
그다음 컨트롤러의 CRUD를 업데이트합니다:
- data 액션은
sortorder열로 정렬된 작업을 반환해야 합니다:
class GanttController < ApplicationController
  def index
  end

  def data
    tasks = Task.all
    links = Link.all

    render :json=>{
      :data => tasks.order(:sortorder).map{|task|{ /*!*/
        :id => task.id,
        :text => task.text,
        :start_date => task.start_date.to_formatted_s(:db),
        :duration => task.duration,
        :progress => task.progress,
        :parent => task.parent,
        :open => true
      }},
      :links => links.map{|link|{
        :id => link.id,
        :source => link.source,
        :target => link.target,
        :type => link.link_type
      }}
    }
  end
end
- 새로 추가된 작업은 초기 값으로
sortorder를 받아야 합니다:
class TaskController < ApplicationController
    ...
    def add

        maxOrder = Task.maximum("sortorder") || 0/*!*/

        task = Task.create(
            :text => params["text"],
            :start_date=> params["start_date"],
            :duration => params["duration"],
            :progress => params["progress"] || 0,
            :parent => params["parent"],
            :sortorder => maxOrder + 1/*!*/
        )

        render :json => {:action => "inserted", :tid => task.id}
    end

end
- 마지막으로 사용자가 작업의 순서를 재정렬하면 작업 순서를 업데이트해야 합니다:
class TaskController < ApplicationController
    protect_from_forgery

    def update
        task = Task.find(params["id"])
        task.text = params["text"]
        task.start_date = params["start_date"]
        task.duration = params["duration"]
        task.progress = params["progress"] || 0
        task.parent = params["parent"]
        task.save

        if(params['target'])/*!*/
            Task.updateOrder(task.id, params['target'])/*!*/
        end/*!*/

        render :json => {:action => "updated"}
    end

    ...
end
Task.updateOrder 구현:
class Task < ApplicationRecord
    def self.updateOrder(taskId, target)
        nextTask = false
        targetId = target

        if(target.start_with?('next:'))
            targetId = target['next:'.length, target.length]
            nextTask = true;
        end

        if(targetId == 'null')
            return
        end

        targetTask = self.find(targetId)

        targetOrder = targetTask.sortorder

        if(nextTask)
            targetOrder += 1
        end

        self.where("sortorder >= ?", targetOrder).
            update_all('sortorder = sortorder + 1')

        task = self.find(taskId)
        task.sortorder = targetOrder
        task.save
    end
end
애플리케이션 보안
Gantt는 SQL 주입이나 XSS, CSRF 공격 등으로부터 애플리케이션을 안전하게 보호하는 수단을 제공하지 않습니다. 애플리케이션의 보안을 유지하는 책임은 백엔드를 구현하는 개발자에게 있습니다. 자세한 내용은 해당 문서를 참고하십시오.
문제 해결
위의 단계를 따라 Ruby on Rails와의 Gantt 통합을 구현했는데도 페이지에 작업과 링크가 렌더링되지 않는 경우에는 Backend 통합 문제 해결을 참조하시기 바랍니다. 문제의 원인을 식별하는 방법이 설명되어 있습니다.
What's next
이제 완전히 작동하는 간트 차트를 가지게 되었습니다. 전체 코드는 GitHub에서 확인하거나 복제(Clone) 또는 다운로드하여 프로젝트에 사용할 수 있습니다.
또한 가이드에서 간트의 다양한 기능을 확인하거나 다른 백엔드 프레임워크와의 Gantt 통합에 대한 튜토리얼을 확인해 보세요( integrations/howtostart-guides.md ).