PHP와 함께하는 dhtmlxGantt: Laravel
이 튜토리얼은 Laravel 앱에 dhtmlxGantt를 추가하는 방법을 설명합니다.
다른 플랫폼을 활용한 서버측 통합 구축에 대한 튜토리얼도 있습니다:
- ASP.NET MVC로 dhtmlxGantt 시작하기
- ASP.NET Core로 dhtmlxGantt 시작하기
- Node.js로 dhtmlxGantt 시작하기
- Python으로 dhtmlxGantt 시작하기
- PHP:Slim으로 dhtmlxGantt 시작하기
- Salesforce LWC로 dhtmlxGantt 시작하기
- Ruby on Rails로 dhtmlxGantt 시작하기
전체 소스 코드는 GitHub에서 확인할 수 있습니다.
PHP Laravel를 사용해 Gantt 차트를 만드는 방법을 보여주는 �비디오 가이드도 확인해 볼 수 있습니다.
1단계. 프로젝트 초기화
프로젝트 생성
다음 명령으로 Composer를 사용해 새 애플리케이션을 만듭니다:
composer create-project laravel/laravel gantt-laravel-app
필요한 파일들을 다운로드하고 생성하는 데에 잠시 걸립니다. 모든 작업이 완료되면 지금까지의 상태가 올바른지 확인할 수 있습니다. 프로젝트 폴더로 이동한 뒤 데이터베이스 마이그레이션을 실행합니다:
cd gantt-laravel-app
php artisan migrate
이제 서버를 실행할 수 있습니다:
php artisan serve
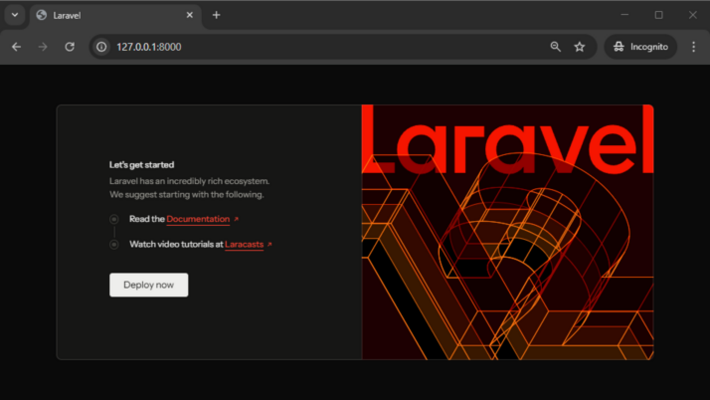
이 단계에서 기본 Laravel 페이지가 표시되어야 합니다:
2단계. 페이지에 Gantt 추가
뷰 추가
먼저 애플리케이션에 dhtmlxGantt를 포함한 새 페이지를 추가합니다. resources/views 폴더로 이동해 gantt.blade.php라는 새 뷰를 만듭니다:
<!DOCTYPE html>
<head>
<meta http-equiv="Content-type" content="text/html; charSet='utf-8'">
<script src="https://cdn.dhtmlx.com/gantt/edge/dhtmlxgantt.js"></script>
<link href="https://cdn.dhtmlx.com/gantt/edge/dhtmlxgantt.css" rel="stylesheet">
<style type="text/css">
html, body{
height:100%;
padding:0px;
margin:0px;
overflow: hidden;
}
</style>
</head>
<body>
<div id="gantt_here" style='width:100%; height:100%;'></div>
<script type="text/javascript">
gantt.init("gantt_here");
</script>
</body>
~~~
여기서는 간단한 HTML 레이아웃을 정의하고 [CDN](/guides/cdn-links-list)에서 dhtmlxGantt의 소스를 추가한 다음 [init](/api/method/init) 메서드를 사용해 gantt를 초기화했습니다.
또한 문서 본문과 gantt 컨테이너의 **100% 높이**를 지정했습니다. 간트는 컨테이너의 크기를 사용하므로 초기 크기가 필요합니다.
### 기본 라우트 변경
새 페이지를 추가한 후에는 브라우저에서 접근 가능하도록 해야 합니다. 이 튜토리얼에서는 우리의 gantt를 앱의 기본 페이지�로 만들 것입니다.
*b routes/web.php*로 가서 기본 경로를 변경합니다:
~~~php title="routes/web.php"
<?php
Route::get('/', function () {
return view('gantt');
});
~~~
다시 앱을 실행해 제대로 작동하는지 확인합니다:

## 3단계. 모델과 마이그레이션 생�성
비어 있는 간트 차트가 생겼으니 데이터베이스에 연결하고 데이터로 채워 넣어봅시다.
### 데이터베이스 생성
*.env*에서 데이터베이스 구성을 업데이트해야 합니다. 예시:
~~~php title=".env"
DB_CONNECTION="mysql"
DB_HOST="127.0.0.1"
DB_PORT="3306"
DB_DATABASE="gantt-test"
DB_USERNAME="root"
DB_PASSWORD=
~~~
다음 단계는 [모델 클래스](https://laravel.com/docs/12.x/eloquent)와 [마이그레이션](https://laravel.com/docs/12.x/migrations)을 생성하는 것입니다. Artisan 명령으로 클래스와 마이그레이션 파일을 생성할 수 있습니다:
~~~js
php artisan make:model Task --migration
~~~
그리고
~~~js
php artisan make:model Link --migration
~~~
그 후 `database/migrations` 폴더에서 마이그레이션 파일을 찾아 [데이터베이스 스키마](https://laravel.com/docs/12.x/migrations#migration-structure)를 정의합니다. 간트가 요구하는 데이터베이스 스키마는 [여기](/guides/loading#databasestructure)에서 확인할 수 있습니다.
Tasks 테이블의 코드는 다음과 같습니다:
```php title="database/migrations/_create_tasks_table.php"
<?php
use Illuminate\Support\Facades\Schema;
use Illuminate\Database\Schema\Blueprint;
use Illuminate\Database\Migrations\Migration;
class CreateTasksTable extends Migration
{
public function up()
{
Schema::create('tasks', function (Blueprint $table){
$table->increments('id');
$table->string('text');
$table->integer('duration');
$table->float('progress');
$table->dateTime('start_date');
$table->integer('parent');
$table->timestamps();
});
}
public function down()
{
Schema::dropIfExists('tasks');
}
}
~~~
다음은 Links 테이블에 대한 코드입니다:
```php title="database/migrations/_create_links_table.php"
<?php
use Illuminate\Support\Facades\Schema;
use Illuminate\Database\Schema\Blueprint;
use Illuminate\Database\Migrations\Migration;
class CreateLinksTable extends Migration
{
public function up()
{
Schema::create('links', function (Blueprint $table) {
$table->increments('id');
$table->string('type');
$table->integer('source');
$table->integer('target');
$table->timestamps();
});
}
public function down()
{
Schema::dropIfExists('links');
}
}
~~~
그리고 마이그레이션을 실행합니다:
~~~php
php artisan migrate
~~~
또한, 앱에 테스트 데이터를 생성할 수 있습니다. [시더 Seeder](https://laravel.com/docs/12.x/seeding) 클래스를 Artisan 명령으로 생성합니다:
~~~php
php artisan make:seeder TasksTableSeeder
php artisan make:seeder LinksTableSeeder
~~~
이제 *database/seeders* 폴더를 열고 **TasksTableSeeder**에 데이터를 추가합니다:
```php title="database/seeds/TasksTableSeeder.php"
<?php
namespace Database\Seeders;
use Illuminate\Database\Seeder;
use Illuminate\Support\Facades\DB;
class TasksTableSeeder extends Seeder
{
public function run(): void
{
DB::table('tasks')->truncate();
DB::table('tasks')->insert([
['id'=>1, 'text'=>'Project #1', 'start_date'=>'2025-04-01 00:00:00',
'duration'=>5, 'progress'=>0.8, 'parent'=>0],
['id'=>2, 'text'=>'Task #1', 'start_date'=>'2025-04-06 00:00:00',
'duration'=>4, 'progress'=>0.5, 'parent'=>1],
['id'=>3, 'text'=>'Task #2', 'start_date'=>'2025-04-05 00:00:00',
'duration'=>6, 'progress'=>0.7, 'parent'=>1],
['id'=>4, 'text'=>'Task #3', 'start_date'=>'2025-04-07 00:00:00',
'duration'=>2, 'progress'=>0, 'parent'=>1],
['id'=>5, 'text'=>'Task #1.1', 'start_date'=>'2025-04-05 00:00:00',
'duration'=>5, 'progress'=>0.34, 'parent'=>2],
['id'=>6, 'text'=>'Task #1.2', 'start_date'=>'2025-04-11 00:00:00',
'duration'=>4, 'progress'=>0.5, 'parent'=>2],
['id'=>7, 'text'=>'Task #2.1', 'start_date'=>'2025-04-07 00:00:00',
'duration'=>5, 'progress'=>0.2, 'parent'=>3],
['id'=>8, 'text'=>'Task #2.2', 'start_date'=>'2025-04-06 00:00:00',
'duration'=>4, 'progress'=>0.9, 'parent'=>3]
]);
}
}
~~~
그다음 **LinksTableSeeder**에 대해서도 동일하게 수행합니다:
```php title="database/seeders/LinksTableSeeder.php"
<?php
namespace Database\Seeders;
use Illuminate\Database\Seeder;
use Illuminate\Support\Facades\DB;
class LinksTableSeeder extends Seeder
{
public function run(): void
{
DB::table('links')->truncate();
DB::table('links')->insert([
['id' => 1, 'source' => 2, 'target' => 3, 'type' => 0],
['id' => 2, 'source' => 3, 'target' => 4, 'type' => 1]
]);
}
}
~~~
그리고 DatabaseSeeder.php에서 테이블 시드를 호출합니다:
```php title="database/seeds/DatabaseSeeder.php"
<?php
namespace Database\Seeders;
use App\Models\Task;
use App\Models\Link;
use Database\Seeders\TasksTableSeeder;
use Database\Seeders\LinksTableSeeder;
use Illuminate\Database\Seeder;
class DatabaseSeeder extends Seeder
{
public function run(): void
{
$this->call(TasksTableSeeder::class);
$this->call(LinksTableSeeder::class);
}
}
~~~
그 후 명령줄에서 데이터베이스를 시드할 수 있습니다:
~~~php
php artisan db:seed
~~~
### 모델 클래스 정의
데이터는 [Eloquent 모델](https://laravel.com/docs/12.x/eloquent) 클래스를 통해 관리됩니다. 이전 단계에서 Task와 Link용 클래스를 이미 생성했습니다. 이들은 간트와 함께 작동하도록 특별한 변경 없이 사용할 수 있습니다.
다음으로 할 수 있는 일은 Task 클래스의 **open** [속성](/guides/loading#dataproperties)을 [JSON 응답](https://laravel.com/docs/12.x/eloquent-serialization)에 추가하는 것입니다. 이를 통해 클라이언트 측에 데이터를 로드할 때 프로젝트 트리가 확장됩니다. 그렇지 않으면 초기에는 모든 분기가 닫힌 상태일 것입니다.
Task 모델은 아래와 같이 보일 것입니다:
```php title="/app/Models/Task.php"
<?php
namespace App\Models;
use Illuminate\Database\Eloquent\Model;
class Task extends Model
{
protected $appends = ["open"];
public function getOpenAttribute(){
return true;
}
}
~~~
Link 모델은 변경이 필요하지 않습니다:
```php title="/app/Models/Link.php"
<?php
namespace App\Models;
use Illuminate\Database\Eloquent\Model;
class Link extends Model
{
}
~~~
## 4단계. 데이터 로딩
데이터베이스가 생성되고 모델이 정의되면 간트 차트에 데이터를 로드할 수 있습니다.
클라이언트 측은 아래 형식의 날짜를 필요로 하므로, 이러한 JSON을 생성하는 액션을 갖는 컨트롤러를 만들어봅시다:
```php title="app/Http/Controllers/GanttController.php"
<?php
namespace App\Http\Controllers;
use Illuminate\Http\JsonResponse;
use App\Models\Task;
use App\Models\Link;
class GanttController extends Controller
{
public function get(): JsonResponse
{
$tasks = Task::all();
$links = Link::all();
return response()->json([
"tasks" => $tasks,
"links" => $links
]);
}
}
~~~
그리고 클라이언트가 이 액션을 호출하도록 라우트를 등록합니다. [api.php 라우트 파일](https://laravel.com/docs/12.x/routing#basic-routing)에 이 라우트를 추가합니다:
```php title="routes/api.php"
<?php
use Illuminate\Support\Facades\Route;
use App\Http\Controllers\GanttController;
Route::get('/data', [GanttController::class, 'get']); /*!*/
~~~
이제 Laravel이 API 라우트를 올바르게 로드하도록 구성해 봅시다.
다음 명령으로 **RouteServiceProvider.php**를 생성합니다:
~~~php
php artisan make:provider RouteServiceProvider
~~~
그 다음 아래 내용으로 파일을 업데이트합니다:
```php title="Providers/RouteServiceProvider.php"
<?php
namespace App\Providers;
use Illuminate\Support\ServiceProvider;
use Illuminate\Support\Facades\Route;
class RouteServiceProvider extends ServiceProvider
{
public function boot(): void
{
Route::prefix('api')
->middleware('api')
->group(base_path('routes/api.php'));
}
}
~~~
그리고 뷰에서 이 액션을 호출합니다:
```js title="resources/views/gantt.blade.php"
gantt.config.date_format = "%Y-%m-%d %H:%i:%s";/*!*/
gantt.init("gantt_here");
gantt.load("/api/data");/*!*/
gantt.load 는 지정된 URL로 AJAX 요청을 보내고 앞서 정의한 대로 JSON 응답을 기대합니다.
또한, date_format 값을 지정한 것도 주목하세요. 이는 간트가 데이터 소스가 사용할 날짜 형식을 알 수 있도록 하여 클라이언트 측에서 이를 파싱할 수 있게 해 줍니다.
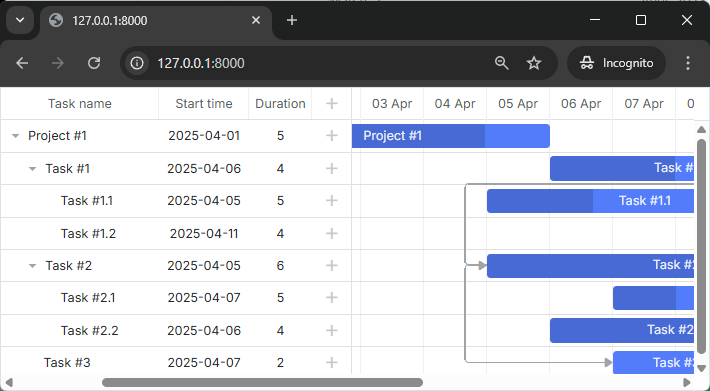
지금 앱을 확인하면 간트 차트에 이제 작업이 보일 것입니다:
5단계. 변경 내용 저장
지금까지 간트는 백엔드에서 데이터를 읽을 수 있습니다. 이제 백엔드로 변경 내용을 기록하도록 만듭시다.
클라이언트 측은 REST 모드에서 동작하며, 작업과 링크에 대해 POST/PUT/DELETE 요청을 보냅니다. 요청 형식과 간트가 사용할 모든 경로는 여기에서 확인할 수 있습니다.
이제 두 모델에 대한 동작을 처리하는 컨트롤러를 정의하고, 이를 위한 경로를 만들어 데이터 저장을 클라이언트 측에서 가능하게 해야 합니다.
컨트롤러 추가
먼저 컨트롤러부터 시작합니다. 각 모델에 대해 하나의 RESTful 리소스 컨트롤러를 만듭니다. 이는 모델을 추가/삭제 및 업데이트하는 메서드를 포함합니다.
Tasks용 컨트롤러
<?php

namespace App\Http\Controllers;

use Illuminate\Http\Request;
use App\Models\Task;

class TaskController extends Controller
{
	public function store(Request $request)
	{
		$data = $request->only(['text', 'start_date', 'duration', 'parent']);
		$data['progress'] = $request->input('progress', 0);

		$task = Task::create($data);

		return response()->json([
			'action' => 'inserted',
			'tid' => $task->id,
		]);
	}

	public function update(Request $request, $id)
	{
		$task = Task::findOrFail($id);

		$data = $request->only(['text', 'start_date', 'duration', 'parent']);
		$data['progress'] = $request->input('progress', 0);

		$task->update($data);

		return response()->json([
			'action' => 'updated',
		]);
	}

	public function destroy($id)
	{
		$task = Task::findOrFail($id);
		$task->delete();

		return response()->json([
			'action' => 'deleted',
		]);
	}
}
Task 모델 구성
컨트롤러 메서드가 작동하려면 대량 할당을 허용하도록 Task 모델을 구성해야 합니다. Laravel의 대량 할당 보호는 create()와 update() 메서드를 통해 채워질 수 있는 속성을 명시적으로 지정하도록 요구합니다.
$fillable 속성을 포함하도록 Task 모델을 업데이트합니다:
<?php

namespace App\Models;

use Illuminate\Database\Eloquent\Model;

class Task extends Model
{
    protected $fillable = ['text', 'start_date', 'duration', 'progress', 'parent']; /*!*/
    protected $appends = ["open"];

    public function getOpenAttribute(){
        return true;
    }
}
$fillable 배열은 대량 할당이 허용되는 필드를 지정합니다. 이는 사용자 입력으로 인해 원하지 않는 필드가 업데이트되는 것을 방지하는 보안 기능입니다.
그리고 이를 위한 라우트도 추가합니다:
<?php

use Illuminate\Support\Facades\Route;
use App\Http\Controllers\GanttController;
use App\Http\Controllers\TaskController;

Route::get('/data', [GanttController::class, 'get']);
Route::resource('task', TaskController::class); /*!*/
이 코드에 관한 몇 가지 주의사항:
- 새 작업이 삽입될 때 응답 객체의 tid 속성으로 클라이언트에 ID를 반환합니다
- 기본값으로 progress 매개변수를 설정합니다. 많은 요청 매개변수는 선택적이므로 클라이언트 측 작업에 해당 매개변수가 없으면 서버 동작으로 전송되지 않습니다.
- 응답 JSON은 추가 속성을 얼마든지 가질 수 있으며, 이들 속성은 모두 클라이언트 측 핸들러에서 접근할 수 있습니다.
이제 LinkController에 대해서도 동일한 구현을 진행해 봅시다.
링크용 컨트롤러
<?php

namespace App\Http\Controllers;

use Illuminate\Http\Request;
use App\Models\Link;

class LinkController extends Controller
{
	public function store(Request $request)
	{
		$link = Link::create($request->only(['type', 'source', 'target']));

		return response()->json([
			'action' => 'inserted',
			'tid' => $link->id,
		]);
	}

	public function update(Request $request, $id)
	{
		$link = Link::findOrFail($id);
		$link->update($request->only(['type', 'source', 'target']));

		return response()->json([
			'action' => 'updated',
		]);
	}

	public function destroy($id)
	{
		$link = Link::findOrFail($id);
		$link->delete();

		return response()->json([
			'action' => 'deleted',
		]);
	}
}
Link 모델 구성
Task 모델과 유사하게 Link 모델도 대량 할당에 대해 구성해야 합니다:
<?php

namespace App\Models;

use Illuminate\Database\Eloquent\Model;

class Link extends Model
{
    protected $fillable = ['type', 'source', 'target']; /*!*/
}
그리고 이의 라우트:
<?php

use Illuminate\Support\Facades\Route;
use App\Http\Controllers\GanttController;
use App\Http\Controllers\TaskController;
use App\Http\Controllers\LinkController;

Route::get('/data', [GanttController::class, 'get']);
Route::resource('task', TaskController::class);
Route::resource('link', LinkController::class); /*!*/
클라이언트 측에서 데이터 저장 활성화
마지막으로 구성指南에서 앞서 구현한 API를 사용하도록 클라이언트 측을 구성합니다:
gantt.config.date_format = "%Y-%m-%d %H:%i:%s";
gantt.init("gantt_here");
gantt.load("/api/data");

const dp = gantt.createDataProcessor({ /*!*/
	url: "/api", /*!*/
	mode: "REST" /*!*/
}); /*!*/
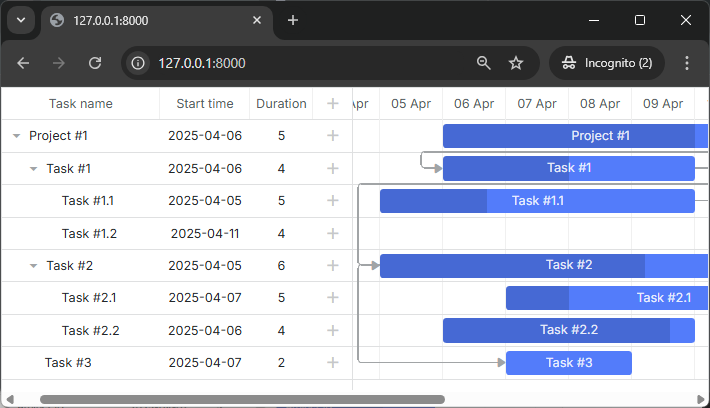
이제 작업과 링크를 조회, 추가, 업데이트 및 삭제할 수 있는 완전한 대화형 Gantt 차트가 있습니다.
더 많은 기능은 가이드를 참고해 주세요.
작업 순서 저장
클라이언트 측의 간트는 drag and drop을 사용한 작업 재정렬을 허용합니다. 이 기능을 사용하면 이 순서를 데이터베이스에 저장해야 합니다. 일반적인 설명은 여기에서 확인할 수 있습니다: 서버 측 가이드 저장 순서.
이 기능을 우리 앱에 추가해 보겠습니다.
클라이언트에서 작업 재정렬 활성화
먼저 사용자가 UI에서 작업 순서를 변경하도록 허용해야 합니다. Index 뷰를 열고 gantt의 구성을 업데이트��합니다:
gantt.config.order_branch = true;/*!*/
gantt.config.order_branch_free = true;/*!*/

gantt.init("gantt_here");
서버에서 작업 재정렬 활성화
이제 이러한 변경 사항을 백엔드에 반영합니다. 정렬 순서를 "sortorder" 열에 저장합니다. 전체 작업 스키마는 아래와 같이 보일 수 있습니다:
Schema::create('tasks', function (Blueprint $table){
	$table->increments('id');
	$table->string('text');
	$table->integer('duration');
	$table->float('progress');
	$table->dateTime('start_date');
	$table->integer('parent');
	$table->integer('sortorder')->default(0);
	$table->timestamps();
});
또는 앞서 생성한 스키마에 마이그레이션을 추가할 수 있습니다:
php artisan make:migration add_sortorder_to_tasks_table --table=tasks
마이그레이션 파일의 코드는 다음과 같습니다:
<?php

use Illuminate\Support\Facades\Schema;
use Illuminate\Database\Schema\Blueprint;
use Illuminate\Database\Migrations\Migration;

class AddSortorderToTasksTable extends Migration
{
	public function up()
	{
		Schema::table('tasks', function (Blueprint $table) {
			$table->integer('sortorder')->default(0);
		});
	}

	public function down()
	{
		Schema::table('tasks', function (Blueprint $table) {
			$table->dropColumn('sortorder');
		});
	}
}
~~~

마이그레이션을 적용합니다:

~~~
php artisan migrate
~~~

그 후에는 컨트롤러에서 CRUD를 업데이트해야 합니다.

1. <b>GET /data</b>는 `sortorder` 열로 정렬된 작업을 반환해야 합니다:

```php
```php title="app/Http/Controllers/GanttController.php"
<?php
namespace App\Http\Controllers;
use Illuminate\Http\JsonResponse;
use App\Models\Task;
use App\Models\Link;

class GanttController extends Controller
{
	public function get(): JsonResponse
	{
		$tasks = Task::orderBy('sortorder')->get(); /*!*/
		$links = Link::all();

		return response()->json([
			"tasks" => $tasks,
			"links" => $links
		]);
	}
}
- 새로 추가된 작업은 초기값
sortorder를 받아야 합니다:
public function store(Request $request)
{
	$data = $request->only(['text', 'start_date', 'duration', 'parent']);
	$data['progress'] = $request->input('progress', 0);
	$data['sortorder'] = Task::max('sortorder') + 1;

	$task = Task::create($data);

	return response()->json([
		'action' => 'inserted',
		'tid' => $task->id,
	]);
}
- 마지막으로 사용자가 작업을 재정렬하면, 작업 순서는 업데이트되어야 합니다:
public function update(Request $request, $id)
{
	$task = Task::findOrFail($id);

	$data = $request->only(['text', 'start_date', 'duration', 'parent']);
	$data['progress'] = $request->input('progress', 0);

	$task->update($data);

	if ($request->has('target')) {
		$this->updateOrder($id, $request->input('target'));
	}

	return response()->json([
		'action' => 'updated',
	]);
}

private function updateOrder($taskId, $target)
{
	$nextTask = false;
	$targetId = $target;

	if (str_starts_with($target, 'next:')) {
		$targetId = substr($target, strlen('next:'));
		$nextTask = true;
	}

	if ($targetId === 'null') {
		return;
	}

	$targetTask = Task::find($targetId);
	if (!$targetTask) {
		return;
	}

	$targetOrder = $targetTask->sortorder;
	if ($nextTask) {
		$targetOrder++;
	}

	Task::where('sortorder', '>=', $targetOrder)->increment('sortorder');

	$updatedTask = Task::find($taskId);
	$updatedTask->sortorder = $targetOrder;
	$updatedTask->save();
}
보안
간트는 SQL 주입이나 XSS 및 CSRF 공격 등 다양한 위협에 대한 방지 수단을 기본적으로 제공하지 않습니다. 애플리케이션의 보안을 안전하게 유지하는 책임은 백엔드를 구현하는 개발자에게 있습니다. 자세한 내용은 해당 기사에서 확인하십시오. (guides/app-security.md)
문제 해결
위의 PHP와의 간트 통합 구현 단계를 완료했는데도 간트가 페이지에 작업과 링크를 렌더링하지 않는 경우, guides/troubleshooting.md 기사를 확인해 보십시오. 문제의 원인을 파악하는 데 도움이 됩니다.
What's next
지금은 완전하게 작동하는 간트 차트를 보유하게 되었습니다. �전체 코드는 GitHub에서 확인하거나 클론/다운로드해 프로젝트에 사용할 수 있습니다.
또한 다수의 기능에 대한 가이드(guides.md)나 다른 백엔드 프레임워크와의 Gantt 통합 튜토리얼(integrations/howtostart-guides.md)을 확인할 수 있습니다.