Step 11. Add/Delete Records in the Grid
Our final functionality is adding and deleting records in the grid.
We will add/delete records by clicking the respective buttons in the toolbar.
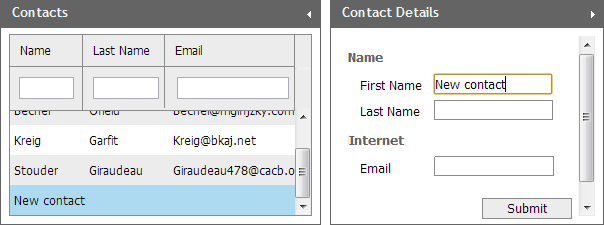
- When the user clicks the "Add" button, a new record - with the first name "New contact" - will be added to the end of the grid (and automatically to the database) and will take the selection. In its turn, the form will get the focus and make the "First Name" input active.

- When the user clicks the "Delete" button, the currently selected row will be deleted and the selection will be moved to the next row. In case, the currently selected row is the last one, the selection will be moved to one row up.
To provide the declared functionality, we will attach handler functions to the onClick event of our "Add"/"Delete" buttons.
To provide a possibility to add, delete records in the grid:
- Attach a handler function to the onClick event to process clicks on the 'Add' button:
"index.html"
The addRow method takes 3 parameters: the row's id, cells' values and row's index.toolbar.attachEvent("onclick",function(id){ if(id=="newContact"){ //'newContact' is the id of the button in the toolbar var rowId=contactsGrid.uid(); //generates an unique id var pos = contactsGrid.getRowsNum(); //gets the number of rows in grid contactsGrid.addRow(rowId,["New contact","",""],pos); //adds a new row }; });
- Attach a handler function to the onAfterUpdate event to select the newly-created record once the grid has gotten a response
from the server that the record has been successfully inserted into the database:
"index.html"
The setFocusOnFirstActive method makes the first form's input active, i.e. opens the editor for it.var dpg = new dataProcessor("data/contacts.php"); dpg.init(contactsGrid); dpg.attachEvent("onAfterUpdate", function(sid, action, tid, tag){ if (action == "inserted"){ contactsGrid.selectRowById(tid); //selects the newly-created row contactForm.setFocusOnFirstActive();//set focus to the 1st form's input }});
- Add a code to the onClick handler function to process clicks on the "Delete" button:
"index.html"
toolbar.attachEvent("onclick",function(id){
    if(id=="newContact"){
        var rowId=contactsGrid.uid();
        var pos = contactsGrid.getRowsNum();
        contactsGrid.addRow(rowId,["New contact","",""],pos);
        contactsGrid.selectRowById(rowId);
        contactForm.setFocusOnFirstActive();
    };
    if(id=="delContact"){
        var rowId = contactsGrid.getSelectedRowId();        var rowIndex = contactsGrid.getRowIndex(rowId);        if(rowId!=null){            contactsGrid.deleteRow(rowId);                if(rowIndex!=(contactsGrid.getRowsNum()-1)){                    contactsGrid.selectRow(rowIndex+1,true);                } else{                    contactsGrid.selectRow(rowIndex-1,true)                }        }    }});
That's all. We believe you have enjoyed the tutorial and got acquainted with the basic principles of building web apps with the DHTMLX library.
Follow our other tutorials to be a true DHTMLX expert.
Back to top
Follow our other tutorials to be a true DHTMLX expert.