Time and Date
A pair of date selectors for setting some time and date period.

scheduler.locale.labels.section_time = 'Time period';

scheduler.config.lightbox.sections = [
    { name:"text", height:50, map_to:"text", type:"textarea", focus:true },
    { name:"time", height:72, type:"time", map_to:"auto"}
];
Properties
The following properties are mostly important and commonly set for the 'time' control (see the full list here):
| name | (string) section's name |
| height | (number) section's height |
| map_to | (string) the name of a data property that will be mapped to the section |
| type | (textarea,time,select,template,multiselect,radio,checkbox,combo) the type of the section's control, "time" for a date-time control |
| year_range | (array, number) sets a range for the year selector. The range can be set in 2 ways: year_range: [2005, 2025] - a period from 2005 till 2025 year year_range: 10 - a period [current year - 10 years; current year + 10 years] |
Automatic end date in the Time control
To set the initial duration of events, and make the end date change automatically to preserve this value, use the event_duration and auto_end_date properties:
// specify event duration in minutes for auto end time
scheduler.config.event_duration = 60;
scheduler.config.auto_end_date = true;
With such configuration, each time the user changes the start event time or date in the lightbox, the end event time and date change automatically, in order to make the event duration equal to 60 minutes (the value of the event_duration option).
Order of date-time selectors
You can change the order of date-time controls in the 'Time period' section or remove some of selectors. To do this, use the time_format property:
scheduler.config.lightbox.sections="["
  {name:"description", height:130, map_to:"text", type:"textarea", focus:true},
  {name:"time", ..., time_format:["%H:%i","%m","%d","%Y"]}
];
Note, you can't change the data presentation format in that way, just the order of items in the array. To change the format of the time part, use the time_picker template.
For example, you can change the format as in:
//default
time_format:["%H:%i", "%m", "%d", "%Y"]
//month goes first
time_format:["%m","%d", "%Y", "%H:%i"]
//the year selector is removed
time_format:["%H:%i", "%m", "%d"]
//incorrect
time_format:["%H:%i", "%M", "%d", "%Y"] //"%m" was changed to "%M"
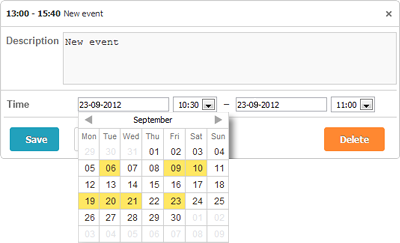
Mini calendar in the lightbox
The mini calendar (date picker) can be used in the lightbox for "start" and "end" dates selection.
To place the mini calendar in the lightbox, follow these steps:
- Include the extension file on the page:
scheduler.plugins({
    minical: true
});
- Set the type of the time section to calendar_time (instead of time):
//default lightbox definition
scheduler.config.lightbox.sections="["
  {name:"description", height:200, map_to:"text", type:"textarea", focus:true},
  {name:"time", height:72, type:"time", map_to:"auto"}
];
//change type:"time" -> type:"calendar_time"
scheduler.config.lightbox.sections = [
  {name:"description", height:200, map_to:"text", type:"textarea", focus:true},
  {name:"time", height:72, type:"calendar_time", map_to:"auto" }
];
To customize the mini calendar you can use Mini Calendar Templates.