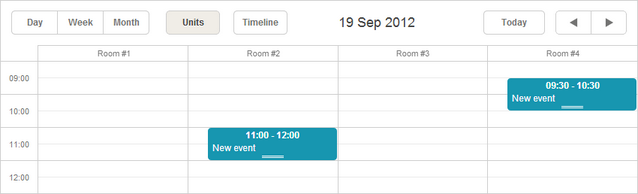
Units View
This view is available in the Scheduler PRO version only.
The Units view is a view, where X-Axis is based on some property of events (not only on time).
Initialization
To add the Units view to the scheduler, follow these steps:
- Activate the Units extension on the page:
scheduler.plugins({
    units: true
});
- Add the view's tab to the scheduler's markup:
<div id="scheduler_here" class="dhx_cal_container" ...>
    <div class="dhx_cal_navline">
       ...
       <div class="dhx_cal_tab" name="unit_tab" style="right:280px;"></div>
    </div>
    ...
</div>
- Set the label for the tab:
//'unit_tab' is the name of our div
scheduler.locale.labels.unit_tab = "Unit"
- Call the createUnitsView method:
scheduler.createUnitsView({
    name:"unit",
    property:"unit_id", //the mapped data property
    list:[              //defines the units of the view
        {key:1, label:"Section A"},
        {key:2, label:"Section B"},
        {key:3, label:"Section C"}
    ]
});
Loading data to the view
Unlike basic views (such as Day, Month, Year etc.), multiple-resource views(that are Units and Timeline) require data items to have one more mandatory field:
- property - (string) the name of a data property that will be used to assign events to certain units
scheduler.createUnitsView({
    name:"unit",
    property:"unit_id",
    list:[
        {key:1, label:"Section A"},
        {key:2, label:"Section B"},
        {key:3, label:"Section C"}
    ]
});

scheduler.init('scheduler_here');
scheduler.parse([
    {id:1, text:"Task1", start_date:"2027-09-17 12:00", end_date:"2027-09-18 21:00",
    unit_id:"1"},
     {id:2, text:"Task2", start_date:"2027-09-17 09:00", end_date:"2027-09-17 21:00",
    unit_id:"3"},
     {id:3, text:"Task3", start_date:"2027-09-17 15:00", end_date:"2027-09-18 15:00",
    unit_id:"2"}
]);
By comparing unit_id and list.key values, the scheduler assigns events to certain units.
Changing sections dynamically
If you need to dynamically update a list of units in the Units view, check the following methods: serverList and updateCollection ones.
Displaying units for multiple days
To display units for multiple days, use the days parameter:
scheduler.createUnitsView({
    name:"week_unit",
    property:"section_id",
    list:sections,
    days:3 /*!*/
});

A scale with days is appeared as the 2nd horizontal scale.
To set the format of the 2nd horizontal scale, use the scheduler.templates[name+"_second_scale_date"] template:
scheduler.templates.units_second_scale_date = function(date) {
    return scheduler.templates.week_scale_date(date);
};
Note,
- The 1st scale is specified as usual, with the UNITS_scale_text template. The height of the scale can be set with the scale_height config.
- You can hide unnecessary time units in the 2nd horizontal scale of a view using a common approach - Hiding Time Units in X-Axis of View
- size and step parameters won't work with multiday units
- Exporting to PDF can be implemented only with the new service and not possible with old export tools
- To change the start day of the displayable interval, use the scheduler.date.{units_name}_start function:
scheduler.date.units_start = function (date) {
    return scheduler.date.week_start(date);
};
Assigning events to several units
Starting from version 4.1, you have a possibility to assign events to several units.
To enable the possibility:
- Activate the Multisection extension on the page
- Set the multisection property to true
- (Optional) Activate the "multiselect" extension on the page to use Multiselect control in the scheduler (a comfortable way to switch between sections)
<script src="codebase/dhtmlxscheduler.js"></script>
<link rel="stylesheet" href="codebase/dhtmlxscheduler.css" type="text/css">

<script>
    scheduler.plugins({
        multisection: true, /*!*/
        multiselect: true,
        units: true
    });
    scheduler.config.multisection = true; /*!*/
    scheduler.init('scheduler_here');
</script>
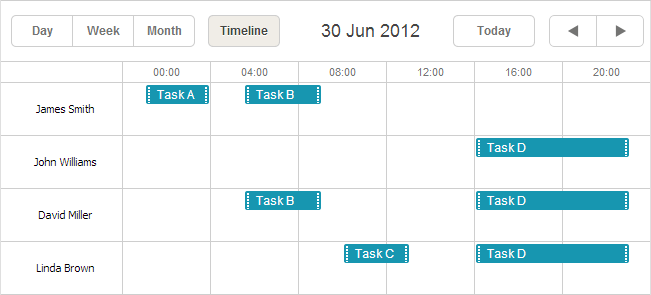
After this you can specify several sections (by default, delimited with a comma) in the related data property of the event and the event will be rendered in all specified units:
scheduler.createUnitsView({
    name: "unit",
    list: [
        {key: 1, label: "James Smith"},
        {key: 2, label: "John Williams"},
        {key: 3, label: "David Miller"},
        {key: 4, label: "Linda Brown"}],
    property: "section_id", /*!*/
    ...
});
scheduler.init('scheduler_here', new Date(2027, 5, 30), "unit");

scheduler.parse([
    { id:1, text:"Task A", section_id:'1',         ...},/*!*/
    { id:2, text:"Task B", section_id:'1,3',     ...},/*!*/
    { id:3, text:"Task C", section_id:'4',         ...},/*!*/
    { id:4, text:"Task D", section_id:'2,3,4',     ...}/*!*/
]);
Multisection events in Timeline and Units view
Data for the X-Axis sections
To set values for the X-Axis, use the list parameter:
scheduler.createUnitsView({
    name:"unit",
    ...
    list:[
        {key:1, label:"Section A"},
        {key:2, label:"Section B"},
        {key:3, label:"Section C"}
    ]
});
To be correctly processed, list items must have 2 mandatory properties:
- key - the item's id
- label - the item's label
Data for the X-Axis sections from the server
To load X-Axis data (sections) from the server, use:
- On the client side - the serverList method:
scheduler.createUnitsView({
    name:"unit",
    property:"type_id",
    list:scheduler.serverList("units"),
    size:20,
    step:1
});
where serverList returns a list of options with the name 'units'.
- On the server side
The data response for the load method should contain a collection with the server list name specified in JSON of the following format:
{
   "data":[
      {
          "id":"1",
          "start_date":"2027-03-02 15:00:00",
          "end_date":"2027-03-04 16:00:00",
          "text":"Team meeting",
          "type_id":"1"
      },
      {
          "id":"2",
          "start_date":"2027-03-02 17:00:00",
          "end_date":"2027-03-04 18:00:00",
          "text":"Strategy meeting",
          "type_id":"2"
      }
   ],
   "collections": {/*!*/
      "units":[/*!*/
         {"value":"1","label":"Conference room 1"},/*!*/
         {"value":"2","label":"Conference room 2"},/*!*/
         {"value":"3","label":"Conference room 3"}/*!*/
      ]/*!*/
   }/*!*/
}
You can also use the OptionsConnector connector:
<?php
    include('connector-php/codebase/scheduler_connector.php');//includes the file

    $res="mysql_connect(""localhost","root","");//connects to the server with our DB
    mysql_select_db("sampleDB");//connects to the DB.'sampleDB' is the DB's name

    $list = new OptionsConnector($res, $dbtype);
    $list->render_table("types","type_id","type_id(value),name(label)");

    $scheduler = new schedulerConnector($res, $dbtype);
    //we set the same name as used on the client side - 'units'
    $scheduler->set_options("units", $list);
    $scheduler->render_table("events","id","start_date,end_date,text,type_id");
?>

Note, you can create a collection manually, instead of using dhtmlxConnector. In this case, to update the collection, use the updateCollection method:
scheduler.updateCollection("units", new_sections_array);
Loading Units sections from the server
Scrolling Units
If you have many units, you can enable horizontal scrolling by using the size, step properties:
scheduler.createUnitsView({
    name:"unit",
    ...
    size:10, // the number of units that should be shown in the view
    step:5   // the number of units that will be scrolled at once
});
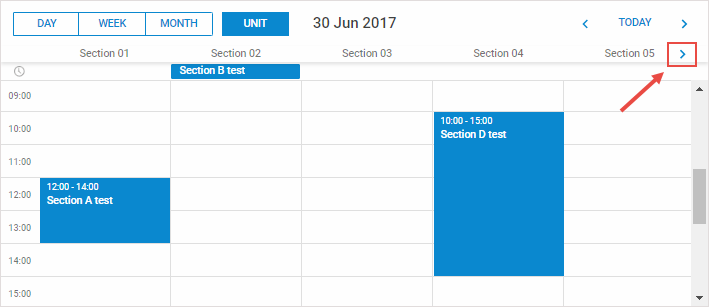
Horizontal scrolling sections in Units view
Skipping events that don't belong to any of the units
By default, if some event belongs to none of the defined units, it's presented in the first unit. Starting from the version 3.0, you have the possibility to skip such events and not display them at all.
To do this, use property skip_incorrect:
scheduler.createUnitsView({
    name:"unit",
    ...
    skip_incorrect:true
});