Duration Control
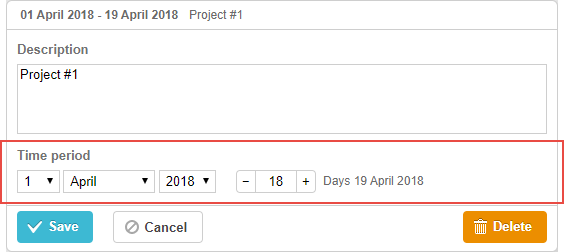
이 섹션에서는 작업의 시작 날짜와 기간(일수)을 지정하여 작업의 기간을 설정할 수 있는 셀렉터 세트를 소개합니다.
gantt.config.lightbox.sections="["
    {name:"description", height:70, map_to:"text", type:"textarea", focus:true},
    {name:"time",        height:72, map_to:"auto", type:"duration"} /*!*/
];
초기화
기본적으로 lightbox에는 하나의 duration 컨트롤이 포함되어 있습니다. 여러 개를 추가하려면 다음 단계를 따르세요:
- lightbox 설정에 새 섹션을 추가합니다:
gantt.config.lightbox.sections="["
    {name:"description", height:70, map_to:"text", type:"textarea",focus:true},
    {name:"time2",       height:72, map_to:"auto", type:"duration"}, /*!*/
    {name:"time",        height:72, map_to:"auto", type:"duration"}
];
- 새 섹션에 대한 라벨을 정의합니다:
gantt.locale.labels.section_time2 = "Actual duration";
속성
time 컨트롤에서 자주 사용하는 주요 속성은 다음과 같습니다 (전체 목록은 여기에서 확인하세요):
- name - (string) 섹션의 식별자
- height - (number) 섹션의 높이
- map_to - (string,object) "auto" 또는 섹션에 매핑되는 데이터 속성(들)을 지정하는 객체
- formatter - (object) durationFormatter 인스턴스
- type - (string) section control의 타입
- focus - (boolean) true로 설정 시 lightbox가 열릴 때 해당 섹션에 포커스
- readonly - (boolean) true로 설정 시 섹션이 읽기 전용이 됨
- year_range - (array,number) 연도 선택 범위 정의. 예:
- year_range: [2005, 2025] - 2005년부터 2025년까지
- year_range: 10 - 현재 연도에서 -10년 ~ +10년
- single_date - (boolean) true로 설정 시 start Date 셀렉터만 표시. 편집된 작업은 시작 날짜만으로 정의되고 기간은 0이 됨. 주로 milestones에 유용
- time_format - (string) 날짜-시간 셀렉터의 순서 지정
날짜-시간 셀렉터 구성
"Time period" 섹션의 셀렉터는 time_format 속성을 사용하여 커스터마이즈할 수 있습니다 (날짜 형식 지정 참조):
Adding the time selector to the 'Time period' section
gantt.config.lightbox.sections = [
    {name:"description", height:38, map_to:"text", type:"textarea", focus:true},
    {name:"time",type:"duration",map_to:"auto",time_format:["%d","%m","%Y","%H:%i"]}/*!*/
];
time_format 배열에서 허용되는 요소:
- "%d" - 일(day) 셀렉터
- "%m" - 월(month) 셀렉터
- "%Y" - 연(year) 셀렉터
- "%H:%i" - 시간 셀렉터 (형식은 time_picker 템플릿으로 제어)
이 요소들은 배열 내에서 순서를 바��꾸거나 생략할 수 있지만, 데이터 형식 자체는 변경할 수 없습니다.
예를 들어, 다음과 같은 변형이 가능합니다:
// 시간 먼저
time_format:["%H:%i", "%m", "%d", "%Y"]
// 월 먼저
time_format:["%m","%d", "%Y", "%H:%i"]
// 연도 셀렉터 생략
time_format:["%H:%i", "%m", "%d"]
// 잘못된 사용 예시
time_format:["%H:%i", "%M", "%d", "%Y"] // "%m" 대신 "%M" 사용
커스텀 시작/종료 날짜-시간 속성 매핑
기본 매핑
일반적으로 time 및 duration 컨트롤은 map_to를 "auto" (map_to:"auto")로 설정하여 필수 'start_date' 및 'end_date' 속성과 연결됩니다.
커스�텀 매핑
컨트롤을 'start_date', 'end_date' 대신 커스텀 날짜 속성에 연결하려면 map_to 속성에 객체를 사용하세요:
gantt.config.lightbox.sections = [
    {name: "description", height: 72, type: "textarea", map_to:"text", focus: true},
    {name: "time",           height: 72, type: "duration", map_to:"auto"},
    {name: "baseline",    height: 72, type: "duration", /*!*/
     map_to:{start_date:"planned_start",end_date:"planned_end"}} /*!*/
];
map_to 객체는 다음 속성을 지원합니다:
- start_date - 입력값에서 시작 날짜를 저장하는 데이터 속성
- end_date - (옵션) 입력값에서 종료 날짜를 저장하는 데이터 속성
- duration - (옵션) 입력값에서 정의된 기간을 저장하는 데이터 속성
속성이 생략된 경우, 컨트롤은 관련 필수 날짜 속성으로 기본 설정됩니다.
섹션 가시성 전환
lightbox 섹션 설정에서 type:"duration_optional" 및 button: true로 duration 섹션의 표시 여부를 토글할 수 있습니다:
gantt.config.lightbox.sections = [
  {name: "description", height: 70, map_to: "text", type: "textarea", focus: true},
  {name: "time", map_to: "auto", button: true, type: "duration_optional"} /*!*/
];
또한 토글 버튼의 두 상태에 대한 라벨을 정의하세요:
gantt.locale.labels.time_enable_button = 'Schedule';
gantt.locale.labels.time_disable_button = 'Unschedule';
토글 버튼이 섹션 옆에 표시되어, 가시성을 전환할 수 있습니다. 표시 상태에서는 **type:"duration"**과 동일하게 동작합니다.
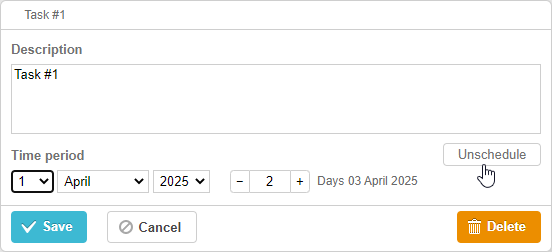
버튼을 끄면 섹션이 즉시 사라지지만, 저장 후 duration 컨트롤에 map_to로 매핑된 작업 속성은 null로 설정됩니다.
gantt.getTask(1);

// 반환 예시
{
    id: '1', text: 'Task #1', unscheduled: true,
    duration: 0, parent: '10',
    end_date: null, start_date: null,
    ...
}
이 기능은 UI에서 직접 작업을 미일정(unscheduled)으로 표시하거나, 기준선 없는 작업을 관리할 때 유용합니다. 관련 샘플을 참고하세요:
Related example: Unscheduled tasks
Related example: Baselines