Bryntum에서 DHTMLX Gantt로 마이그레이션하기
전체 데모 소스 코드는 GitHub에서 확인할 수 있습니다: https://github.com/DHTMLX/gantt-migrating-from-bryntum.
Bryntum Gantt에서 DHTMLX Gantt로의 마이그레이션
소개
Bryntum Gantt은 프로젝트 관리 도구를 위한 JavaScript 간트 차트 컴포넌트입니다.
이 가이드는 기존 애플리케이션을 Bryntum Gantt에서 DHTMLX Gantt로 마이그레이션하는 과정을 안내합니다. 데이터베이스 스키마 변경, 서버 측 API 수정, 클라이언트 코드 업데이트 등 필요한 모든 단계들을 다룹니다.
사전 준비
마이그레이션을 시작하기 전에 아래를 확보하시길 권합니다:
- Bryntum Gantt를 사용하는 기존의 작동 애플리케이션
- Node.js (>= 20.0.0) 설치
- Bryntum 데이터 구조를 사용하는 MySQL 데이터베이스
- Express.js와 JavaScript에 대한 기본 지식
1단계: 데이터베이스 마이그레이션
현재 스키마 이해하기
Bryntum 데모 설정을 따라왔다면 두 개의 테이블, 즉 tasks와 dependencies가 있을 것입니다.
The tasks table structure:
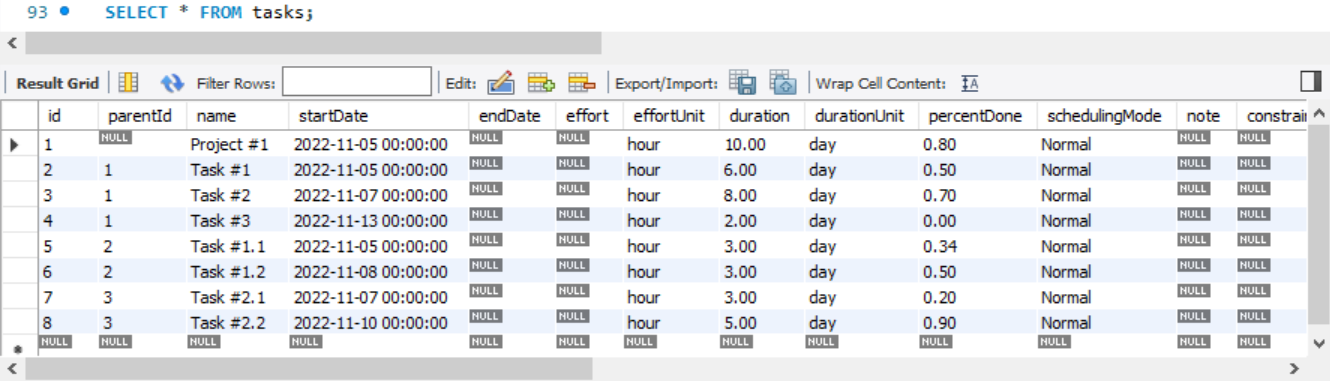
The dependencies table structure:
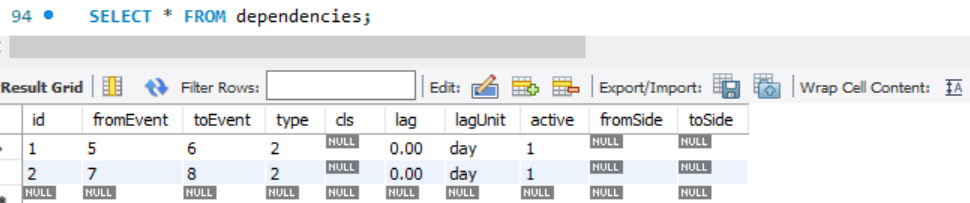
DHTMLX 테이블 생성
DHTMLX Gantt는 더 간단한 데이터베이스 구조를 사용합니다. DHTMLX Gantt와 호환되는 두 개의 새 테이블을 생성합니다:
CREATE TABLE `gantt_tasks`
(
    `id`              int(11)      NOT NULL AUTO_INCREMENT,
    `text`            varchar(255) NOT NULL,
    `start_date`      datetime     NOT NULL,
    `end_date`        datetime     NOT NULL,
    `duration`        int(11)      NOT NULL,
    `progress`        float        NOT NULL,
    `parent`          int(11)      NOT NULL,
    `constraint_type` varchar(20)  DEFAULT 'asap',
    `constraint_date` datetime     DEFAULT NULL,
    PRIMARY KEY (`id`)
);

CREATE TABLE `gantt_links`
(
    `id`     int(11)    NOT NULL AUTO_INCREMENT,
    `source` int(11)    NOT NULL,
    `target` int(11)    NOT NULL,
    `type`   varchar(1) NOT NULL,
    PRIMARY KEY (`id`)
);
참고:
- 제약 조건 자동 스케줄링 기능이 Bryntum과 DHTMLX Gantt 양쪽에서 가능하므로, 이를 지원하기 위해
constraint_type과constraint_date필드를 추가했습니다. - Gantt가 계산한 정확한 종료일을 보존하기 위해
end_date필드를 추가했습니다.start_date와duration만 저장하면 활성화된 기능(자동 스케줄링, 작업 시간, 제약 조건)에 따라 재계산될 수 있으며, 이 기본 정보를 잃을 수 있습니다.end_date를 저장하면 이 정보를 잃지 않습니다.
기존 데이터 마이그레이션
이제 기존 Bryntum 데이터를 새로운 DHTMLX 테이블로 마이그레이션합니다.
태스크 마이그레이션:
INSERT INTO gantt_tasks (
    `id`,
    `text`,
    `start_date`,
    `end_date`,
    `duration`,
    `progress`,
    `parent`,
    `constraint_type`,
    `constraint_date`
)
SELECT
    `id`,
    `name`,                              -- 'name' */} 'text'
    `startDate`,
    DATE_ADD(`startDate`, INTERVAL `duration` DAY), -- startDate + duration으로 end_date 계산
    `duration`,
    `percentDone`,                       -- 'percentDone' */} 'progress'
    IFNULL(`parentId`, 0),               -- 'parentId' */} 'parent' (루트 태스크의 경우 0)
    CASE `constraintType`                -- 제약 조건 유형 매핑
        WHEN 'assoonaspossible' THEN 'asap'
        WHEN 'aslateaspossible' THEN 'alap'
        WHEN 'startnoearlierthan' THEN 'snet'
        WHEN 'startnolaterthan' THEN 'snlt'
        WHEN 'finishnoearlierthan' THEN 'fnet'
        WHEN 'finishnolaterthan' THEN 'fnlt'
        WHEN 'muststarton' THEN 'mso'
        WHEN 'mustfinishon' THEN 'mfo'
        ELSE 'asap'
    END,
    `constraintDate`
FROM tasks;
마이그레이션 링크(의존성):
INSERT INTO gantt_links (`id`, `source`, `target`, `type`)
SELECT
    `id`,
    `fromEvent`,               -- 'fromEvent' */} 'source'
    `toEvent`,                 -- 'toEvent' */} 'target'
    CASE `type`                -- Bryntum 링크 유형을 DHTMLX 형식으로 변환
        WHEN 0 THEN '1'        -- Start-to-Start
        WHEN 1 THEN '3'        -- Start-to-Finish
        WHEN 2 THEN '0'        -- Finish-to-Start (가장 일반적)
        WHEN 3 THEN '2'        -- Finish-to-Finish
        ELSE '0'               -- 기본값은 Finish-to-Start
    END
FROM dependencies;
데이터가 올바르게 마이그레이션되었는지 아래 명령으로 확인할 수 있습니다:
SELECT * FROM gantt_tasks;
SELECT * FROM gantt_links;
모든 태스크와 링크가 올바르게 전송되었는지, 필드 매핑이 정확한지 확인합니다.
Bryntum 태스크 필드에서 DHTMLX Gantt로의 매핑
Bryntum Gantt의 TaskModel에는 DHTMLX Gantt에서 다르게 구현되었거나 마이그레이션 중 특별한 처리가 필요한 여러 필드가 있습니다. 아래 표는 가장 일반적인 Bryntum 태스크 필드들을 DHTMLX Gantt로 매핑하는 방법을 설명합니다:
| Bryntum Field | Description | Recommended Approach |
|---|---|---|
effort / effortUnit | 작업의 작업량(예: 16h), 노력 중심 및 자원 기반 스케줄링에 사용 | DHTMLX Gantt는 태스크 수준의 effort-driven 스케줄링을 지원하지 않습니다. 대안으로 자원 관리 모듈을 사용해 리소스를 배정하고 workload를 시각화합니다. 자원 배정은 노력(예: 하루당 시간)을 나타낼 수 있지만 작업 기간은 자동으로 재계산되지 않으며 수동으로 관리하거나 커스텀 로직으로 처리해야 합니다. |
durationUnit | 태스크 기간 해석에 사용되는 단위(시간, 일, 주 등) | DHTMLX Gantt는 전역 기간 단위가 gantt.config.duration_unit로 설정됩니다. 마이그레이션 중에는 모든 기간을 단일 단위로 정규화하는 것이 권장됩니다. 작업별로 서로 다른 기간 단위를 두고 싶다면 예: 일부 태스크의 기간을 시간으로, 일부는 “일”로 보이게 하려면 formatter 모듈을 사용할 수 있습니다. |
schedulingMode | 태스크 스케줄링 동작 정의(Normal, FixedDuration, FixedEffort 등) | 직접 대체가 존재하지 않는 항목입니다. DHTMLX Gantt는 태스크별 스케줄링 모드를 지원하지 않습니다. 이 값을 커스텀 필드로 저장하고 필요 시 Gantt 이벤트(onBeforeTaskUpdate)를 통해 커스텀 동작을 강제할 수 있습니다. |
note | 태스크에 attached된 자유 텍스트 메모 또는 설명 | 커스텀 텍스트 필드(note 또는 description)로 직접 마이그레이션하고 라이트박스, 툴팁 또는 커스텀 격자 열에서 표시합니다. |
manuallyScheduled | 태스크가 자동 스케줄링에서 제외되었는지 여부 | 태스크의 task.auto_scheduling 속성을 사용할 수 있으며, 이를 통해 전역적으로 활성화된 자동 스케줄링을 유지하면서 특정 태스크를 자동 스케줄링에서 제외할 수 있습니다. 자세한 내용은 특정 태스크에 대한 자동 스케줄링 비활성화를 참고하세요. |
calendar | 태스크에 할당된 달력 | DHTMLX Gantt는 다중 작업 달력을 지원합니다. 태스크에 달력을 할당하려면 calendar_id 속성(또는 gantt.config.calendar_property로 정의된 커스텀 속성)을 사용합니다. 자세한 내용은 태스크에 달력 지정하기를 참조하세요. |
deadline | 태스크가 초과해서는 안 되는 목표 날짜 | task.deadline 속성을 통해 완전하게 지원됩니다. 지정되면 타임라인에 시각적 마감선 표시가 나타납니다. 값은 start_date와 같은 날짜 형식을 사용합니다. |
2단계: 백엔드 마이그레이션 (server.js)
Bryntum 전용 코드 제거
먼저 server.js에서 Bryntum 패키지 제공 미들웨어를 제거합니다:
// DELETE this line:
app.use(express.static(path.join(__dirname, '/node_modules/@bryntum/gantt')));
중요: 이 데모에서 사용할 Vite를 통해 더 이상 node_modules를 직접 제공할 필요가 없으므로, 전체 node_modules 디렉토리를 노출하는 미들웨어를 제거합니다:
// DELETE this line if present:
app.use('/node_modules', express.static(path.join(__dirname, 'node_modules')));
Bryntum 엔드포인트 제거
다음 Bryntum 전용 엔드포인트 및 도우미 함수를 삭제합니다:
app.get('/load', ...)- Bryntum 데이터 로드 엔드포인트app.post('/sync', ...)- Bryntum 동기화 엔드포인트applyTableChanges()함수createOperation()함수updateOperation()함수deleteOperation()함수
DHTMLX Gantt 패키지 및 Vite 설치
Bryntum 의존성을 제거합니다. npm으로 Bryntum을 사용 중이었으면 제거합니다:
npm uninstall @bryntum/gantt
설치는 설치 가이드를 따릅니다. 이번 튜토리얼에서는 DHTMLX Gantt의 트라이얼 버전을 사용합니다:
npm install @dhx/trial-gantt
또한 빌드 도구로 Vite를 설치합니다:
npm install --save-dev vite
데이터 로딩 엔드포인트 추가
DHTMLX 형식으로 데이터를 로드하는 GET 엔드포인트를 추가합니다:
import dateFormat from 'date-format-lite';

// GET /data - Load tasks and links
app.get('/data', async (req, res) => {
  try {
    const [[tasks], [links]] = await Promise.all([
      db.query('SELECT * FROM gantt_tasks'),
      db.query('SELECT * FROM gantt_links'),
    ]);

    // DHTMLX Gantt용 날짜 포맷 지정
    for (let i = 0; i < tasks.length; i++) {
      tasks[i].start_date = tasks[i].start_date.format("YYYY-MM-DD hh:mm:ss");
      tasks[i].end_date = tasks[i].end_date.format("YYYY-MM-DD hh:mm:ss");
      // constraint_date가 존재하는 경우 포맷 지정
      if (tasks[i].constraint_date) {
        tasks[i].constraint_date = tasks[i].constraint_date.format("YYYY-MM-DD hh:mm:ss");
      }
    }

    res.json({
      tasks,
      links
    });
  } catch (error) {
    res.status(500).json({
      success: false,
      message: error.message,
    });
  }
});
참고: Bryntum과 달리 응답 형식이 다릅니다. DHTMLX는 Bryntum의 중첩 구조 대신 { tasks: [], links: [] }를 기대합니다.
태스크 및 링크에 대한 CRUD 엔드포인트 추가
DHTMLX Gantt DataProcessor는 RESTful 엔드포인트를 사용합니다. 태스크 작업에 대한 핸들러를 추가합니다:
// Create a new task
app.post("/data/task", async (req, res) => {
    const task = getTask(req.body);
    const { text, start_date, end_date, duration, progress, parent, constraint_type, constraint_date } = task;

    try {
        const [result] = await db.query(
            "INSERT INTO gantt_tasks(text, start_date, end_date, duration, progress, parent, constraint_type, constraint_date) VALUES (?,?,?,?,?,?,?,?)",
            [text, start_date, end_date, duration, progress, parent, constraint_type, constraint_date]
        );
        sendResponse(res, "inserted", result.insertId);
    } catch (error) {
        sendResponse(res, "error", null, error);
    }
});

// Update an existing task
app.put("/data/task/:id", async (req, res) => {
    const sid = req.params.id;
    const task = getTask(req.body);
    const { text, start_date, end_date, duration, progress, parent, constraint_type, constraint_date } = task;

    try {
        await db.query(
            "UPDATE gantt_tasks SET text = ?, start_date = ?, end_date = ?, duration = ?, progress = ?, parent = ?, constraint_type = ?, constraint_date = ? WHERE id = ?",
            [text, start_date, end_date, duration, progress, parent, constraint_type, constraint_date, sid]
        );
        sendResponse(res, "updated");
    } catch (error) {
        sendResponse(res, "error", null, error);
    }
});

// Delete a task
app.delete("/data/task/:id", async (req, res) => {
    const sid = req.params.id;

    try {
        await db.query("DELETE FROM gantt_tasks WHERE id = ?", [sid]);
        sendResponse(res, "deleted");
    } catch (error) {
        sendResponse(res, "error", null, error);
    }
});
핵심은 링크(의존성) 작업에 대한 핸들러도 추가하는 것입니다:
// Create a new link
app.post("/data/link", async (req, res) => {
    const link = getLink(req.body);
    const { source, target, type } = link;

    try {
        const [result] = await db.query(
            "INSERT INTO gantt_links(source, target, type) VALUES (?,?,?)",
            [source, target, type]
        );
        sendResponse(res, "inserted", result.insertId);
    } catch (error) {
        sendResponse(res, "error", null, error);
    }
});

// Update an existing link
app.put("/data/link/:id", async (req, res) => {
    const sid = req.params.id;
    const link = getLink(req.body);
    const { source, target, type } = link;

    try {
        await db.query(
            "UPDATE gantt_links SET source = ?, target = ?, type = ? WHERE id = ?",
            [source, target, type, sid]
        );
        sendResponse(res, "updated");
    } catch (error) {
        sendResponse(res, "error", null, error);
    }
});

// Delete a link
app.delete("/data/link/:id", async (req, res) => {
    const sid = req.params.id;

    try {
        await db.query("DELETE FROM gantt_links WHERE id = ?", [sid]);
        sendResponse(res, "deleted");
    } catch (error) {
        sendResponse(res, "error", null, error);
    }
});
헬퍼 함수 추가
데이터를 처리하고 응답을 전송하는 유틸리티 함수도 추가합니다:
function getTask(data) {
    return {
        text: data.text,
        start_date: data.start_date.date("YYYY-MM-DD hh:mm:ss"),
        end_date: data.end_date.date("YYYY-MM-DD hh:mm:ss"),
        duration: data.duration,
        progress: data.progress || 0,
        parent: data.parent,
        constraint_type: data.constraint_type || 'asap',
        constraint_date: data.constraint_date || null
    };
}

function getLink(data) {
    return {
        source: data.source,
        target: data.target,
        type: data.type
    };
}

function sendResponse(res, action, tid, error) {
    if (action === "error") {
        console.log(error);
    }

    const result = { action: action };

    if (tid !== undefined && tid !== null) {
        result.tid = tid;
    }

    res.send(result);
}
입력 데이터의 XSS 보안 처리(백엔드 권장)
DHTMLX Gantt는 텍스트 필드(text) 표시를 HTML로 렌더링하고 기본적으로 이를 이스케이프하지 않으므로, 이전에 마이그레이션한 데이터나 사용자가 입력한 마크업이 그대로 렌더링될 수 있어 잠재적 XSS 벡터가 됩니다. Bryntum과 대부분의 라이브러리도 비슷한 동작을 하므로, 이 문제를 명시적으로 처리하는 것이 좋습니다.
권장: 백엔드에서 sanitize 처리. 자유 텍스트 필드를 데이터베이스에 전달되기 전에 정제합니다:
npm install isomorphic-dompurify
import DOMPurify from 'isomorphic-dompurify';

function getTask(data) {
    return {
        text: DOMPurify.sanitize(data.text),
        // ...나머지 필드는 변경 없이 유지
    };
}
프런트엔드에서 이스케이프 처리(최후의 방어선). src/main.js에서 태스크 텍스트를 렌더링하는 템플릿을 오버라이드합니다:
const escapeHTML = (value) =>
String(value ?? "").replace(/[&<>"']/g, (ch) =>
({ "&": "&", "<": "<", ">": ">", '"': """, "'": "'" }[ch]));
gantt.templates.task_text = (start, end, task) => escapeHTML(task.text);
gantt.templates.tooltip_text = (start, end, task) => escapeHTML(task.text);
// 또한 "text" 그리드 열도 escape 해주세요: template: (task) => escapeHTML(task.text)
전체 권장 사항 세트 — Content Security Policy, lightbox 정제, SQL 주입 방지 가이드 — 은 [Application Security] 가이드를 참조하세요.
3단계: Vite로 프런트엔드 마이그레이션
Vite 구성 설정
프로젝트 루트에 vite.config.js 파일을 생성합니다:
import { defineConfig } from 'vite';
import path from 'path';

export default defineConfig({
  root: '.',

  server: {
    port: 5173,
    proxy: {
      // Express 백엔드로 API 요청 프록시
      '/data': {
        target: 'http://localhost:1337',
        changeOrigin: true,
      }
    }
  },

  build: {
    outDir: 'dist',
    emptyOutDir: true,
    sourcemap: true,
  },

  resolve: {
    alias: {
      '@': path.resolve(__dirname, './src')
    }
  }
});
프로젝트 파일 구조 재구성
다음 구조로 프로젝트를 정리합니다:
dhtmlx-demo/
├── index.html         # public/에서 루트로 이동
├── src/
│   └── main.js        # 애플리케이션 로직용 파일 생성
├── dist/              # Vite 빌드로 생성
├── server.js          # 백엔드
├── vite.config.js     # Vite 구성
└── package.json
index.html 업데이트
index.html을 프로젝트 루트로 이동하고 업데이트합니다. Vite를 사용하면 CSS와 JS 파일들을 수동으로 포함할 필요가 없으며, Vite가 자동으로 번들합니다.
<!DOCTYPE html>
<html lang="en">
  <head>
    <meta charSet="UTF-8" />
    <meta name="viewport" content="width=device-width, initial-scale=1.0" />
    <title>DHTMLX Gantt Demo</title>

    <style>
      html, body {
        margin: 0;
        padding: 0;
        height: 100%;
        width: 100%;
      }
      #gantt_here {
        width: 100%;
        height: 100%;
      }
    </style>
  </head>
  <body>
    <div id="gantt_here"></div>
        <script type="module" src="/src/main.js"></script>
  </body>
</html>
참고: 컨테이너 ID가 gantt_here로 변경되었으며, 이는 DHTMLX Gantt의 일반적인 컨테이너 ID입니다.
src/main.js 생성
새로운 src/main.js 파일을 생성하고 DHTMLX Gantt 초기화 코드를 작성합니다:
Bryntum 코드를 제거합니다:
// DELETE all Bryntum imports and initialization
import { Gantt, ProjectModel } from './gantt.module.js';

const project = new ProjectModel({
  taskStore: { transformFlatData: true },
  loadUrl: '/load',
  syncUrl: '/sync',
  autoLoad: true,
  autoSync: true,
});

const gantt = new Gantt({
  appendTo: document.body,
  project,
  columns: [...]
});
src/main.js에 DHTMLX 코드를 추가합니다:
// Import DHTMLX Gantt CSS and library
import '@dhx/trial-gantt/codebase/dhtmlxgantt.css';
import gantt from '@dhx/trial-gantt';

// Enable plugins
gantt.plugins({
  auto_scheduling: true,
  marker: true,
  tooltip: true
});

// Configure auto-scheduling with constraints
gantt.config.auto_scheduling = {
  enabled: true,
  show_constraints: true,
  apply_constraints: true,
  project_constraint: true,
};

// Project settings
gantt.config.project_start = new Date(2026, 10, 5);

// Enable work time
gantt.config.work_time = true;

// Enable additional features
gantt.config.drag_project = true;   // Drag projects
gantt.config.order_branch = true;   // Vertically reorder tasks within the same tree level

// Date format
gantt.config.date_format = "%Y-%m-%d %H:%i:%s";
gantt.config.open_tree_initially = true;

// Configure columns to display constraint information
gantt.config.columns = [
    { name: "text", tree: true, width: '*', resize: true, width: 150 },
    { name: "start_date", align: "center", resize: true, width: 150 },
    { name: "duration", align: "center", width: 80, resize: true, },
    {
        name: "constraint_type", align: "center", width: 100, template: function (task) {
            return gantt.locale.labels[gantt.getConstraintType(task)];
        }, resize: true,
    },
    {
        name: "constraint_date", align: "center", width: 120, template: function (task) {
            const constraintTypes = gantt.config.constraint_types;

            if (task.constraint_date && task.constraint_type != constraintTypes.ASAP && task.constraint_type != constraintTypes.ALAP) {
                return task.constraint_date;
            }
            return "";
        }, resize: true,
    },
    { name: "add", width: 44 }
];

// Configure lightbox sections
gantt.config.lightbox.sections = [
    { name:"description", height:38, map_to:"text", type:"textarea", focus:true},
    { name:"constraint", type:"constraint" },
    { name:"time", type:"duration", map_to:"auto" }
];

// Configure mouse wheel zoom
const hourToStr = gantt.date.date_to_str("%H:%i");
const hourRangeFormat = function(step){
	return function(date) {
		const intervalEnd = new Date(gantt.date.add(date, step, "hour") - 1)
		return hourToStr(date) + " - " + hourToStr(intervalEnd);
	};
};

const zoomConfig = {
    minColumnWidth: 80,
    maxColumnWidth: 150,
    levels: [
        [
            { unit: "month", format: "%M %Y", step: 1},
            { unit: "week", step: 1, format: function (date) {
                    const dateToStr = gantt.date.date_to_str("%d %M");
                    const endDate = gantt.date.add(date, 7 - date.getDay(), "day");
                    const weekNum = gantt.date.date_to_str("%W")(date);
                    return "Week #" + weekNum + ", " + dateToStr(date) + " - " + dateToStr(endDate);
                }}
        ],
        [
            { unit: "month", format: "%M %Y", step: 1},
            { unit: "day", format: "%d %M", step: 1}
        ],
        [
            { unit: "day", format: "%d %M", step: 1},
            { unit: "hour", format: hourRangeFormat(12), step: 12}
        ],
        [
            {unit: "day", format: "%d %M",step: 1},
            {unit: "hour",format: hourRangeFormat(6),step: 6}
        ],
        [
            { unit: "day", format: "%d %M", step: 1 },
            { unit: "hour", format: "%H:%i", step: 1}
        ]
    ],
    startDate: new Date(2026, 10, 5),
    endDate: new Date(2026, 10, 20),
    useKey: "ctrlKey",
    trigger: "wheel",
    element: function(){
        return gantt.$root.querySelector(".gantt_task");
    }
}

gantt.ext.zoom.init(zoomConfig);

// Add marker for project start
gantt.addMarker({
    start_date: gantt.config.project_start,
    text: "project start"
});

// Highlight weekends in the timeline
gantt.templates.scale_cell_class = function (date) {
    if (date.getDay() == 0 || date.getDay() == 6) {
        return "weekend";
    }
};
gantt.templates.timeline_cell_class = function (item, date) {
    if (date.getDay() == 0 || date.getDay() == 6) {
        return "weekend";
    }
};

// Initialize Gantt
gantt.init("gantt_here");

// Load data from server
gantt.load("/data");

const dp = gantt.createDataProcessor({
  url: '/data',
  mode: 'REST'
});
DataProcessor는 자동으로 다음을 수행합니다:
- 태스크 생성 시
/data/task로 POST 요청 전송 - 태스크 업데이트 시
/data/task/:id로 PUT 요청 전송 - 태스크 삭제 시
/data/task/:id로 DELETE 요청 전송 - 링크도
/data/link엔드포인트로 유사하게 처리
Bryntum 기본 기능 활성화
중요 주의: Bryntum Gantt에서 기본으로 활성화된 일부 기능은 DHTMLX Gantt에서도 명시적으로 활성화해야 합니다. 위 구성에는 Bryntum에서 표준적으로 사용되던 여러 기능이 포함되어 있습니다.
제약 조건이 있는 자동 스케줄링
DHTMLX Gantt에서 이를 사용하려면:
auto_scheduling플러그인을 활성화gantt.config.auto_scheduling설정 구성
작업 시간과 주말 하이라이트
타임라인에서 비근무일을 강조하려면:
work_time구성을 활성화- 주말 강조를 위해
scale_cell_class와timeline_cell_class템플릿 사용
툴팁
툴팁 버튼를 활성화하여 마우스 오버 시 태스크 정보를 표시합니다.
gantt.plugins({
  tooltip: true
});
마우스 휠 확대/축소
마우스 휠로 확대를 가능하게 하려면 gantt.ext.zoom를 구성합니다. 이를 통해 일(day), 주(week), 월(month) 등의 뷰 간에 전환할 수 있습니다.
드래그 앤 드롭 기능
drag_project: 프로젝트 유형의 항목 드래그 앤 드롭 활성화order_branch: 같은 트리 레벨 내에서 태스크를 수직으로 재정렬
태스크 순서에 대한 주의: order_branch가 활성화된 경우 UI에서 태스크를 재정렬할 수 있습니다. 다만 이 변경 내용은 데이터베이스에 자동으로 저장되지는 않습니다. 순서를 유지하려면 서버 측 로직을 추가 구현해야 합니다. 상세 구현은 이 가이드를 참조하세요.
프로젝트 마커
타임라인에 중요한 날짜를 강조하기 위한 시각적 마커를 추가합니다.
주말 스타일 추가
index.html에 CSS 스타일을 추가합니다:
<style>
  html, body {
    margin: 0;
    padding: 0;
    height: 100%;
    width: 100%;
  }
  #gantt_here {
    width: 100%;
    height: 100%;
  }

  /* 주말 스타일링 */
  .weekend {
     background: var(--dhx-gantt-base-colors-background-alt);
  }

  [data-column-name='constraint_type'] .gantt_tree_content {
		padding: 1px;
		line-height: 17px;
		white-space: normal;
		text-align: right;
		box-sizing: border-box;
	}

	.gantt_grid_editor_placeholder[data-column-name='constraint_type'] select {
		line-height: 20px;
		white-space: normal;
	}
</style>
package.json 스크립트 업데이트
package.json의 스크립트를 Vite에 맞게 업데이트합니다:
{
  "scripts": {
    "dev": "vite",
    "build": "vite build",
    "preview": "vite preview",
    "server": "nodemon server.js"
  }
}
4단계: 마이그레이션 테스트
개발 모드
개발 중에는 두 개의 프로세스를 실행해야 합니다:
터미널 1 - 백엔드(Express):
npm run server
이 명령은 API 서버를 http://localhost:1337에서 시작합니다.
터미널 2 - 프런트엔드(Vite):
npm run dev
이 명령은 Vite 개발 서버를 http://localhost:5173에서 시작합니다.
브라우저를 열고 http://localhost:5173로 접속합니다. Vite가 Express 백엔드로의 API 요청을 자동으로 프록시합니다.
데이터베이스에서 데이터를 로드한 DHTMLX Gantt 차트를 확인할 수 있습니다:
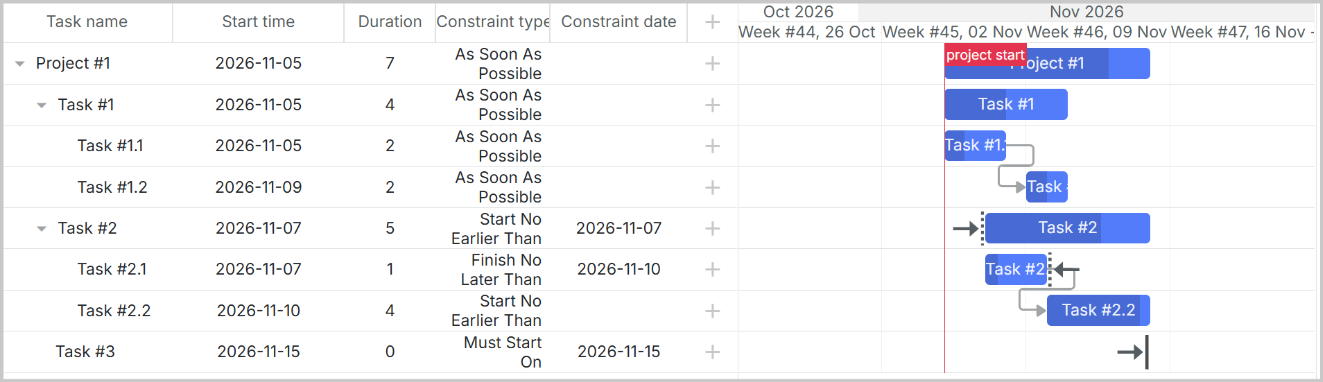
프로덕션 모드
프로덕션을 위해 먼저 프런트엔드를 빌드합니다:
npm run build
이 명령은 dist/ 폴더에 최적화된 번들을 생성합니다. 그런 다음 빌드된 파일들을 서비스하도록 server.js를 업데이트합니다:
import path from 'path';

// Production 배포 시 server.js에 추가
const __dirname = import.meta.dirname;

if (process.env.NODE_ENV === 'production') {
  app.use(express.static(path.join(__dirname, 'dist')));
}
이제 백엔드만 실행하면 됩니다:
npm run server
그리고 애플리케이션에 http://localhost:1337 로 접속합니다.
다음 단계
- 고급 기능을 위한 DHTMLX Gantt 문서 확인하기: DHTMLX Gantt documentation
- API 참조 확인: API reference
- 구현 예제 확인: DHTMLX Gantt samples