The complete demo source code is available on GitHub: https://github.com/DHTMLX/gantt-migrating-from-bryntum.
Migrating from Bryntum Gantt to DHTMLX Gantt
Introduction
Bryntum Gantt is a JavaScript Gantt chart component for project management tools.
This guide will walk you through the process of migrating an existing application from Bryntum Gantt to DHTMLX Gantt. We'll cover all necessary steps including database schema changes, server-side API modifications, and client-side code updates.
Prerequisites
Before starting the migration, ensure you have:
- An existing working application using Bryntum Gantt
- Node.js (>= 20.0.0) installed
- MySQL database with Bryntum data structure
- Basic knowledge of Express.js and JavaScript
Step 1: Database Migration
Understanding Current Schema
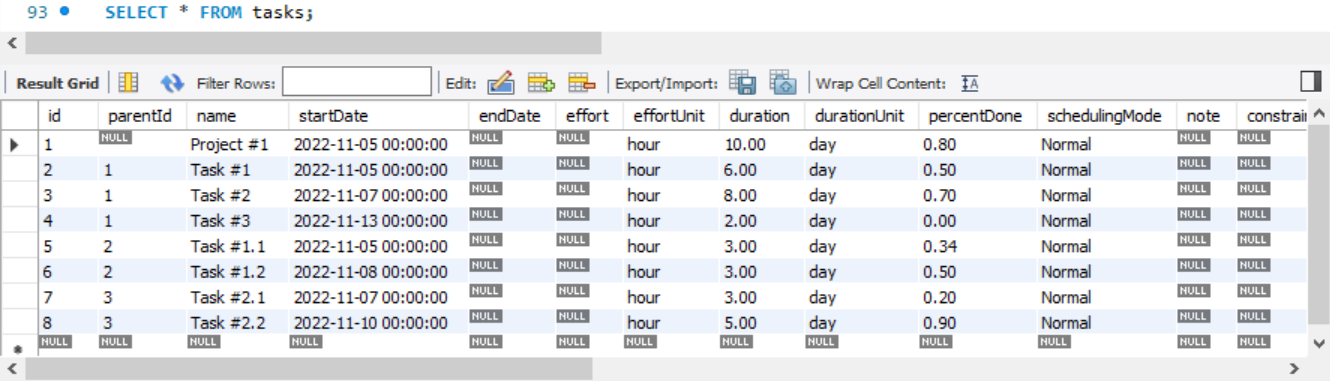
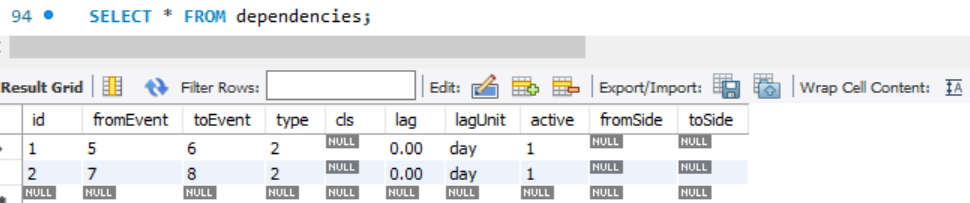
If you followed the Bryntum demo setup, you should have two tables: tasks and dependencies.
The tasks table structure:
The dependencies table structure:
Create DHTMLX Tables
DHTMLX Gantt uses a simpler database structure. Create two new tables compatible with DHTMLX Gantt:
CREATE TABLE `gantt_tasks`
(
    `id`              int(11)      NOT NULL AUTO_INCREMENT,
    `text`            varchar(255) NOT NULL,
    `start_date`      datetime     NOT NULL,
    `end_date`        datetime     NOT NULL,
    `duration`        int(11)      NOT NULL,
    `progress`        float        NOT NULL,
    `parent`          int(11)      NOT NULL,
    `constraint_type` varchar(20)  DEFAULT 'asap',
    `constraint_date` datetime     DEFAULT NULL,
    PRIMARY KEY (`id`)
);

CREATE TABLE `gantt_links`
(
    `id`     int(11)    NOT NULL AUTO_INCREMENT,
    `source` int(11)    NOT NULL,
    `target` int(11)    NOT NULL,
    `type`   varchar(1) NOT NULL,
    PRIMARY KEY (`id`)
);
Note:
- We've added
constraint_typeandconstraint_datefields to support auto-scheduling with constraints, which is a feature available in both Bryntum and DHTMLX Gantt. - We've added
end_datefield to preserve the exact end date calculated by the Gantt. Without storingend_date, it would be recalculated based onstart_dateandduration, which can vary depending on enabled features (auto-scheduling, work time, constraints). Storingend_dateprevents loss of this fundamental information.
Migrate Existing Data
Now migrate your existing Bryntum data to the new DHTMLX tables.
Migrate tasks:
INSERT INTO gantt_tasks (
    `id`,
    `text`,
    `start_date`,
    `end_date`,
    `duration`,
    `progress`,
    `parent`,
    `constraint_type`,
    `constraint_date`
)
SELECT
    `id`,
    `name`,                              -- 'name' */} 'text'
    `startDate`,
    DATE_ADD(`startDate`, INTERVAL `duration` DAY), -- Calculate end_date from start_date + duration
    `duration`,
    `percentDone`,                       -- 'percentDone' */} 'progress'
    IFNULL(`parentId`, 0),               -- 'parentId' */} 'parent' (0 for root tasks)
    CASE `constraintType`                -- Map constraint types
        WHEN 'assoonaspossible' THEN 'asap'
        WHEN 'aslateaspossible' THEN 'alap'
        WHEN 'startnoearlierthan' THEN 'snet'
        WHEN 'startnolaterthan' THEN 'snlt'
        WHEN 'finishnoearlierthan' THEN 'fnet'
        WHEN 'finishnolaterthan' THEN 'fnlt'
        WHEN 'muststarton' THEN 'mso'
        WHEN 'mustfinishon' THEN 'mfo'
        ELSE 'asap'
    END,
    `constraintDate`
FROM tasks;
Migrate links (dependencies):
INSERT INTO gantt_links (`id`, `source`, `target`, `type`)
SELECT
    `id`,
    `fromEvent`,               -- 'fromEvent' */} 'source'
    `toEvent`,                 -- 'toEvent' */} 'target'
    CASE `type`                -- Convert Bryntum link types to DHTMLX format
        WHEN 0 THEN '1'        -- Start-to-Start
        WHEN 1 THEN '3'        -- Start-to-Finish
        WHEN 2 THEN '0'        -- Finish-to-Start (most common)
        WHEN 3 THEN '2'        -- Finish-to-Finish
        ELSE '0'               -- Default to Finish-to-Start
    END
FROM dependencies;
You can verify that the data was migrated correctly by running the following commands:
SELECT * FROM gantt_tasks;
SELECT * FROM gantt_links;
You should see all your tasks and links properly transferred with the correct field mappings.
Mapping Bryntum Task Fields to DHTMLX Gantt
Bryntum Gantt's TaskModel contains a number of fields that are either implemented differently in DHTMLX Gantt or require special handling during migration. The following table explains how to map the most common Bryntum task fields to DHTMLX Gantt:
| Bryntum Field | Description | Recommended Approach |
|---|---|---|
effort / effortUnit | Amount of work required to complete a task (e.g. 16h), used for effort-driven and resource-based scheduling | DHTMLX Gantt does not support effort-driven scheduling at the task level. As an alternative, you can use the Resource Management module to assign resources and visualize workload. Resource assignments can represent effort (e.g. hours per day), but task duration is not recalculated automatically and must be managed manually or via custom logic. |
durationUnit | Unit used to interpret the task duration (hours, days, weeks, etc.) | DHTMLX Gantt uses a global duration unit configured via gantt.config.duration_unit. During migration, it's recommended to normalize all durations to a single unit. If you want to have different duration units for different tasks, i.e. to show durations of some tasks in hours and some tasks in "days", you can use the formatter module. |
schedulingMode | Defines how task scheduling behaves (Normal, FixedDuration, FixedEffort, etc.) | No direct equivalent. DHTMLX Gantt does not support per-task scheduling modes. You can store this value as a custom field and, if required, enforce custom behavior using Gantt events (e.g., onBeforeTaskUpdate). |
note | Free-text notes or description attached to a task | Can be migrated directly as a custom text field (e.g. note or description) and shown in the lightbox, tooltip, or a custom grid column. |
manuallyScheduled | Indicates whether a task is excluded from automatic scheduling | The task.auto_scheduling property of the task can be used which allows individual tasks to be excluded from auto scheduling while keeping it enabled globally. See Disabling auto scheduling for specific tasks. |
calendar | The calendar, assigned to the task | DHTMLX Gantt supports multiple working calendars. A calendar can be assigned to a task via the calendar_id property (or a custom property defined by gantt.config.calendar_property). See Assigning Calendar to Task. |
deadline | A target date that the task should not exceed | Fully supported via the task.deadline property. When specified, DHTMLX Gantt displays a visual deadline indicator on the timeline. The value uses the same date format as start_date. |
Step 2: Backend Migration (server.js)
Remove Bryntum-Specific Code
First, remove the Bryntum package serving middleware from your server.js:
// DELETE this line:
app.use(express.static(path.join(__dirname, '/node_modules/@bryntum/gantt')));
Important: With Vite which will be used in this demo, you no longer need to serve node_modules directly. Remove any middleware that exposes the entire node_modules directory:
// DELETE this line if present:
app.use('/node_modules', express.static(path.join(__dirname, 'node_modules')));
Remove Bryntum Endpoints
Delete the following Bryntum-specific endpoints and helper functions:
app.get('/load', ...)- Bryntum data loading endpointapp.post('/sync', ...)- Bryntum sync endpointapplyTableChanges()functioncreateOperation()functionupdateOperation()functiondeleteOperation()function
Install DHTMLX Gantt Package and Vite
Remove Bryntum dependency. If you were using Bryntum via npm, uninstall it:
npm uninstall @bryntum/gantt
Install DHTMLX Gantt following the installation guide.
For this tutorial, we will use the trial version of DHTMLX Gantt:
npm install @dhx/trial-gantt
Let's also install Vite as a build tool:
npm install --save-dev vite
Add Data Loading Endpoint
Add the GET endpoint to load data in DHTMLX format:
import dateFormat from 'date-format-lite';

// GET /data - Load tasks and links
app.get('/data', async (req, res) => {
  try {
    const [[tasks], [links]] = await Promise.all([
      db.query('SELECT * FROM gantt_tasks'),
      db.query('SELECT * FROM gantt_links'),
    ]);

    // Format dates for DHTMLX Gantt
    for (let i = 0; i < tasks.length; i++) {
      tasks[i].start_date = tasks[i].start_date.format("YYYY-MM-DD hh:mm:ss");
      tasks[i].end_date = tasks[i].end_date.format("YYYY-MM-DD hh:mm:ss");
      // Format constraint_date if it exists
      if (tasks[i].constraint_date) {
        tasks[i].constraint_date = tasks[i].constraint_date.format("YYYY-MM-DD hh:mm:ss");
      }
    }

    res.json({
      tasks,
      links
    });
  } catch (error) {
    res.status(500).json({
      success: false,
      message: error.message,
    });
  }
});
Note: The response format is different from Bryntum. DHTMLX expects { tasks: [], links: [] } instead of Bryntum's nested structure.
Add CRUD Endpoints for Tasks and Links
DHTMLX Gantt DataProcessor uses RESTful endpoints. Add handlers for task operations:
// Create a new task
app.post("/data/task", async (req, res) => {
    const task = getTask(req.body);
    const { text, start_date, end_date, duration, progress, parent, constraint_type, constraint_date } = task;

    try {
        const [result] = await db.query(
            "INSERT INTO gantt_tasks(text, start_date, end_date, duration, progress, parent, constraint_type, constraint_date) VALUES (?,?,?,?,?,?,?,?)",
            [text, start_date, end_date, duration, progress, parent, constraint_type, constraint_date]
        );
        sendResponse(res, "inserted", result.insertId);
    } catch (error) {
        sendResponse(res, "error", null, error);
    }
});

// Update an existing task
app.put("/data/task/:id", async (req, res) => {
    const sid = req.params.id;
    const task = getTask(req.body);
    const { text, start_date, end_date, duration, progress, parent, constraint_type, constraint_date } = task;

    try {
        await db.query(
            "UPDATE gantt_tasks SET text = ?, start_date = ?, end_date = ?, duration = ?, progress = ?, parent = ?, constraint_type = ?, constraint_date = ? WHERE id = ?",
            [text, start_date, end_date, duration, progress, parent, constraint_type, constraint_date, sid]
        );
        sendResponse(res, "updated");
    } catch (error) {
        sendResponse(res, "error", null, error);
    }
});

// Delete a task
app.delete("/data/task/:id", async (req, res) => {
    const sid = req.params.id;

    try {
        await db.query("DELETE FROM gantt_tasks WHERE id = ?", [sid]);
        sendResponse(res, "deleted");
    } catch (error) {
        sendResponse(res, "error", null, error);
    }
});
Add handlers for link (dependency) operations:
// Create a new link
app.post("/data/link", async (req, res) => {
    const link = getLink(req.body);
    const { source, target, type } = link;

    try {
        const [result] = await db.query(
            "INSERT INTO gantt_links(source, target, type) VALUES (?,?,?)",
            [source, target, type]
        );
        sendResponse(res, "inserted", result.insertId);
    } catch (error) {
        sendResponse(res, "error", null, error);
    }
});

// Update an existing link
app.put("/data/link/:id", async (req, res) => {
    const sid = req.params.id;
    const link = getLink(req.body);
    const { source, target, type } = link;

    try {
        await db.query(
            "UPDATE gantt_links SET source = ?, target = ?, type = ? WHERE id = ?",
            [source, target, type, sid]
        );
        sendResponse(res, "updated");
    } catch (error) {
        sendResponse(res, "error", null, error);
    }
});

// Delete a link
app.delete("/data/link/:id", async (req, res) => {
    const sid = req.params.id;

    try {
        await db.query("DELETE FROM gantt_links WHERE id = ?", [sid]);
        sendResponse(res, "deleted");
    } catch (error) {
        sendResponse(res, "error", null, error);
    }
});
Add Helper Functions
Also, let's add utility functions to process data and send responses:
function getTask(data) {
    return {
        text: data.text,
        start_date: data.start_date.date("YYYY-MM-DD hh:mm:ss"),
        end_date: data.end_date.date("YYYY-MM-DD hh:mm:ss"),
        duration: data.duration,
        progress: data.progress || 0,
        parent: data.parent,
        constraint_type: data.constraint_type || 'asap',
        constraint_date: data.constraint_date || null
    };
}

function getLink(data) {
    return {
        source: data.source,
        target: data.target,
        type: data.type
    };
}

function sendResponse(res, action, tid, error) {
    if (action === "error") {
        console.log(error);
    }

    const result = { action: action };

    if (tid !== undefined && tid !== null) {
        result.tid = tid;
    }

    res.send(result);
}
Sanitize Task Data (XSS Protection)
DHTMLX Gantt renders fields such as a task's text as HTML and does not escape them by default, so any markup in your migrated data (or entered later by a user) is rendered as-is — a potential XSS vector. Bryntum and most other libraries behave the same way, so it's worth handling this explicitly during migration.
Sanitize on the backend (recommended). Clean free-text fields before they reach the database:
npm install isomorphic-dompurify
import DOMPurify from 'isomorphic-dompurify';

function getTask(data) {
    return {
        text: DOMPurify.sanitize(data.text),
        // ...the remaining fields unchanged
    };
}
Escape on the frontend (defense in depth). Override the templates that render task text in src/main.js:
const escapeHTML = (value) =>
String(value ?? "").replace(/[&<>"']/g, (ch) =>
({ "&": "&", "<": "<", ">": ">", '"': """, "'": "'" }[ch]));
gantt.templates.task_text = (start, end, task) => escapeHTML(task.text);
gantt.templates.tooltip_text = (start, end, task) => escapeHTML(task.text);
// also escape the "text" grid column: template: (task) => escapeHTML(task.text)
For the full set of recommendations — Content Security Policy, lightbox sanitization, and SQL-injection guidance — see the Application Security guide.
Step 3: Frontend Migration with Vite
Set Up Vite Configuration
Create a vite.config.js file in the root of your project:
import { defineConfig } from 'vite';
import path from 'path';

export default defineConfig({
  root: '.',

  server: {
    port: 5173,
    proxy: {
      // Proxy API requests to Express backend
      '/data': {
        target: 'http://localhost:1337',
        changeOrigin: true,
      }
    }
  },

  build: {
    outDir: 'dist',
    emptyOutDir: true,
    sourcemap: true,
  },

  resolve: {
    alias: {
      '@': path.resolve(__dirname, './src')
    }
  }
});
Restructure Project Files
Organize your project with this structure:
dhtmlx-demo/
├── index.html         # Move from public/ to root
├── src/
│   └── main.js        # Create this file for app logic
├── dist/              # Generated by Vite build
├── server.js          # Backend
├── vite.config.js     # Vite configuration
└── package.json
Update index.html
Move index.html to the project root and update it. With Vite, you don't need to manually include CSS and JS files - Vite will bundle them automatically.
<!DOCTYPE html>
<html lang="en">
  <head>
    <meta charSet="UTF-8" />
    <meta name="viewport" content="width=device-width, initial-scale=1.0" />
    <title>DHTMLX Gantt Demo</title>

    <style>
      html, body {
        margin: 0;
        padding: 0;
        height: 100%;
        width: 100%;
      }
      #gantt_here {
        width: 100%;
        height: 100%;
      }
    </style>
  </head>
  <body>
    <div id="gantt_here"></div>
        <script type="module" src="/src/main.js"></script>
  </body>
</html>
Note: The container ID changed to gantt_here, which is DHTMLX Gantt's conventional container ID.
Create src/main.js
Create a new src/main.js file with your DHTMLX Gantt initialization code:
Remove Bryntum code:
// DELETE all Bryntum imports and initialization
import { Gantt, ProjectModel } from './gantt.module.js';

const project = new ProjectModel({
  taskStore: { transformFlatData: true },
  loadUrl: '/load',
  syncUrl: '/sync',
  autoLoad: true,
  autoSync: true,
});

const gantt = new Gantt({
  appendTo: document.body,
  project,
  columns: [...]
});
Add DHTMLX code in src/main.js:
// Import DHTMLX Gantt CSS and library
import '@dhx/trial-gantt/codebase/dhtmlxgantt.css';
import gantt from '@dhx/trial-gantt';

// Enable plugins
gantt.plugins({
  auto_scheduling: true,
  marker: true,
  tooltip: true
});

// Configure auto-scheduling with constraints
gantt.config.auto_scheduling = {
  enabled: true,
  show_constraints: true,
  apply_constraints: true,
  project_constraint: true,
};

// Project settings
gantt.config.project_start = new Date(2026, 10, 5);

// Enable work time
gantt.config.work_time = true;

// Enable additional features
gantt.config.drag_project = true;   // Drag projects
gantt.config.order_branch = true;   // Vertically reorder tasks within the same tree level

// Date format
gantt.config.date_format = "%Y-%m-%d %H:%i:%s";
gantt.config.open_tree_initially = true;

// Configure columns to display constraint information
gantt.config.columns = [
    { name: "text", tree: true, width: '*', resize: true, width: 150 },
    { name: "start_date", align: "center", resize: true, width: 150 },
    { name: "duration", align: "center", width: 80, resize: true, },
    {
        name: "constraint_type", align: "center", width: 100, template: function (task) {
            return gantt.locale.labels[gantt.getConstraintType(task)];
        }, resize: true,
    },
    {
        name: "constraint_date", align: "center", width: 120, template: function (task) {
            const constraintTypes = gantt.config.constraint_types;

            if (task.constraint_date && task.constraint_type != constraintTypes.ASAP && task.constraint_type != constraintTypes.ALAP) {
                return task.constraint_date;
            }
            return "";
        }, resize: true,
    },
    { name: "add", width: 44 }
];

// Configure lightbox sections
gantt.config.lightbox.sections = [
    { name:"description", height:38, map_to:"text", type:"textarea", focus:true},
    { name:"constraint", type:"constraint" },
    { name:"time", type:"duration", map_to:"auto" }
];

// Configure mouse wheel zoom
const hourToStr = gantt.date.date_to_str("%H:%i");
const hourRangeFormat = function(step){
	return function(date) {
		const intervalEnd = new Date(gantt.date.add(date, step, "hour") - 1)
		return hourToStr(date) + " - " + hourToStr(intervalEnd);
	};
};

const zoomConfig = {
    minColumnWidth: 80,
    maxColumnWidth: 150,
    levels: [
        [
            { unit: "month", format: "%M %Y", step: 1},
            { unit: "week", step: 1, format: function (date) {
                    const dateToStr = gantt.date.date_to_str("%d %M");
                    const endDate = gantt.date.add(date, 7 - date.getDay(), "day");
                    const weekNum = gantt.date.date_to_str("%W")(date);
                    return "Week #" + weekNum + ", " + dateToStr(date) + " - " + dateToStr(endDate);
                }}
        ],
        [
            { unit: "month", format: "%M %Y", step: 1},
            { unit: "day", format: "%d %M", step: 1}
        ],
        [
            { unit: "day", format: "%d %M", step: 1},
            { unit: "hour", format: hourRangeFormat(12), step: 12}
        ],
        [
            {unit: "day", format: "%d %M",step: 1},
            {unit: "hour",format: hourRangeFormat(6),step: 6}
        ],
        [
            { unit: "day", format: "%d %M", step: 1 },
            { unit: "hour", format: "%H:%i", step: 1}
        ]
    ],
    startDate: new Date(2026, 10, 5),
    endDate: new Date(2026, 10, 20),
    useKey: "ctrlKey",
    trigger: "wheel",
    element: function(){
        return gantt.$root.querySelector(".gantt_task");
    }
}

gantt.ext.zoom.init(zoomConfig);

// Add marker for project start
gantt.addMarker({
    start_date: gantt.config.project_start,
    text: "project start"
});

// Highlight weekends in the timeline
gantt.templates.scale_cell_class = function (date) {
    if (date.getDay() == 0 || date.getDay() == 6) {
        return "weekend";
    }
};
gantt.templates.timeline_cell_class = function (item, date) {
    if (date.getDay() == 0 || date.getDay() == 6) {
        return "weekend";
    }
};

// Initialize Gantt
gantt.init("gantt_here");

// Load data from server
gantt.load("/data");

const dp = gantt.createDataProcessor({
  url: '/data',
  mode: 'REST'
});
The DataProcessor will automatically:
- Send POST requests to
/data/taskwhen creating tasks - Send PUT requests to
/data/task/:idwhen updating tasks - Send DELETE requests to
/data/task/:idwhen deleting tasks - Handle links similarly with
/data/linkendpoints
Enable Bryntum Default Features
Important Note: To use some features enabled in Bryntum Gantt by default, you need to enable them in DHTMLX Gantt explicitly. The configuration above includes several features that are standard in Bryntum:
Auto-Scheduling with Constraints
In DHTMLX Gantt, you need to:
- Enable the
auto_schedulingplugin - Configure
gantt.config.auto_schedulingsettings
Time constraints for tasks
Auto Scheduling
Work Time and Weekend Highlighting
To highlight non-working days in the timeline:
- Enable
work_timeconfiguration - Use
scale_cell_classandtimeline_cell_classtemplates to highlight weekends
Tooltips
Enable the tooltip plugin to show task information on hover.
gantt.plugins({
  tooltip: true
});
Mouse Wheel Zoom
Configure gantt.ext.zoom to enable zooming with the mouse wheel, allowing users to switch between day, week, month, and other views.
Drag & Drop Features
drag_project: Enables drag and drop of items of the project typeorder_branch: Allows vertically reorder tasks within the same tree level
Note about Task Ordering: When order_branch is enabled, users can reorder tasks in the UI. However, these changes are not automatically saved to the database. To persist task order, you need to implement additional server-side logic. Check this guide for detailed implementation instructions.
Project Markers
Add visual markers to highlight important dates (like project start) on the timeline.
Add Weekend Styling
Add CSS styles to your index.html:
<style>
  html, body {
    margin: 0;
    padding: 0;
    height: 100%;
    width: 100%;
  }
  #gantt_here {
    width: 100%;
    height: 100%;
  }

  /* Weekend styling */
  .weekend {
     background: var(--dhx-gantt-base-colors-background-alt);
  }

  [data-column-name='constraint_type'] .gantt_tree_content {
		padding: 1px;
		line-height: 17px;
		white-space: normal;
		text-align: right;
		box-sizing: border-box;
	}

	.gantt_grid_editor_placeholder[data-column-name='constraint_type'] select {
		line-height: 20px;
		white-space: normal;
	}
</style>
Update package.json Scripts
Update your package.json scripts to use Vite:
{
  "scripts": {
    "dev": "vite",
    "build": "vite build",
    "preview": "vite preview",
    "server": "nodemon server.js"
  }
}
Step 4: Testing the Migration
Development Mode
For development, you need to run two processes:
Terminal 1 - Backend (Express):
npm run server
This starts the API server on http://localhost:1337
Terminal 2 - Frontend (Vite):
npm run dev
This starts the Vite dev server on http://localhost:5173
Open your browser and navigate to http://localhost:5173. Vite will proxy API requests to the Express backend automatically.
You should see the DHTMLX Gantt chart with your data loaded from the database:

Production Mode
For production, first build the frontend:
npm run build
This creates an optimized bundle in the dist/ folder. Then update your server.js to serve the built files:
import path from 'path';

// In server.js, add this for production
const __dirname = import.meta.dirname;

if (process.env.NODE_ENV === 'production') {
  app.use(express.static(path.join(__dirname, 'dist')));
}
Now you can run just the backend:
npm run server
And access the application at http://localhost:1337
Next Steps
- Explore DHTMLX Gantt documentation for advanced features
- Review the API reference for customization options
- Check out DHTMLX Gantt samples for implementation examples