本示例的完整演示源码可在 GitHub 获取: https://github.com/DHTMLX/gantt-migrating-from-bryntum.
从 Bryntum Gantt 迁移到 DHTMLX Gantt
介绍
Bryntum Gantt 是一个用于项目管理工具的 JavaScript 甘特图组件。
本指南将引导您完成将现有应用从 Bryntum Gantt 迁移到 DHTMLX Gantt 的全过程。我们将覆盖所有必要步骤,包括数据库模式(架构)变更、服务器端 API 修改,以及客户端代码更新。
前提条件
在开始迁移之前,请确保您具备:
- 已经在使用 Bryntum Gantt 的现有可运行应用
- 已安装 Node.js(≥ 20.0.0)
- 具备 Bryntum 数据结构的 MySQL 数据库
- 基本了解 Express.js 和 JavaScript
第一步:数据库迁移
理解当前架构
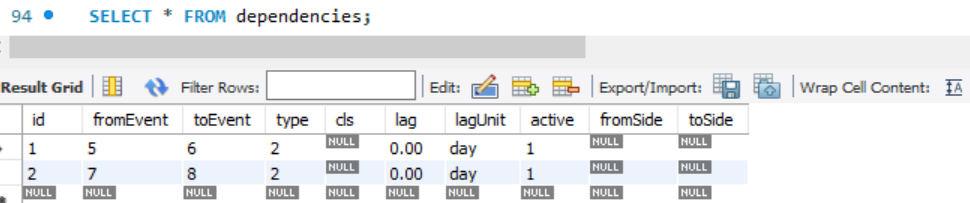
如果您按照 Bryntum 演示设置进行操作,应该有两张表:tasks 和 dependencies。
tasks 表结构:
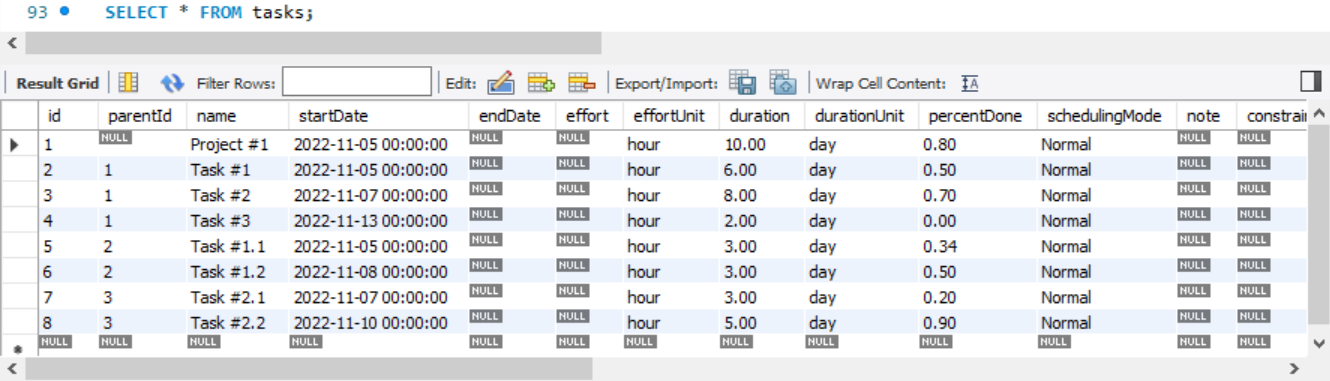
dependencies 表结构:
创建 DHTMLX 表
DHTMLX Gantt 使用更简单的数据库结构。创建两张与 DHTMLX Gantt 兼容的新表:
CREATE TABLE `gantt_tasks`
(
    `id`              int(11)      NOT NULL AUTO_INCREMENT,
    `text`            varchar(255) NOT NULL,
    `start_date`      datetime     NOT NULL,
    `end_date`        datetime     NOT NULL,
    `duration`        int(11)      NOT NULL,
    `progress`        float        NOT NULL,
    `parent`          int(11)      NOT NULL,
    `constraint_type` varchar(20)  DEFAULT 'asap',
    `constraint_date` datetime     DEFAULT NULL,
    PRIMARY KEY (`id`)
);

CREATE TABLE `gantt_links`
(
    `id`     int(11)    NOT NULL AUTO_INCREMENT,
    `source` int(11)    NOT NULL,
    `target` int(11)    NOT NULL,
    `type`   varchar(1) NOT NULL,
    PRIMARY KEY (`id`)
);
注:
- 我们添加了
constraint_type和constraint_date字段,以支持带约束的自动调度 — 这是 Bryntum 与 DHTMLX Gantt 都支持的特性。 - 我们添加了
end_date字段,以保留甘特图计算得到的确切结束日期。若不存储end_date,将会基于start_date与duration重新计算,且结果可能因启用的特性(自动调度、工作时间、约束)而不同。存储end_date可以避免丢失这个基本信息。
迁移现有数据
现在将现有的 Bryntum 数据迁移到新的 DHTMLX 表中。
迁移任务(tasks):
INSERT INTO gantt_tasks (
    `id`,
    `text`,
    `start_date`,
    `end_date`,
    `duration`,
    `progress`,
    `parent`,
    `constraint_type`,
    `constraint_date`
)
SELECT
    `id`,
    `name`,                              -- 'name' */} 'text'
    `startDate`,
    DATE_ADD(`startDate`, INTERVAL `duration` DAY), -- 根据 start_date + duration 计算 end_date
    `duration`,
    `percentDone`,                       -- 'percentDone' */} 'progress'
    IFNULL(`parentId`, 0),               -- 'parentId' */} 'parent' (0 表示根任务)
    CASE `constraintType`                -- 映射约束类型
        WHEN 'assoonaspossible' THEN 'asap'
        WHEN 'aslateaspossible' THEN 'alap'
        WHEN 'startnoearlierthan' THEN 'snet'
        WHEN 'startnolaterthan' THEN 'snlt'
        WHEN 'finishnoearlierthan' THEN 'fnet'
        WHEN 'finishnolaterthan' THEN 'fnlt'
        WHEN 'muststarton' THEN 'mso'
        WHEN 'mustfinishon' THEN 'mfo'
        ELSE 'asap'
    END,
    `constraintDate`
FROM tasks;
迁移链接(dependencies):
INSERT INTO gantt_links (`id`, `source`, `target`, `type`)
SELECT
    `id`,
    `fromEvent`,               -- 'fromEvent' */} 'source'
    `toEvent`,                 -- 'toEvent' */} 'target'
    CASE `type`                -- 将 Bryntum 链接类型转换为 DHTMLX 格式
        WHEN 0 THEN '1'        -- Start-to-Start
        WHEN 1 THEN '3'        -- Start-to-Finish
        WHEN 2 THEN '0'        -- Finish-to-Start (最常见)
        WHEN 3 THEN '2'        -- Finish-to-Finish
        ELSE '0'               -- 默认为 Finish-to-Start
    END
FROM dependencies;
您可以通过执行以下命令来验证数据是否正确迁移:
SELECT * FROM gantt_tasks;
SELECT * FROM gantt_links;
您应该能看到所有任务和链接已正确传输,并且字段映射正确。
Bryntum 任务字段到 DHTMLX Gantt 的映射
Bryntum Gantt 的 TaskModel 包含许多字段,这些字段在 DHTMLX Gantt 中实现方式不同,或在迁移时需要特殊处理。下表解释了将最常用的 Bryntum 任务字段映射到 DHTMLX Gantt 的方式:
| Bryntum Field | Description | Recommended Approach |
|---|---|---|
effort / effortUnit | 完成任务所需的工作量(如 16h),用于基于工作量和资源的调度 | DHTMLX Gantt 不在任务级别支持基于工作量的调度。可改用 Resource Management 模块来分配资源并可视化工作量。资源分配可以表示工作量(如每日小时数),但任务持续时间不会自动重新计算,需手动或通过自定义逻辑管理。 |
durationUnit | 解释任务持续时间的单位(小时、天、周等) | DHTMLX Gantt 使用通过 gantt.config.duration_unit 全局配置的单位。在迁移时,建议将所有持续时间规范化为单一单位。如需对不同任务使用不同单位(如某些任务为小时,某些为天),可以使用 formatter module。 |
schedulingMode | 定义任务调度行为(Normal、FixedDuration、FixedEffort 等) | 无直接等价。DHTMLX Gantt 不支持按任务的调度模式。可以将该值存储为自定义字段,如有需要,使用 Gantt 事件(如 onBeforeTaskUpdate)强制自定义行为。 |
note | 附加到任务的自由文本备注或描述 | 可直接迁移为自定义文本字段(如 note 或 description),并在 lightbox、tooltip 或自定义网格列中显示。 |
manuallyScheduled | 指示任务是否被排除在自动调度之外 | 可使用任务的 task.auto_scheduling 属性,允许单个任务从全局自动调度中排除,同时全局仍启用。请参阅 禁用特定任务的自动调度。 |
calendar | 分配给任务的日历 | DHTMLX Gantt 支持多日历。可以通过 calendar_id 属性(或由 gantt.config.calendar_property 定义的自定义属性)将日历分配给任务。参阅 为任务分配日历。 |
deadline | 任务不应超过的目标日期 | 通过 task.deadline 属性完全支持。当指定时,DHTMLX Gantt 会在时间线显示可视的截止日期指示。该值使用与 start_date 相同的日期格式。 |
第二步:后端迁移(server.js)
删除 Bryntum 专用代码
首先,从 server.js 中移除 Bryntum 包的服务中间件:
// 删除这行:
app.use(express.static(path.join(__dirname, '/node_modules/@bryntum/gantt')));
重要: 在本示例中将使用的 Vite 不再需要直接提供 node_modules。删除任何暴露整个 node_modules 目录的中间件:
// 如果存在,请删除:
app.use('/node_modules', express.static(path.join(__dirname, 'node_modules')));
删除 Bryntum 端点
删除以下 Bryntum 专用端点和帮助函数:
app.get('/load', ...)- Bryntum 数据加载端点app.post('/sync', ...)- Bryntum 同步端点applyTableChanges()函数createOperation()函数updateOperation()函数deleteOperation()函数
安装 DHTMLX Gantt 包和 Vite
移除 Bryntum 依赖项。如果您通过 npm 使用 Bryntum,请卸载它:
npm uninstall @bryntum/gantt
按照 安装指南 安装 DHTMLX Gantt。
在本教程中,我们将使用 DHTMLX Gantt 的试用版:
npm install @dhx/trial-gantt
另外安装 Vite 作为构建工具:
npm install --save-dev vite
添加数据加载端点
添加 GET 端点以加载 DHTMLX 格式的数据:
import dateFormat from 'date-format-lite';

// GET /data - 加载任务和链接
app.get('/data', async (req, res) => {
  try {
    const [[tasks], [links]] = await Promise.all([
      db.query('SELECT * FROM gantt_tasks'),
      db.query('SELECT * FROM gantt_links'),
    ]);

    // 为 DHTMLX Gantt 格式格式化日期
    for (let i = 0; i < tasks.length; i++) {
      tasks[i].start_date = tasks[i].start_date.format("YYYY-MM-DD hh:mm:ss");
      tasks[i].end_date = tasks[i].end_date.format("YYYY-MM-DD hh:mm:ss");
      // 如果存在 constraint_date,则格式化
      if (tasks[i].constraint_date) {
        tasks[i].constraint_date = tasks[i].constraint_date.format("YYYY-MM-DD hh:mm:ss");
      }
    }

    res.json({
      tasks,
      links
    });
  } catch (error) {
    res.status(500).json({
      success: false,
      message: error.message,
    });
  }
});
注: 该响应格式与 Bryntum 不同。DHTMLX 期望 { tasks: [], links: [] },而不是 Bryntum 的嵌套结构。
为 Tasks 与 Links 添加 CRUD 端点
DHTMLX Gantt DataProcessor 使用 RESTful 端点。为任务操作添加处理程序:
// 创建新任务
app.post("/data/task", async (req, res) => {
    const task = getTask(req.body);
    const { text, start_date, end_date, duration, progress, parent, constraint_type, constraint_date } = task;

    try {
        const [result] = await db.query(
            "INSERT INTO gantt_tasks(text, start_date, end_date, duration, progress, parent, constraint_type, constraint_date) VALUES (?,?,?,?,?,?,?,?)",
            [text, start_date, end_date, duration, progress, parent, constraint_type, constraint_date]
        );
        sendResponse(res, "inserted", result.insertId);
    } catch (error) {
        sendResponse(res, "error", null, error);
    }
});

// 更新现有任务
app.put("/data/task/:id", async (req, res) => {
    const sid = req.params.id;
    const task = getTask(req.body);
    const { text, start_date, end_date, duration, progress, parent, constraint_type, constraint_date } = task;

    try {
        await db.query(
            "UPDATE gantt_tasks SET text = ?, start_date = ?, end_date = ?, duration = ?, progress = ?, parent = ?, constraint_type = ?, constraint_date = ? WHERE id = ?",
            [text, start_date, end_date, duration, progress, parent, constraint_type, constraint_date, sid]
        );
        sendResponse(res, "updated");
    } catch (error) {
        sendResponse(res, "error", null, error);
    }
});

// 删除任务
app.delete("/data/task/:id", async (req, res) => {
    const sid = req.params.id;

    try {
        await db.query("DELETE FROM gantt_tasks WHERE id = ?", [sid]);
        sendResponse(res, "deleted");
    } catch (error) {
        sendResponse(res, "error", null, error);
    }
});
为链接(依赖)添加处理程序:
// 创建新链接
app.post("/data/link", async (req, res) => {
    const link = getLink(req.body);
    const { source, target, type } = link;

    try {
        const [result] = await db.query(
            "INSERT INTO gantt_links(source, target, type) VALUES (?,?,?)",
            [source, target, type]
        );
        sendResponse(res, "inserted", result.insertId);
    } catch (error) {
        sendResponse(res, "error", null, error);
    }
});

// 更新现有链接
app.put("/data/link/:id", async (req, res) => {
    const sid = req.params.id;
    const link = getLink(req.body);
    const { source, target, type } = link;

    try {
        await db.query(
            "UPDATE gantt_links SET source = ?, target = ?, type = ? WHERE id = ?",
            [source, target, type, sid]
        );
        sendResponse(res, "updated");
    } catch (error) {
        sendResponse(res, "error", null, error);
    }
});

// 删除链接
app.delete("/data/link/:id", async (req, res) => {
    const sid = req.params.id;

    try {
        await db.query("DELETE FROM gantt_links WHERE id = ?", [sid]);
        sendResponse(res, "deleted");
    } catch (error) {
        sendResponse(res, "error", null, error);
    }
});
添加辅助函数
此外,我们还将添加工具函数来处理数据并返回响应:
function getTask(data) {
    return {
        text: data.text,
        start_date: data.start_date.date("YYYY-MM-DD hh:mm:ss"),
        end_date: data.end_date.date("YYYY-MM-DD hh:mm:ss"),
        duration: data.duration,
        progress: data.progress || 0,
        parent: data.parent,
        constraint_type: data.constraint_type || 'asap',
        constraint_date: data.constraint_date || null
    };
}

function getLink(data) {
    return {
        source: data.source,
        target: data.target,
        type: data.type
    };
}

function sendResponse(res, action, tid, error) {
    if (action === "error") {
        console.log(error);
    }

    const result = { action: action };

    if (tid !== undefined && tid !== null) {
        result.tid = tid;
    }

    res.send(result);
}
对任务数据进行净化(XSS 保护)
DHTMLX Gantt 将诸如任务文本的字段渲染为 HTML,默认不会对其进行转义,因此迁移后的数据中任何标记都将按原样呈现 — 这是一种潜在的 XSS 向量。Bryntum 及多数其他库的行为都类似,因此在迁移时显式处理它是值得的。
后端净化(推荐)。 在数据进入数据库之前清理自由文本字段:
npm install isomorphic-dompurify
import DOMPurify from 'isomorphic-dompurify';

function getTask(data) {
    return {
        text: DOMPurify.sanitize(data.text),
        // ...其余字段保持不变
    };
}
前端转义(前置防御)。 在 src/main.js 中覆盖渲染任务文本的模板:
const escapeHTML = (value) =>
String(value ?? "").replace(/[&<>"']/g, (ch) =>
({ "&": "&", "<": "<", ">": ">", '"': """, "'": "'" }[ch]));
gantt.templates.task_text = (start, end, task) => escapeHTML(task.text);
gantt.templates.tooltip_text = (start, end, task) => escapeHTML(task.text);
// 也对 "text" 网格列进行转义:template: (task) => escapeHTML(task.text)
关于 Content Security Policy、lightbox 清洗以及 SQL 注入等完整推荐,请参阅 应用程序安全性指南。
第三步:使用 Vite 的前端迁移
安装 Vite 配置
在项目根目录创建一个 vite.config.js 文件:
import { defineConfig } from 'vite';
import path from 'path';

export default defineConfig({
  root: '.',

  server: {
    port: 5173,
    proxy: {
      // 将 API 请求代理到 Express 后端
      '/data': {
        target: 'http://localhost:1337',
        changeOrigin: true,
      }
    }
  },

  build: {
    outDir: 'dist',
    emptyOutDir: true,
    sourcemap: true,
  },

  resolve: {
    alias: {
      '@': path.resolve(__dirname, './src')
    }
  }
});
重新组织项目文件
按照以下结构组织您的项目:
dhtmlx-demo/
├── index.html         # 从 public/ 移至根目录
├── src/
│   └── main.js        # 创建此文件用于应用逻辑
├── dist/              # 通过 Vite 构建生成
├── server.js          # 后端
├── vite.config.js     # Vite 配置
└── package.json
更新 index.html
将 index.html 移动到项目根目录并进行更新。使用 Vite 时,不需要手动包含 CSS 和 JS 文件,Vite 将自动打包。
<!DOCTYPE html>
<html lang="en">
  <head>
    <meta charSet="UTF-8" />
    <meta name="viewport" content="width=device-width, initial-scale=1.0" />
    <title>DHTMLX Gantt Demo</title>

    <style>
      html, body {
        margin: 0;
        padding: 0;
        height: 100%;
        width: 100%;
      }
      #gantt_here {
        width: 100%;
        height: 100%;
      }
    </style>
  </head>
  <body>
    <div id="gantt_here"></div>
        <script type="module" src="/src/main.js"></script>
  </body>
</html>
注: 容器 ID 改为 gantt_here,这是 DHTMLX Gantt 的约定容器 ID。
创建 src/main.js
创建一个新的 src/main.js,包含 DHTMLX Gantt 的初始化代码:
移除 Bryntum 代码:
// 删除所有 Bryntum 导入和初始化
import { Gantt, ProjectModel } from './gantt.module.js';

const project = new ProjectModel({
  taskStore: { transformFlatData: true },
  loadUrl: '/load',
  syncUrl: '/sync',
  autoLoad: true,
  autoSync: true,
});

const gantt = new Gantt({
  appendTo: document.body,
  project,
  columns: [...]
});
在 src/main.js 中加入 DHTMLX Gantt 代码:
// 导入 DHTMLX Gantt 的 CSS 与库
import '@dhx/trial-gantt/codebase/dhtmlxgantt.css';
import gantt from '@dhx/trial-gantt';

// 启用插件
gantt.plugins({
  auto_scheduling: true,
  marker: true,
  tooltip: true
});

// 配置带约束的自动调度
gantt.config.auto_scheduling = {
  enabled: true,
  show_constraints: true,
  apply_constraints: true,
  project_constraint: true,
};

// 项目起始设置
gantt.config.project_start = new Date(2026, 10, 5);

// 启用工作时间
gantt.config.work_time = true;

// 启用附加功能
gantt.config.drag_project = true;   // 拖动项目
gantt.config.order_branch = true;   // 在同一树级内垂直重新排序任务

// 日期格式
gantt.config.date_format = "%Y-%m-%d %H:%i:%s";
gantt.config.open_tree_initially = true;

// 配置要显示约束信息的列
gantt.config.columns = [
    { name: "text", tree: true, width: '*', resize: true, width: 150 },
    { name: "start_date", align: "center", resize: true, width: 150 },
    { name: "duration", align: "center", width: 80, resize: true, },
    {
        name: "constraint_type", align: "center", width: 100, template: function (task) {
            return gantt.locale.labels[gantt.getConstraintType(task)];
        }, resize: true,
    },
    {
        name: "constraint_date", align: "center", width: 120, template: function (task) {
            const constraintTypes = gantt.config.constraint_types;

            if (task.constraint_date && task.constraint_type != constraintTypes.ASAP && task.constraint_type != constraintTypes.ALAP) {
                return task.constraint_date;
            }
            return "";
        }, resize: true,
    },
    { name: "add", width: 44 }
];

// 配置 lightbox(弹出框)部分
gantt.config.lightbox.sections = [
    { name:"description", height:38, map_to:"text", type:"textarea", focus:true},
    { name:"constraint", type:"constraint" },
    { name:"time", type:"duration", map_to:"auto" }
];

// 配置鼠标滚轮缩放
const hourToStr = gantt.date.date_to_str("%H:%i");
const hourRangeFormat = function(step){
	return function(date) {
		const intervalEnd = new Date(gantt.date.add(date, step, "hour") - 1)
		return hourToStr(date) + " - " + hourToStr(intervalEnd);
	};
};

const zoomConfig = {
    minColumnWidth: 80,
    maxColumnWidth: 150,
    levels: [
        [
            { unit: "month", format: "%M %Y", step: 1},
            { unit: "week", step: 1, format: function (date) {
                    const dateToStr = gantt.date.date_to_str("%d %M");
                    const endDate = gantt.date.add(date, 7 - date.getDay(), "day");
                    const weekNum = gantt.date.date_to_str("%W")(date);
                    return "Week #" + weekNum + ", " + dateToStr(date) + " - " + dateToStr(endDate);
                }}
        ],
        [
            { unit: "month", format: "%M %Y", step: 1},
            { unit: "day", format: "%d %M", step: 1}
        ],
        [
            { unit: "day", format: "%d %M", step: 1},
            { unit: "hour", format: hourRangeFormat(12), step: 12}
        ],
        [
            {unit: "day", format: "%d %M",step: 1},
            {unit: "hour",format: hourRangeFormat(6),step: 6}
        ],
        [
            { unit: "day", format: "%d %M", step: 1 },
            { unit: "hour", format: "%H:%i", step: 1}
        ]
    ],
    startDate: new Date(2026, 10, 5),
    endDate: new Date(2026, 10, 20),
    useKey: "ctrlKey",
    trigger: "wheel",
    element: function(){
        return gantt.$root.querySelector(".gantt_task");
    }
}

gantt.ext.zoom.init(zoomConfig);

// 为项目起始添加标记
gantt.addMarker({
    start_date: gantt.config.project_start,
    text: "project start"
});

// 在时间线中高亮周末
gantt.templates.scale_cell_class = function (date) {
    if (date.getDay() == 0 || date.getDay() == 6) {
        return "weekend";
    }
};
gantt.templates.timeline_cell_class = function (item, date) {
    if (date.getDay() == 0 || date.getDay() == 6) {
        return "weekend";
    }
};

// 初始化 Gantt
gantt.init("gantt_here");

// 从服务器加载数据
gantt.load("/data");

const dp = gantt.createDataProcessor({
  url: '/data',
  mode: 'REST'
});
DataProcessor 将自动执行:
- 创建任务时发送 POST 请求到
/data/task - 更新任务时发送 PUT 请求到
/data/task/:id - 删除任务时发送 DELETE 请求到
/data/task/:id - 以相同方式处理链接,端点为
/data/link
启用 Bryntum 默认功能
重要提醒: 要在 DHTMLX Gantt 中使用 Bryntum Gantt 默认启用的一些功能,需在 DHTMLX Gantt 中显式启用。上述配置已经包含了一些在 Bryntum 中标准的一些特性。
具约束的自动调度
在 DHTMLX Gantt 中,您需要:
- 启用
auto_scheduling插件 - 配置
gantt.config.auto_scheduling设置
工作时间与周末高亮
在时间线中高亮非工作日:
- 启用
work_time配置 - 使用
scale_cell_class与timeline_cell_class模板高亮周末
工具提示
启用工具提示插件,在悬停时显示任务信息。
gantt.plugins({
  tooltip: true
});
鼠标滚轮缩放
配置 gantt.ext.zoom 以实现鼠标滚轮缩放,允许用户在日、周、月等视图之间切换。
拖放功能
drag_project:启用项目类型项的拖放order_branch:允许在同一树级内垂直重新排序任务
[关于任务排序的说明] 当启用 order_branch 时,用户可以在 UI 中重新排序任务。然而,这些更改不会自动保存到数据库。要持久化任务排序,您需要实现额外的服务端逻辑。请参阅此指南以了解详细实现步骤:在客户端启用任务排序的实现。
项目标记
向时间线添加可视化标记以突出显示重要日期(如项目起始日)。
添加周末样式
在 index.html 中添加 CSS 样式:
<style>
  html, body {
    margin: 0;
    padding: 0;
    height: 100%;
    width: 100%;
  }
  #gantt_here {
    width: 100%;
    height: 100%;
  }

  /* 周末样式 */
  .weekend {
     background: var(--dhx-gantt-base-colors-background-alt);
  }

  [data-column-name='constraint_type'] .gantt_tree_content {
		padding: 1px;
		line-height: 17px;
		white-space: normal;
		text-align: right;
		box-sizing: border-box;
	}

	.gantt_grid_editor_placeholder[data-column-name='constraint_type'] select {
		line-height: 20px;
		white-space: normal;
	}
</style>
更新 package.json 脚本
将 package.json 的脚本更新为使用 Vite:
{
  "scripts": {
    "dev": "vite",
    "build": "vite build",
    "preview": "vite preview",
    "server": "nodemon server.js"
  }
}
第四步:测试迁移
开发模式
对于开发,您需要同时运行两个进程:
终端 1 - 后端(Express):
npm run server
这将在 http://localhost:1337 启动 API 服务器
终端 2 - 前端(Vite):
npm run dev
这将在 http://localhost:5173 启动 Vite 开发服务器
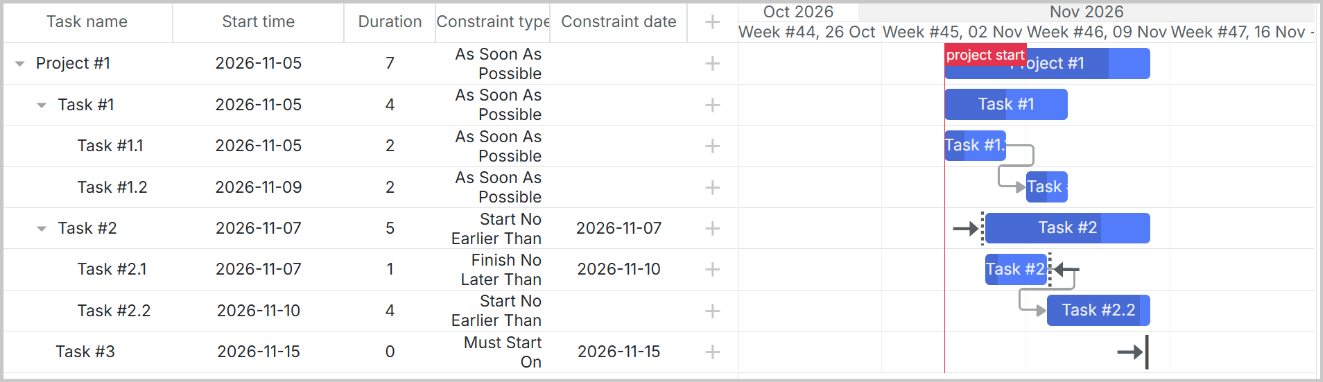
在浏览器中打开并导航到 http://localhost:5173。Vite 会自动将 API 请求代理到 Express 后端。
你应该能看到加载自数据库的数据的 DHTMLX Gantt 图:
生产模式
生产环境下,先构建前端:
npm run build
这会在 dist/ 文件夹中生成一个优化后的打包。然后在你的 server.js 中配置将构建后的文件服务起来:
import path from 'path';

// 在 server.js 中,生产环境使用
const __dirname = import.meta.dirname;

if (process.env.NODE_ENV === 'production') {
  app.use(express.static(path.join(__dirname, 'dist')));
}
现在你可以仅启动后端:
npm run server
并在浏览器中访问应用:http://localhost:1337
下一步
- 浏览 DHTMLX Gantt 文档 以了解高级特性
- 查看 API 参考 以了解自定义选项
- 参考 DHTMLX Gantt 示例 以获取实现示例