完整的演示源代码可在 GitHub 上获得: https://github.com/DHTMLX/gantt-migrating-from-syncfusion.
从 Syncfusion Gantt 迁移到 DHTMLX Gantt
简介
本指南将带您完成将现有应用从 Syncfusion Gantt 迁移到 DHTMLX Gantt 的过程。我们将覆盖所有必要的步骤,包括数据库模式更改、服务器端 API 修改,以及客户端代码更新。
前提条件
在开始迁移之前,请确保您具备:
- 已有使用 Syncfusion Gantt 的工作应用
- 安装了 Node.js(>= 20.0.0)
- 具有 Syncfusion 数据结构的 MySQL 数据库
- 对 Express.js 和 JavaScript 的基础了解
步骤 1:数据库迁移
理解当前模式
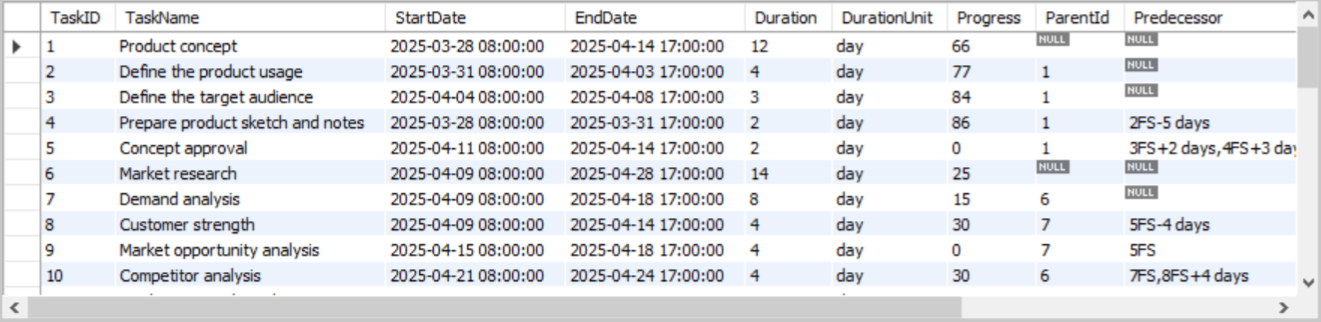
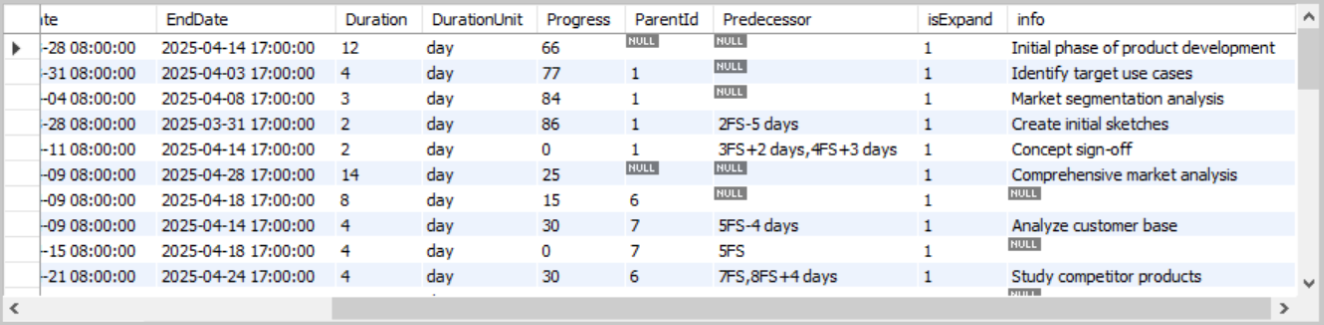
如果您遵循了 Syncfusion 演示的设置,您应该只有一个表:syncfusion_tasks。
syncfusion_tasks 表的结构:
创建 DHTMLX 表
创建两个与 DHTMLX Gantt 兼容的新表:
CREATE TABLE IF NOT EXISTS `gantt_tasks` (
    `id`         INT(11)        NOT NULL AUTO_INCREMENT,
    `text`       VARCHAR(255)   NOT NULL,
    `start_date` DATETIME       NOT NULL,
    `end_date`   DATETIME       NOT NULL,
    `duration`   INT(11)        NOT NULL,
    `progress`   FLOAT          NOT NULL DEFAULT 0,
    `parent`     INT(11)        NOT NULL DEFAULT 0,
    `notes`      TEXT           NULL,
    `open`       BOOLEAN        NOT NULL DEFAULT TRUE,
    PRIMARY KEY (`id`)
);

CREATE TABLE IF NOT EXISTS `gantt_links` (
    `id`         INT(11)        NOT NULL AUTO_INCREMENT,
    `source`     INT(11)        NOT NULL,
    `target`     INT(11)        NOT NULL,
    `type`       VARCHAR(1)     NOT NULL,
    `lag`        INT(11)        DEFAULT 0,
    PRIMARY KEY (`id`)
);
迁移现有数据
现在将现有的 Syncfusion 数据迁移到新的 DHTMLX 表中。
迁移任务:
INSERT INTO gantt_tasks (id, text, start_date, end_date, duration, progress, parent, notes, open)
SELECT
    TaskID,
    TaskName,                                           -- TaskName → text
    StartDate,
    COALESCE(EndDate,
        DATE_ADD(StartDate, INTERVAL Duration DAY)),   -- 如果缺失则计算 end_date
    COALESCE(Duration,
        DATEDIFF(EndDate, StartDate)),                 -- 如果缺失则计算 duration
    COALESCE(Progress, 0) / 100,                       -- 将百分比(0-100)转换为小数(0-1)
    COALESCE(ParentId, 0),                             -- ParentId → parent(根任务为 0)
    info,                                              -- info → notes
    COALESCE(isExpand, TRUE)                           -- isExpand → open
FROM syncfusion_tasks;
迁移链接(依赖关系)
在 Syncfusion Gantt 的数据结构中,依赖关系以字符串形式存储在 Predecessor 列中:
- 格式示例:
"5"、"3,4"、"5FS+2"、"7SS-1,8FF+3"、"2FS-5 days"
在 DHTMLX Gantt 中,任务和链接存储在分离的表中。每个链接是一行,字段如下:
id- 链接IDsource- 依赖从哪一个任务开始target- 依赖到哪一个任务结束type- 依赖类型:"0"(FS)、"1"(SS)、"2"(FF)、"3"(SF)lag- 可选的任务滞后值
我们将实现一个 Node.js 迁移脚本,用于解析 Syncfusion 的字符串格式并转换为 DHTMLX 的结构化格式。
理解 Syncfusion 先行格式(Predecessor):
| 示例 | 含义 | DHTMLX 等价 |
|---|---|---|
"5" | 任务依赖于任务 5(默认 FS) | source: 5, type: "0" |
"3,4" | 依赖于任务 3 和任务 4 | 两条独立的链接 |
"5FS" | Finish-to-Start 依赖 | source: 5, type: "0" |
"5FS+2" | FS 伴随 2 天正滞后 | source: 5, type: "0", lag: 2 |
"5FS-3" | FS 伴随 3 天负滞后 | source: 5, type: "0", lag: -3 |
"2FS-5 days" | FS 的滞后包含文本 "days" | source: 2, type: "0", lag: -5 |
创建一个 migrate-dependencies.js 文件并粘贴以下代码:
import { pool } from './server.js';

const LINK_TYPE_MAP = {
  FS: '0', // Finish-to-Start
  SS: '1', // Start-to-Start
  FF: '2', // Finish-to-Finish
  SF: '3', // Start-to-Finish
};

/**
 * 解析单个前置字符串,如 "5FS+2" 或 "7SS-1 days"
 * @param {string} predecessor - 单个前置字符串
 * @returns {object|null} - 解析后的链接对象,若无效则返回 null
 */
function parseSinglePredecessor(predecessor) {
  const clean = predecessor.trim();

  // 正则模式:TaskID [Type] [+/-Lag]
  // 匹配:"5"、"5FS"、"5FS+2"、"7SS-1"、"3FS+2 days"、"8SS-1 days"
  const pattern = /^(\d+)(FS|SS|FF|SF)?([\+\-]\d+)?(?:\s+days?)?$/i;
  const match = clean.match(pattern);

  if (!match) {
    console.warn(`Cannot parse predecessor: "${predecessor}"`);
    return null;
  }

  const source = parseInt(match[1]);
  const typeCode = match[2] ? match[2].toUpperCase() : 'FS';
  const lag = match[3] ? parseInt(match[3]) : 0;

  return {
    source,
    type: LINK_TYPE_MAP[typeCode] || '0',
    lag,
  };
}

/**
 * 解析一个可能包含多个依赖的完整前置字符串
 * @param {string} predecessorString - 数据库中的完整前置字符串(如 "3,4FS+2,5SS-1")
 * @returns {array} - 链接对象数组
 */
function parsePredecessors(predecessorString) {
  if (!predecessorString || predecessorString.trim() === '') {
    return [];
  }

  const parts = predecessorString.split(',');
  const links = [];

  for (const part of parts) {
    const link = parseSinglePredecessor(part);
    if (link) {
      links.push(link);
    }
  }

  return links;
}

async function migrateDependencies() {
  const connection = await pool.getConnection();

  try {
    console.log('Starting dependency migration...\n');

    // 步骤 1:查询所有有前置的任务
    const [tasks] = await connection.query(
      'SELECT TaskID, TaskName, Predecessor FROM syncfusion_tasks WHERE Predecessor IS NOT NULL AND Predecessor != ""'
    );

    console.log(`Found ${tasks.length} tasks with predecessors\n`);

    const linksToInsert = [];
    let skippedCount = 0;

    // 步骤 2:解析每个任务的前置字符串
    for (const task of tasks) {
      const targetId = task.TaskID;
      const predecessorString = task.Predecessor;
      const links = parsePredecessors(predecessorString);

      if (links.length === 0) {
        console.log(`No valid links parsed`);
        skippedCount++;
        continue;
      }

      // 步骤 3:为插入创建链接对象
      for (const link of links) {
        linksToInsert.push({
          source: link.source,
          target: targetId,
          type: link.type,
          lag: link.lag || 0,
        });

        const typeName = Object.keys(LINK_TYPE_MAP).find((key) => LINK_TYPE_MAP[key] === link.type);
        console.log(`Link: ${link.source} -> ${targetId} (${typeName})`);
      }
    }

    console.log(`\n--- Summary ---`);
    console.log(`Tasks processed: ${tasks.length}`);
    console.log(`Links to create: ${linksToInsert.length}`);
    console.log(`Tasks skipped: ${skippedCount}\n`);

    // 步骤 4:将链接插入数据库(带事务)
    if (linksToInsert.length > 0) {
      await connection.beginTransaction();

      try {
        // 清空现有链接以避免重复
        await connection.query('DELETE FROM gantt_links');
        console.log('Cleared existing links from gantt_links table');

        // 插入每个链接
        for (const link of linksToInsert) {
          await connection.query('INSERT INTO gantt_links (source, target, type, `lag`) VALUES (?, ?, ?, ?)', [
            link.source,
            link.target,
            link.type,
            link.lag,
          ]);
        }

        await connection.commit();
        console.log(`Successfully inserted ${linksToInsert.length} links\n`);

        const [insertedLinks] = await connection.query('SELECT * FROM gantt_links ORDER BY id');
        console.log('Inserted links:');
        console.table(insertedLinks);
      } catch (error) {
        await connection.rollback();
        throw error;
      }
    }

    console.log('\nMigration completed successfully!');
  } catch (error) {
    console.error('Error during migration:', error);
    throw error;
  } finally {
    connection.release();
    await pool.end();
  }
}

// Run the migration
migrateDependencies().catch(console.error);
Then add a script to your dhtmlx-demo/package.json:
{
  "scripts": {
    "migrate-deps": "node migrate-dependencies.js"
  }
}
运行迁移:
cd dhtmlx-demo
npm run migrate-deps
您可以通过以下命令验证数据是否正确迁移:
SELECT * FROM gantt_tasks;
SELECT * FROM gantt_links;
您应看到所有任务和链接已正确转移并具有正确的字段映射。
将 Syncfusion 任务字段映射到 DHTMLX Gantt
| Syncfusion Field | DHTMLX Field | 备注 |
|---|---|---|
TaskID | id | Task id |
TaskName | text | Task name |
StartDate | start_date | Task start date |
EndDate | end_date | Task end date(若未提供,在 DHTMLX 中计算) |
Duration | duration | Task duration |
DurationUnit | (config) | DHTMLX Gantt 使用通过 gantt.config.duration_unit 配置的全局持续时间单位。在迁移期间,建议将所有持续时间标准化为一个单位。如果要为不同任务使用不同的持续时间单位,例如某些任务显示为小时、某些为“天”,可使用 formatter module。 |
Progress | progress | Syncfusion: 0-100%,DHTMLX: 0-1(小数) |
ParentId | parent | 父任务 ID(根任务为 0) |
Predecessor | (links table) | Syncfusion 将其存为字符串,DHTMLX 使用单独的 gantt_links 表 |
info (notes) | - | 可作为自定义列添加。更多信息请参阅本文:如何在网格中添加自定义列 |
isExpand | open | 父任务的展开/折叠状态 |
Indicators | markers | DHTMLX 使用 gantt.addMarker() API。了解更多关于 添加垂直标记 的信息 |
步骤 2:后端迁移(server.js)
删除 Syncfusion 端点
从 server.js 中删除以下与 Syncfusion 相关的端点:
app.post('/api/getTasks', ...)- Syncfusion 数据加载端点app.post('/api/batchTasks', ...)- Syncfusion 批量同步端点
安装 DHTMLX Gantt 包和 Vite
卸载 Syncfusion 依赖:
npm uninstall @syncfusion/ej2
按照 安装指南 安装 DHTMLX Gantt。
在本教程中,我们将使用 DHTMLX Gantt 的试用版本:
npm install @dhx/trial-gantt
还要安装 Vite 作为构建工具:
npm install --save-dev vite
添加数据加载端点
我们将使用 date-format-lite 库将 MySQL DATETIME 格式格式化为 DHTMLX 期望的格式。
安装该库:
npm install date-format-lite
添加用于以 DHTMLX 格式加载数据的 GET 端点:
import dateFormat from 'date-format-lite';

// GET /data - Load tasks and links
app.get('/data', async (req, res) => {
  try {
    const [tasks] = await pool.query('SELECT * FROM gantt_tasks ORDER BY id');
    const [links] = await pool.query('SELECT * FROM gantt_links');

    tasks.forEach((task) => {
      if (task.start_date) {
        task.start_date = task.start_date.format('YYYY-MM-DD hh:mm:ss');
      }
      if (task.end_date) {
        task.end_date = task.end_date.format('YYYY-MM-DD hh:mm:ss');
      }
    });

    res.json({
      tasks,
      links,
    });
  } catch (error) {
    console.error('Error loading data:', error);
    res.status(500).json({ error: 'Failed to load data' });
  }
});
注意: 返回格式与 Syncfusion 不同({ result: [...], count: number })。DHTMLX 期望 { tasks: [], links: [] }。
为任务与链接添加 CRUD 端点
DHTMLX Gantt 的 DataProcessor 使用 RESTful 端点与服务器进行数据同步。每个操作(创建、更新、删除)都作为单独的 HTTP 请求发送。了解更多关于 Server-side integration。
为 任务操作 添加处理程序:
// Create a new task
app.post('/data/task', async (req, res) => {
  try {
    const task = getTask(req.body);

    const [result] = await pool.query(
      `INSERT INTO gantt_tasks (text, start_date, end_date, duration, progress, parent, notes)
               VALUES (?, ?, ?, ?, ?, ?, ?)`,
      [task.text, task.start_date, task.end_date, task.duration, task.progress, task.parent, task.notes]
    );
    sendResponse(res, 'inserted', result.insertId);
  } catch (error) {
    sendResponse(res, 'error', null, error);
  }
});

// Update an existing task
app.put('/data/task/:id', async (req, res) => {
  try {
    const taskId = req.params.id;
    const task = getTask(req.body);
    await pool.query(
      `UPDATE gantt_tasks
               SET text = ?, start_date = ?, end_date = ?, duration = ?, progress = ?, parent = ?, notes = ?
               WHERE id = ?`,
      [task.text, task.start_date, task.end_date, task.duration, task.progress, task.parent, task.notes, taskId]
    );
    sendResponse(res, 'updated');
  } catch (error) {
    sendResponse(res, 'error', null, error);
  }
});

// Delete a task
app.delete('/data/task/:id', async (req, res) => {
  try {
    const taskId = req.params.id;
    await pool.query('DELETE FROM gantt_tasks WHERE id = ?', [taskId]);
    sendResponse(res, 'deleted');
  } catch (error) {
    sendResponse(res, 'error', null, error);
  }
});
为链接(依赖关系)操作添加处理程序:
// POST /data/link - Create new link
app.post('/data/link', async (req, res) => {
  try {
    const link = getLink(req.body);
    const [result] = await pool.query('INSERT INTO gantt_links (source, target, type) VALUES (?, ?, ?)', [
      link.source,
      link.target,
      link.type,
    ]);
    sendResponse(res, 'inserted', result.insertId);
  } catch (error) {
    sendResponse(res, 'error', null, error);
  }
});

// PUT /data/link/:id - Update existing link
app.put('/data/link/:id', async (req, res) => {
  try {
    const linkId = req.params.id;
    const link = getLink(req.body);
    await pool.query('UPDATE gantt_links SET source = ?, target = ?, type = ? WHERE id = ?', [
      link.source,
      link.target,
      link.type,
      linkId,
    ]);
    sendResponse(res, 'updated');
  } catch (error) {
    sendResponse(res, 'error', null, error);
  }
});

// DELETE /data/link/:id - Delete link
app.delete('/data/link/:id', async (req, res) => {
  try {
    const linkId = req.params.id;
    await pool.query('DELETE FROM gantt_links WHERE id = ?', [linkId]);
    sendResponse(res, 'deleted');
  } catch (error) {
    sendResponse(res, 'error', null, error);
  }
});
添加辅助函数
此外,让我们添加用于处理数据和发送响应的工具函数:
// Helper: Parse task data from request
function getTask(data) {
  return {
    text: data.text,
    start_date: data.start_date,
    end_date: data.end_date,
    duration: data.duration || 1,
    progress: parseFloat(data.progress) || 0,
    parent: data.parent || 0,
    notes: data.notes || null,
  };
}

// Helper: Parse link data from request
function getLink(data) {
  return {
    source: data.source,
    target: data.target,
    type: data.type,
  };
}

// Helper: Send response to DataProcessor
function sendResponse(res, action, tid = null, error = null) {
  if (error) {
    console.error('Error:', error);
    return res.status(500).json({ action: 'error', message: error.message });
  }
  const result = { action };
  if (tid !== null) result.tid = tid;
  res.json(result);
}
对任务数据进行清洗(XSS 防护)
DHTMLX Gantt 会将任务的 text 字段渲染为 HTML,默认不会对其进行转义,因此迁移的数据中的任意标记都会原样渲染——这可能成为 XSS 向量。Syncfusion 及大多数其他库的行为也大致相同,因此在迁移过程中显式处理此问题是值得的。
在后端进行清洗(推荐)。 在到达数据库之前,清理自由文本字段:
npm install isomorphic-dompurify
import DOMPurify from 'isomorphic-dompurify';

function getTask(data) {
  return {
    text: DOMPurify.sanitize(data.text),
    notes: data.notes ? DOMPurify.sanitize(data.notes) : null,
    // ...其余字段保持不变
  };
}
在前端进行转义(前线防御)。覆盖在 src/app/app.ts 中渲染任务文本的模板:
const escapeHTML = (value: unknown) =>
String(value ?? '').replace(/[&<>"']/g, (ch) =>
({ '&': '&', '<': '<', '>': '>', '"': '"', "'": ''' }[ch] as string));
gantt.templates.task_text = (start, end, task) => escapeHTML(task.text);
// 也对显示任务文本的任意自定义网格列进行转义:template: (task) => escapeHTML(task.text)
完整的建议集——包括内容安全策略、灯箱清洗以及防止 SQL 注入的指南——请参阅 应用程序安全性 指南。
步骤 3:使用 Vite 的前端迁移
设置 Vite 配置
在项目根目录创建 vite.config.js 文件:
import { defineConfig } from 'vite';

export default defineConfig({
  root: './src',
  server: {
    port: 5173,
    proxy: {
      '/data': {
        target: 'http://localhost:1337',
        changeOrigin: true,
      },
    },
  },
  build: {
    outDir: 'dist',
    emptyOutDir: true,
  },
});
将项目组织成如下结构:
dhtmlx-demo/
├── src/                    # 前端源码
│   ├── app/
│   │   └── app.ts         # 主 Gantt 初始化
│   ├── index.html         # 主 HTML 文件
│   ├── resources/
│   └── styles/
├── e2e/                   # 端到端测试(可选)
├── .env.example
├── .gitignore
├── migrate-dependencies.js  # 依赖迁移脚本
├── package.json           # 项目依赖
├── server.js              # Express 服务器
├── setup.sql              # 数据库设置脚本
├── tsconfig.json          # TypeScript 配置
└── vite.config.js         # Vite 配置
更新 index.html
将 index.html 更新为以下代码:
<!DOCTYPE html>
<html lang="en">
  <head>
    <title>DHTMLX Gantt Chart Demo</title>
    <meta charSet="utf-8" />
    <meta name="viewport" content="width=device-width, initial-scale=1.0, user-scalable=no" />
    <meta name="description" content="DHTMLX Gantt Chart - MySQL Integration Demo" />
    <meta name="author" content="DHTMLX" />

    <style>
      html,
      body {
        margin: 0;
        padding: 0;
        height: 100%;
        width: 100%;
        font-family: Arial, sans-serif;
      }

      .container {
        width: 100%;
        height: 100%;
        display: flex;
        flex-direction: column;
        padding: 20px;
        box-sizing: border-box;
      }

      h1 {
        color: #333;
        margin: 0 0 20px 0;
      }

      #gantt_here {
        flex-grow: 1;
        width: 100%;
      }
    </style>
  </head>

  <body>
    <div class="container">
      <h1>DHTMLX Gantt Chart - MySQL Integration Demo</h1>
      <div id="gantt_here"></div>
    </div>

    <script type="module" src="./app/app.ts"></script>
  </body>
</html>
注:容器 ID 已更改为 gantt_here,这是 DHTMLX Gantt 的常用容器 ID。
更新 src/app/app.ts
在 src/app/app.ts 文件中,移除所有与 Syncfusion 相关的导入和代码。
替换为 DHTMLX Gantt 初始化:
import '@dhx/trial-gantt/codebase/dhtmlxgantt.css';
import { Gantt } from '@dhx/trial-gantt';

const gantt = Gantt.getGanttInstance();

gantt.config.date_format = '%Y-%m-%d %H:%i:%s';
gantt.config.scale_height = 50;

gantt.config.scales = [
  { unit: 'month', step: 1, format: '%F %Y' },
  { unit: 'day', step: 1, format: '%d' },
];

gantt.config.lightbox.sections = [
  { name: 'description', height: 38, map_to: 'text', type: 'textarea', focus: true },
  { name: 'time', height: 72, type: 'duration', map_to: 'auto' },
  { name: 'notes', height: 70, map_to: 'notes', type: 'textarea' },
];

gantt.init('gantt_here');
gantt.load('/data');

const dp = gantt.createDataProcessor({
  url: '/data', // REST 端点的基础 URL
  mode: 'REST', // 使用 RESTful 模式
});
DataProcessor 将自动完成以下操作:
- 创建任务时向
/data/task发送 POST 请求 - 更新任务时向
/data/task/:id发送 PUT 请求 - 删除任务时向
/data/task/:id发送 DELETE 请求 - 同样处理链接,使用
/data/link端点
更新 package.json 脚本
将你的 package.json 脚本更新为使用 Vite:
{
  "scripts": {
    "dev": "vite",
    "build": "vite build",
    "preview": "vite preview",
    "server": "nodemon server.js",
    "migrate-deps": "node migrate-dependencies.js"
  }
}
步骤 4:测试迁移
运行应用程序
在开发模式下,需要同时运行两个进程:
- 终端 1——后端(Express):
npm run server
这会在 http://localhost:1337(或您配置的端口)启动 API 服务器
- 终端 2——前端(Vite):
npm run dev
这会在 http://localhost:5173 启动 Vite 开发服务器。打开浏览器,访问 http://localhost:5173。Vite 将自动把 API 请求代理到 Express 后端。
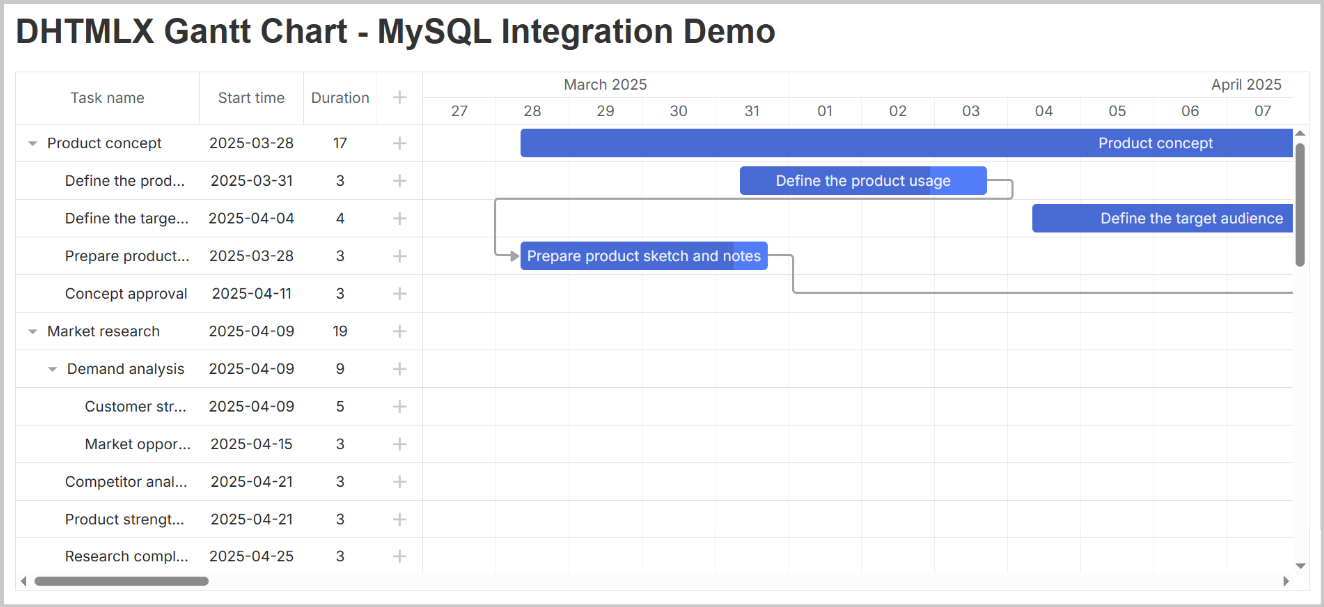
您应该会看到 DHTMLX Gantt 图表以及从数据库加载的数据:
下一步
- 了解 DHTMLX Gantt 文档 的高级功能
- 查看 API 参考 的自定义选项
- 了解更多实现示例,请查看 DHTMLX Gantt 示例