완전한 데모 소스 코드는 GitHub에서 확인할 수 있습니다: https://github.com/DHTMLX/gantt-migrating-from-syncfusion.
Syncfusion Gantt에서 DHTMLX Gantt로 마이그레이션하기
개요
이 가이드는 기존 애플리케이션을 Syncfusion Gantt에서 DHTMLX Gantt로 마이그레이션하는 과정을 안내합니다. 데이터베이스 스키마 변경, 서버 측 API 수정, 클라이언트 코드 업데이트 등 필요한 모든 단계들을 다룹니다.
전제 조건
마이그레이션을 시작하기 전에 아래 사항을 확인하십시오.
- Syncfusion Gantt를 사용 중인 기존 애플리케이션
- Node.js 버전(≥ 20.0.0) 설치
- MySQL 데이터베이스의 Syncfusion 데이터 구조
- Express.js와 JavaScript에 대한 기본 지식
1단계: 데이터베이스 마이그레이션
현재 스키마 이해하기
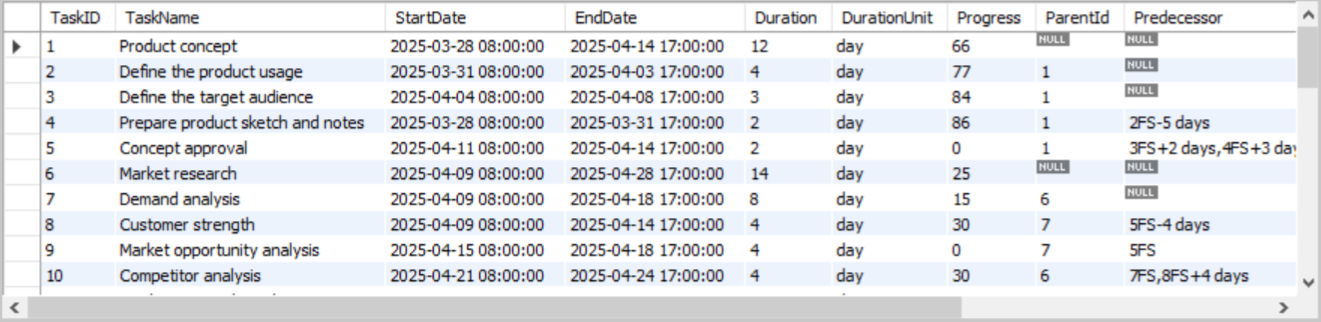
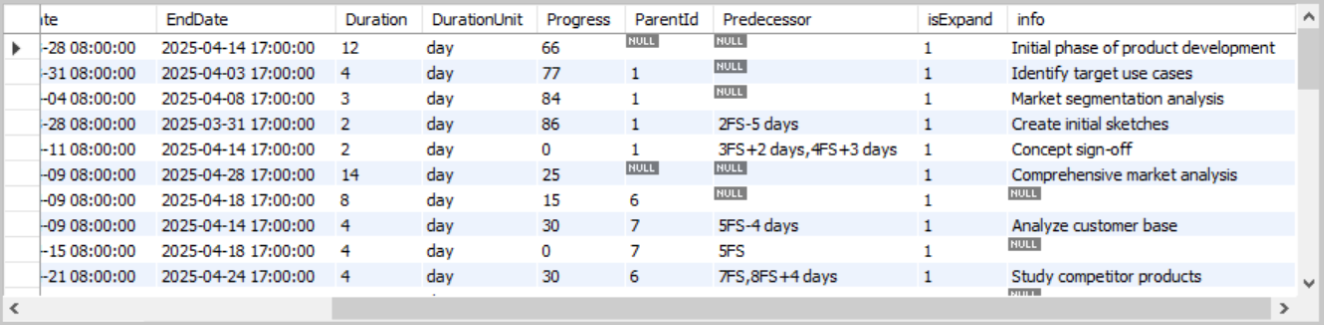
Syncfusion 데모 설정을 따라갔다면 하나의 테이블 syncfusion_tasks를 갖고 있을 가능성이 큽니다.
syncfusion_tasks 테이블 구조:
DHTMLX 테이블 생성
DHTMLX Gantt에 맞춰 두 개의 새 테이블을 생성합니다.
CREATE TABLE IF NOT EXISTS `gantt_tasks` (
    `id`         INT(11)        NOT NULL AUTO_INCREMENT,
    `text`       VARCHAR(255)   NOT NULL,
    `start_date` DATETIME       NOT NULL,
    `end_date`   DATETIME       NOT NULL,
    `duration`   INT(11)        NOT NULL,
    `progress`   FLOAT          NOT NULL DEFAULT 0,
    `parent`     INT(11)        NOT NULL DEFAULT 0,
    `notes`      TEXT           NULL,
    `open`       BOOLEAN        NOT NULL DEFAULT TRUE,
    PRIMARY KEY (`id`)
);

CREATE TABLE IF NOT EXISTS `gantt_links` (
    `id`         INT(11)        NOT NULL AUTO_INCREMENT,
    `source`     INT(11)        NOT NULL,
    `target`     INT(11)        NOT NULL,
    `type`       VARCHAR(1)     NOT NULL,
    `lag`        INT(11)        DEFAULT 0,
    PRIMARY KEY (`id`)
);
기존 데이터 마이그레이션
이제 기존 Syncfusion 데이터를 새 DHTMLX 테이블로 마이그레이션합니다.
TASK 마이그레이션:
INSERT INTO gantt_tasks (id, text, start_date, end_date, duration, progress, parent, notes, open)
SELECT
    TaskID,
    TaskName,                                           -- TaskName → text
    StartDate,
    COALESCE(EndDate,
        DATE_ADD(StartDate, INTERVAL Duration DAY)),   -- 엔드 날짜가 없으면 계산
    COALESCE(Duration,
        DATEDIFF(EndDate, StartDate)),                 -- 기간이 없으면 계산
    COALESCE(Progress, 0) / 100,                       -- 백분율(0-100)을 소수(0-1)로 변환
    COALESCE(ParentId, 0),                             -- ParentId → parent (루트 태스크의 경우 0)
    info,                                              -- info → notes
    COALESCE(isExpand, TRUE)                           -- isExpand → open
FROM syncfusion_tasks;
링크(의존성) 마이그레이션
Syncfusion Gantt의 데이터 구조에서 의존성은 Predecessor 열에 문자열로 저장됩니다:
- 형식 예:
"5","3,4","5FS+2","7SS-1,8FF+3","2FS-5 days"
DHTMLX Gantt에서는 태스크와 링크가 별도의 테이블에 저장됩니다. 각 링크는 한 행으로 저장됩니다.
id- 링크 IDsource- 의존성이 시작될 태스크의 IDtarget- 의존성이 종료될 태스크의 IDtype- 의존성 유형:"0"(FS),"1"(SS),"2"(FF),"3"(SF)lag- 선택적 태스크의 지연
Syncfusion의 문자열 포맷을 파싱하고 DHTMLX의 구조화된 형식으로 변환하는 Node.js 마이그레이션 스크립트를 구현합니다.
Syncfusion Predecessor 포맷 이해하기:
| 예시 | 의미 | DHTMLX 대응 |
|---|---|---|
"5" | 태스크 5를 의존(기본 FS) | source: 5, type: "0" |
"3,4" | 태스크 3 및 4를 의존 | 두 개의 개별 링크 |
"5FS" | Finish-to-Start 의존성 | source: 5, type: "0" |
"5FS+2" | FS에 2일의 양의 지연 | source: 5, type: "0", lag: 2 |
"5FS-3" | FS에 3일의 음의 지연 | source: 5, type: "0", lag: -3 |
"2FS-5 days" | 텍스트 "days"를 포함한 지연 | source: 2, type: "0", lag: -5 |
다음 코드를 붙여넣어 migrate-dependencies.js 파일을 만들고 사용합니다:
import { pool } from './server.js';

const LINK_TYPE_MAP = {
  FS: '0', // Finish-to-Start
  SS: '1', // Start-to-Start
  FF: '2', // Finish-to-Finish
  SF: '3', // Start-to-Finish
};

/**
 * Parse a single predecessor string like "5FS+2" or "7SS-1 days"
 * @param {string} predecessor - Single predecessor string
 * @returns {object|null} - Parsed link object or null if invalid
 */
function parseSinglePredecessor(predecessor) {
  const clean = predecessor.trim();

  // Regex pattern to match: TaskID [Type] [+/-Lag]
  // Matches: "5", "5FS", "5FS+2", "7SS-1", "3FS+2 days", "8SS-1 days"
  const pattern = /^(\d+)(FS|SS|FF|SF)?([\+\-]\d+)?(?:\s+days?)?$/i;
  const match = clean.match(pattern);

  if (!match) {
    console.warn(`Cannot parse predecessor: "${predecessor}"`);
    return null;
  }

  const source = parseInt(match[1]);
  const typeCode = match[2] ? match[2].toUpperCase() : 'FS';
  const lag = match[3] ? parseInt(match[3]) : 0;

  return {
    source,
    type: LINK_TYPE_MAP[typeCode] || '0',
    lag,
  };
}

/**
 * Parse a full predecessor string that may contain multiple dependencies
 * @param {string} predecessorString - Full predecessor string from database (e.g., "3,4FS+2,5SS-1")
 * @returns {array} - Array of link objects
 */
function parsePredecessors(predecessorString) {
  if (!predecessorString || predecessorString.trim() === '') {
    return [];
  }

  const parts = predecessorString.split(',');
  const links = [];

  for (const part of parts) {
    const link = parseSinglePredecessor(part);
    if (link) {
      links.push(link);
    }
  }

  return links;
}

async function migrateDependencies() {
  const connection = await pool.getConnection();

  try {
    console.log('Starting dependency migration...\n');

    // Step 1: Query all tasks that have predecessors
    const [tasks] = await connection.query(
      'SELECT TaskID, TaskName, Predecessor FROM syncfusion_tasks WHERE Predecessor IS NOT NULL AND Predecessor != ""'
    );

    console.log(`Found ${tasks.length} tasks with predecessors\n`);

    const linksToInsert = [];
    let skippedCount = 0;

    // Step 2: Parse each task's predecessor string
    for (const task of tasks) {
      const targetId = task.TaskID;
      const predecessorString = task.Predecessor;
      const links = parsePredecessors(predecessorString);

      if (links.length === 0) {
        console.log(`No valid links parsed`);
        skippedCount++;
        continue;
      }

      // Step 3: Create link objects for insertion
      for (const link of links) {
        linksToInsert.push({
          source: link.source,
          target: targetId,
          type: link.type,
          lag: link.lag || 0,
        });

        const typeName = Object.keys(LINK_TYPE_MAP).find((key) => LINK_TYPE_MAP[key] === link.type);
        console.log(`Link: ${link.source} -> ${targetId} (${typeName})`);
      }
    }

    console.log(`\n--- Summary ---`);
    console.log(`Tasks processed: ${tasks.length}`);
    console.log(`Links to create: ${linksToInsert.length}`);
    console.log(`Tasks skipped: ${skippedCount}\n`);

    // Step 4: Insert links into database (with transaction)
    if (linksToInsert.length > 0) {
      await connection.beginTransaction();

      try {
        // Clear existing links to avoid duplicates
        await connection.query('DELETE FROM gantt_links');
        console.log('Cleared existing links from gantt_links table');

        // Insert each link
        for (const link of linksToInsert) {
          await connection.query('INSERT INTO gantt_links (source, target, type, `lag`) VALUES (?, ?, ?, ?)', [
            link.source,
            link.target,
            link.type,
            link.lag,
          ]);
        }

        await connection.commit();
        console.log(`Successfully inserted ${linksToInsert.length} links\n`);

        const [insertedLinks] = await connection.query('SELECT * FROM gantt_links ORDER BY id');
        console.log('Inserted links:');
        console.table(insertedLinks);
      } catch (error) {
        await connection.rollback();
        throw error;
      }
    }

    console.log('\nMigration completed successfully!');
  } catch (error) {
    console.error('Error during migration:', error);
    throw error;
  } finally {
    connection.release();
    await pool.end();
  }
}

// Run the migration
migrateDependencies().catch(console.error);
그 다음에 dhtmlx-demo/package.json에 스크립트를 추가합니다:
{
  "scripts": {
    "migrate-deps": "node migrate-dependencies.js"
  }
}
마이그레이션을 실행합니다:
cd dhtmlx-demo
npm run migrate-deps
다음 명령을 실행하여 데이터가 올바르게 마이그레이션되었는지 확인할 수 있습니다:
SELECT * FROM gantt_tasks;
SELECT * FROM gantt_links;
작업 및 링크가 올바른 필드 매핑으로 전부 전달되었는지 확인합니다.
Syncfusion 태스크 필드를 DHTMLX Gantt로 매핑
| Syncfusion 필드 | DHTMLX 필드 | 비고 |
|---|---|---|
TaskID | id | 태스크 ID |
TaskName | text | 태스크 이름 |
StartDate | start_date | 태스크 시작 날짜 |
EndDate | end_date | 태스크 종료 날짜(없으면 DHTMLX에서 계산) |
Duration | duration | 태스크 기간 |
DurationUnit | (config) | DHTMLX Gantt는 글로벌 지속 시간 단위를 사용하도록 구성됩니다(gantt.config.duration_unit). 마이그레이션 동안 모든 기간을 하나의 단위로 정규화하는 것이 권장됩니다. 다른 태스크에 대해 서로 다른 기간 단위를 사용하려면 예: 일부 태스크의 기간은 시간 단위로, 일부는 "일" 단위로 표시하려면 formatter 모듈을 사용하십시오. |
Progress | progress | Syncfusion: 0-100%, DHTMLX: 0-1(소수) |
ParentId | parent | 부모 태스크 ID(루트 태스크의 경우 0) |
Predecessor | (links table) | Syncfusion은 문자열로 저장, DHTMLX는 별도 gantt_links 테이블 사용 |
info (notes) | - | 커스텀 컬럼으로 추가 가능. 자세한 내용은 이 기사 참고: How to add a custom column in the grid |
isExpand | open | 부모 태스크의 확장/축소 상태 |
Indicators | markers | DHTMLX는 gantt.addMarker() API를 사용. 수직 마커 추가에 대한 자세한 내용은 마커 가이드를 참고 |
2단계: 백엔드 마이그레이션 (server.js)
Syncfusion 엔드포인트 제거
server.js에서 Syncfusion 전용 엔드포인트를 제거합니다:
app.post('/api/getTasks', ...)- Syncfusion 데이터 불러오기 엔드포인트app.post('/api/batchTasks', ...)- Syncfusion 배치 동기화 엔드포인트
DHTMLX Gantt 패키지 및 Vite 설치
Syncfusion 의존성 제거:
npm uninstall @syncfusion/ej2
설치 가이드를 따라 DHTMLX Gantt를 설치합니다.
本 실습에서는 DHTMLX Gantt의 트라이얼 버전을 사용합니다:
npm install @dhx/trial-gantt
빌드 도구로 Vite도 설치합니다:
npm install --save-dev vite
데이터 로딩 엔드포인트 추가
MySQL DATETIME 형식에서 DHTMLX가 기대하는 형식으로 날짜를 포맷하기 위해 date-format-lite 라이브러리를 사용합니다.
라이브러리를 설치합니다:
npm install date-format-lite
데이터를 DHTMLX 형식으로 로드하는 GET 엔드포인트를 추가합니다:
import dateFormat from 'date-format-lite';

// GET /data - Load tasks and links
app.get('/data', async (req, res) => {
  try {
    const [tasks] = await pool.query('SELECT * FROM gantt_tasks ORDER BY id');
    const [links] = await pool.query('SELECT * FROM gantt_links');

    tasks.forEach((task) => {
      if (task.start_date) {
        task.start_date = task.start_date.format('YYYY-MM-DD hh:mm:ss');
      }
      if (task.end_date) {
        task.end_date = task.end_date.format('YYYY-MM-DD hh:mm:ss');
      }
    });

    res.json({
      tasks,
      links,
    });
  } catch (error) {
    console.error('Error loading data:', error);
    res.status(500).json({ error: 'Failed to load data' });
  }
});
참고: 응답 형식은 Syncfusion의 { result: [...], count: number }와 다릅니다. DHTMLX는 { tasks: [], links: [] }를 기대합니다.
Tasks 및 Links에 대한 CRUD 엔드포인트 추가
DHTMLX Gantt의 DataProcessor는 서버와 데이터를 동기화하기 위해 RESTful 엔드포인트를 사용합니다. 각 작업은 적절한 HTTP 메서드로 별도의 요청으로 전송됩니다. 서버 측 통합에 대한 자세한 내용은 Server-side integration을 참조하십시오.
다음은 태스크 CRUD 핸들러 예시입니다:
// Create a new task
app.post('/data/task', async (req, res) => {
  try {
    const task = getTask(req.body);

    const [result] = await pool.query(
      `INSERT INTO gantt_tasks (text, start_date, end_date, duration, progress, parent, notes)
               VALUES (?, ?, ?, ?, ?, ?, ?)`,
      [task.text, task.start_date, task.end_date, task.duration, task.progress, task.parent, task.notes]
    );
    sendResponse(res, 'inserted', result.insertId);
  } catch (error) {
    sendResponse(res, 'error', null, error);
  }
});

// Update an existing task
app.put('/data/task/:id', async (req, res) => {
  try {
    const taskId = req.params.id;
    const task = getTask(req.body);
    await pool.query(
      `UPDATE gantt_tasks
               SET text = ?, start_date = ?, end_date = ?, duration = ?, progress = ?, parent = ?, notes = ?
               WHERE id = ?`,
      [task.text, task.start_date, task.end_date, task.duration, task.progress, task.parent, task.notes, taskId]
    );
    sendResponse(res, 'updated');
  } catch (error) {
    sendResponse(res, 'error', null, error);
  }
});

// Delete a task
app.delete('/data/task/:id', async (req, res) => {
  try {
    const taskId = req.params.id;
    await pool.query('DELETE FROM gantt_tasks WHERE id = ?', [taskId]);
    sendResponse(res, 'deleted');
  } catch (error) {
    sendResponse(res, 'error', null, error);
  }
});
링크(의존성) 작업에 대한 핸들러 예시:
// POST /data/link - Create new link
app.post('/data/link', async (req, res) => {
  try {
    const link = getLink(req.body);
    const [result] = await pool.query('INSERT INTO gantt_links (source, target, type) VALUES (?, ?, ?)', [
      link.source,
      link.target,
      link.type,
    ]);
    sendResponse(res, 'inserted', result.insertId);
  } catch (error) {
    sendResponse(res, 'error', null, error);
  }
});

// PUT /data/link/:id - Update existing link
app.put('/data/link/:id', async (req, res) => {
  try {
    const linkId = req.params.id;
    const link = getLink(req.body);
    await pool.query('UPDATE gantt_links SET source = ?, target = ?, type = ? WHERE id = ?', [
      link.source,
      link.target,
      link.type,
      linkId,
    ]);
    sendResponse(res, 'updated');
  } catch (error) {
    sendResponse(res, 'error', null, error);
  }
});

// DELETE /data/link/:id - Delete link
app.delete('/data/link/:id', async (req, res) => {
  try {
    const linkId = req.params.id;
    await pool.query('DELETE FROM gantt_links WHERE id = ?', [linkId]);
    sendResponse(res, 'deleted');
  } catch (error) {
    sendResponse(res, 'error', null, error);
  }
});
도우미 함수 추가
또한 데이터를 처리하고 응답을 보내기 위한 유틸리티 함수를 추가합니다:
// Helper: Parse task data from request
function getTask(data) {
  return {
    text: data.text,
    start_date: data.start_date,
    end_date: data.end_date,
    duration: data.duration || 1,
    progress: parseFloat(data.progress) || 0,
    parent: data.parent || 0,
    notes: data.notes || null,
  };
}

// Helper: Parse link data from request
function getLink(data) {
  return {
    source: data.source,
    target: data.target,
    type: data.type,
  };
}

// Helper: Send response to DataProcessor
function sendResponse(res, action, tid = null, error = null) {
  if (error) {
    console.error('Error:', error);
    return res.status(500).json({ action: 'error', message: error.message });
  }
  const result = { action };
  if (tid !== null) result.tid = tid;
  res.json(result);
}
데이터 정 sanitization (XSS 보호)
DHTMLX Gantt는 텍스트 필드를 HTML로 렌더링하므로 기본적으로 HTML 이스케이프가 적용되지 않습니다. migrated 데이터나 사용자가 입력한 마크업이 그대로 렌더링될 수 있어 XSS 벡터가 될 수 있습니다. 이슈를 방지하기 위해 백엔드에서 데이터를 정제하는 것을 권장합니다.
백엔드에서 정제하기(권장):
npm install isomorphic-dompurify
import DOMPurify from 'isomorphic-dompurify';

function getTask(data) {
  return {
    text: DOMPurify.sanitize(data.text),
    notes: data.notes ? DOMPurify.sanitize(data.notes) : null,
    // ...다른 필드는 변경 없이 유지
  };
}
프런트엔드에서 방어를 추가하는 방식도 있습니다(보안 계층 2차 방어):
const escapeHTML = (value: unknown) =>
String(value ?? '').replace(/[&<>"']/g, (ch) =>
({ '&': '&', '<': '<', '>': '>', '"': '"', "'": ''' }[ch] as string));
gantt.templates.task_text = (start, end, task) => escapeHTML(task.text);
// 태스크 텍스트를 보여주는 커스텀 그리드 열도 escape하면 좋습니다: template: (task) => escapeHTML(task.text)
Content Security Policy, 경량화된 정 sanitization, SQL 인젝션 가이드 등 전체 권고사항은 Application Security 가이드를 참고하십시오.
3단계: 프론트엔드 마이그레이션 with Vite
Vite 구성 설정
프로젝트의 루트에 vite.config.js 파일을 생성합니다:
import { defineConfig } from 'vite';

export default defineConfig({
  root: './src',
  server: {
    port: 5173,
    proxy: {
      '/data': {
        target: 'http://localhost:1337',
        changeOrigin: true,
      },
    },
  },
  build: {
    outDir: 'dist',
    emptyOutDir: true,
  },
});
다음 구조로 프로젝트를 구성합니다:
dhtmlx-demo/
├── src/                    # 프런트엔드 소스 코드
│   ├── app/
│   │   └── app.ts         # 메인 Gantt 초기화
│   ├── index.html         # 메인 HTML 파일
│   ├── resources/
│   └── styles/
├── e2e/                   # 엔드-투-엔드 테스트(선택적)
├── .env.example
├── .gitignore
├── migrate-dependencies.js  # 종속성 마이그레이션 스크립트
├── package.json           # 프로젝트 의존성
├── server.js              # Express 서버
├── setup.sql              # 데이터베이스 설정 스크립트
├── tsconfig.json          # TypeScript 설정
└── vite.config.js         # Vite 구성
index.html 업데이트
다음 코드로 업데이트합니다:
<!DOCTYPE html>
<html lang="en">
  <head>
    <title>DHTMLX Gantt Chart Demo</title>
    <meta charSet="utf-8" />
    <meta name="viewport" content="width=device-width, initial-scale=1.0, user-scalable=no" />
    <meta name="description" content="DHTMLX Gantt Chart - MySQL Integration Demo" />
    <meta name="author" content="DHTMLX" />

    <style>
      html,
      body {
        margin: 0;
        padding: 0;
        height: 100%;
        width: 100%;
        font-family: Arial, sans-serif;
      }

      .container {
        width: 100%;
        height: 100%;
        display: flex;
        flex-direction: column;
        padding: 20px;
        box-sizing: border-box;
      }

      h1 {
        color: #333;
        margin: 0 0 20px 0;
      }

      #gantt_here {
        flex-grow: 1;
        width: 100%;
      }
    </style>
  </head>

  <body>
    <div class="container">
      <h1>DHTMLX Gantt Chart - MySQL Integration Demo</h1>
      <div id="gantt_here"></div>
    </div>

    <script type="module" src="./app/app.ts"></script>
  </body>
</html>
참고: 컨테이너 ID가 gantt_here로 변경되었으며, 이는 DHTMLX Gantt의 표준 컨테이너 ID입니다.
src/app/app.ts 업데이트
src/app/app.ts 파일에서 모든 Syncfusion 관련 import 및 코드를 제거합니다.
다음과 같이 DHTMLX Gantt 초기화를 사용합니다:
import '@dhx/trial-gantt/codebase/dhtmlxgantt.css';
import { Gantt } from '@dhx/trial-gantt';

const gantt = Gantt.getGanttInstance();

gantt.config.date_format = '%Y-%m-%d %H:%i:%s';
gantt.config.scale_height = 50;

gantt.config.scales = [
  { unit: 'month', step: 1, format: '%F %Y' },
  { unit: 'day', step: 1, format: '%d' },
];

gantt.config.lightbox.sections = [
  { name: 'description', height: 38, map_to: 'text', type: 'textarea', focus: true },
  { name: 'time', height: 72, type: 'duration', map_to: 'auto' },
  { name: 'notes', height: 70, map_to: 'notes', type: 'textarea' },
];

gantt.init('gantt_here');
gantt.load('/data');

const dp = gantt.createDataProcessor({
  url: '/data', // REST 엔드포인트의 기본 URL
  mode: 'REST', // RESTful 모드 사용
});
DataProcessor는 자동으로 다음을 수행합니다:
- 태스크 생성 시 POST
/data/task - 태스크 업데이트 시 PUT
/data/task/:id - 태스크 삭제 시 DELETE
/data/task/:id - 링크도
/data/link엔드포인트로 처리
package.json 스크립트 업데이트
package.json의 스크립트를 Vite를 사용하도록 업데이트합니다:
{
  "scripts": {
    "dev": "vite",
    "build": "vite build",
    "preview": "vite preview",
    "server": "nodemon server.js",
    "migrate-deps": "node migrate-dependencies.js"
  }
}
4단계: 마이그레이션 테스트
애플리케이션 실행
개발 모드에서는 두 개의 프로세스를 실행해야 합니다.
-
백엔드(Express): 터미널 1
npm run server이 서버는
http://localhost:1337에 API를 제공합니다(포트는 구성에 따라 다를 수 있습니다). -
프런트엔드(Vite): 터미널 2
npm run dev이 명령은
http://localhost:5173에서 Vite 개발 서버를 시작합니다. 브라우저를 열고http://localhost:5173로 접속하면 Vite가 Express 백엔드의 API 요청을 자동으로 프록시합니다.
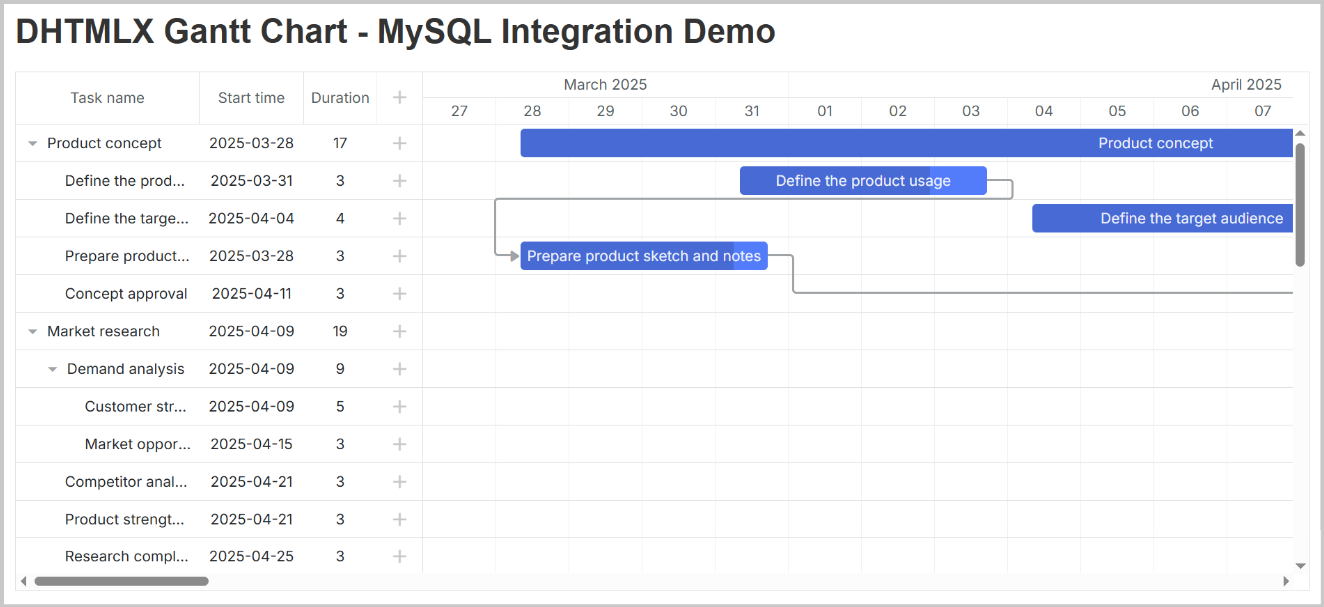
데이터베이스에서 불러온 데이터로 DHTMLX Gantt 차트를 확인할 수 있습니다:
다음 단계
- 고급 기능을 위한 DHTMLX Gantt 문서 확인: DHTMLX Gantt documentation
- 커스터마이징 옵션에 대한 API 참조 확인: API reference
- 구현 예제 확인: DHTMLX Gantt samples