dhtmlxGantt with ASP.NET MVC
This tutorial will give you step-by-step instructions on creating Gantt with ASP.NET and REST API on the server side.
You can also explore other server-side integration possibilities of Gantt by choosing one of the following tutorials:
- dhtmlxGantt with ASP.NET Core
- dhtmlxGantt with Node.js
- dhtmlxGantt with Python
- dhtmlxGantt with PHP: Laravel
- dhtmlxGantt with PHP:Slim
- dhtmlxGantt with Salesforce LWC
- dhtmlxGantt with Ruby on Rails
We will make use of the ASP.NET MVC 5 web platform and the Web API 2 controller for REST API to create a Gantt application. To organize communication with a database we will use the Entity Framework. We will build our application with the help of the Visual Studio IDE.
The complete source code is available on GitHub.
Step 1. Creating a project
Creating a new Visual Studio project
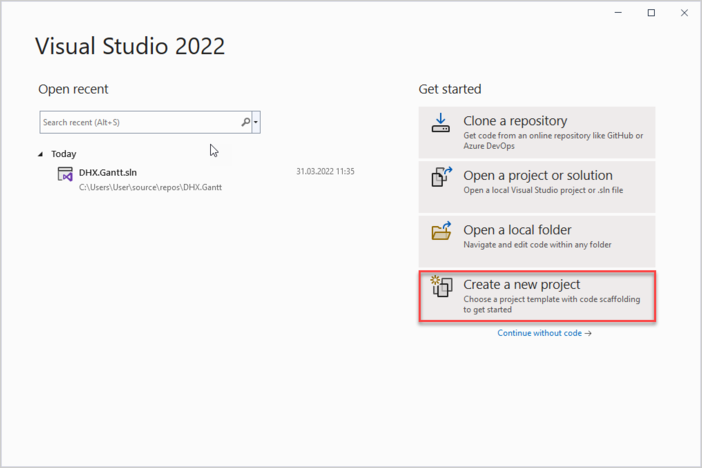
Launch Visual Studio 2022 and select Create a new project.
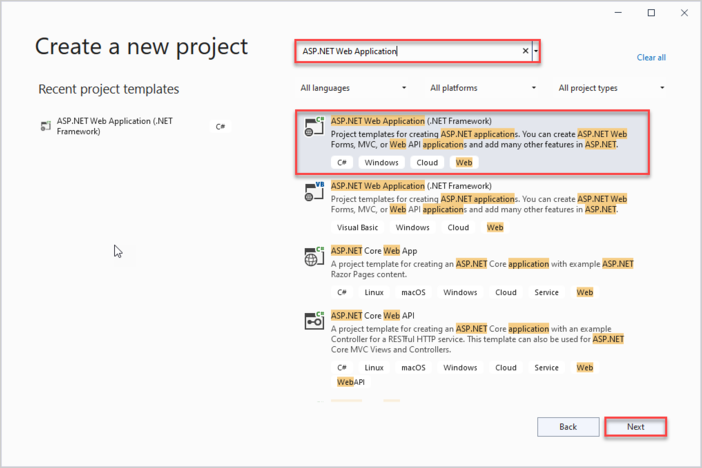
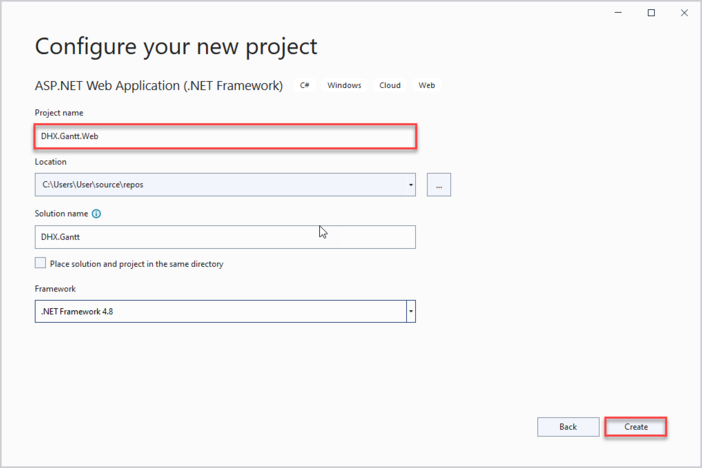
Next select "ASP.NET Web Application" and name it DHX.Gantt.Web. If you can't find the necessary template, check the Troubleshooting section.
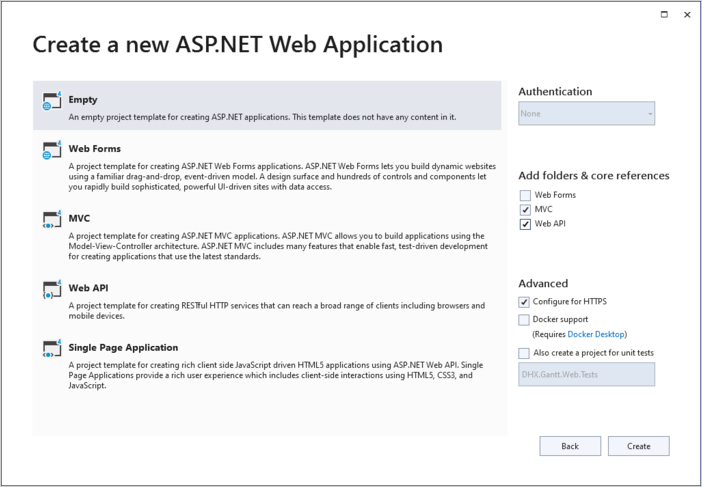
Select an Empty project among available templates and check MVC and Web API checkboxes near the list of templates.
Step 2. Adding Gantt to the page
Creating a Controller
Now we have an empty project and everything is ready for implementing our gantt.
Firstly, we'll add an MVC controller which will show a page with a gantt chart.
To create it, call the context menu for the Controllers folder and choose Add->Controller. In the opened window select MVC 5 Controller -> Empty and name a newly added controller "HomeController".

HomeController has the Index() method of the ActionResult class by default, so it doesn't require any additional logic. We will just add a view for it.
using System;
using System.Collections.Generic;
using System.Linq;
using System.Web;
using System.Web.Mvc;

namespace DHX.Gantt.Web.Controllers
{
    public class HomeController : Controller
    {
        // GET: Home
        public ActionResult Index()
        {
            return View();
        }
    }
}
Creating a View
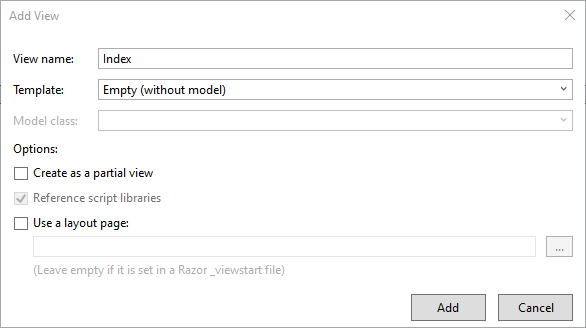
Now it's time to create our index page. Go to Views/Home and add an empty view named Index:
Open the newly created view and put the following code into it:
@{
    Layout = null;
}

<!DOCTYPE html>

<html>
<head>
    <meta name="viewport" content="width="device-width"" />
    <title>Index</title>
    <link href="https://cdn.dhtmlx.com/gantt/edge/dhtmlxgantt.css"
        rel="stylesheet" type="text/css" />
    <script src="https://cdn.dhtmlx.com/gantt/edge/dhtmlxgantt.js"></script>
    <script>
        document.addEventListener("DOMContentLoaded", function(event) {
            // specifying the date format
            gantt.config.date_format = "%Y-%m-%d %H:%i";
            // initializing gantt
            gantt.init("gantt_here");

            // initiating data loading
            gantt.load("/api/data");
            // initializing dataProcessor
            var dp = new gantt.dataProcessor("/api/");
            // and attaching it to gantt
            dp.init(gantt);
            // setting the REST mode for dataProcessor
            dp.setTransactionMode("REST");
        });
    </script>
</head>
<body>
    <div id="gantt_here" style="width: 100%; height: 100vh;"></div>
</body>
</html>
What we have done here:
- defined a simple page markup for our gantt application
- added dhtmlx gantt js/css sources using CDN links
- and created gantt on the page
Pay attention to the configuration: we've specified the format of dates that come from the data source.
gantt.config.date_format = "%Y-%m-%d %H:%i";
It's needed for our client to be able to parse dates that come from the server.
And also we told the gantt that it's going to work with RESTful API on a backend and use "/api/" as a default route:
gantt.load("/api/data");
// initializing dataProcessor
var dp = new gantt.dataProcessor("/api/");
// and attaching it to gantt
dp.init(gantt);
// setting the REST mode for dataProcessor
dp.setTransactionMode("REST");
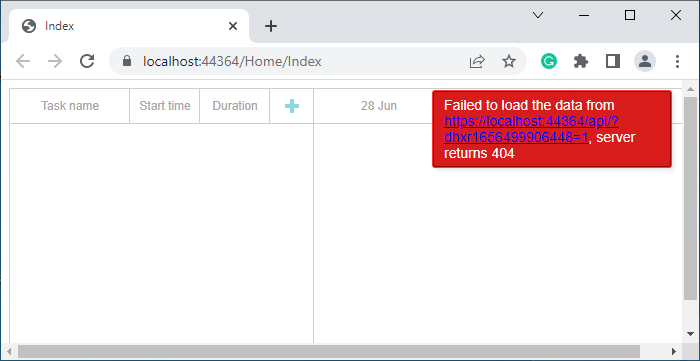
The server side itself will be implemented a bit later. For now, you can run the application and see that a gantt is rendered on the page.
Step 3. Creating models and database
Creating Models
Now we should define model classes for the gantt chart. A Gantt data model consists of Links and Tasks. As you can see, dhtmlxGantt uses a certain naming convention for data model that is different from the one traditionally used in C#. The client-side model can also contain some properties that you don't need to store in a database, but which will be used either on the client or in the backend logic.
Because of this, we'll go with the Data Transfer Object pattern here: we'll define domain model classes that will be used with EF and inside the app, and DTO classes that will be used to communicate with Web API. Then we'll implement some kind of mapping between the two models.
Let's start!
Task Model
First, we will create a class for Task. Its content can be similar to this one:
using System;

namespace DHX.Gantt.Web.Models
{
    public class Task
    {
        public int Id { get; set; }
        public string Text { get; set; }
        public DateTime StartDate { get; set; }
        public int Duration { get; set; }
        public decimal Progress { get; set; }
        public int? ParentId { get; set; }
        public string Type { get; set; }
    }
}
You can find the full list of properties, both mandatory and optional, available for the Task object in the corresponding article of documentation.
Link Model
Now it's time for the Link class, which may look as follows:
namespace DHX.Gantt.Web.Models
{
    public class Link
    {
        public int Id { get; set; }
        public string Type { get; set; }
        public int SourceTaskId { get; set; }
        public int TargetTaskId { get; set; }
    }
}
Configuring DataBase Connection
Installing Entity Framework
As you remember, we are going to organize the work with a database with the help of the Entity Framework.
So, first of all we need to install the framework. To do it, you need to run the following command in the Package Manager Console:
Install-Package EntityFramework
Creating Database Context
The next step is to create Context. Context represents a session with the DataBase. It allows getting and saving data.
Call the context menu for the Models folder and select Add->Class. The new class will be called "GanttContext" and will have the following content:
using System.Data.Entity;

namespace DHX.Gantt.Web.Models
{
    public class GanttContext : DbContext
    {
        public DbSet<Task> Tasks { get; set; }
        public DbSet<Link> Links { get; set; }
    }
}
Adding initial records to database
Now we can add some records into the database.
The Entity Framework can automatically create a database when an application runs. We should specify that a database should be dropped and re-created whenever the model changes.
First, we should create a database initializer. For this purpose, we need to add a new class in the App_Start folder that will be inherited from the DropCreateDatabaseIfModelChanges class. Let's call it "GanttInitializer".
In this class we are going to redefine the Seed() method to populate it with test data. Then we will add the entities collection into the context with the Add() method.
The full code of the GanttInitializer class is given below:
using System;
using System.Collections.Generic;
using System.Data.Entity;


namespace DHX.Gantt.Web.Models
{
    public class GanttInitializer : DropCreateDatabaseIfModelChanges<GanttContext>
    {
        protected override void Seed(GanttContext context)
        {
            List<Task> tasks = new List<Task>()
            {
                new Task()
                {
                    Id = 1,
                    Text = "Project #2",
                    StartDate = DateTime.Today.AddDays(-3),
                    Duration = 18,
                    Progress = 0.4m,
                    ParentId = null
                },
                new Task()
                {
                    Id = 2,
                    Text = "Task #1",
                    StartDate = DateTime.Today.AddDays(-2),
                    Duration = 8,
                    Progress = 0.6m,
                    ParentId = 1
                },
                new Task()
                {
                    Id = 3,
                    Text = "Task #2",
                    StartDate = DateTime.Today.AddDays(-1),
                    Duration = 8,
                    Progress = 0.6m,
                    ParentId = 1
                }
            };

            tasks.ForEach(s => context.Tasks.Add(s));
            context.SaveChanges();

            List<Link> links = new List<Link>()
            {
                new Link() {Id = 1, SourceTaskId = 1, TargetTaskId = 2, Type = "1"},
                new Link() {Id = 2, SourceTaskId = 2, TargetTaskId = 3, Type = "0"}
            };

            links.ForEach(s => context.Links.Add(s));
            context.SaveChanges();
        }
    }
}
Open the Global.asax file. It contains the code that runs on the application start. Add the necessary namespace and the code line that will set Initializer for our context into the Application_Start() method:
using System;
using System.Web;
using System.Web.Mvc;
using System.Web.Routing;
using System.Web.Http;

using System.Data.Entity;
using DHX.Gantt.Web.Models;

namespace DHX.Gantt.Web
{
    public class Global : HttpApplication
    {
        void Application_Start(object sender, EventArgs e)
        {
            // Code that runs on application startup
            AreaRegistration.RegisterAllAreas();
            GlobalConfiguration.Configure(WebApiConfig.Register);
            RouteConfig.RegisterRoutes(RouteTable.Routes);

            Database.SetInitializer(new GanttInitializer());/*!*/
        }
    }
}
Defining DTOs and Mapping
It's time to declare DTO classes that will be used for Web API. As for mapping between Model and DTO, we'll go the simplest way and just define an explicit conversion operator for these classes.
The TaskDto class will look as follows:
using System;

namespace DHX.Gantt.Web.Models
{
    public class TaskDto
    {
        public int id { get; set; }
        public string text { get; set; }
        public string start_date { get; set; }
        public int duration { get; set; }
        public decimal progress { get; set; }
        public int? parent { get; set; }
        public string type { get; set; }
        public bool open
        {
            get { return true; }
            set { }
        }

        public static explicit operator TaskDto(Task task)
        {
            return new TaskDto
            {
                id = task.Id,
                text = task.Text,
                start_date = task.StartDate.ToString("yyyy-MM-dd HH:mm"),
                duration = task.Duration,
                parent = task.ParentId,
                type = task.Type,
                progress = task.Progress
            };
        }

        public static explicit operator Task(TaskDto task)
        {
            return new Task
            {
                Id = task.id,
                Text = task.text,
                StartDate = DateTime.Parse(
                    task.start_date,
                    System.Globalization.CultureInfo.InvariantCulture),
                Duration = task.duration,
                ParentId = task.parent,
                Type = task.type,
                Progress = task.progress
            };
        }
    }
}
And the code of the LinkDto class is given below:
namespace DHX.Gantt.Web.Models
{
    public class LinkDto
    {
        public int id { get; set; }
        public string type { get; set; }
        public int source { get; set; }
        public int target { get; set; }

        public static explicit operator LinkDto(Link link)
        {
            return new LinkDto
            {
                id = link.Id,
                type = link.Type,
                source = link.SourceTaskId,
                target = link.TargetTaskId
            };
        }

        public static explicit operator Link(LinkDto link)
        {
            return new Link
            {
                Id = link.id,
                Type = link.type,
                SourceTaskId = link.source,
                TargetTaskId = link.target
            };
        }
    }
}
Lastly, let's add a model for the data source:
using System.Collections.Generic;

namespace DHX.Gantt.Web.Models
{
    public class GanttDto
    {
        public IEnumerable<TaskDto> data { get; set; }
        public IEnumerable<LinkDto> links { get; set; }
    }
}
Step 4. Implementing Web API
General technique of loading data using REST API
Finally it's time to implement the API.
As you can see from the API details we'll need two controllers: one for tasks and one for links. We will also need one more controller for the 'load data' action, since gantt expects a mixed result there.
Task Controller
To create a new controller:
- Activate the context menu for the Controllers folder and select Add -> Controller.
- Choose the Web API 2 Controller -> Empty. The new controller will be called "TaskController".
Now we need to implement basic CRUD actions for the task entry:
using System.Collections.Generic;
using System.Data.Entity;
using System.Linq;
using System.Web.Http;
using System.Web.UI.WebControls;

using DHX.Gantt.Web.Models;

namespace DHX.Gantt.Web.Controllers
{
    public class TaskController : ApiController
    {
        private GanttContext db = new GanttContext();

        // GET api/Task
        public IEnumerable<TaskDto> Get()
        {
            return db.Tasks
                .ToList()
                .Select(t => (TaskDto)t);
        }

        // GET api/Task/5
        [System.Web.Http.HttpGet]
        public TaskDto Get(int id)
        {
            return (TaskDto)db
                .Tasks
                .Find(id);
        }

        // PUT api/Task/5
        [System.Web.Http.HttpPut]
        public IHttpActionResult EditTask(int id, TaskDto taskDto)
        {
            var updatedTask = (Task)taskDto;
            updatedTask.Id = id;
            db.Entry(updatedTask).State = EntityState.Modified;
            db.SaveChanges();

            return Ok(new
            {
                action = "updated"
            });
        }

        // POST api/Task
        [System.Web.Http.HttpPost]
        public IHttpActionResult CreateTask(TaskDto taskDto)
        {
            var newTask = (Task)taskDto;

            db.Tasks.Add(newTask);
            db.SaveChanges();

            return Ok(new
            {
                tid = newTask.Id,
                action = "inserted"
            });
        }

        // DELETE api/Task/5
        [System.Web.Http.HttpDelete]
        public IHttpActionResult DeleteTask(int id)
        {
            var task = db.Tasks.Find(id);
            if (task != null)
            {
                db.Tasks.Remove(task);
                db.SaveChanges();
            }

            return Ok(new
            {
                action = "deleted"
            });
        }

        protected override void Dispose(bool disposing)
        {
            if (disposing)
            {
                db.Dispose();
            }
            base.Dispose(disposing);
        }
    }
}
Everything is pretty straightforward here:
- in the GET actions we load tasks from database and output their data transfer objects
- in the PUT/POST actions we're getting DTOs as an input, converting it to a Task model and saving changes to the DB Context
Now let's do the same for the links.
Link Controller
We'll create an empty Web API Controller for links like this:
using System.Collections.Generic;
using System.Data.Entity;
using System.Linq;
using System.Web.Http;
using DHX.Gantt.Web.Models;

namespace DHX.Gantt.Web.Controllers
{
    public class LinkController : ApiController
    {
        private GanttContext db = new GanttContext();

        // GET api/Link
        [System.Web.Http.HttpGet]
        public IEnumerable<LinkDto> Get()
        {
            return db
                .Links
                .ToList()
                .Select(l => (LinkDto)l);
        }

        // GET api/Link/5
        [System.Web.Http.HttpGet]
        public LinkDto Get(int id)
        {
            return (LinkDto)db
                .Links
                .Find(id);
        }

        // POST api/Link
        [System.Web.Http.HttpPost]
        public IHttpActionResult CreateLink(LinkDto linkDto)
        {
            var newLink = (Link)linkDto;
            db.Links.Add(newLink);
            db.SaveChanges();

            return Ok(new
            {
                tid = newLink.Id,
                action = "inserted"
            });
        }

        // PUT api/Link/5
        [System.Web.Http.HttpPut]
        public IHttpActionResult EditLink(int id, LinkDto linkDto)
        {
            var clientLink = (Link)linkDto;
            clientLink.Id = id;

            db.Entry(clientLink).State = EntityState.Modified;
            db.SaveChanges();

            return Ok(new
            {
                action = "updated"
            });
        }

        // DELETE api/Link/5
        [System.Web.Http.HttpDelete]
        public IHttpActionResult DeleteLink(int id)
        {
            var link = db.Links.Find(id);
            if (link != null)
            {
                db.Links.Remove(link);
                db.SaveChanges();
            }
            return Ok(new
            {
                action = "deleted"
            });
        }

        protected override void Dispose(bool disposing)
        {
            if (disposing)
            {
                db.Dispose();
            }
            base.Dispose(disposing);
        }

    }
}
Data Controller
Finally, we will add a controller for the data action:
using System.Web.Http;

using DHX.Gantt.Web.Models;

namespace DHX.Gantt.Web.Controllers
{
    public class DataController : ApiController
    {
        // GET api/
        [System.Web.Http.HttpGet]
        public GanttDto Get()
        {
            return new GanttDto
            {
                data = new TaskController().Get(),
                links = new LinkController().Get()
            };
        }
    }
}
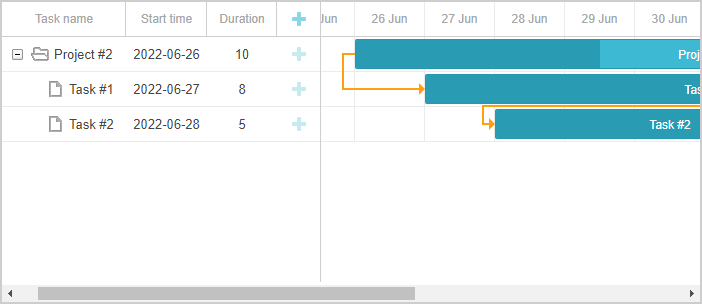
Now everything is ready. Run the application and a fully-fledged Gantt should appear on the page:
You can find a ready demo at github.
Error handling
Exception filters" can be used for capturing exceptions in CRUD handlers and returning a client response that can be recognized by the client-side gantt.
To provide error handling for the gantt, follow the steps below:
Go to App_Start and add a new class called GanttAPIExceptionFilterAttribute:
using System.Net;
using System.Net.Http;
using System.Web.Http.Filters;

namespace DHX.Gantt.Web
{
    public class GanttAPIExceptionFilterAttribute : ExceptionFilterAttribute
    {
        public override void OnException(HttpActionExecutedContext context)
        {

            context.Response = context.Request.CreateResponse(
                HttpStatusCode.InternalServerError, new
                    {
                        action = "error",
                        message = context.Exception.Message
                    }
            );
        }
    }
}
Then we will add this class to our WebAPI controllers:
- Data controller:
namespace DHX.Gantt.Web.Controllers
{
    [GanttAPIExceptionFilter]/*!*/
    public class DataController : ApiController
- Link controller:
namespace DHX.Gantt.Web.Controllers
{
    [GanttAPIExceptionFilter]/*!*/
    public class LinkController : ApiController
- and Task controller:
namespace DHX.Gantt.Web.Controllers
{
    [GanttAPIExceptionFilter]/*!*/
    public class TaskController : ApiController
Now if any Web API controller fires an exception while processing the request, the client side will receive an error status and an error message that can be either somehow processed or shown to the user.
Note that returning an exception message to the client might not be the best idea for a production environment.
Storing the order of tasks
The client-side gantt allows reordering tasks using drag and drop. So if you use this feature, you'll have to store this order in the database. You can check the common description here.
Let's now add this feature to our app.
Enable tasks reordering on the client
Firstly, we need to allow users to change the tasks order in the UI.
Open the Index view and update the configuration of gantt:
gantt.config.order_branch = true;/*!*/
gantt.config.order_branch_free = true;/*!*/

// specifying the date format
gantt.config.date_format = "%Y-%m-%d %H:%i";
// initializing gantt
gantt.init("gantt_here");
Adding tasks order to the model
Now, let's reflect these changes on the backend.
We are going to store the order in the property named SortOrder, so let's update the Task class accordingly:
using System;
using System.ComponentModel.DataAnnotations;

namespace DHX.Gantt.Web.Models
{
    public class Task
    {
        public int Id { get; set; }
        [MaxLength(255)]
        public string Text { get; set; }
        public DateTime StartDate { get; set; }
        public int Duration { get; set; }
        public decimal Progress { get; set; }
        public int? ParentId { get; set; }
        public string Type { get; set; }
        public int SortOrder { get; set; }/*!*/
    }
}
Now we need to update TaskController, namely:
- the client side should receive tasks ordered by the SortOrder value:
namespace DHX.Gantt.Web.Controllers
{
    [GanttAPIExceptionFilter]
    public class TaskController : ApiController
    {
        private GanttContext db = new GanttContext();

        // GET api/Task
        public IEnumerable<TaskDto> Get()
        {
            return db.Tasks
                .OrderBy(t => t.SortOrder) /*!*/
                .ToList()
                .Select(t => (TaskDto)t);
        }
- new tasks should receive the default value SortOrder:
namespace DHX.Gantt.Web.Controllers
{
    [System.Web.Http.HttpPost]
    public IHttpActionResult CreateTask(TaskDto taskDto)
    {
        var newTask = (Task)taskDto;

        newTask.SortOrder = db.Tasks.Max(t => t.SortOrder) + 1;/*!*/

        db.Tasks.Add(newTask);
        db.SaveChanges();

        return Ok(new
        {
            tid = newTask.Id,
            action = "inserted"
        });
    }
- SortOrder should be updated when the task order is modified on the client.
When a user changes the order of tasks, gantt will call a PUT action providing an info about a new task position in the 'target' property of the request, together with the rest of task properties.
Thus, we should add an extra property to the task DTO class:
namespace DHX.Gantt.Web.Models
{
  public class TaskDto
  {
    public int id { get; set; }
    public string text { get; set; }
    public string start_date { get; set; }
    public int duration { get; set; }
    public decimal progress { get; set; }
    public int? parent { get; set; }
    public string type { get; set; }
    public bool open{ get { return true; } set { } }
    public string target { get; set; }/*!*/

    ...
  }
}
And now we will implement reordering in our PUT (EditTask) action:
    // PUT api/Task/5
    [System.Web.Http.HttpPut]
    public IHttpActionResult EditTask(int id, TaskDto taskDto)
    {
      var updatedTask = (Task)taskDto;
      updatedTask.Id = id;

      if (!string.IsNullOrEmpty(taskDto.target))
      {
        // reordering occurred
        this._UpdateOrders(updatedTask, taskDto.target);/*!*/
      }

      db.Entry(updatedTask).State = EntityState.Modified;
      db.SaveChanges();

      return Ok(new
      {
        action = "updated"
      });
    }

    private void _UpdateOrders(Task updatedTask, string orderTarget)/*!*/
    {
      int adjacentTaskId;
      var nextSibling = false;

      var targetId = orderTarget;

      // adjacent task id is sent either as '{id}' or as 'next:{id}' depending
      // on whether it's the next or the previous sibling
      if (targetId.StartsWith("next:"))
      {
        targetId = targetId.Replace("next:", "");
        nextSibling = true;
      }

      if (!int.TryParse(targetId, out adjacentTaskId))
      {
        return;
      }

      var adjacentTask = db.Tasks.Find(adjacentTaskId);
      var startOrder = adjacentTask.SortOrder;

      if (nextSibling)
        startOrder++;

      updatedTask.SortOrder = startOrder;

      var updateOrders = db.Tasks
       .Where(t => t.Id != updatedTask.Id)
       .Where(t => t.SortOrder >= startOrder)
       .OrderBy(t => t.SortOrder);

       var taskList = updateOrders.ToList();

       taskList.ForEach(t => t.SortOrder++);
    }
Known issues
HTTP PUT and DELETE requests return 405 or 401 error when an app is running on IIS. The issue may be caused by the WebDAV module which can conflict with RESTful handlers.
As a common solution, the module can be disabled from the web.config file. More details are given here.
Application security
Gantt doesn't provide any means of preventing an application from various threats, such as SQL injections or XSS and CSRF attacks. It is important that responsibility for keeping an application safe is on the developers implementing the backend. Read the details in the corresponding article.
Trouble shooting
ASP.NET Web Application template is absent
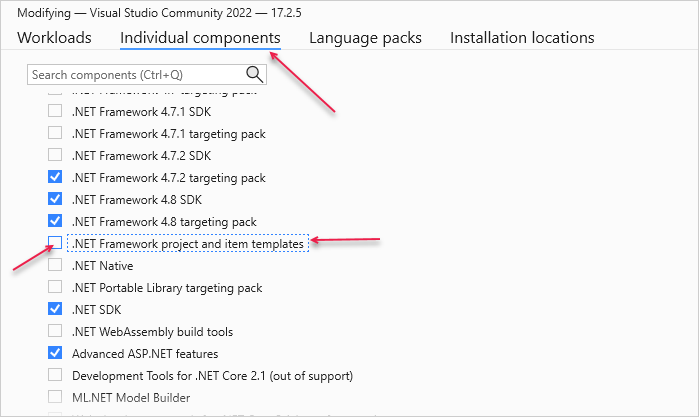
If you can't find the necessary "ASP.NET Web Application" project template in Visual Studio 2022, follow the steps below:
-
Close Visual Studio 2022
-
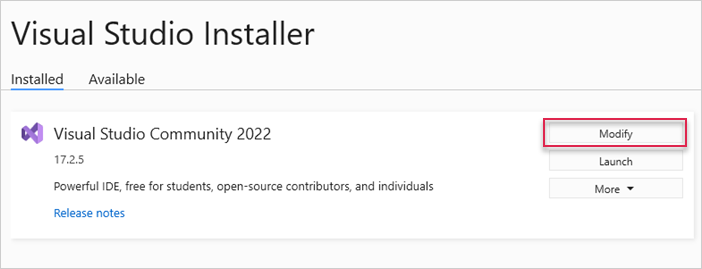
Start Menu -> Visual Studio Installer
-
Find Visual Studio Community 2022 -> click on Modify
- In the window opened, select Individual components, check ".NET Framework Project and item templates" point in the list and click on Modify
After that, you can launch Visual Studio 2022 and find the necessary template.
An exception occurred while initializing the database
Sometimes, you may face a problem with the DropCreateDatabaseIfModelChanges initializer which drops an existing database but doesn't create a new one.
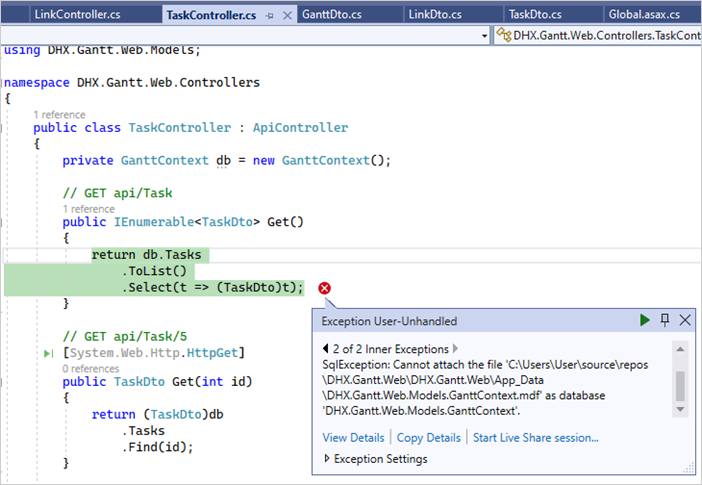
In this case, open GanttInitializer.cs and replace DropCreateDatabaseIfModelChanges with DropCreateDatabaseAlways:
using System;
using System.Collections.Generic;
using System.Data.Entity;

namespace DHX.Gantt.Web.Models
{
    public class GanttInitializer : DropCreateDatabaseAlways<GanttContext> /*!*/
    {
        ...
    }
}
Then run the application again.
Issues with rendering tasks and links
In case you've completed the above steps to implement Gantt integration with ASP.NET MVC, but Gantt doesn't render tasks and links on a page, have a look at the Troubleshooting Backend Integration Issues article. It describes the ways of identifying the roots of the problems.
What's next
Now you have a fully functioning gantt. You can view the full code on GitHub, clone or download it and use it for your projects.
You can also check guides on the numerous features of gantt or tutorials on integrating Gantt with other backend frameworks.