Work Time Calculation
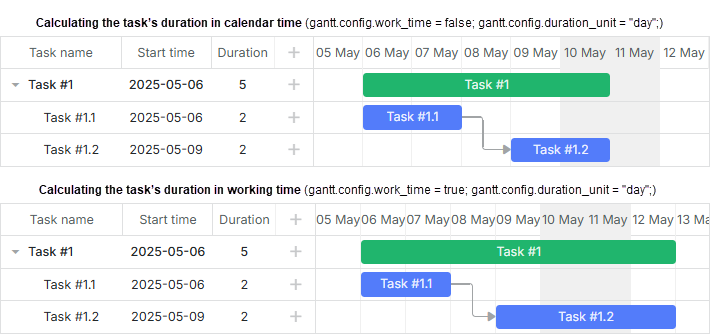
By default, dhtmlxGantt calculates the duration of tasks in calendar time. It assumes that the final duration of the tasks can include weekends and holidays.
Check the Task end date display & Inclusive end dates article to read about the format of the end date of a task.
Enabling Work Time Calculation
To provide calculating tasks' duration in work time, use the work_time option:
Enabling the mode when tasks' duration is calculated in working time
gantt.config.work_time = true;     // removes non-working time from calculations /*!*/
gantt.config.skip_off_time = true; /*!*/   // hides non-working time in the chart

gantt.init("gantt_here");
Please note that the skip_off_time configuration option is available only in the PRO version.
Duration includes only working days
Depending on the value of duration_unit, dhtmlxGantt calculates the tasks' duration in different time units (e.g. if duration_unit = "hour", the duration is calculated in the working hours).
Task duration in decimal format
This functionality is available only in the PRO edition.
Starting from v6.3 dhtmlxGantt allows specifying the duration of tasks in decimal format ("2.5 days",
"0.5 hours", "3.75 hours") via the Duration Formatter module.
The important point to remember is that internally Gantt always stores the duration of tasks in integer values.
Whereas, the provided module allows parsing the duration of tasks from the format entered by the user into the format stored in Gantt (for example, instead of entered "1.5 hours" Gantt will store the number of minutes - 90). Besides, the stored values can be converted into the readable format (from 12 hours to "0.5 days").
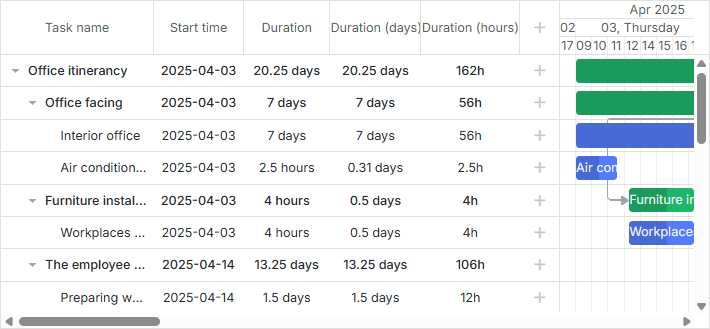
The duration of tasks can be represented as a fraction of an hour, day or any other supported by the duration_unit config unit, except for minutes.
Implementing decimal format
To provide displaying the duration of tasks in decimal format, follow the logic given below:
- set duration_unit to minute
gantt.config.work_time = true;
gantt.config.duration_unit = "minute"; /*!*/
Pay attention that you need to store task durations in a smaller unit than the units of the values displayed in decimal format. To put it simply:
-
if you want a user to be able to specify durations as a fraction of an hour (e.g. "0.5 hours"), you need to set duration_unit to minute
-
If you want a user to be able to specify durations as a fraction of a day, you need to set duration_unit to hour. In this case, users will be able to enter the duration of the task as "0.5 day", but "0.5 hour" will be rounded up to 1 hour, since the duration will be stored in integer hours.
By default, task dates are snapped to the time scale. If you have a time scale in days, you may want to disable it in order to be able to drag and drop a task to different hours within a day.
To enable this drag and drop, you need to disable round_dnd_dates and set an appropriate value to time_step.
For example:
// global time step is 15 minutes, requires "minute" as duration units
gantt.config.time_step = 15;
gantt.config.round_dnd_dates = false;
or
// global time step is one hour,
// such value can be used when duration unit is set to "hour"
gantt.config.time_step = 60;
gantt.config.round_dnd_dates = false;
- create the formatter object for formatting the duration of tasks:
// formatting the duration
const formatter = gantt.ext.formatters.durationFormatter({
    enter: "day",
    store: "minute", // duration_unit
    format: "day",
    hoursPerDay: 8,
    hoursPerWeek: 40,
    daysPerMonth: 30
});
- add the formatter object to the "Duration" column by defining the template function, that will return the formatted duration of the task, via the template attribute of the columns parameter:
gantt.config.columns = [
    { name: "text", tree: true, width: 170, resize: true, editor: textEditor },
    { name: "start_date", align: "center", resize: true, editor: dateEditor },
    { name: "duration", label: "Duration", resize: true, align: "center",
        template: task => formatter.format(task.duration), width: 100 },
    { name: "add", width: 44 }
];
- add the formatter object to the lightbox section by setting the formatter property for the time control:
gantt.config.lightbox.sections = [
    { name: "description", map_to: "text", type: "textarea", height: 70, focus: true },
    { name: "time", map_to: "auto", type: "duration", formatter: formatter }
];
- in case inline editing in Grid is enabled, you also need to add the formatter object to the durationEditor object via the formatter attribute:
const durationEditor = {
    type: "duration",
    map_to: "duration",
    formatter: formatter, /*!*/
    min: 0,
    max: 1000
};

gantt.config.columns = [
    { name: "text", tree: true, width: 170, resize: true },
    { name: "start_date", align: "center", resize: true },
    { name: "duration", label: "Duration", resize: true, align: "center",
        template: (task) => formatter.format(task.duration),
        editor: durationEditor, width: 100 },
    { name: "add", width: 44 }
];
If you already have Gantt with the duration of tasks stored in minutes, hours or any other unit, you can also use the Duration Formatter module to present the durations in decimal format.
Global Settings
Setting the working time
The default working time is the following:
- Working days: Monday - Friday.
- Working hours: 8:00 - 12:00, 13:00 - 17:00.
To change the default working time, use the setWorkTime method:
// changes the working time of working days
gantt.setWorkTime({ hours: ["9:00-18:00"] });

// makes all Fridays days-off
gantt.setWorkTime({ day: 5, hours: false });

// changes the working time for Fridays and Saturdays
gantt.setWorkTime({ day: 5, hours: ["8:00-12:00"] });
gantt.setWorkTime({ day: 6, hours: ["8:00-12:00"] });

// makes a specific date a working day
gantt.setWorkTime({ date: new Date(2025, 2, 31) });

// makes a specific date a day-off
gantt.setWorkTime({ date: new Date(2025, 0, 1), hours: false });
Related sample: Custom working days and time
Setting working time hours for the night shift
Working time settings for the hours attribute of the setWorkTime method' config object should be specified from
the lesser interval to the greater one, that is in the ascending order. In case time settings are provided in the descending order, part of them
will be ignored. In the example below the time intervals after 18:00 will be ignored:
// the settings below are incorrect
gantt.setWorkTime({ day: 5, hours: ["16:00-18:00", "14:00-15:00", "08:00-10:00"] });
gantt.setWorkTime({ day: 5, hours: ["16:00-18:00", "00:00-04:00", "05:00-06:00"] });
If you need to specify working time settings for the night shift, you should set them in the following way:
- within 24 hours for the first day
- within 24 hours for the following day
For example:
gantt.setWorkTime({ day: 5, hours: ["16:00-18:00"] });
gantt.setWorkTime({ day: 6, hours: ["00:00-04:00", "05:00-06:00"] });
Configuring working time rules
There is the ability to configure different working time rules for different periods of time by using the customWeeks attribute of the setWorkTime method. For instance, you can change the default working time for winter months:
//changes the working time for winter months
gantt.setWorkTime({
    customWeeks: {
        winter: {
            from: new Date(2025, 11, 1), // December 1st, 2025
            to: new Date(2026, 2, 1), // March 1st 00:00, 2026
            hours: ["9:00-13:00", "14:00-16:00"],
            days: [1, 1, 1, 1, 0, 0, 0]
        }
    }
});
To specify the working time not only from an hour to hour (e.g."8:00-12:00") but also including minutes (e.g. "8:15-12:45"), set the duration_unit config to "minute".
gantt.config.duration_unit = "minute";

// sets the working time up to minutes
gantt.setWorkTime({ hours: ["8:15-12:45"] });
The format of the working time that was used up to version 7.0 will continue working as before:
gantt.setWorkTime({ hours: [9, 18] });
Re-writing a working time rule
Note, each next call of the method for the same date will re-write the previous working-time rule. So, if you need to unset some rule, call the setWorkTime method with other configuration:
gantt.setWorkTime({ hours: ["8:00-12:00"] });
gantt.setWorkTime({ hours: ["13:00-17:00"] });
//the result of the above commands will be the working time 13:00-17:00
//and not a mixin of both commands
Setting custom working days/days-off
Note that it is not possible to apply the working time settings that don't include any working days/hours. For example, in the following way:
gantt.setWorkTime({ day: 0, hours: [] });
gantt.setWorkTime({ day: 1, hours: [] });
gantt.setWorkTime({ day: 2, hours: [] });
gantt.setWorkTime({ day: 3, hours: [] });
gantt.setWorkTime({ day: 4, hours: [] });
gantt.setWorkTime({ day: 5, hours: [] });
gantt.setWorkTime({ day: 6, hours: [] });
As a result, Gantt will ignore applying the method to one of the working days, and it will still contain working hours.
If you tried to calculate the nearest working time or duration from some date, there would be neither such date, nor duration. It means that setting such a calendar doesn't make any sense. Even if you set certain dates with working hours, it wouldn't work correctly, since Gantt can calculate dates only within a date range that contains working days/hours. Trying to calculate dates out of the range would result in the absence of the date and various errors.
If you want to make a calendar where some months or even years have only non-working days, you should use the customWeeks setting of the setWorkTime() method. In order to specify working days/hours within the necessary range, you need to:
- divide it into periods without working hours
- set working hours for the necessary dates
gantt.setWorkTime({ date: new Date(2025, 3, 10), hours: ["8:00-12:00"] })
gantt.setWorkTime({ date: new Date(2025, 3, 11), hours: ["13:00-17:00"] })

gantt.setWorkTime({
    customWeeks: {
        period1: {
            from: new Date(2025, 3, 1),
            to: new Date(2025, 3, 10),
            hours: false,
        },

        period2: {
            from: new Date(2025, 3, 12),
            to: new Date(2025, 5, 1),
            hours: false,
        },

    }
});
Related sample Using customWeeks to make all days in the calendar days-off
Unsetting the working time
You can unset a working time by using the unsetWorkTime method:
// changes the working time of working days from ["8:00-17:00"] to ["8:00-12:00"]
gantt.setWorkTime({ hours: ["8:00-12:00"] });
// unsets the working time
gantt.unsetWorkTime({ hours: ["8:00-12:00"] });
Checking the working time
To check whether the specified date is working time, use the isWorkTime method:
// makes 1 January, 2025 a day off
gantt.setWorkTime({ date: new Date(2025, 0, 1), hours: false });
gantt.isWorkTime(new Date(2025, 0, 1)); // -> false  /*!*/

// makes 15 March, 2025 a working day from 9:00 till 18:00
gantt.setWorkTime({ date: new Date(2025, 2, 15), hours: ["8:00-17:00"] });
gantt.isWorkTime(new Date(2025, 2, 15, 10, 0), "hour"); // -> true  /*!*/
gantt.isWorkTime(new Date(2025, 2, 15, 8, 0), "hour"); // -> false  /*!*/
Related sample: Correct task position on drag
Getting the working time
To get the working hours of the specified date, use the getWorkHours method:
gantt.getWorkHours(new Date(2025, 3, 30)); // -> ["8:00-17:00"]
To get the closest working day to the specified date, use the getClosestWorkTime method:
gantt.getClosestWorkTime(new Date(2025, 3, 30));
Repeating the specific working time
You may often need to specify some working time that will repeat only on certain days (e.g. the last Friday of a month is a short day, December 25 is a holiday) but during the whole span of the project.
The current version of dhtmlxGantt doesn't provide any configs for setting such type of the working time.
The library allows you only:
- to specify the working time for a day of the week (Monday, Tuesday,...)
- to specify the working time for a specific date (4th June 2025)
- to override working time rules for a date range (1st June 2025 - 1st September 2025)
So if you have some exceptions to the working time rules you need to manually get the dates that match your rule and apply worktime settings to each of these dates separately.
For example, you have a project that lasts 5 years and you want to set the 1st of January as a day-off, and the last Friday of each month as a short day.
To specify the 1st of January as a day off you can simply hardcode values as in:
gantt.setWorkTime({ hours: false, date: new Date(2025, 0, 1) });
gantt.setWorkTime({ hours: false, date: new Date(2026, 0, 1) });
gantt.setWorkTime({ hours: false, date: new Date(2027, 0, 1) });
gantt.setWorkTime({ hours: false, date: new Date(2028, 0, 1) });
gantt.setWorkTime({ hours: false, date: new Date(2029, 0, 1) });
And here is a code sample of how to set the last Friday of a month as a short day during the whole project:
const lastFridayOfMonth = (date) => {
    let lastDay = new Date(date.getFullYear(), date.getMonth() + 1, 0);

    if (lastDay.getDay() < 5) {
        lastDay.setDate(lastDay.getDate() - 7);
    }

    lastDay.setDate(lastDay.getDate() - (lastDay.getDay() - 5));

    return lastDay;
};

const projectStart = new Date(2025, 5, 1);
const projectEnd = new Date(2026, 5, 1);
let currentDate = new Date(projectStart);

while (currentDate <= projectEnd) {
    const lastFriday = lastFridayOfMonth(currentDate);
    gantt.setWorkTime({ hours: ["8:00-12:00", "13:00-15:00"], date: lastFriday });
    currentDate = gantt.date.add(currentDate, 1, "month");
}
Coloring the day-off times
To color the day-off times in the chart area, use the timeline_cell_class template:
gantt.templates.timeline_cell_class = (task, date) =>
    !gantt.isWorkTime({ task, date }) ? "week_end" : "";
Related sample: Custom working days and time
Learn more in the Highlighting Time Slots article.
To hide the day-off time, use the technique described in the article - Hiding Time Units in the Scale.
Multiple Work Time Calendars
In addition to global working time settings, Gantt allows creating multiple work time calendars. You can assign them to individual tasks or groups of tasks.
Creating a working calendar
A new calendar instance can be created using the createCalendar method.
This method presupposes two possible options:
- when called without parameters, it creates a full-time calendar: 24 working hours per day, 7 days per week
const calendar = gantt.createCalendar();
- if you have a ready calendar and want to reuse it for making a new one with different options, you can pass your calendar as a parameter to the createCalendar method
const newCalendar = gantt.createCalendar(calendar);
The calendar object is initially detached from Gantt and won't take any effect until you add it into Gantt.
Adding a working calendar into Gantt
After you've created a calendar, you have to add it into Gantt with the help of the addCalendar method. Once again, there are two possibilities:
- add an existing calendar configuration
const calendarId = gantt.addCalendar(calendar);
- set a new calendar config, which includes the calendar id and the worktime object with working days and hours:
const calendarId = gantt.addCalendar({
    id: "custom", // optional
    worktime: {
        hours: ["8:00-17:00"],
        days: [1, 1, 1, 1, 1, 1, 1]
    }
});
You can also use this option for creating a calendar.
Setting different working hours for different time spans
Starting with v7.1, there is the possibility to set different working-time rules for different periods of time within one calendar. For instance, you can apply a separate schedule for winter months while adding a calendar into Gantt. For that, you need to use the customWeeks property of the addCalendar method:
const calendarId = gantt.addCalendar({
    id: "global", // optional
    worktime: {
        hours: ["8:00-17:00"],
        days: [1, 1, 1, 1, 1, 1, 1],
        customWeeks: {
            winter: {
                from: new Date(2025, 11, 1), // December 1st, 2025
                to: new Date(2026, 2, 1), // March 1st, 00:00, 2026
                hours: ["9:00-13:00", "14:00-16:00"],
                days: [1, 1, 1, 1, 0, 0, 0]
            }
        }
    }
});
Related sample: Different worktimes for different time periods
Changing working hours
You can change the working time for separate days of the necessary calendar via the setWorkTime() method:
const calendar = gantt.getCalendar("custom");
calendar.setWorkTime({ day: 6, hours: ["8:00-12:00"] });
calendar.setWorkTime({ date: new Date(2025, 0, 1), hours: ["8:00-12:00"] });
Getting Calendars
You can get the objects of working calendars to work with them later on. There are several available options which are described below.
Getting the global Gantt calendar
To get the object of the global Gantt calendar using the getCalendar method:
const calendar = gantt.getCalendar(id);
The calendar object is an instance of the calendar interface.
The default calendar instance (global settings) can be accessed by the predefined "global" id:
const globalSettings = gantt.getCalendar("global");
This calendar is used by the work time methods, when there is no other calendar specified. It is assigned to tasks by default.
Getting the current calendar of a task
To get the object of a working calendar assigned to a particular task, apply the getTaskCalendar method. You need to pass the task object to the method:
const task = gantt.getTask(taskId);
const calendar = gantt.getTaskCalendar(task);

if (calendar.isWorkTime(date)) {
    alert("TaskWorkTime");
}
Related sample: Task level calendars
If work time is disabled in the gantt config, the method will return a 24/7 work time calendar.
Using global methods to access calendars
The work time methods of the Gantt object can be used to calculate the time duration of a specific task, without accessing its calendar manually.
In that case methods take an object argument where the related "task" object is passed as one of the properties.
if (gantt.isWorkTime({ date: date, task: task })) {
    alert(`Work time of a task: ${task.text}`);
}
Which is equal to:
const calendar = gantt.getTaskCalendar(task);

if (calendar.isWorkTime({ date: date })) {
    alert(`Work time of a task: ${task.text}`);
}
const endDate = gantt.calculateEndDate({
    start_date: date, duration: duration, task: task
});
// or
const endDate = gantt.calculateEndDate(task);
const duration = gantt.calculateDuration({
    start_date: start, end_date: end, task: task
});
// or
const duration = gantt.calculateDuration(task);
const closestTime = gantt.getClosestWorkTime({ date: date, task: task });
Getting all Gantt calendars
To get all the calendars added into Gantt (both the global one and those assigned to separate tasks), make use of the getCalendars method:
const calendars = gantt.getCalendars();
The method returns an array of Calendar interface objects.
Deleting calendars
In case, you don't need a calendar anymore, you can easily remove it via the deleteCalendar method. You should pass the calendar id to this method:
// adding a calendar
gantt.addCalendar({
    id: "custom",
    worktime: {
        hours: ["8:00-17:00"],
        days: [1, 1, 1, 1, 1, 1, 1]
    }
});

// deleting a calendar
gantt.deleteCalendar("custom");
Assigning Calendar to Task
To assign a working calendar to a task, you need to set the calendar id and the worktime object with working days and hours:
gantt.addCalendar({
    id: "custom", // optional
    worktime: {
        hours: ["8:00-17:00"],
        days: [1, 1, 1, 1, 1, 1, 1]
    }
});
and then set the id of the calendar as a value of the "calendar_id" attribute in the task object:
{
    id: 2, text: "Task #1", start_date: "02-04-2025", duration: 8,
    calendar_id: "custom" /*!*/
}
You can modify the name of the task property responsible for binding a calendar to a task via the calendar_property configuration option:
gantt.config.calendar_property = "property_name";
Related sample: Task level calendars
Assigning Calendar to Resource
This functionality is available only in the PRO edition.
It is also possible to assign a particular working calendar to tasks that require specific resources (people, appliances, etc.).
For example, you can set individual calendars for tasks, depending on a user a task is assigned to. The order of your actions will be as follows:
- define the property of a task object that will store a resource id via the resource_property configuration attribute. In the example below the property named user will store ids of users:
gantt.config.resource_property = "user";
- use the resource_calendars configuration option to add the desired calendar for each user and group calendars into one object.
gantt.config.resource_calendars = {
    1 : gantt.addCalendar({
        worktime: {
            days: [0, 1, 1, 1, 1, 1, 0]
        }
    }),
    2 : gantt.addCalendar({
        worktime: {
            days: [1, 0, 0, 0, 0, 0, 1]
        }
    }),
    3 : gantt.addCalendar({
        worktime: {
            days: [0, 1, 1, 1, 0, 1, 1]
        }
    })
};
The object includes a set of key:value pairs, where key is the id of the resource and value corresponds to the id of the calendars returned by the addCalendar method.
- specify the user attribute in task config objects. As a value of this attribute, use the key of the necessary calendar from the object defined in the resource_calendars configuration option:
{ id: 1, user: 1, text: "Project #2", start_date: "01-04-2025", duration: 5 },
{ id: 2, user: 0, text: "Task #1", start_date: "02-04-2025", duration: 2 },
{ id: 3, user: 2, text: "Task #2", start_date: "11-04-2025", duration: 4 },
{ id: 4, user: 3, text: "Task #3", start_date: "13-04-2025", duration: 3 },
{ id: 5, user: 0, text: "Task #1.1", start_date: "02-04-2025", duration: 7 },
{ id: 6, user: 1, text: "Task #1.2", start_date: "03-04-2025", duration: 7 }
Note that when a task has both a custom and a resource calendars, the custom calendar has a higher priority and overrides the resource calendar settings.
Merging multiple calendars
Starting from v7.0, it is possible to merge multiple calendars into one.
For example, you want to set two or more resources with different working calendars for the same task. The working hours of the first one are from 9:00 to 15:00 while the working time of another is from 12:00 to 17:00. As a result of their merging, you'll get one calendar with working hours from 12:00 to 15:00.
Setting the dynamic_resource_calendars config to true will enable this feature automatically:
gantt.config.dynamic_resource_calendars = true;
Related sample: Merge work Calendars of different resources
But you can also merge calendars manually with the help of the mergeCalendars method:
const johnCalendarId = gantt.addCalendar({
    worktime: {
        hours: ["0:00-24:00"],
        days: [0, 1, 1, 1, 1, 1, 0]
    }
});

const mikeCalendarId = gantt.addCalendar({
    worktime: {
        hours: ["8:00-12:00", "13:00-17:00"],
        days: [0, 1, 1, 1, 1, 1, 0]
    }
});

const joinedCalendar = gantt.mergeCalendars(
    gantt.getCalendar(mikeCalendarId),
    gantt.getCalendar(johnCalendarId)
);
Learn the logic of how merging of working hours is performed in the mergeCalendars() article.
Assigning Calendar to Project
This functionality is available only in the PRO edition.
There is a possibility to specify a working calendar not only for a particular task or resource, but for a project, so that tasks could inherit the same calendar that their parent project is assigned to.
The logic of inheriting a calendar by a task is the following:
- If a user assigns a calendar to a subproject with tasks, all its tasks will use this calendar.
- If a task has a personal calendar assigned to it, it will use its calendar and not the calendar of its parent project.
To enable this functionality, you need to set the inherit_calendar configuration option to true. By default this option is disabled.
gantt.config.inherit_calendar = true;
- If true, tasks that have no calendar assigned to them, will use the calendar assigned to their summary parent (which can get a calendar from its parent in its turn).
- If false, tasks that have no calendar assigned to them, will use the global calendar.
In the example below tasks inherit calendars from their parent projects by default. In case a task has a different calendar assigned, this calendar will be used instead. Thus, "Task #2.2" and "Task #3" use the "Full week" calendars unlike their parent projects:
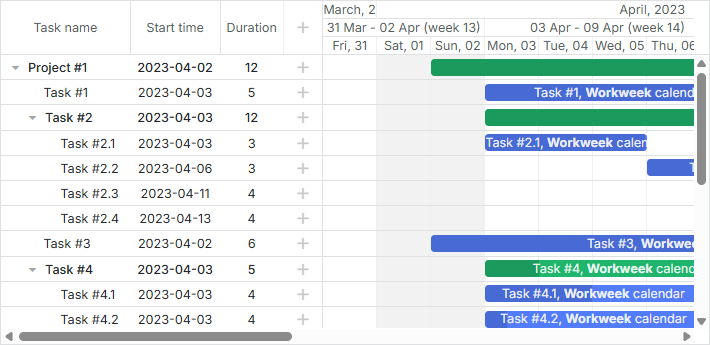
Related sample: Project level calendars
Changing Calendar Dynamically
Starting from v7.0, Gantt picks up the change of a task calendar and recalculates time of tasks automatically.
However, you can update the task schedule manually when its calendar changes. For example, a calendar can be changed from lightbox:
const updateTaskTiming = (task) => {
    task.start_date = gantt.getClosestWorkTime({
        dir: "future",
        date: task.start_date,
        unit: gantt.config.duration_unit,
        task: task
    });
    task.end_date = gantt.calculateEndDate(task);
};

gantt.attachEvent("onLightboxSave", (id, task, is_new) => {
    updateTaskTiming(task);
    return true;
});
Or, you can define recalculation of all tasks on demand:
gantt.batchUpdate(() => {
    gantt.eachTask((task) => {
        task.start_date = gantt.getClosestWorkTime({
            dir: "future",
            date: task.start_date,
            unit: gantt.config.duration_unit,
            task: task
        });
        task.end_date = gantt.calculateEndDate(task);
        gantt.updateTask(task.id);
    });
});
Related sample: Toggle working time settings and move the task to the working date
Related sample: Toggle working time settings and recalculate the task's end dates
Work-time based displaying of task bars in Day/Week scales
Since v9.1 Gantt allows specifying the projection setting in the configuration of a task object. With this property, you can
set the position and size of task bars in the Day and Week scales based on the working time, instead of the 00:00-24:00 interval.
Check the detailed description of scale projection possibilities in the related guide.