Split Tasks
This functionality is available in the PRO edition only.
In case you have a large task which is not continuous and can be interrupted, you can divide it into several parts. There can be as many parts, as it's required.
At the data level, such tasks can be represented as a summary task (project) with subtasks, where each subtask defines an isolated part of the main task.

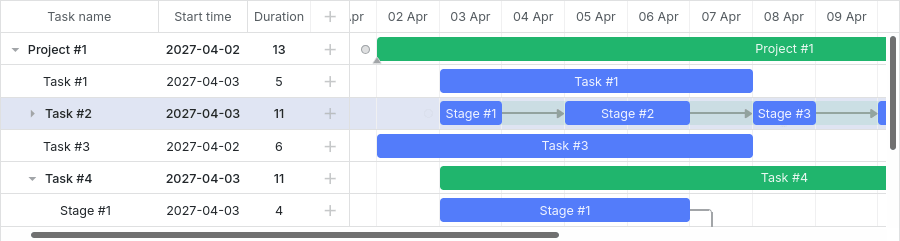
Which you can display in one row, as a single task:
To display a project as a split task, you need to set its render property to split:
const tasks = [
    { id: 1, text: "Task #2", start_date: "03-04-2027 00:00", type: "project", render: "split" },
    { id: 2, text: "Stage #1", start_date: "03-04-2027 00:00", duration: 1, parent: 1 },
    { id: 3, text: "Stage #2", start_date: "05-04-2027 00:00", duration: 2, parent: 1 },
    { id: 4, text: "Stage #3", start_date: "08-04-2027 00:00", duration: 1, parent: 1 }
];
The task "Task #2" is split and rendered as a set of tasks: "Stage #1", "Stage #2", and "Stage #3", which are fully interactive.
Related sample: Split task
To show a split task in its typical tree mode, i.e. as a project with subtasks, you just need to change the value of the task.render property and re-render Gantt:
const task = gantt.getTask(1);

// repaint task in the 'split' mode
task.render = "split";
gantt.render();

// repaint task in the regular (tree) mode
task.render = "";
gantt.render();
For instance, it is possible to add a control mapped to the task.render property into the lightbox to dynamically switch between the split and hierarchical views. Check an example in the section below.
Switching split mode dynamically
You can configure the lightbox so that it allows switching the split mode for the task on and off. For this, you can add a new section with a checkbox into the lightbox by changing configuration settings
for project types of tasks - gantt.config.lightbox.project_sections and add a label for the new section:
gantt.locale.labels.section_split = "Display";
gantt.config.lightbox.project_sections = [
    { name: "description", height: 70, map_to: "text", type: "textarea", focus: true },
    {
        name: "split",
        type: "checkbox",
        map_to: "render",
        options: [
            { key: "split", label: "Split Task" }
        ]
    },
    { name: "time", type: "duration", readonly: true, map_to: "auto" }
];
The result will look like this:
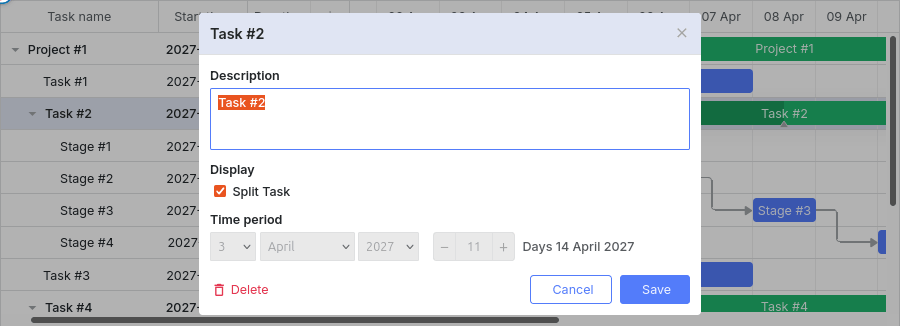
When the checkbox is unchecked, a split task is rendered as a project with subtasks.
Related sample: Split task
Checking if task is split
You can check whether a task is split with the help of the isSplitTask() method. It takes the task object as an argument and returns true if the task is split.
const task = gantt.getTask(1);

if (gantt.isSplitTask(task)) {
    // ...
}
Expanding/collapsing split tasks
In case you want to expand/collapse a split task right from the grid interface, there is a special configuration option that will help you. It is called open_split_tasks and it takes
a boolean value to make a split task expandable and otherwise.
gantt.config.open_split_tasks = true;

Per-child placement of split subtasks
By default, split subtasks are rendered inline on the parent row when the parent is collapsed and are moved to subrows when the parent row is expanded.
You can control this behavior per child with the split_placement property of a task object by using the necessary mode of splitting tasks depending on the state of the parent row:
- when the parent row is collapsed:
split_placement: "auto" (default)- a subtask is rendered on the parent rowsplit_placement: "inline"- a subtask is rendered on the parent rowsplit_placement: "subrow"- a subtask is not visible
- when the parent row is expanded:
split_placement: "auto" (default)- a subtask is rendered as a subrowsplit_placement: "inline"- a subtask is rendered on the parent rowsplit_placement: "subrow"- a subtask is rendered as a subrow
const tasks = [
    // the parent row is expanded on rendering
    { id: 10, text: "Creative Production", start_date: "01-04-2027", render: "split", duration: 35, parent: 1 },
    // the subtask is rendered on the parent row
    { id: 11, text: "Photo Shoot", start_date: "03-04-2027", split_placement: "inline", duration: 3, parent: 10 },
    // the subtask is rendered as a subrow
    { id: 12, text: "Video Editing", start_date: "08-04-2027", split_placement: "subrow", duration: 10, parent: 10 },
    // the subtask is rendered on the parent row (default)
    { id: 13, text: "Copywriting", start_date: "04-04-2027", duration: 7, parent: 10 }
];
Related sample: Per-child placement of split subtasks
Filtering split tasks
To filter the subtasks of the split task rendered on the Gantt chart, apply the onBeforeSplitTaskDisplay event and return:
- true, for a subtask you want to display
- false, for a subtask you want not to display
gantt.attachEvent("onBeforeSplitTaskDisplay", (id, task, parent) => {
    if (task.duration < 3) {
        return false;
    }
    return true;
});
Styling
Split tasks are defined as subtasks of a parent item, and the light green bar in the background is a bar of that parent item, with additional styles applied.
When split tasks are collapsed and displayed in a single row, the light green bar of their parent item is still rendered at the same position, but with the modified opacity and z-index values.

Related sample: Expand and collapse split tasks
You can change the color of the bar of the parent item in the same way as you can style all bars in the timeline or completely hide it via CSS:
.gantt_task_line.gantt_split_parent {
    display: none;
}
Related sample: Hide transparent parent bar of the split tasks
When you have only one split task, the summary item (type="project") becomes invisible because it is completely covered by the split task. If there are no split subtasks, the summary item has a default date and duration.
Styling separate split tasks
From v8.0, split tasks come into template functions with the task.$rendered_at property which contains the id of a row the split task is rendered at. Thus, to style specific split tasks based on the row they are displayed at, you may use the task_class template:
gantt.templates.task_class = (startDate, endDate, task) => {
    if (task.$rendered_at) {
        if (gantt.calculateTaskLevel(gantt.getTask(task.$rendered_at)) === 1) {
            return "phase-level-split-task";
        }
    }
    return "";
};