dhtmlxScheduler with ASP.NET MVC
This tutorial will give you step-by-step instructions on creating Scheduler with ASP.NET and REST API on the server side.
You can also explore other server-side integration possibilities of Scheduler by choosing one of the following tutorials:
- dhtmlxScheduler with ASP.NET Core
- dhtmlxScheduler with Blazor
- dhtmlxScheduler with Node.js
- dhtmlxScheduler with FastAPI
- dhtmlxScheduler with PHP
- dhtmlxScheduler with PHP:Slim
- dhtmlxScheduler with PHP:Laravel
- dhtmlxScheduler with SalesForce LWC
- dhtmlxScheduler with Ruby on Rails
- dhtmlxScheduler with dhtmlxConnector
We will make use of the ASP.NET MVC 5 web platform and the Web API controller for REST API to create a Scheduler application. To organize communication with a database we will use the Entity Framework. We will build our application with the help of the Visual Studio IDE.
The complete source code is available on GitHub.
Step 1. Creating a project
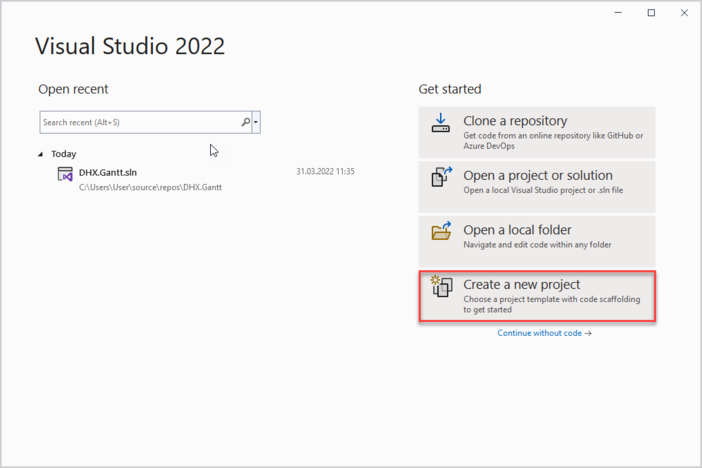
Launch Visual Studio 2022 and select Create a new project.
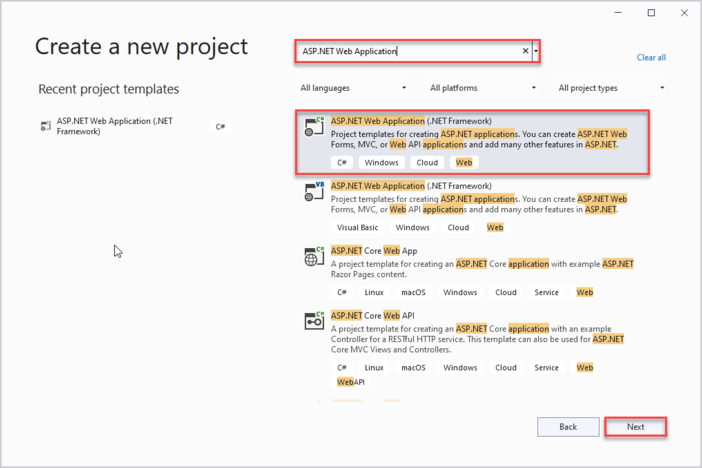
Next select "ASP.NET Web Application" and name it DHX.Scheduler.Web. If you can't find the necessary template, check the Troubleshooting section.

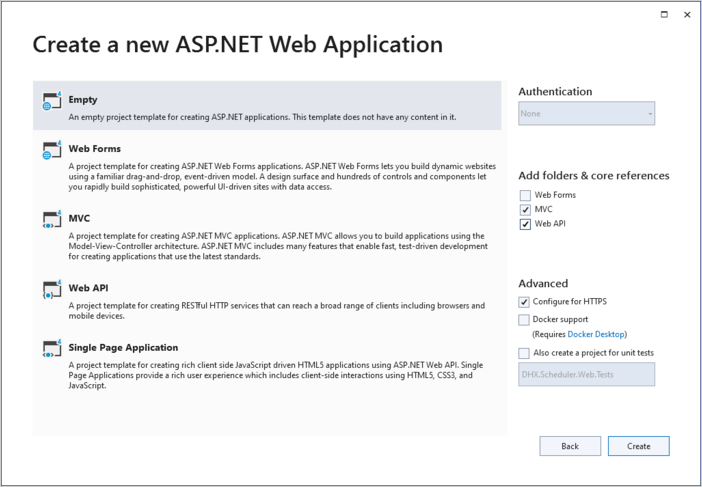
Select an Empty project among available templates and check MVC and Web API checkboxes to the right of the list of templates:
Step 2. Adding Scheduler to the page
Creating a Controller
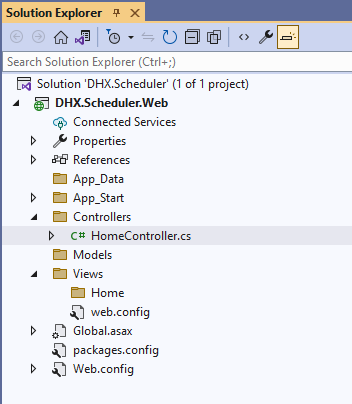
Now we have an empty project and everything is ready for implementing our scheduler.
Firstly, we will add an MVC controller which will show a page with a scheduler.
To create it, call the context menu for the Controllers folder and choose Add -> Controller. In the opened window select MVC 5 Controller -> Empty and press Add. Enter the name of the new controller, let it be "HomeController".
HomeController has the Index() method of the ActionResult class by default, so it doesn't require any additional logic. We will just add a view for it.
using System.Web.Mvc;

namespace DHX.Scheduler.Web.Controllers
{
    public class HomeController : Controller
    {
        // GET: Home
        public ActionResult Index()
        {
            return View();
        }
    }
}
Creating a View
Now it's time to create our index page. Go to View/Home and add an empty view named Index:

Open the newly created view and put the following code into it:
@{
Layout = null;
}
<!DOCTYPE html>
<html>
<head>
<meta name="viewport" content="width="device-width"" />
<title>Index</title>
<link href="https://cdn.dhtmlx.com/scheduler/edge/dhtmlxscheduler.css"
rel="stylesheet" type="text/css" />
<script src="https://cdn.dhtmlx.com/scheduler/edge/dhtmlxscheduler.js"></script>
<script>
document.addEventListener("DOMContentLoaded", function(event) {
// initializing scheduler
scheduler.init("scheduler_here", new Date(2027,0,15));
// load data from backend
scheduler.load("/api/scheduler");
// connect backend to scheduler
const dp = scheduler.createDataProcessor({
    url: "/api/scheduler",
    mode: "REST"
});
});
</script>
</head>
<body>
<div id="scheduler_here" class="dhx_cal_container" style='width:100%; height:100vh;'>
<div class="dhx_cal_navline">
<div class="dhx_cal_prev_button"> </div>
<div class="dhx_cal_next_button"> </div>
<div class="dhx_cal_today_button"></div>
<div class="dhx_cal_date"></div>
<div class="dhx_cal_tab" name="day_tab"></div>
<div class="dhx_cal_tab" name="week_tab"></div>
<div class="dhx_cal_tab" name="month_tab"></div>
</div>
<div class="dhx_cal_header"></div>
<div class="dhx_cal_data"></div>
</div>
</body>
</html>
What we have done here:
- defined a simple page markup for our scheduler application
- added dhtmlx scheduler js/css sources using CDN links
- created scheduler on the page
And also we told the scheduler that it's going to work with the RESTful API on a backend and use "/api/scheduler/" to get all data during loading and as a default route:
// load data from backend
scheduler.load("/api/scheduler");
// connect backend to scheduler
const dp = scheduler.createDataProcessor({
url: "/api/scheduler",
mode: "REST"
});
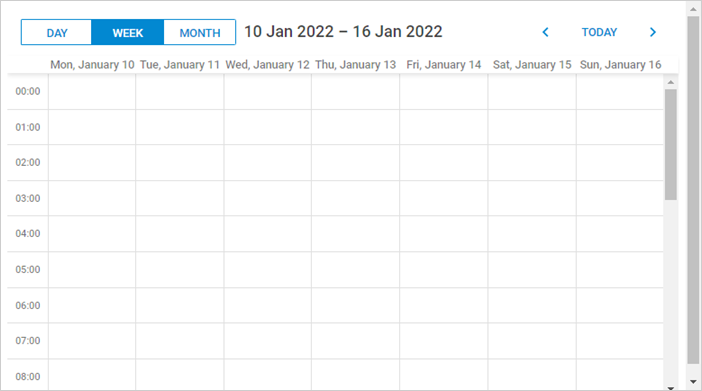
The server side itself will be implemented a bit later. For now, you can run the application and see that a scheduler is rendered on the page.
Step 3. Creating models and database
Creating Models
Now we should define model classes for scheduler. You'll need a class for scheduler events. As you can see, dhtmlxScheduler uses a certain naming convention for data model that is different from the one traditionally used in C#. The client-side model can also contain some properties that you don't need to store in a database, but which will be used either in the client logic or in the backend one.
Because of this, we'll go with the Data Transfer Object pattern here: we'll define domain model classes that will be used with EF and inside the app, and DTO classes that will be used to communicate with Web API. Then mapping between the two models will be implemented.
Scheduler Event Model
First we will create a class for Event. This is how the model can look like:
using System;

namespace DHX.Scheduler.Web.Models
{
    public class SchedulerEvent
    {
        public int Id { get; set; }
        public string Text { get; set; }
        public DateTime StartDate { get; set; }
        public DateTime EndDate { get; set; }

    }
}
Note that scheduler events can have all kinds of additional properties, which can be utilized in the calendar. We're showing you the basic stuff here.
Configuring Database Connection
Installing Entity Framework
You can either install the framework via the NuGet package manager:
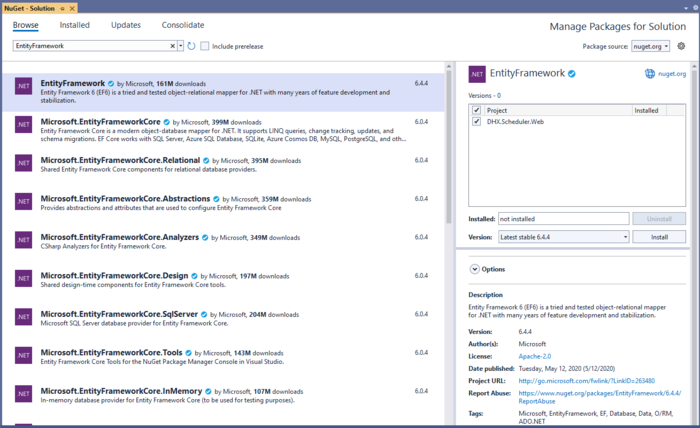
or you can run the following command in the Package Manager Console:
PM> Install-Package EntityFramework
Creating Database Context
The next step is to create Context. Context represents a session with the Database. It allows getting and saving data.
Call the context menu for the Models folder and select Add -> Class. The new class will be called "SchedulerContext" and will have the following content:
using System.Data.Entity;

namespace DHX.Scheduler.Web.Models
{
    public class SchedulerContext : DbContext
    {
        public DbSet<SchedulerEvent> SchedulerEvents { get; set; }
    }
}
Adding initial records to database
Now we can add some records into the database.
The Entity Framework can automatically create a database when an application runs. We should specify that a database should be dropped and re-created whenever the model changes.
First, we should create a database initializer. For this, we need to add a new class in the App_Start folder that will be inherited from the DropCreateDatabaseIfModelChanges class. Let's call it "SchedulerInitializer":
In this class we are going to redefine the Seed() method to populate it with test data. Then we will add the entities collection into the context with the Add() method.
The full code of the SchedulerInitializer class is given below:
using System;
using System.Collections.Generic;
using System.Data.Entity;

using DHX.Scheduler.Web.Models;

namespace DHX.Scheduler.Web.App_Start
{
  public class SchedulerInitializer:DropCreateDatabaseIfModelChanges<SchedulerContext>
    {
        protected override void Seed(SchedulerContext context)
        {
            List<SchedulerEvent> events = new List<SchedulerEvent>()
            {
                new SchedulerEvent()
                {
                    Id = 1,
                    Text = "Event 1",
                    StartDate = new DateTime(2027, 1, 11, 2, 0, 0),
                    EndDate = new DateTime(2027, 1, 11, 4, 0, 0)
                },
                new SchedulerEvent()
                {
                    Id = 2,
                    Text = "Event 2",
                    StartDate = new DateTime(2027, 1, 14, 3, 0, 0),
                    EndDate = new DateTime(2027, 1, 14, 6, 0, 0)
                },
                new SchedulerEvent()
                {
                    Id = 3,
                    Text = "Multiday event",
                    StartDate = new DateTime(2027, 1, 11, 0, 0, 0),
                    EndDate = new DateTime(2027, 1, 16, 0, 0, 0)
                }
            };

            events.ForEach(s => context.SchedulerEvents.Add(s));
            context.SaveChanges();

        }

    }
}
Open the Global.asax file. It contains the code that runs on the application start. Add the necessary namespace and the code line that will set Initializer for our context into the Application_Start() method:
using System;
using System.Web;
using System.Web.Mvc;
using System.Web.Routing;
using System.Web.Http;

using System.Data.Entity;
using DHX.Scheduler.Web.App_Start;

namespace DHX.Scheduler.Web
{
    public class Global : HttpApplication
    {
        void Application_Start(object sender, EventArgs e)
        {
            // Code that runs on application startup
            AreaRegistration.RegisterAllAreas();
            GlobalConfiguration.Configure(WebApiConfig.Register);
            RouteConfig.RegisterRoutes(RouteTable.Routes);

            Database.SetInitializer(new SchedulerInitializer()); /*!*/
        }
    }
}
Defining DTOs and Mapping
It's time to declare DTO classes that will be used for Web API. As for mapping between Model and DTO, we'll define an explicit conversion operator for our classes.
The WebAPIEvent class will look like this:
using System;

namespace DHX.Scheduler.Web.Models
{
    public class WebAPIEvent
    {
        public int id { get; set; }
        public string text { get; set; }
        public string start_date { get; set; }
        public string end_date { get; set; }

        public static explicit operator WebAPIEvent(SchedulerEvent schedulerEvent)
        {
            return new WebAPIEvent
            {
                id = schedulerEvent.Id,
                text = schedulerEvent.Text,
                start_date = schedulerEvent.StartDate.ToString("yyyy-MM-dd HH:mm"),
                end_date = schedulerEvent.EndDate.ToString("yyyy-MM-dd HH:mm")
            };
        }

        public static explicit operator SchedulerEvent(WebAPIEvent schedulerEvent)
        {
            return new SchedulerEvent
            {
                Id = schedulerEvent.id,
                Text = schedulerEvent.text,
                StartDate = DateTime.Parse(
                    schedulerEvent.start_date,
                    System.Globalization.CultureInfo.InvariantCulture),
                EndDate = DateTime.Parse(
                    schedulerEvent.end_date,
                    System.Globalization.CultureInfo.InvariantCulture)
            };
        }

    }
}
Step 4. Implementing Web API
Scheduler Controller
To create a new controller:
- Call the context menu for the Controllers folder and select Add -> Controller.
- Choose the Web API 2 Controller -> Empty. Type the name of a new controller - "SchedulerController".
Now we should implement basic CRUD actions for the scheduler events entry:
using System;
using System.Collections.Generic;
using System.Data.Entity;
using System.Linq;
using System.Web.Http;

using DHX.Scheduler.Web.App_Start;
using DHX.Scheduler.Web.Models;

namespace DHX.Scheduler.Web.Controllers
{
    public class SchedulerController : ApiController
    {
        private SchedulerContext db = new SchedulerContext();

        // GET: api/scheduler
        public IEnumerable<WebAPIEvent> Get()
        {
            return db.SchedulerEvents
                .ToList()
                .Select(e => (WebAPIEvent)e);
        }

        // GET: api/scheduler/5
        public WebAPIEvent Get(int id)
        {
            return (WebAPIEvent)db.SchedulerEvents.Find(id);
        }

        // PUT: api/scheduler/5
        [HttpPut]
        public IHttpActionResult EditSchedulerEvent(int id, WebAPIEvent webAPIEvent)
        {
            var updatedSchedulerEvent = (SchedulerEvent)webAPIEvent;
            updatedSchedulerEvent.Id = id;
            db.Entry(updatedSchedulerEvent).State = EntityState.Modified;
            db.SaveChanges();

            return Ok(new
            {
                action = "updated"
            });
        }

        // POST: api/scheduler/5
        [HttpPost]
        public IHttpActionResult CreateSchedulerEvent(WebAPIEvent webAPIEvent)
        {
            var newSchedulerEvent = (SchedulerEvent)webAPIEvent;
            db.SchedulerEvents.Add(newSchedulerEvent);
            db.SaveChanges();

            return Ok(new
            {
                tid = newSchedulerEvent.Id,
                action = "inserted"
            });
        }

        // DELETE: api/scheduler/5
        [HttpDelete]
        public IHttpActionResult DeleteSchedulerEvent(int id)
        {
            var schedulerEvent = db.SchedulerEvents.Find(id);
            if (schedulerEvent != null)
            {
                db.SchedulerEvents.Remove(schedulerEvent);
                db.SaveChanges();
            }

            return Ok(new
            {
                action = "deleted"
            });
        }

        protected override void Dispose(bool disposing)
        {
            if (disposing)
            {
                db.Dispose();
            }
            base.Dispose(disposing);
        }
    }
}
In the above code we:
- load scheduler events from database and output their data transfer objects in the GET actions
- get DTOs as an input, converting it to a SchedulerEvent model and saving changes to the DB Context in the PUT/POST actions
Everything is ready. You can run the application and see the fully-fledged Scheduler.
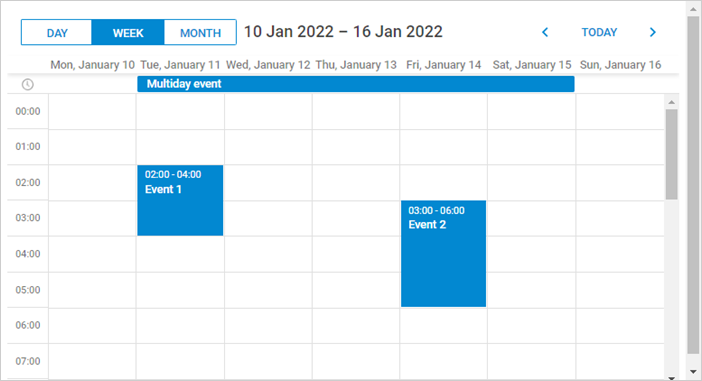
You can find a ready demo at github.
In case Scheduler doesn't render events on a page, check the Troubleshooting Backend Integration Issues article.
Dynamic loading
Each time scheduler calls our GET action, it loads the whole events table. It may be ok for a start, but after the app is used for a several months the amount of transferred data will significantly grow. So it may be useful to implement dynamic loading, which allows scheduler to load only a required range of events.
On the client side it is enabled by the scheduler.setLoadMode method:
scheduler.setLoadMode("day");
// load data from the backend
scheduler.load("/api/scheduler");
After that scheduler will start adding from and to date parameters to GET requests, so that the backend could return only events between these dates.
All we need to do is to get these parameters in our GET action and to filter events appropriately. This is how we can do it:
// GET: api/scheduler
public IEnumerable<WebAPIEvent> Get(DateTime from, DateTime to)
{
    return db.SchedulerEvents
       .Where(e => e.StartDate < to && e.EndDate >= from)
       .ToList()
       .Select(e => (WebAPIEvent)e);
}
In case Scheduler doesn't render events on a page, check the Troubleshooting Backend Integration Issues article.
Recurring events
In order to enable recurrence (e.g. "repeat event daily"), you'll need to enable an appropriate extension on the scheduler page:
scheduler.plugins({
    recurring: true
});
Updating the Models
We also need to update our model in order for it to store the recurrence info:
using System;

namespace DHX.Scheduler.Web.Models
{
    public class SchedulerEvent
    {
        public int Id { get; set; }
        public string Text { get; set; }
        public DateTime StartDate { get; set; }
        public DateTime EndDate { get; set; }
        public int? Duration { get; set; } /*!*/
        public string Rrule { get; set; } /*!*/
        public string RecurringEventId { get; set; } /*!*/
        public string OriginalStart { get; set; } /*!*/
        public bool? Deleted { get; set; } /*!*/
    }
}
as well as the DTO:
using System;

namespace DHX.Scheduler.Web.Models
{
    public class WebAPIEvent
    {
        public int id { get; set; }
        public string text { get; set; }
        public string start_date { get; set; }
        public string end_date { get; set; }
        public int? duration { get; set; } /*!*/
        public string rrule { get; set; } /*!*/
        public string recurring_event_id { get; set; } /*!*/
        public string original_start { get; set; } /*!*/
        public bool? deleted { get; set; } /*!*/

        public static explicit operator WebAPIEvent(SchedulerEvent schedulerEvent)
        {
            return new WebAPIEvent
            {
                id = schedulerEvent.Id,
                text = schedulerEvent.Text,
                start_date = schedulerEvent.StartDate.ToString("yyyy-MM-dd HH:mm"),
                end_date = schedulerEvent.EndDate.ToString("yyyy-MM-dd HH:mm"),
                duration = schedulerEvent.Duration, /*!*/
                rrule = schedulerEvent.Rrule, /*!*/
                recurring_event_id = schedulerEvent.RecurringEventId, /*!*/
                original_start = schedulerEvent.OriginalStart, /*!*/
                deleted = schedulerEvent.Deleted /*!*/
            };
        }

        public static explicit operator SchedulerEvent(WebAPIEvent schedulerEvent)
        {
            return new SchedulerEvent
            {
                Id = schedulerEvent.id,
                Text = schedulerEvent.text,
                StartDate = DateTime.Parse(
                    schedulerEvent.start_date,
                    System.Globalization.CultureInfo.InvariantCulture),
                EndDate = DateTime.Parse(
                    schedulerEvent.end_date,
                    System.Globalization.CultureInfo.InvariantCulture),
                Duration = schedulerEvent.duration, /*!*/
                Rrule = schedulerEvent.rrule, /*!*/
                RecurringEventId = schedulerEvent.recurring_event_id, /*!*/
                OriginalStart = schedulerEvent.original_start, /*!*/
                Deleted = schedulerEvent.deleted /*!*/
            };
        }
    }
}
If the database does not apply changes made to a Scheduler event, you need to delete the database so that the changes will be applied the next time you run the project.
Updating API Controller
Lastly, we need to modify our PUT/POST/DELETE actions in order to handle special rules of recurring events.
First, let's take a look at the POST action. We need to process a special case for recurring events: deletion of a specific occurrence of the recurring series requires creating a new database record and the client will call the insert action for it:
// POST: api/scheduler/5
[HttpPost]
public IHttpActionResult CreateSchedulerEvent(WebAPIEvent webAPIEvent)
{
    var newSchedulerEvent = (SchedulerEvent)webAPIEvent;
    var action = "inserted";
    if (webAPIEvent.deleted == true) /*!*/
    {
        // delete a single occurrence from a recurring series
        action = "deleted"; /*!*/
    }
    db.SchedulerEvents.Add(newSchedulerEvent);
    db.SaveChanges();

    return Ok(new
    {
        tid = newSchedulerEvent.Id,
        action
    });
}
In the PUT action we need to make sure to update all properties of the model. Additionally, we need to handle a different special case there: when a recurring series is modified, we need to delete all modified occurrences of that series:
// PUT: api/scheduler/5
[HttpPut]
public IHttpActionResult EditSchedulerEvent(int id, WebAPIEvent webAPIEvent)
{
    var updatedSchedulerEvent = (SchedulerEvent)webAPIEvent;
    var dbEvent = db.SchedulerEvents.Find(id);
    if (dbEvent == null)
    {
        return NotFound();
    }
    dbEvent.Text = updatedSchedulerEvent.Text;
    dbEvent.StartDate = updatedSchedulerEvent.StartDate;
    dbEvent.EndDate = updatedSchedulerEvent.EndDate;
    dbEvent.Duration = updatedSchedulerEvent.Duration; /*!*/
    dbEvent.Rrule = updatedSchedulerEvent.Rrule; /*!*/
    dbEvent.RecurringEventId = updatedSchedulerEvent.RecurringEventId; /*!*/
    dbEvent.OriginalStart = updatedSchedulerEvent.OriginalStart; /*!*/
    if (!string.IsNullOrEmpty(dbEvent.Rrule) && dbEvent.RecurringEventId == null) /*!*/
    {
        // all modified occurrences must be deleted when we update a recurring series
        // https://docs.dhtmlx.com/scheduler/server_integration.html#savingrecurringevents
        var eventsToDelete = db.SchedulerEvents
            .Where(e => !string.IsNullOrEmpty(e.RecurringEventId)
                && e.RecurringEventId == dbEvent.Id.ToString())
            .ToList();
        db.SchedulerEvents.RemoveRange(eventsToDelete);
    }

    db.SaveChanges();

    return Ok(new
    {
        action = "updated"
    });
}
And finally, the DELETE action. Here we have to check two special cases:
- if the event you are going to delete is a modified instance of the recurring series. Instead of deleting, update the record to mark
deleted. - if a user deletes a whole recurring series, you also need to delete all the modified instances of that series.
// DELETE: api/scheduler/5
[HttpDelete]
public IHttpActionResult DeleteSchedulerEvent(int id)
{
    var dbEvent = db.SchedulerEvents.Find(id);
    if (dbEvent != null)
    {
        if (dbEvent.RecurringEventId != null) /*!*/
        {
            // deleting a modified occurrence from a recurring series.
            // An event with a recurring_event_id value should be marked
            // with .deleted = true instead of being deleted.
            dbEvent.Deleted = true; /*!*/
        }
        else
        {
            if (dbEvent.Rrule != null) /*!*/
            {
                // if a recurring series was deleted, delete all modified occurrences of the series
                var eventsToDelete = db.SchedulerEvents
                    .Where(e => !string.IsNullOrEmpty(e.RecurringEventId)
                        && e.RecurringEventId == dbEvent.Id.ToString())
                    .ToList();
                db.SchedulerEvents.RemoveRange(eventsToDelete);
            }
            db.SchedulerEvents.Remove(dbEvent);
        }
        db.SaveChanges();
    }

    return Ok(new
    {
        action = "deleted"
    });
}
Recurring events (legacy, pre-7.1)
The approach below applies to events stored in the legacy pre-7.1 format (event_pid, rec_type, event_length). Use it only if you still maintain data that uses those fields; new projects should use the rrule-based engine described above. See the migration guide and the legacy recurring events guide for context.
To stay on the legacy engine, enable the recurring_legacy plugin instead of recurring:
scheduler.plugins({
    recurring_legacy: true
});
Updating the Models
The legacy engine stores recurrence info in three columns - event_pid, rec_type, event_length:
using System;

namespace DHX.Scheduler.Web.Models
{
    public class SchedulerEvent
    {
        public int Id { get; set; }
        public string Text { get; set; }
        public DateTime StartDate { get; set; }
        public DateTime EndDate { get; set; }

        public int EventPID { get; set; }
        public string RecType { get; set; }
        public long EventLength { get; set; }

    }
}
as well as the DTO:
using System;

namespace DHX.Scheduler.Web.Models
{
    public class WebAPIEvent
    {
        public int id { get; set; }
        public string text { get; set; }
        public string start_date { get; set; }
        public string end_date { get; set; }

        public int? event_pid { get; set; }
        public string rec_type { get; set; }
        public long? event_length { get; set; }

        public static explicit operator WebAPIEvent(SchedulerEvent schedulerEvent)
        {
            return new WebAPIEvent
            {
                id = schedulerEvent.Id,
                text = schedulerEvent.Text,
                start_date = schedulerEvent.StartDate.ToString("yyyy-MM-dd HH:mm"),
                end_date = schedulerEvent.EndDate.ToString("yyyy-MM-dd HH:mm"),

                event_pid = schedulerEvent.EventPID,
                rec_type = schedulerEvent.RecType,
                event_length = schedulerEvent.EventLength
            };
        }

        public static explicit operator SchedulerEvent(WebAPIEvent schedulerEvent)
        {
            return new SchedulerEvent
            {
                Id = schedulerEvent.id,
                Text = schedulerEvent.text,
                StartDate = DateTime.Parse(
                    schedulerEvent.start_date,
                    System.Globalization.CultureInfo.InvariantCulture),
                EndDate = DateTime.Parse(
                    schedulerEvent.end_date,
                    System.Globalization.CultureInfo.InvariantCulture),
                EventPID = schedulerEvent.event_pid != null ?
                    schedulerEvent.event_pid.Value : 0,
                EventLength = schedulerEvent.event_length != null ?
                    schedulerEvent.event_length.Value : 0,
                RecType = schedulerEvent.rec_type
            };
        }

    }
}
Updating API Controller
The legacy POST/PUT/DELETE actions follow the same idea but key off rec_type and event_pid. Firstly, the POST action - a deleted occurrence of a recurring series is created as a new record with rec_type == "none":
// POST: api/scheduler/5
[HttpPost]
public IHttpActionResult CreateSchedulerEvent(WebAPIEvent webAPIEvent)
{
  var newSchedulerEvent = (SchedulerEvent)webAPIEvent;
  db.SchedulerEvents.Add(newSchedulerEvent);
  db.SaveChanges();

  // delete a single occurrence from a recurring series
  var resultAction = "inserted";
  if(newSchedulerEvent.RecType == "none")
  {
     resultAction = "deleted";
  }

  return Ok(new
  {
      tid = newSchedulerEvent.Id,
    action = resultAction
  });
}
In the PUT action we need to make sure to update all properties of the model. When a recurring series is modified, all modified occurrences of that series have to be deleted:
// PUT: api/scheduler/5
[HttpPut]
public IHttpActionResult EditSchedulerEvent(int id, WebAPIEvent webAPIEvent)
{
    var updatedSchedulerEvent = (SchedulerEvent)webAPIEvent;
    updatedSchedulerEvent.Id = id;
    db.Entry(updatedSchedulerEvent).State = EntityState.Modified;

    if (!string.IsNullOrEmpty(updatedSchedulerEvent.RecType) &&
        updatedSchedulerEvent.RecType != "none")
    {
      //all modified occurrences must be deleted when we update a recurring series
      //https://docs.dhtmlx.com/scheduler/server_integration.html#recurringevents

      db.SchedulerEvents.RemoveRange(
         db.SchedulerEvents.Where(e => e.EventPID == id)
      );
    }

    db.SaveChanges();

    return Ok(new
    {
       action = "updated"
    });
}
And finally, the DELETE action. Two special cases:
- if the event you are going to delete has a non-empty event_pid, it means a user deletes a modified instance of the recurring series. Instead of deleting such a record from the database, you need to give it rec_type='none', in order for scheduler to skip this occurrence.
- if a user deletes a whole recurring series, you also need to delete all the modified instances of that series.
// DELETE: api/scheduler/5
[HttpDelete]
public IHttpActionResult DeleteSchedulerEvent(int id)
{
    var schedulerEvent = db.SchedulerEvents.Find(id);
    if (schedulerEvent != null)
    {
     //some logic specific to recurring events support
     //https://docs.dhtmlx.com/scheduler/server_integration.html#recurringevents

     if(schedulerEvent.EventPID != default(int))
     {
       // deleting a modified occurrence from a recurring series
       // If an event with the event_pid value was deleted, it should be updated
       // with rec_type==none instead of deleting.

       schedulerEvent.RecType = "none";
     }
     else
     {
       // if a recurring series deleted, delete all modified occurrences of the series

       if (!string.IsNullOrEmpty(schedulerEvent.RecType) &&
         schedulerEvent.RecType != "none")
       {
       //all modified occurrences must be deleted when we update recurring series
      //https://docs.dhtmlx.com/scheduler/server_integration.html#recurringevents

         db.SchedulerEvents.RemoveRange(
             db.SchedulerEvents.Where(ev => ev.EventPID == id)
         );
       }

       db.SchedulerEvents.Remove(schedulerEvent);
     }
     db.SaveChanges();
    }

    return Ok(new
    {
      action = "deleted"
    });
}
Parsing recurring series
A recurring event is stored in the database as a single record that can be splitted up by Scheduler on the client side. If you need to get dates of separate events on the server side, use a helper library for parsing recurring events of dhtmlxScheduler on ASP.NET.
You will find the ready library on GitHub.
Error handling
Exception filters can be used for capturing exceptions in CRUD handlers and returning a client response that can be recognized by the client-side scheduler.
To provide error handling for the scheduler, follow the steps below:
Go to App_Start and add a new class called SchedulerAPIExceptionFilterAttribute:
using System.Net;
using System.Net.Http;
using System.Web.Http.Filters;

namespace DHX.Scheduler.Web.App_Start
{
 public class SchedulerAPIExceptionFilterAttribute : ExceptionFilterAttribute
  {
   public override void OnException(HttpActionExecutedContext context)
    {
      context.Response = context.Request.CreateResponse(
          HttpStatusCode.InternalServerError, new
        {
          action = "error",
          message = context.Exception.Message
        });
    }
  }
}
Then we will add this class to our WebAPI controller (SchedulerController) as in:
namespace DHX.Scheduler.Web.Controllers
{
    [SchedulerAPIExceptionFilter]
    public class SchedulerController : ApiController
    {
Now if any Web API controller fires an exception while processing the request, the client side will receive an error status and an error message that can be either somehow processed or shown to the user.
Note that returning an exception message to the client might not be the best idea for a production environment.
Application Security
Scheduler doesn't provide any means of preventing an application from various threats, such as SQL injections, XSS and CSRF attacks. The responsibility for keeping an application safe is on the developers who implement the backend. Read the details in the corresponding article.
XSS protection
A simple solution would be to encode the text properties of data items when we send them to the client side.
Install the encoder package if you don't already have it. You can run the following command in the Package Manager Console:
PM> Install-Package System.Text.Encodings.Web -Version 6.0.0
For example, in the below code a built-in HtmlEncoder is used to escape HTML values in the text of events. That way our database will contain unmodified data, but the client side will receive safe values of event.text.
using System.Text.Encodings.Web;

public static explicit operator WebAPIEvent(SchedulerEvent schedulerEvent)
{
  return new WebAPIEvent
    {
      id = schedulerEvent.Id,
      text = HtmlEncoder.Default.Encode(schedulerEvent.Text),
      start_date = schedulerEvent.StartDate.ToString("yyyy-MM-dd HH:mm"),
      end_date = schedulerEvent.EndDate.ToString("yyyy-MM-dd HH:mm")
    };
}
Another approach would be to use a specialized library, e.g. HtmlAgilityPack and completely strip any HTML event when we save/load data.
Troubleshooting
ASP.NET Web Application template is absent
If you can't find the necessary "ASP.NET Web Application" project template in Visual Studio 2022, follow the steps below:
-
Close Visual Studio 2022
-
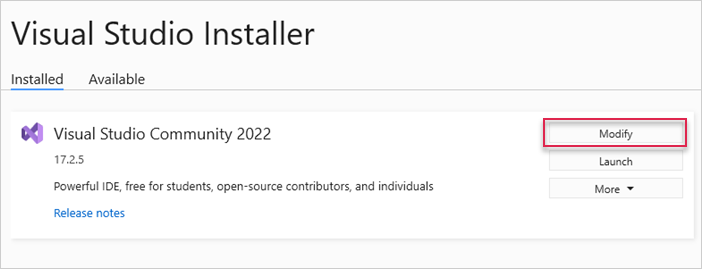
Start Menu -> Visual Studio Installer
-
Find Visual Studio Community 2022 -> click on Modify
- In the window opened, select Individual components, check ".NET Framework Project and item templates" point in the list and click on Modify
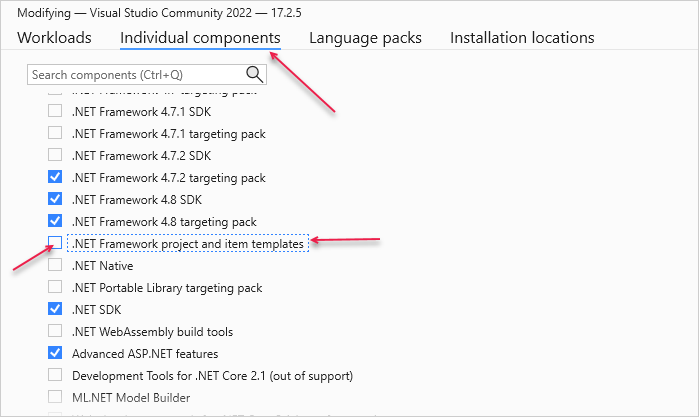
After that, you can launch Visual Studio 2022 and find the necessary template.
Issues with rendering tasks and links
In case you've completed the above steps to implement Scheduler integration with ASP.NET MVC, but Scheduler doesn't render events on a page, have a look at the Troubleshooting Backend Integration Issues article. It describes the ways of identifying the roots of the problems.
What's next
Now you have a fully functioning Scheduler. You can view the full code on GitHub, clone or download it and use it for your projects.
You can also check guides on the numerous features of Scheduler or tutorials on integration of Scheduler with other backend frameworks.