Step 3. Load Data to the Form
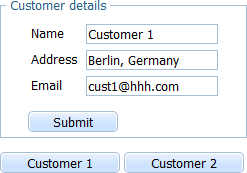
Now, we will provide loading data to the form. Our form will present details of 2 customers: "Customer 1" and "Customer 2". We'll use a MySQL database "sampledb " and the table "customers " in it as the data source.

We will add 2 buttons: "Customer 1" and "Customer 2" to load details of a specific customer to the form. Initially, we will load details of Customer 1.
To load data we will use the PHP platform and the dhtmlxConnector library, as this is the easiest way to implement the server-side logic for a DHTMLX-based application.
- is a server-side library that lets you access external data sources and backend systems.
- provides wide server-side functionality, such as data loading (static or dynamic), saving, filtering, validation etc.
- consists of individual component-specific connectors. For a grid, you need to use FormConnector.
- outputs data in the XML format
1) Make sure that your MySql, Apache servers are running and you've defined the correct directory to your app for them, otherwise the error "LoadXML" will appear.
2) Make sure that your
'ID' field in the database is set as autoincrement.
- Find the db.sql file in the demo app and import it into your local database.
- Create a subfolder with the name "connector " in the "codebase " folder.
- Download the dhtmlxConnector library (link to download).
- Open the "dhtmlxConnector.zip " archive and extract the content of its "codebase " folder to the "connector " folder.
- Create a PHP file in the "form_serverside " folder and name it "formdata.php ".
- Open the "data.php " file and add the following server-side code to it:
"formdata.php" file
Make sure that all the includes used within the connector's script don't have any whitespaces beyond the <?php and ?> tags.<?php require_once("codebase/connector/form_connector.php");//includes connector file //connects to the database with the name "sampledb" $res=new PDO("mysql:dbname=sampledb;host=localhost","user","password"); $conn = new FormConnector($res); //initializes the connector object $conn->render_table("customers","id","name,address,email");//loads data from db
The render_table method allows to load data from a single table. As parameters, the method takes: the table's name, the id field, a list of fields to load (used as values of the grid's cells).
- Call the load() method to load data from the database to the form:
'index.html'
As a parameter, the method takes the path to the server-side script. The path must include the id of the loaded record.myform.load('formdata.php?id=1'); //takes the path to your data feed
The client side of the dhtmlxConnector functionality is already contained in the dhtmlx.js file, so we needn't to include any additional files on the page.
- Specify a handler function for the onButtonClick event to load customer's details on clicking the "Customer 1"
and "Customer 2" buttons.
'index.html'
myform.attachEvent("onButtonClick", function(id){
    if (id=='button1'){
        myform.load("formdata.php?id=1")//loads data of the 1st customer (id=1)
    }
    else if (id=='button2'){
        myform.load("formdata.php?id=2")//loads data of the 2nd customer (id=2)
    }
});
