Step 5. Create a Scheduler
And now, we're going to add a scheduler on the page. The technique used for dhtmlxGrid is the same for all other DHTMLX components,
including dhtmlxScheduler.
We will again divide the step into 2 substeps:
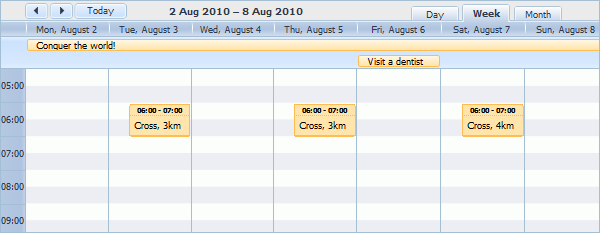
If after completing the step, you will run webhost/cdemo/event/scheduler, the app will produce the following scheduler that loads data from server and saves them back:

Step 5.1. Configuring the View object
Again, we will use a standard code initializing the component.
For a deeper learning of dhtmlxScheduler initialization, read:
- How to start (step-by-step guide);
- Scheduler Markup
- Common Configuration Instructions;
- Server-side Integration.
To configure the View object:
- In the "views " folder create a new file and name it "scheduler.php "
- Open the "scheduler.php " file and add the following code there:
"views/scheduler.php" file
<!DOCTYPE html> <head> <meta http-equiv="Content-type" content="text/html; charset=utf-8"> <script src="/dhtmlx/scheduler/dhtmlxscheduler.js"></script> <link rel="stylesheet" href="/dhtmlx/scheduler/dhtmlxscheduler_glossy.css"> </head> <body> <div id="scheduler_here" class="dhx_cal_container" style='width:800px; height:600px;'> <div class="dhx_cal_navline"> <div class="dhx_cal_prev_button"> </div> <div class="dhx_cal_next_button"> </div> <div class="dhx_cal_today_button"></div> <div class="dhx_cal_date"></div> <div class="dhx_cal_tab" name="day_tab" style="right:204px;"></div> <div class="dhx_cal_tab" name="week_tab" style="right:140px;"></div> <div class="dhx_cal_tab" name="month_tab" style="right:76px;"></div> </div> <div class="dhx_cal_header"> </div> <div class="dhx_cal_data"> </div> </div> <script type="text/javascript" charset="utf-8">
scheduler.config.multi_day = true; scheduler.config.xml_date="%Y-%m-%d %H:%i"; scheduler.config.first_hour = 5; scheduler.init('scheduler_here',new Date(2010,7,5),"week"); //refers to the 'data' action that we will create in the next substep var dp = new dataProcessor("/scheduler/data"); scheduler.load("/scheduler/data"); //refers to the 'data' action as well var dp = new dataProcessor("/scheduler/data"); dp.action_param ="dhx_editor_status"; dp.init(scheduler);
</script> </body>
Step 5.2. Configuring the Controller object
We won't create a separate controller file for the scheduler and just add the required functionality to the grid's controller.
To configure the Controller object:
- Create an action that will load the view displaying the scheduler in the "EventController.php " file:
"controllers/EventController.php" file
class EventController extends Controller {
    public function actionIndex() {
        $this->render('index');
    }
    public function actionGrid() {
        $this->render('grid');
    }
    public function actionGrid_data() {
        $grid = new GridConnector(Events::model(), "PHPYii");
        $grid->configure("-", "event_id", "start_date, end_date, event_name");
        $grid->render();
    }
    public function actionScheduler() {                                     $this->render('scheduler'); //loads the 'scheduler' view        }                                                               }
- Create an action that will load data to the scheduler:
"controllers/EventController.php" file
class EventController extends Controller {
    public function actionIndex() {
        $this->render('index');
    }
    public function actionGrid() {
        $this->render('grid');
    }
    public function actionGrid_data() {
        $grid = new GridConnector(Events::model(), "PHPYii");
        $grid->configure("-", "event_id", "start_date, end_date, event_name");
        $grid->render();
    }
    public function actionScheduler() {
        $this->render('scheduler'); //loads the 'scheduler' view
    }
    public function actionScheduler_data() {                                                 $scheduler = new SchedulerConnector(Events::model(), "PHPYii");                      $scheduler->configure("-","event_id","start_date,end_date,event_name");          $scheduler->render();                                                            }                                                                                }
That's all. We believe you have enjoyed the tutorial and seen how easy you could integrate Yii with dhtmlxConnector.
The final application logic was not the goal of this article, but the interface built here is a good start for creating a fully-functional web application.
Follow our other tutorials to become a true DHTMLX expert.
Back to top
Follow our other tutorials to become a true DHTMLX expert.