Step 5. Create a Scheduler
Now we're going to add a scheduler on the page. The technique used for dhtmlxGrid is the same for all other DHTMLX components,
including dhtmlxScheduler.
We will divide the step into 2 substeps again:
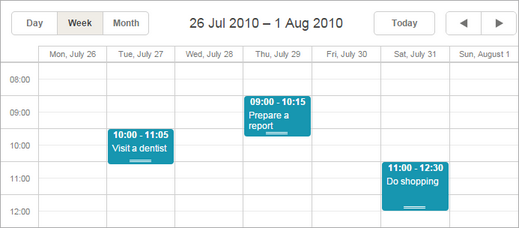
If after completing the step, you will run webhost/codeigniter_dhtmlx/scheduler, the app will produce the following scheduler that loads data from server and saves them back:

Step 5.1. Configuring the View object
Let's create a View file that will present our scheduler.
For a deeper learning of dhtmlxScheduler initialization, read:
- How to start (step-by-step guide);
- Scheduler Markup;
- Common Configuration Instructions;
- Server-side Integration.
- In the "views " folder create a new file and name it "SchedulerView.php "
- Open the "SchedulerView.php " file and add the following code there:
"views/SchedulerView.php" file
<!DOCTYPE html> <head> <meta http-equiv="Content-type" content="text/html; charset=utf-8"> <script src="./static/lib/dhtmlxScheduler/codebase/dhtmlxscheduler.js"></script> <link rel="stylesheet" href=".../dhtmlxScheduler/codebase/dhtmlxscheduler.css"> </head> <body> <div id="scheduler_here" class="dhx_cal_container" style='width:100%; height:100%;'> <div class="dhx_cal_navline"> <div class="dhx_cal_prev_button"> </div> <div class="dhx_cal_next_button"> </div> <div class="dhx_cal_today_button"></div> <div class="dhx_cal_date"></div> <div class="dhx_cal_tab" name="day_tab" style="right:204px;"></div> <div class="dhx_cal_tab" name="week_tab" style="right:140px;"></div> <div class="dhx_cal_tab" name="month_tab" style="right:76px;"></div> </div> <div class="dhx_cal_header"> </div> <div class="dhx_cal_data"> </div> </div> <script type="text/javascript" charset="utf-8">
document.body.onload = function() { scheduler.init('scheduler_here',new Date(2010,7,1),"month"); scheduler.setLoadMode("month"); // refers to the 'data' action that we will create in the next substep scheduler.load("./scheduler/data"); // refers to the 'data' action as well var dp = new dataProcessor("./scheduler/data"); dp.init(scheduler); };
</script> </body>
Step 5.2. Configuring the Controller object
In the controller, we'll use the same technique that was used for Grid. So let's implement the following actions:
- One that loads the view.
- One that loads and processes data.
To load and process data we will use SchedulerConnector. A common use of SchedulerConnector is:
$connector = new SchedulerConnector($db, $type);
$connector->configure($table,$id, $text, $extra);
$connector->render();
The SchedulerConnector constructor takes 2 parameters:
- $db - the DB connection variable;
- $type - the database type.
Remember, in case of working with CodeIgniter, the parameters will always get the values:
$this->db and "PHPCI".
The configure method configures the SchedulerConnector object without rendering data and takes 4 parameters:
- $table - the name of a table;
- $id - the name of the id field;
- $text - a comma separated list of rendered data fields;
- $extra - (optional) a comma separated list of extra fields.
- Create a new file in the "controllers " folder and name it "Scheduler.php ".
- Open the "Scheduler.php " file and apply the use keyword to include SchedulerConnector:
"controllers/Scheduler.php" file
<?php
use Dhtmlx\Connector\SchedulerConnector;
?>
- Create the root controller class with the name "Scheduler ":
"controllers/Scheduler.php" file
<?php
use Dhtmlx\Connector\SchedulerConnector;

class Scheduler extends CI_Controller {                 // here you should place all your functions     }                                                                                              ?>
- Create an action that will load the view:
"controllers/Scheduler.php" file
сlass Scheduler extends CI_Controller {
    public function index(){                            $this->load->view("SchedulerView");         }                                           };
- Create an action that will load and process data:
"controllers/Scheduler.php" file
class Scheduler extends CI_Controller {
    public function index(){
        $this->load->view("SchedulerView");
    }
    public function data(){                                                 $this->load->database(); // data feed                                $connector = new SchedulerConnector($this->db, "PHPCI");            $connector->configure(                                                  "scheduler_events",                                                 "event_id",                                                         "start_date, end_date, event_name"                              );                                                                  $connector->render();                                           }                                                               };