Resource Management
This functionality is available only in the PRO edition.
Gantt provides predefined resource views for highlighting resource load, methods for breaking project down by a resource for load balancing, task and resource-specific work-time calendars.

Although Gantt itself does not calculate the resource load, and does not have any methods that can be used out of the box, Gantt provides you with public API for implementing any custom behavior.
Resource view panel
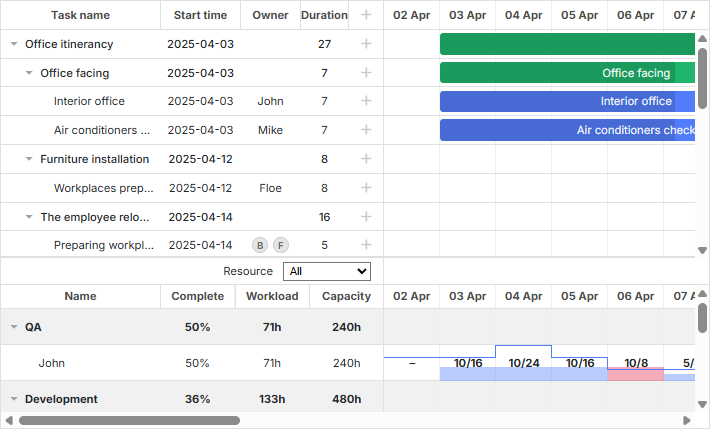
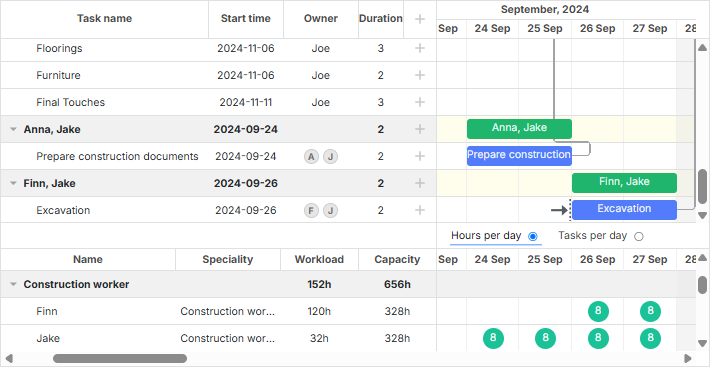
dhtmlxGantt has two types of predefined layout view for displaying resource load of gantt: resource load diagram and resource histogram.
Resource load diagram
It includes corresponding views for the grid and timeline: "resourceGrid" and "resourceTimeline".
gantt.config.layout = {
    css: "gantt_container",
    rows: [
        {
            // layout for default Grid and Timeline
            cols: [
                { view: "grid", group: "grids", scrollY: "scrollVer" },
                { resizer: true, width: 1 },
                { view: "timeline", scrollX: "scrollHor", scrollY: "scrollVer" },
                { view: "scrollbar", id: "scrollVer", group: "vertical" }
            ],
            gravity: 2
        },
        { resizer: true, width: 1 },
        {
            // layout for Grid and Timeline of resource panel
            config: resourceConfig, // config for Grid and Timeline
            cols: [
                { view: "resourceGrid", group: "grids", width: 435,
                    scrollY: "resourceVScroll"
                },
                { resizer: true, width: 1 },
                { view: "resourceTimeline", scrollX: "scrollHor",
                    scrollY: "resourceVScroll"
                },
                { view: "scrollbar", id: "resourceVScroll", group: "vertical" }
            ],
            gravity: 1
        },
        { view: "scrollbar", id: "scrollHor" }
    ]
};
Related sample: Resource load diagram
Once initialized, resourceGrid will work in the same way as the default grid view, but readonly. resourceTimeline will inherit the scale configuration from the default timeline and will have two layers:
- background rows, which inherit task_row_class and timeline_cell_class. The templates of resourceTimeline can be redefined at the layout level.
- resource layer - a layer specific for resourceTimeline. It will display blocks in cells where the resource has tasks assigned. The block style and content can be templated with the resource_cell_class and resource_cell_value templates:
gantt.templates.resource_cell_value = (startDate, endDate, resource, tasks, assignments) =>
    `<div>${tasks.length * 8}h</div>`;
Related sample: Templates of the Resource diagram
Resource histogram
This type of the layout view for displaying resource load of gantt includes the "resourceGrid" and "resourceHistogram" views for the grid and timeline correspondingly.
gantt.config.layout = {
    css: "gantt_container",
    rows: [
        {
            // layout for default Grid and Timeline
            gravity: 2,
            cols: [
                { view: "grid", group: "grids", scrollY: "scrollVer" },
                { resizer: true, width: 1 },
                { view: "timeline", scrollX: "scrollHor", scrollY: "scrollVer" },
                { view: "scrollbar", id: "scrollVer", group: "vertical" }
            ]
        },
        { resizer: true, width: 1, next: "resources" },
        {
            // layout for Grid and Timeline of resource panel
            gravity: 1,
            id: "resources",
            config: resourceConfig, // config for Grid and Timeline
            templates: resourceTemplates, // templates for Grid and Timeline
            cols: [
                { view: "resourceGrid", group: "grids", scrollY: "resourceVScroll" },
                { resizer: true, width: 1 },
                {
                    view: "resourceHistogram",
                    capacity: 24,
                    scrollX: "scrollHor",
                    scrollY: "resourceVScroll"
                },
                { view: "scrollbar", id: "resourceVScroll", group: "vertical" }
            ]
        },
        { view: "scrollbar", id: "scrollHor" }
    ]
};
Related sample: Resource histogram
The same as in the resource load diagram, resourceGrid will work in the same way as the default grid view, but readonly. resourceHistogram has the following additional templates:
- histogram_cell_class - the CSS class which is applied to a cell of the resource panel
gantt.templates.histogram_cell_class =
    (start_date, end_date, resource, tasks, assignments) => "";
- histogram_cell_label - the label inside a cell
gantt.templates.histogram_cell_label =
    (start_date, end_date, resource, tasks, assignments) => tasks.length * 8;
- histogram_cell_allocated - the height of the filled area in the histogram. Its value can be set from 0 to maxCapacity *.
gantt.templates.histogram_cell_allocated =
    (start_date, end_date, resource, tasks, assignments) => tasks.length * 8;
- histogram_cell_capacity - the height of the line that defines the available capacity of the resource. Its value can be set from -1 to maxCapacity *. Values less than 0 won't render the line.
gantt.templates.histogram_cell_capacity =
    (start_date, end_date, resource, tasks, assignments) => 24;
What maxCapacity is
If each row of the histogram is considered as a bar chart, maxCapacity is the height of the Y-scale of this chart. In the image below maxCapacity = 24:

Thus, if the templates histogram_cell_allocated or histogram_cell_capacity are set to value 24, it implies the highest point of the row.
By default, maxCapacity is 24 for all resources. It means that if you return the value bigger than 24 in the histogram_cell_capacity template, the numbers will be calculated correctly, but the area of the cells of the resource panel may not be filled as you expected.

But there is the ability to configure maxCapacity for all histogram at once and for each resource separately. Check the example below:
Related sample: Configuring maxCapacity
maxCapacity can be defined either at the histogram level:
{ view: "resourceHistogram", capacity: 24, scrollX: "scrollHor", scrollY: "resourceVScroll" }
or individually for each resource:
resourcesStore.parse([
    { id: 1, text: "John", capacity: 8 },
    { id: 2, text: "Mike", capacity: 4 },
    { id: 3, text: "Anna", capacity: 8 },
    { id: 4, text: "Bill", capacity: 8 },
    { id: 5, text: "Floe", capacity: 8 }
]);
Capacity defined at the resource level overrides the global capacity of histogram for a given resource.
Working with resource view panel
By default both views (either "resourceGrid" and "resourceTimeline" or "resourceGrid" and "resourceHistogram") will be bound to the data store named as specified in the gantt.config.resource_store configuration option.
Auto creation of data store
From v8.0, the data store for resources will be created automatically during the initialization of the gantt and will be available by the time "onGanttReady" is called. To use the datastore created by gantt, apply the gantt.getDatastore method.
If you need to provide an extra configuration to the resource store, you can use the new gantt.config.resources option:
gantt.config.resources = {
    resource_store: {
        type: "treeDataStore",
        fetchTasks: true,
        initItem: item => {
            item.parent = item.parent || gantt.config.root_id;
            item[gantt.config.resource_property] = item.parent;
            item.open = true;
            return item;
        }
    }
};
Settings passed to resource_store will be used by the gantt to create the default resource datastore. If you've already created the resource datastore in your code, the gantt will use your store instead.
In order to load resources, you can either pass resources into the gantt.parse()/gantt.load() methods as described here, or you can access the datastore and populate it using the datastore.parse() method:
gantt.attachEvent("onGanttReady", () => {
    const store = gantt.getDatastore(gantt.config.resource_store);
    store.parse([
        { id: 6, text: "John" },
        { id: 7, text: "Mike" },
        { id: 8, text: "Anna" },
        { id: 9, text: "Bill" }
    ]);
});
The resource control of the lightbox will be connected to the resource list automatically:
gantt.config.lightbox = {
    sections: [
        ...,
        { name: "resource_selector", label: "Resources", type: "resource_selector", map_to: "auto" }
    ]
};
Manual creation of data store
It is also possible to initialize the data store manually with the help of the createDatastore method:
const resourcesStore = gantt.createDatastore({
    name: gantt.config.resource_store,
    // Use treeDatastore if you have hierarchical resources (e.g. workers/departments),
    // skip the "type" if you have a flat structure when you don't use the assignments or render everything manually
    type: "treeDatastore",
    initItem: item => {
        item.parent = item.parent || gantt.config.root_id;
        item[gantt.config.resource_property] = item.parent;
        item.open = true;
        return item;
    }
});
In order to populate the data store, use the datastore.parse method:
resourcesStore.parse([
    { id: 1, text: "QA", parent: null },
    { id: 2, text: "Development", parent: null },
    { id: 3, text: "Sales", parent: null },
    { id: 4, text: "Other", parent: null },
    { id: 5, text: "Unassigned", parent: 4 },
    { id: 6, text: "John", parent: 1 },
    { id: 7, text: "Mike", parent: 2 },
    { id: 8, text: "Anna", parent: 2 },
    { id: 9, text: "Bill", parent: 3 },
    { id: 10, text: "Floe", parent: 3 }
]);
If you want to use resources in the lightbox, it might be a good idea to do it via the serverList method from the onParse event of the data store:
resourcesStore.attachEvent("onParse", () => {
    const people = [];
    resourcesStore.eachItem(res => {
        if (!resourcesStore.hasChild(res.id)) {
            const copy = gantt.copy(res);
            copy.key = res.id;
            copy.label = res.text;
            people.push(copy);
        }
    });
    gantt.updateCollection("resourceOptions", people);
});
Expanding resources panel
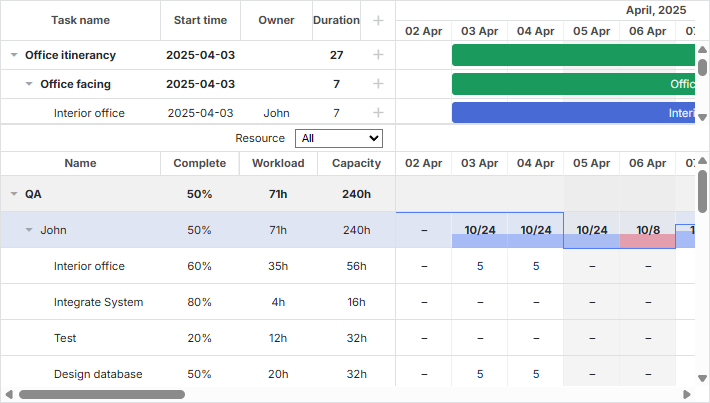
It is possible to expand the resources panel to show all the tasks assigned to a particular resource by enabling the fetchTasks property during initialization of the datastore:
gantt.config.resources = {
    resource_store: {
        type: "treeDataStore",
        fetchTasks: true, /*!*/
        initItem: item => {
            item.parent = item.parent || gantt.config.root_id;
            item[gantt.config.resource_property] = item.parent;
            item.open = !item.parent;
            return item;
        }
    }
};
or
gantt.$resourcesStore = gantt.createDatastore({
    name: gantt.config.resource_store,
    type: "treeDatastore",
    fetchTasks: true, /*!*/
    initItem: item => {
        item.parent = item.parent || gantt.config.root_id;
        item[gantt.config.resource_property] = item.parent;
        item.open = !item.parent;
        return item;
    }
});
Related sample: Show all assigned tasks in the resource panel
With the fetchTasks property set to true, Gantt renders all tasks assigned to a certain resource in the resource view panel. This functionality works both for the resource diagram and resource histogram types of layout.
There is a shorthand for getting all tasks assigned to a resource - getResourceAssignments.
gantt.getResourceAssignments("6");
Assigning resources
Connecting resources to tasks
The resource relation is defined by the resource_property configuration option:
gantt.config.resource_property = "user_id";
// task.user_id <-> resource.id
Resources can be connected to tasks via the properties of the task object in one of the following ways:
- assigning one resource to one task
{
    id: 1, text: "Task #1", start_date: "02-04-2018", duration: 8, progress: 0.6,
    user_id: 5 // 5 is the id of the resource
}
- assigning multiple resources to one task
{
    id: 1, text: "Task #1", start_date: "02-04-2018", duration: 8, progress: 0.6,
    users: [2, 3] // 2 and 3 are the ids of resources
}
You can use this format with the custom multiselect control.
- assigning multiple resources and specifying their quantity
{
    id: 1, text: "Task #1", start_date: "02-04-2025", duration: 8, progress: 0.6,
    users: [{resource_id: 2, value: 8}, {resource_id: 3, value: 4}]
}
The resources are assigned to the Task1 as follows: the resource with id="2" - in the quantity of 8 units, while the resource with the id="3" - in the quantity of 4 units. This format is supported by the Resources Control and Resource Assignments control of the lightbox.
Starting from v8.0 you can also load resource assignments as a separate list, and gantt will connect them to tasks automatically:
gantt.parse({
    tasks: [...],
    links: [...],
    resources: [...],
    assignments: [{id: 1, resource_id: 2, task_id: 5, value: 8}, ...]
});
You can read more about data formats here.
When sending data to the server, DataProcessor serializes the values of the described properties into JSON. To process such records on the server with ease, make use of the "REST_JSON" dataprocessor mode.
In some cases, you may want to save changes in Resource Assignments separately from task objects. In this case, you can enable the following config:
gantt.config.resources = {
    dataprocessor_assignments: true,
    dataprocessor_resources: true,
};
Read more about it in a separate article.
Setting the time of the resource assignments
By default, the resource is considered to be assigned for the whole duration of a task.
Starting from v7.1, the object of the resource assignment can accept additional optional parameters that allow specifying the dates of the assignment within the task.
The additional properties are:
- id - (string|number) the id of the assignment
- start_date - (Date|string) the date the assignment is scheduled to start
- end_date - (Date|string) the date the assignment is scheduled to be completed
- delay - (number) the difference between the assignment start date and the task start date
- duration - (number) the duration of the assignment
- mode - (string) the calculation mode of the time of the resource assignment: "default"|"fixedDates"|"fixedDuration"
{
    id: 5, text: "Interior office", type: "task", start_date: "03-04-2025 00:00",
    duration: 7, parent: "2", progress: 0.6, priority: 1,
    users: [
        {
            resource_id: "3",
            value: 8,
            delay: 1
        },
        {
            resource_id: "6",
            value: 3,
            start_date: "03-04-2025 00:00",
            end_date: "05-04-2025 00:00",
            mode: "fixedDates"
        },
        {
            resource_id: "7",
            value: 3,
            delay: 1,
            duration: 2,
            mode: "fixedDuration"
        }
    ]
}
Related sample: Assign resource values to specific days
-
The start and end dates of the resource assignment will be reflected in the resource histogram and diagram.
-
The optional id property of the assignment can be added to the resource assignment object:
{
    id: 1, text: "Task #1", start_date: "02-04-2025", duration: 8, progress: 0.6,
    users: [{
        id: 5,
        resource_id: 2,
        value: 8,
        delay: 1
    }]
}
The assignment object will be accessible for the gantt API via this id:
const assignment = gantt.getDatastore("resourceAssignments").getItem(5);
The "resourceAssignments" datastore is only available when the process_resource_assignments config is enabled.
- The work of the rest properties is defined by the value of the mode property:
- the "default" mode
{
    id: 1, text: "Task #1", start_date: "02-04-2025", duration: 8, progress: 0.6,
    users: [
        { resource_id: 2, value: 8, delay: 1},
        { resource_id: 3, value: 6},
    ]
}
If the mode is not specified or is set to the "default" value, the start_date and end_date of the assignment are calculated from the dates of the task. By default, the start date of the assignment matches the start date of the task. The same approach is applied to the end date.
The delay property works similarly to the Delay property of MS Project.
If the delay is specified, the start_date of the assignment is calculated as
gantt.calculateEndDate({start_date:task.start_date, duration:assignment.delay, task:task}).
The resource assignment will start with the specified delay from the start of the task. The end date of the assignment will match the end date of the task.
Whenever the task object is updated, the start/end dates of the assignment will be updated accordingly.
- the "fixedDuration" mode
{
    id: 1, text: "Task #1", start_date: "02-04-2025", duration: 8, progress: 0.6,
    users: [
        { resource_id: 2, value: 8, duration: 1, delay: 0, mode: "fixedDuration" },
        { resource_id: 2, value: 2, duration: 1, delay: 1, mode: "fixedDuration" },
        { resource_id: 2, value: 3, delay: 2, mode: "default" }
    ]
}
The start_date of the assignment is calculated in the same way as it's calculated in the "default" mode.
The end_date is no longer linked to the end date of the task. Instead, it's calculated as
gantt.calculateEndDate({start_date:assignment.start_date, duration:assignment.delay, task:task}).
Whenever the task object is updated, the dates of the assignments are recalculated, and the durations of the assignments remain unchanged.
- the "fixedDates" mode
{
    id: 1, text: "Task #1", start_date: "02-04-2025", duration: 8, progress: 0.6,
    users: [{
        resource_id: 2, value: 8,
        start_date: "03-04-2025", end_date: "11-04-2025", mode: "fixedDates"
    }]
}
In this mode, the dates of the resource assignment have exactly the same values as specified in the data and are not changed when the task is modified.
The delay field doesn't affect the dates of the assignment when the "fixedDates" mode is used.
Here is a short summary of how assignment dates are calculated in each mode:
-
default
- assignment.start_date = task.start_date + assignment.delay
- assignment.end_date = task.end_date
-
fixedDuration
- assignment.start_date = task.start_date + assignment.delay
- assignment.end_date = assignment.start_date + assignment.duration
-
fixedDates
- assignment.start_date = assignment.start_date
- assignment.end_date = assignment.end_date
Getting tasks a resource is assigned to
There is a shorthand for getting all tasks assigned to a resource - getResourceAssignments.
gantt.getResourceAssignments("6");
The method takes as a parameter the id of the resource and returns an array of objects with tasks assigned to the resource:
[
    { task_id: 5, resource_id: "6", value: 5, delay: 0, duration: 7,
        start_date: "03-04-2025 00:00", end_date: "12-04-2025 00:00",
        id: 1617258553240, mode: "default" },
    { task_id: 18, resource_id: "6", value: 2, delay: 0, duration: 2,
        start_date: "05-04-2025 00:00", end_date: "09-04-2025 00:00",
        id: 1617258553250, mode: "default" },
    { task_id: 19, resource_id: "6", value: 3, delay: 0, duration: 4,
        start_date: "09-04-2025 00:00", end_date: "13-04-2025 00:00",
        id: 1617258553251, mode: "default" },
    { task_id: 21, resource_id: "6", value: 5, delay: 0, duration: 4,
        start_date: "03-04-2025 00:00", end_date: "09-04-2025 00:00",
        id: 1617258553254, mode: "default" }
]
Each object contains the following properties:
- task_id - the id of the task
- resource_id - the id of the resource
- value - the quantity of the resource assigned to a task
- delay - the difference between the assignment start date and the task start date
- duration - the duration of the assignment
- start_date - the date the assignment is scheduled to start
- end_date - the date the assignment is scheduled to be completed
- id - the id of the assignment
- mode - the calculation mode of the time of the resource assignment: "default"|"fixedDates"|"fixedDuration"
Getting resource assignments of a task
The getTaskAssignments method allows getting the parsed resource assignments of a specific task from the datastore:
gantt.getTaskAssignments(5);
The method takes as a parameter the id of the task and returns an array of objects with the resource assignments of the task:
[
    { task_id: 5, id: 1617254693938, delay: 0, duration: 2,
        start_date: "03-04-2025 00:00", end_date: "05-04-2025 00:00",
        mode: "fixedDuration", resource_id: 6, value: 3 },
    { task_id: 5, id: 1617254693946, delay: 3, duration: 1,
        start_date: "06-04-2025 00:00", end_date: "07-04-2025 00:00",
        mode: "fixedDuration", resource_id: 6, value: 6 }
]
The return object contains the same list of properties as the return object of the getResourceAssignments method.
Setting connection via lightbox
Resources can be assigned to any property of the task object using the built-in lightbox.
gantt.serverList("people", [
    { key: 1, label: "John" },
    { key: 2, label: "Mike" },
    { key: 3, label: "Anna" },
    { key: 4, label: "Bill" },
    { key: 7, label: "Floe" }
]);

gantt.locale.labels.section_owner = "Owner";

gantt.config.lightbox.sections = [
    { name: "description", height: 38, map_to: "text", type: "textarea", focus: true },
    { name: "owner", map_to: "owner_id", type: "select",
        options: gantt.serverList("people") },
    { name: "time", type: "duration", map_to: "auto" }
];
Read about how to configure the resource control of the lightbox in the Resources Control and Resource Assignments control articles.
Loading collections
Collections specified as server lists can be loaded and updated dynamically, after gantt is initialized:
// init lightbox with an empty collection
gantt.locale.labels.section_owner = "Owner";

gantt.config.lightbox.sections = [
    { name: "description", height: 38, map_to: "text", type: "textarea", focus: true },
    { name: "owner", map_to: "owner_id", type: "select",
        options: gantt.serverList("people") },
    { name: "time", type: "duration", map_to: "auto" }
];

// once options are loaded
gantt.updateCollection("people", [
    { key: 1, label: "John" },
    { key: 2, label: "Mike" },
    { key: 3, label: "Anna" },
    { key: 4, label: "Bill" },
    { key: 7, label: "Floe" }
]);

Related sample: Assigning owners to tasks
If you define resources via the serverList collection, they can be loaded together with the rest of the data, otherwise you'll need to load them manually.
Read about how to configure the resource control of the lightbox in the Resources control and Resource Assignments control articles.
Loading resources and resource assignments
From v8.0, resources and resource assignments can be loaded into the gantt using gantt.parse() or gantt.load() methods:
gantt.parse({
    tasks: [
        ...,
        {
            id: 5,
            text: "Interior office",
            type: "task",
            start_date: "03-04-2025 00:00",
            duration: 7,
            parent: "2",
            owner: [
                {
                    resource_id: "6",
                    value: 3,
                    start_date: "03-04-2025 00:00",
                    end_date: "05-04-2025 00:00",
                }
            ]
        },
        ...
    ],
    links: [],
    resources: [
        { id: 6, text: "John", unit: "hours/day" },
        { id: 7, text: "Mike", unit: "hours/day" },
        { id: 8, text: "Anna", unit: "hours/day" },
        { id: 9, text: "Bill", unit: "hours/day" },
        { id: 10, text: "Floe", unit: "hours/day" }
    ]
});
Resource assignments can be passed into the method separately from tasks:
gantt.parse({
    tasks: [
        ...,
        {
            id: 5,
            text: "Interior office",
            type: "task",
            start_date: "03-04-2025 00:00",
            duration: 7,
            parent: "2",
            priority: 1
        },
        ...
    ],
    links: [],
    assignments: [
        {
            id: 1,
            task_id: 5,
            resource_id: 6,
            value: 3,
            start_date: "03-04-2025 00:00",
            end_date: "05-04-2025 00:00"
        }
    ],
    resources: [
        { id: 6, text: "John", unit: "hours/day" },
        { id: 7, text: "Mike", unit: "hours/day" },
        { id: 8, text: "Anna", unit: "hours/day" },
        { id: 9, text: "Bill", unit: "hours/day" },
        { id: 10, text: "Floe", unit: "hours/day" }
    ]
});
Managing resource assignments
Parsing resource assignments
Starting with v7.1, you can work with the resource assignments as with objects of the data store.
The new process_resource_assignments property enables the process of parsing of the values from the gantt.config.resource_property of tasks into the internal objects of the resource assignments. As a result, you are able to manipulate the resource assignments via the DataStore object. For instance, you can get the necessary assignment object or update it.
Note, that this functionality is required if you want to specify the desired duration and time for the resources when building Resource Diagram and Histogram.
The process may add noticeable performance overhead and large projects may start working slower. Therefore, if you don't need to set time or duration of the assignment, you can disable parsing of the resource assignments using the config:
gantt.config.process_resource_assignments = false;
When the config is disabled, the gantt.getDatastore("resourceAssignments") datastore won't be available and the assignment objects won't have any dynamic properties. The resource diagram and histogram will consider resources to be assigned to the whole duration of the task.
Updating resource assignments
The resource assignments are stored in the data store which is created automatically.
By default, the store of the assignments is populated from the task objects. It means, that if you modify the resource property of the task object (e.g. task.users), the changes will be automatically reflected in the data store.
task[gantt.config.resource_property] = [
    {
        resource_id: "6",
        value: 3,
        start_date: "03-04-2025 00:00",
        end_date: "05-04-2025 00:00",
    }
];

gantt.updateTask(taskId);
But you may need to refresh the data of the assignments in the opposite direction. Namely, you may need to apply the changes to the task object after the resource assignments are modified via the datastore API. In this case, you need to update the resource property of the task object with the values from the datastore by calling the gantt.updateTaskAssignments() method:
const assignmentStore = gantt.getDatastore(gantt.config.resource_assignment_store);

assignmentStore.addItem({
    resource_id: 5,
    task_id: 2,
    value: 4
});

assignmentStore.removeItem(assignment.id);
assignmentStore.updateItem(assignment.id);

// after the assignments are updated in the datastore, you need
// to call `updateTaskAssignments` to write the changes to the task object:
gantt.updateTaskAssignments(taskId);
Re-rendering resource assignments during task drag
When a task is being dragged, the resource panel is re-rendered, but the resource assignments are not modified. Only the cells of the resource panel that are affected by the task dragging (by default, only those inside the task dates) are re-rendered.
To update the resource assignments in all the cells, you need either to disable the process_resource_assignments configuration option or update all the resource assignments of the task manually, as it is shown in the example below:
gantt.attachEvent("onTaskDrag", (id, mode, task, original) => {
    const assignments = gantt.getTaskAssignments(id);
    assignments.forEach(assignment => {
        if (assignment.mode === "default") {
            assignment.start_date = task.start_date;
            assignment.end_date = task.end_date;
        }
    });
});
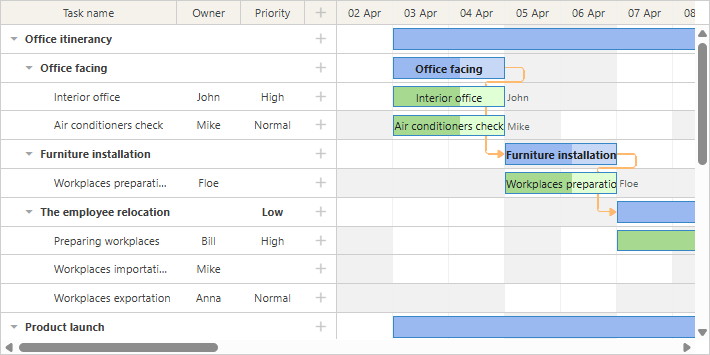
Showing task resource
The resource name can be displayed as a part of task description or a label of one of the grid cells. Gantt doesn't provide a ready method for getting an item specified in the server list by its id, so you'll need to implement a small helper for this:
const byId = (list, id) => {
    const item = list.find(item => item.key === id);
    return item ? item.label || "" : "";
};
After that you can use the resource name in templates:
gantt.config.columns = [
    { name: "owner", width: 80, align: "center",
        template: (item) => byId(gantt.serverList('people'), item.owner_id) },
    { name: "text", label: "Task name", tree: true, width: '*' },
    { name: "add", width: 40 }
];

gantt.templates.rightside_text =
    (start, end, task) => byId(gantt.serverList('people'), task.owner_id);
Related sample: Assigning owners to tasks
Editable resource diagram
In order to make resource assignments editable in the resource diagram, you can use the following configuration:
gantt.config.resources = {
    editable_resource_diagram: true
};
Related sample: Assign resource values to specific days
When the editable_resource_diagram property is enabled, gantt will automatically assign gantt.templates.resource_cell_value and gantt.templates.resource_cell_class templates in order to make resource assignments editable in the gantt.
If you assign custom functions to these templates - the gantt will use templates defined by you.
The default implementation of templates is available in the gantt.ext.resources object.
gantt.templates.resource_cell_value = gantt.ext.resources.editableResourceCellTemplate;
gantt.templates.resource_cell_class = gantt.ext.resources.editableResourceCellClass;
Normally you won't need to assign these templates for editable diagram manually, it's expected to be handled by Gantt.
In the example below, a template with editable cells is provided. You can customize it if needed:
Related sample: Customizable resource diagram template
Custom styling of resources
For coloring you'll usually need the following templates:
- gantt.templates.grid_row_class - the CSS of a row in the left hand grid
- gantt.templates.task_row_class - the background row in the timeline (won't be called if smart_rendering is enabled)
- gantt.templates.task_class - the CSS class of a task bar element
Depending on your context, you can
- either have predefined classes for each resource
- or load styling, e.g. background and text color settings together with the resources. In that case you'll need to generate a CSS dynamically on the page
Related sample: Assigning owners to tasks
Resource calendars
Gantt supports the custom work-time calendars feature. Work-time calendars can be associated with specific resources.
They are mapped to tasks via the property value in one-to-one relation:
// a resource value will be taken from the `task.resource_id` property
gantt.config.resource_property = "resource_id";

gantt.config.resource_calendars = {
    "resource1" : "calendarId1",
    "resource2" : "calendarId2",
    "resource3" : "calendarId3"
};
You can use any property to assign calendars to resources. If the resource property is changed dynamically, the gantt will automatically recalculate time of tasks using a new calendar.
Related sample: Resource calendars
If multiple resources can be assigned to a single task, the gantt can automatically generate a common calendar for all assigned resources.
You can get more information in the related article.
Balancing resource load
You can use the grouping extension to break down the whole project by the resource property.
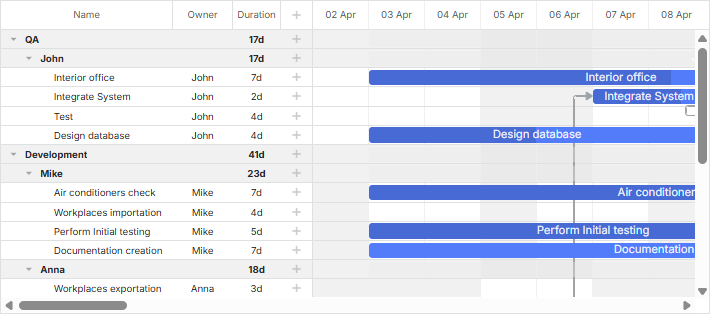
This feature can be used for balancing resource load in the calendar.
Related sample: Break down by resources
Read more about task grouping in the related article.
Grouping tasks by multiple resources
In case you assign several resources to a task, tasks will be grouped by assigned resources. It means that a task assigned to two persons won't be duplicated for each of them. Instead it will be rendered once with both persons assigned to it. Note that grouped tasks will be sorted by the start date.
Related sample: Group by multiple resources
- If tasks in the loaded data set have several resources assigned to them, Gantt will create groups for them automatically.
- For tasks without assigned resources Gantt will create the default group Not assigned. In case there is such a group in the data set that is passed into the groupBy() method, it should have the default:true config specified to prevent automatic creation of a such a group.
Please note that dragging of tasks grouped by multiple resources is impossible.