Creating Custom Element
To create a custom control for the lightbox, define a new object in the following way:
gantt.form_blocks["my_editor"]={
    render:function(sns){ //sns - the section's configuration object
        return "html code of the editor here";
    },
    set_value:function(node,value,task,section){
        //node - an html object related to the html defined above
        //value - a value defined by the map_to property
        //task - the task object
        //section- the section's configuration object
        ... code to set value to the element ...
    },
    get_value:function(node,task,section){
        //node - an html object related to the html defined above
        //task - the task object
        //section - the section's configuration object
        return "current value from editor";
    },
    focus:function(node){
        //node - an html object related to the html defined above
        ...code to set focus to the element...
    }
}
Make sure that you don't use the short closing syntax for tags inside the HTML code returned by the "render" function, since that might cause parsing problems in the browser:
//this is WRONG
render:function(){
    return "<div id='box'/>";
}

//instead use opening and closing tags syntax:
render:function(){
    return "<div id='box'></div>";// recommended
}
Custom control in the lightbox
The lightbox control has the following types:
- render (sns): string - a function that returns a string with the HTML elements of the section
- sns - (LightboxSection) - the section's configuration object
- set_value (node, value, task, section): any - a function that obtains the value from the Task object and sets it to the section
- node - (HTMLElement) - an html object related to the html defined above
- value - (any) - a value defined by the map_to property
- task - (Task) - the task object
- section - (LightboxSection) - the section's configuration object
- get_value (node, task, section): any - a function that obtains the value from the section and saves it to the Task object
- node - (HTMLElement) - an html object related to the html defined above
- task - (Task) - the task object
- section - (LightboxSection) - the section's configuration object
- focus (node): void - a function to set focus to the section
- node - (HTMLElement) - an html object related to the html defined above
Custom editor with two inputs
Let's consider how to create the following custom editor:
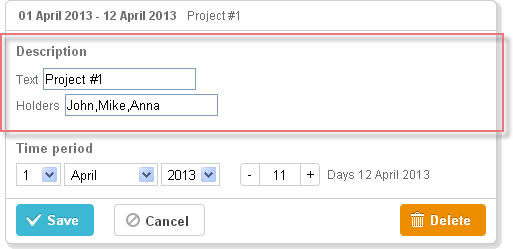
gantt.form_blocks["my_editor"] = {
render: function (sns) {
return "<div className='dhx_cal_ltext' style='height:60px;'>"+
"Text <input className='editor_description' type='text'/>"+
"
Holders <input className='editor_holders' type='text'/>"+
"</div>";
},
set_value: function (node, value, task) {
node.querySelector(".editor_description").value = value || "";
node.querySelector(".editor_holders").value = task.users || "";
},
get_value: function (node, task) {
task.users = node.querySelector(".editor_holders").value;
return node.querySelector(".editor_description").value;
},
focus: function (node) {
var a = node.querySelector(".editor_description");
a.select();
a.focus();
}
};
gantt.config.lightbox.sections = [
{ name:"description", height:200, map_to:"text", type:"my_editor", focus:true},
{ name:"time", height:72, type:"duration", map_to:"auto"}
];
Custom control in the lightbox
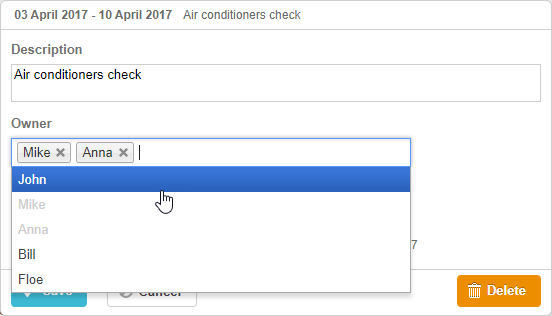
Custom third-party editor
You can create a custom multiselect control for selecting multiple values.
For example, you can make a control based on the jQuery Chosen plugin to assign multiple resources to a task. Unlike the default Gantt resource control, it allows just assigning resources to a task without setting their quantity. However, it can be useful, if you want a pretty simple control.
To use a jQuery Chosen-based control in the Gantt Chart:
- include its source files on the page
<script
    src="https://code.jquery.com/jquery-3.3.1.min.js?v="5.2.4""
    integrity="sha256-FgpCb/KJQlLNfOu91ta32o/NMZxltwRo8QtmkMRdAu8="
    crossOrigin="anonymous"></script>

<script src="https://cdnjs.cloudflare.com/ajax/libs/chosen/1.8.7/chosen.jquery.js?v="5.2.4""></script>
<link rel="stylesheet" type="text/css"
    href="https://cdnjs.cloudflare.com/ajax/libs/chosen/1.8.7/chosen.css?v="5.2.4"">
- describe the control logic
gantt.form_blocks["multiselect"] = {
 render: function (sns) {
  var height = (sns.height || "23") + "px";
  var html = "<div className='gantt_cal_ltext gantt_cal_chosen gantt_cal_multiselect'"+
     "style='height:"+ height + ";'><select data-placeholder='...'"+
        "class='chosen-select' multiple>";
  if (sns.options) {
   for (var i = 0; i < sns.options.length; i++) {
    if(sns.unassigned_value !== undefined && sns.options[i].key==sns.unassigned_value){
        continue;
    }
    html+="<option value='" +sns.options[i].key+ "'>"+sns.options[i].label+"</option>";
  }
}
  html += "</select></div>";
  return html;
},

set_value: function (node, value, ev, sns) {
    node.style.overflow = "visible";
    node.parentNode.style.overflow = "visible";
    node.style.display = "inline-block";
    var select = $(node.firstChild);

    if (value) {
        value = (value + "").split(",");
        select.val(value);
    }
    else {
        select.val([]);
    }

    select.chosen();
    if(sns.onchange){
        select.change(function(){
            sns.onchange.call(this);
        })
    }
    select.trigger('chosen:updated');
    select.trigger("change");
},

get_value: function (node, ev) {
    var value = $(node.firstChild).val();
    //value = value ? value.join(",") : null
    return value;
},

focus: function (node) {
    $(node.firstChild).focus();
 }
};
- use the control as a lightbox section with the type:"multiselect"
gantt.config.lightbox.sections = [
    {name:"description",height:38,map_to:"text",type:"textarea",focus: true},
    {name:"owner",height:60, type:"multiselect", options:gantt.serverList("people"),
        map_to:"owner_id", unassigned_value:5 },
    {name: "time", type: "duration", map_to: "auto"}
];
The unassigned_value property in the control object is used to hide resources that shouldn't be available for selection in the control. You need to set the id of the corresponding resource as a value of this property. In the example above the resource with the id="5" is not shown as an option in the control.
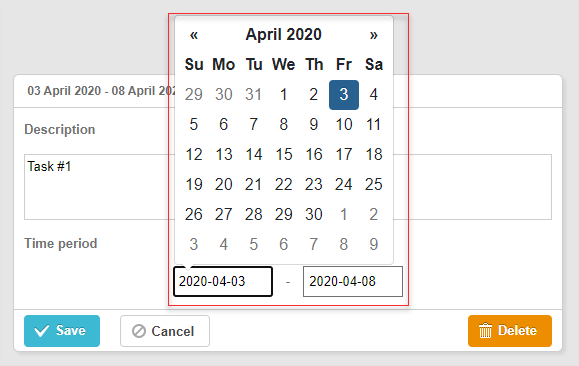
Custom third-party datepicker
You can add a custom datepicker control to the lightbox for setting task duration by specifying the start and end dates of a task.
jQuery Datepicker in the lightbox
For example, you can create a Datepicker control on the base of jQuery UI Datepicker.
Related sample 3rd party Datepicker control
To use a jQuery Datepicker control in the Gantt Chart:
- include the source files of the jQuery library on the page:
<script src="https://code.jquery.com/jquery-3.5.1.min.js"></script>
<script src="https://code.jquery.com/ui/1.12.1/jquery-ui.min.js"></script>
<link  rel="stylesheet" type="text/css"
    href="https://code.jquery.com/ui/1.12.1/themes/base/jquery-ui.css">
- describe the control logic:
(function () {
    function startDatepicker(node){
        return $(node).find("input[name='start']");
    }
    function endDateInput(node){
        return $(node).find("input[name='end']");
    }

    gantt.form_blocks["datepicker"] = {
        render: function (sns) { //sns - the section's configuration object
            return "<div className='gantt-lb-datepicker'>"+
                "<input type='text' name='start'/>"+
                "<input type='text' name='end'/>"+
                "</div>";;
        },
        set_value: function (node, value, task, section) {
            //node - an html object related to the html defined above
            //value - a value defined by the map_to property
            //task - the task object
            //section- the section's configuration object

            startDatepicker(node).datepicker({
                dateFormat: "yy-mm-dd",
                onSelect: function (dateStr) {
                    var endValue = endDateInput(node).datepicker('getDate');
                    var startValue = startDatepicker(node).datepicker('getDate');

                    if(startValue && endValue){
                        if(endValue.valueOf() <= startValue.valueOf()){
                            endDateInput(node).datepicker("setDate",
                                gantt.calculateEndDate({
                                    start_date: startValue, duration: 1, task:task
                                  })
                            );
                           }
                    }
                }
            });

            startDatepicker(node).datepicker("setDate", task.start_date);

            endDateInput(node).datepicker({
                dateFormat: "yy-mm-dd",
                onSelect: function (dateStr) {
                    //    gantt.ext.inlineEditors.save()
                }
            });
            endDateInput(node).datepicker("setDate", task.end_date);
        },
        get_value: function (node, task, section) {

            if(task.start_date && task.end_date) {
                var start = startDatepicker(node).datepicker('getDate');
                var end =  endDateInput(node).datepicker('getDate');

                   if(end.valueOf() <= start.valueOf()){
                       end = gantt.calculateEndDate({
                        start_date: start, duration: 1, task:task
                    });
                  }
                  task.start_date = start;
                  task.end_date = end;
            }

            task.duration = gantt.calculateDuration(task);
        },
        focus: function (node) {

        }
    }
})();
- use the control as a lightbox section with the type:"datepicker":
gantt.config.lightbox.sections = [
  { name: "description", height: 70, map_to: "text", type: "textarea", focus: true },
  { name: "time", height: 72, map_to: "auto", type: "datepicker" }
];
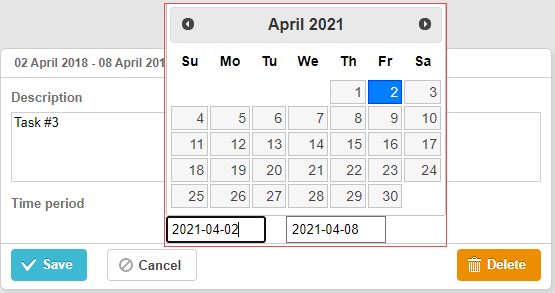
Bootstrap Datepicker in the lightbox
A Bootstrap Datepicker can be added into the lightbox in the similar way as jQuery Datepicker.
Related sample Bootstrap Datepicker control
To use a Bootstrap Datepicker control in the Gantt Chart:
-
include the source files of the Bootstrap library on the page;
-
describe the control logic:
(function () {
    const startDatepicker = (node) => $(node).find("input[name='start']");
    const endDateInput = (node) => $(node).find("input[name='end']");

    gantt.form_blocks["datepicker"] = {
        render: (sns) => {
          const height = sns.height || 45;
            return "<div className='gantt-lb-datepicker' style='height:" + height + "px;'>"+
                        "<input type='text' name='start'/> - "+
                        "<input type='text' name='end'/>"+
                    "</div>";;
        },
        set_value: (node, value, task, section) => {
              const datepickerConfig = {
                  format: 'yyyy-mm-dd',
                  autoclose: true,
                   container: gantt.$container
            };
            startDatepicker(node).datepicker(datepickerConfig);
              startDatepicker(node).datepicker('setDate',
                  value ? value.start_date : task.start_date
            );

            endDateInput(node).datepicker(datepickerConfig);
              endDateInput(node).datepicker('setDate',
                  value ? value.end_date : task.end_date
            );

            startDatepicker(node).datepicker().on('changeDate', function(e) {
                const endValue = endDateInput(node).datepicker('getDate');
                const startValue = startDatepicker(node).datepicker('getDate');

                if (startValue && endValue) {
                    if (endValue.valueOf() <= startValue.valueOf()) {
                        endDateInput(node).datepicker('setDate',
                            gantt.calculateEndDate({
                                start_date: startValue, duration: 1, task:task
                            })
                        );
                    }
                }
            });
        },
        get_value: (node, task, section) => {
            const start = startDatepicker(node).datepicker('getDate');
            let end =  endDateInput(node).datepicker('getDate');

            if (end.valueOf() <= start.valueOf()) {
                end = gantt.calculateEndDate({
                    start_date: start,
                    duration: 1,
                    task:task
                });
            }
            if (task.start_date && task.end_date) {
                  task.start_date = start;
                  task.end_date = end;
            }

            task.duration = gantt.calculateDuration(task);

              return {
                start_date: start,
                  end_date: end,
                  duration: task.duration
            };
        },
        focus: (node) => {
        }
    }
})();
- use the control as a lightbox section with the type:"datepicker":
gantt.config.lightbox.sections = [
  { name: "description", height: 70, map_to: "text", type: "textarea", focus: true },
  { name: "time", height: 45, map_to: "auto", type: "datepicker" }
];
Custom third-party Duration control
You may also need to add a custom Duration control to the lightbox for specifying the start date of a task and the number of days.
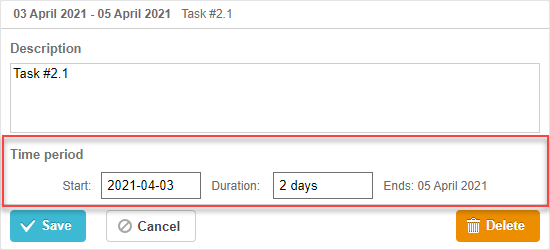
Related sample 3rd party Duration control
Let's consider how to add a custom Duration control on the base of jQuery:
- include the source files of the jQuery library on the page:
<script src="https://code.jquery.com/jquery-3.5.1.min.js"></script>
<script src="https://code.jquery.com/ui/1.12.1/jquery-ui.min.js"></script>
<link  rel="stylesheet" type="text/css"
    href="https://code.jquery.com/ui/1.12.1/themes/base/jquery-ui.css">
- describe the logic of the control:
(function () {
    function startDatepicker(node){
        return $(node).find("input[name='start']");
    }
    function durationInput(node){
        return $(node).find("input[name='duration']");
    }
    function endDateLabel(node){
        return $(node).find("span.gantt-lb-datepicker-label");
    }

    var formatter = gantt.ext.formatters.durationFormatter({
        enter: "day",
        store: "day",
        format: "auto"
    });

    gantt.form_blocks["datepicker_duration"] = {
        render: function (sns) { //sns - the section's configuration object
            return "<div className='gantt-lb-datepicker'>"+
                "<label>Start:<input type='text' name='start'/></label>"+
                "<label>Duration: <input type='text' name='duration'/></label>"+
                "<span className='gantt-lb-datepicker-label'></span>"
                "</div>";
        },
        set_value: function (node, value, task, section) {
            //node - an html object related to the html defined above
            //value - a value defined by the map_to property
            //task - the task object
            //section- the section's configuration object

            startDatepicker(node).datepicker({
                dateFormat: "yy-mm-dd",
                onSelect: function (dateStr) {
                    var endValue = durationInput(node).datepicker('getDate');
                    var startValue = startDatepicker(node).datepicker('getDate');

                    if(startValue && endValue){
                        if(endValue.valueOf() <= startValue.valueOf()){
                            durationInput(node).datepicker("setDate",
                                gantt.calculateEndDate({
                                    start_date: startValue, duration: 1, task:task
                                })
                            );
                        }
                    }
                }
            });

            startDatepicker(node).datepicker("setDate", task.start_date);

            durationInput(node).val(formatter.format(task.duration));
            endDateLabel(node).text(
                "Ends: " + gantt.templates.task_date(task.end_date)
            );
        },
        get_value: function (node, task, section) {

            if(task.start_date && task.end_date) {
                var start = startDatepicker(node).datepicker('getDate');
                var end = task.end_date;
                var duration = formatter.parse(durationInput(node).val());

                if(duration && !isNaN(Number(duration))){
                    end = gantt.calculateEndDate({
                        start_date: start, duration: duration, task:task
                    });
                }
                task.start_date = start;
                task.duration = duration;
                task.end_date = end;
            }

            task.duration = gantt.calculateDuration(task);
            return {
                start_date: task.start_date,
                end_date: task.end_date,
                duration: task.duration
            }
        },
        focus: function (node) {

        }
    }
})();
- use the control as a lightbox section with the type:"datepicker_duration":
gantt.config.lightbox.sections = [
  { name: "description", height: 70, map_to: "text", type: "textarea", focus: true },
  { name: "time", height: 72, map_to: "auto", type: "datepicker_duration" }
];