Step 5. Create a Scheduler
And now, we're going to add a scheduler on the page. The technique used for dhtmlxGrid is the same for all other DHTMLX components,
including dhtmlxScheduler.
We will again divide the step into 2 substeps:
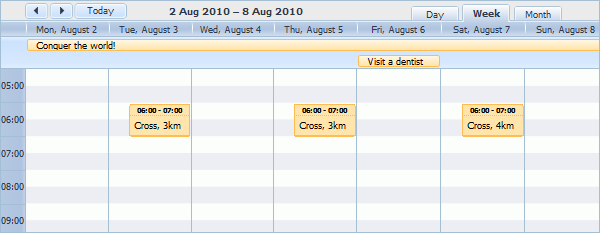
If after completing the step, you will run webhost/scheduler/scheduler, the app will produce the following scheduler that loads data from server and saves them back:

Step 5.1. Configuring the View object
Let's create a View file that will present our scheduler.
Again, we'll use a standard code initializing the component plus will rename the status variable.
For a deeper learning of dhtmlxScheduler initialization, read:
- How to start (step-by-step guide);
- Scheduler Markup
- Common Configuration Instructions;
- Server-side Integration.
- In the "views " folder create a new file and name it "scheduler.php "
- Open the "scheduler.php " file and add the following code there:
"views/scheduler.php" file
<!DOCTYPE html> <head> <meta http-equiv="Content-type" content="text/html; charset=utf-8"> <script src="/dhtmlx/scheduler/dhtmlxscheduler.js"></script> <link rel="stylesheet" href="/dhtmlx/scheduler/dhtmlxscheduler_glossy.css"> </head> <body> <div id="scheduler_here" class="dhx_cal_container" style='width:800px; height:600px;' > <div class="dhx_cal_navline"> <div class="dhx_cal_prev_button"> </div> <div class="dhx_cal_next_button"> </div> <div class="dhx_cal_today_button"></div> <div class="dhx_cal_date"></div> <div class="dhx_cal_tab" name="day_tab" style="right:204px;"></div> <div class="dhx_cal_tab" name="week_tab" style="right:140px;"></div> <div class="dhx_cal_tab" name="month_tab" style="right:76px;"></div> </div> <div class="dhx_cal_header"> </div> <div class="dhx_cal_data"> </div> </div> <script type="text/javascript" charset="utf-8">
scheduler.config.multi_day = true; scheduler.config.xml_date="%Y-%m-%d %H:%i"; scheduler.config.first_hour = 5; scheduler.init('scheduler_here',new Date(2010,7,5),"week"); // refers to the 'data' action that we will create in the next substep scheduler.load("/scheduler/data"); // refers to the 'data' action as well var dp = new dataProcessor("/scheduler/data"); dp.action_param ="dhx_editor_status"; dp.init(scheduler);
</script> </body>
Step 5.2. Configuring the Controller object
In the controller file we will repeat the technique used for dhtmlxGrid.
After that we can leave the connector file as it is. However, in order to show you how to handle events, we'll extend the connector file with handlers for formatting and validating data. Note that events handlers in CodeIgniter take the same parameters as the JavaScript handlers do.
To learn more about handling and using dhtmlxConnector events, read the following:
The articles refer to the PHP version of the dhtmlxConnector. For details on other versions, see the related documentation here.
- In the "controllers " folder create a new file and name it "scheduler.php ".
- Open the "scheduler.php " file and add the following code there:
"controllers/scheduler.php" file
require_once("./dhtmlx/connector/scheduler_connector.php");
require_once("./dhtmlx/connector/db_phpci.php");
DataProcessor::$action_param ="dhx_editor_status";


class Scheduler extends CI_Controller {
    public function index()
    {
        $this->load->view('scheduler');// loads the view
    }
    public function data()
    {
        //data feed
        $this->load->database();

        $connector = new SchedulerConnector($this->db, "PHPCI");
        $connector->configure(
            "events",
            "event_id",
            "start_date, end_date, event_name"
        );
        $connector->render();
    }
}
- Add the beforeRender event handler to format data before rendering:
"controllers/scheduler.php" file
public function beforeRender($action){
    if ($action->get_id() == 10)
        //marks an event if its id is 10
        $action->set_userdata("color", "pink");
}
- Add the beforeProcessing event handler to validate data on the server side:
public function beforeProcessing($action){
    //validation before saving
    if ($action->get_value("event_name") == ""){
        $action->invalid();//calls $action->invalid() if data fails validation
        $action->set_response_attribute("details", "Empty data not allowed");
    }
}