마일스톤
이 기능은 PRO 에디션에서만 사용할 수 있습니다
마일스톤은 지속 시간이 0인 작업으로, 프로젝트의 중요한 날짜를 표시하거나 주요 이벤트나 목표를 나타내기 위해 사용됩니다. 예를 들어 검토 회의의 날짜나 프로젝트 단계의 예상 완료 날짜를 강조 표시하기 위해 마일스톤을 사용할 수 있습니다.
프로그래밍적으로, 마일스톤은 미리 정의된 작업 유형 중 하나입니다. 그러나 이는 일반적인 작업으로 처리되며, 즉 동일한 이벤트와 템플릿을 트리거합니다.
관련 샘플: 프로젝트 및 마일스톤
일반적으로 차트에 마일스톤을 추가할 수 있는 가능성을 제공하려면:
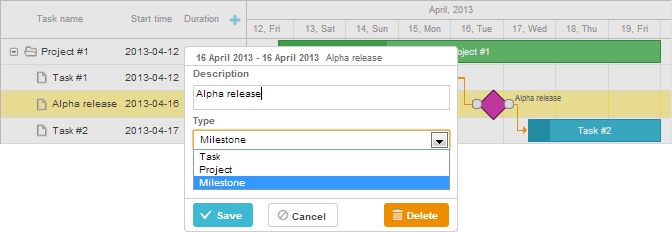
라이트박스에 추가 섹션을 - Typeselect Control - 를 추가하면 사용자가 작업의 유형을 변경하고 마일스톤을 선택할 수 있습니다.
gantt.config.lightbox.sections = [
    {name: "description", height: 70, map_to: "text", type: "textarea"},
    {name: "type", type: "typeselect", map_to: "type"},
    {name: "time", height: 72, type: "duration", map_to: "auto"}
];
rightside_text 또는 leftside_text 템플릿을 정의하여 마일스톤에 대한 텍스트 레이블을 설정합니다. 주의, task_text 템플릿으로 설정된 레이블은 마일스톤이 지속 시간이 0이므로 표시되지 않습니다.
gantt.templates.rightside_text = function(start, end, task){
    if(task.type == gantt.config.types.milestone){
        return task.text;
    }
    return "";
};
엔드 유저를 위해 작업 흐름을 단순화하기 위해 order_branch 속성을 활성화합니다. 이 옵션은 상위 브랜치 내에서 작업을 드래그할 수 있게 하며 사용자가 어느 위치에서나 마일스톤을 생성한 후 올바른 위치로 드래그할 수 있도록 합니다.
gantt.config.order_branch = true;
이 단계를 완료하면 Gantt 차트는 마일스톤과 함께 동작할 준비가 완전히 갖춰졌습니다.
관련 샘플: 프로젝트 및 마일스톤
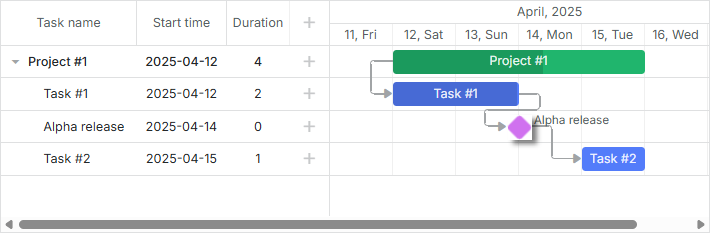
데이터 세트에서 마일스톤 지정
초기 데이터 세트에서 마일스톤을 정의하려면 데이터 항목의 type 속성을 'milestone' 값으로 설정합니다(값은 types 객체에 저장됩니다):
var data = {
    tasks:[
        {id:1, text:"Project #1",    type:gantt.config.types.project,    open:true},
        {id:2, text:"Task #1",       start_date:"12-04-2020", duration:3, parent:1},
        {id:3, text:"Alpha release", type:gantt.config.types.milestone,   parent:1, /*!*/
            start_date:"14-04-2020"}],                                              /*!*/
    links:[]
};
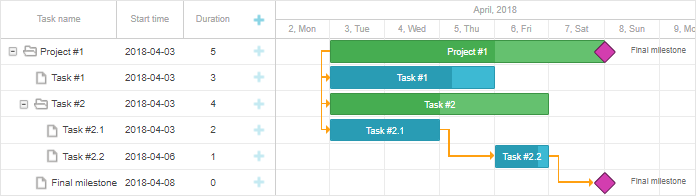
롤업 작업 및 마일스톤
버전 7.1부터는 상위 프로젝트에서 작업과 마일스톤을 표시하는 기능이 있습��니다. 이를 위해 데이터 항목의 rollup 속성을 true로 설정해야 합니다:
var data = {
    tasks:[
        {id:11, text:"Project #1", type:"project", progress: 0.6, open: true},
        {id:12, text:"Task #1", start_date:"03-04-2018", duration:"3",
            parent:"11", progress: 1, open: true},
        {id:13, text:"Task #2", start_date:"03-04-2018", type:"project",
            parent:"11", progress: 0.5, open: true},
        {id:16, text:"Final milestone", start_date:"08-04-2018", type:"milestone",  /*!*/
            rollup: true, parent:"11", progress: 0, open: true},  /*!*/
        {id:17, text:"Task #2.1", start_date:"03-04-2018", duration:"2",
            parent:"13", progress: 1, open: true},
        {id:18, text:"Task #2.2", start_date:"06-04-2018", duration:"1",
            parent:"13", progress: 0.8, open: true}],
    links:[]
};
결과는 다음과 같습니다:
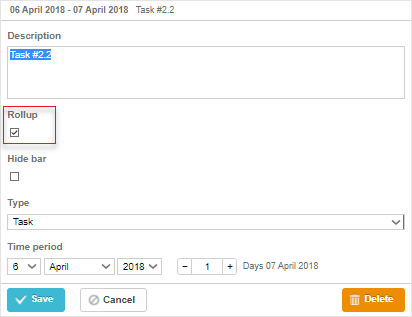
또한 라이트박스의 Rollup 체크박스를 통해 롤업 기능을 전환할 수 있습니다:
gantt.config.lightbox.milestone_sections = [
    {name: "description", height: 70, map_to: "text", type: "textarea", focus: true},
    {name: "rollup", type: "checkbox", map_to: "rollup"},/*!*/
    {name: "hide_bar", type: "checkbox", map_to: "hide_bar"},
    {name: "type", type: "typeselect", map_to: "type"},
    {name: "time", type: "duration", map_to: "auto"}
];
관련 샘플: 롤업 작업 및 마일스톤
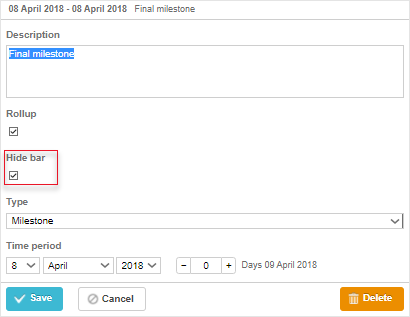
작업 및 마일스톤 숨기기
버전 7.1부터 타임라인 영역에서 작업 막대와 마일스톤을 숨길 수 있으며 데이터 항목의 hide_bar: true 속성을 설정합니다:
var data = {
    tasks:[
        {id:11, text:"Project #1", type:"project", progress: 0.6, open: true},
        {id:12, text:"Task #1", start_date:"03-04-2018", duration:"3",
            parent:"11", progress: 1},
        {id:13, text:"Task #2", start_date:"03-04-2018", type:"project",
            parent:"11", progress: 0.5, open: true},
        {id:16, text:"Final milestone", start_date:"08-04-2018", type:"milestone",  /*!*/
            rollup: true, hide_bar: true, parent:"11", progress: 0},  /*!*/
        {id:17, text:"Task #2.1", start_date:"03-04-2018", duration:"2",
            parent:"13", progress: 1},
        {id:18, text:"Task #2.2", start_date:"06-04-2018", duration:"1",
            parent:"13", progress: 0.8}],
    links:[]
};
다음과 같이 보일 것입니다:

참고: 데이터 항목에 hide_bar:true와 rollup:true 속성이 모두 지정된 경우, 타임라인에서 해당 항목은 숨겨지지만 상위 프로젝트에서 표시됩니다.
상위 프로젝트에서 모든 롤업 아이템을 숨기려면 (버전 8.0부터) project 객체에서 rollup:false 로 설정합니다:
{ id:11, text:"Project #1", type:"project", rollup:false, open: true }
필요한 작업/마일스톤을 타임라인 영역에서 숨길 수 있도록 라이트박스에서 Hide bar 체크박스를 전환할 수 있습니다:
gantt.config.lightbox.sections = [
    {name: "description", height: 70, map_to: "text", type: "textarea", focus: true},
    {name: "rollup", type: "checkbox", map_to: "rollup"},
    {name: "hide_bar", type: "checkbox", map_to: "hide_bar"},  /*!*/
    {name: "type", type: "typeselect", map_to: "type"},
    {name: "time", type: "duration", map_to: "auto"}
];

gantt.config.lightbox.milestone_sections = [
    {name: "description", height: 70, map_to: "text", type: "textarea", focus: true},
    {name: "rollup", type: "checkbox", map_to: "rollup"},
    {name: "hide_bar", type: "checkbox", map_to: "hide_bar"},  /*!*/
    {name: "type", type: "typeselect", map_to: "type"},
    {name: "time", type: "duration", map_to: "auto"}
];

gantt.config.lightbox.project_sections = [
    {name: "description", height: 70, map_to: "text", type: "textarea", focus: true},
    {name: "hide_bar", type: "checkbox", map_to: "hide_bar"},  /*!*/
    {name: "type", type: "typeselect", map_to: "type"},
    {name: "time", type: "duration", map_to: "auto"}
];
관련 샘플: 롤업 작업 및 마일스톤
API 개요
상위 프로젝트에서 롤업 작업의 가시성을 제어하는 데 사용할 수 있는 이벤트가 있습니다:
// 롤업 작업이 상위 프로젝트에 표시되기 전에
gantt.attachEvent("onBeforeRollupTaskDisplay", function(taskId, task, parentId){
    // 사용자 정의 로직 작성
    return false;
});
개별 롤업 아이템 스타일링
버전 8.0부터 롤업 아이템은 task.$rendered_at 속성을 가진 템플릿 함수로 들어오며, 이 속성은 롤업 아이템이 렌더링된 행의 ID를 포함합니다. 따라서 표시되는 행에 따라 특정 롤업 아이템의 스타일을 지정하려면 task_class 템플릿을 사용할 수 있습니다:
gantt.templates.task_class = function(start, end, task) {
    if(task.$rendered_at) {
        if(gantt.calculateTaskLevel(gantt.getTask(task.$rendered_at)) === 1) {
            return "phase-level-rollup";
        }
    }
    return "";
};