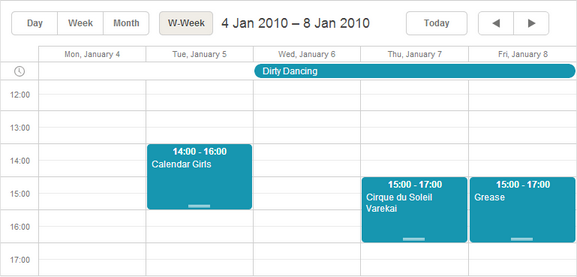
Custom View
If the available views don't meet your needs, you can create your custom view.
The view tab
Creating a custom view starts from adding a new tab to the scheduler - the tab of your future view. Mostly it looks like in:
<div class="dhx_cal_tab" data-tab="workweek"></div>
Remember:
- The tab's name must have the following form: {viewName}_tab
- The tab must have at least one class defined - "dhx_cal_tab"- and it must go first.
The label for the view is set as in:
scheduler.locale.labels.{viewName}_tab = "someName"
Methods for handling the view
There are 3 mandatory methods that define common behavior of a view - the view interval (e.g. a week for the Week view, a month for the Month view etc.) and the active date in the view, when the user clicks on the 'Next', 'Prev' navigation buttons in the view header.
- scheduler.date.{viewName}_start (active_date) - takes the active date of the scheduler and returns the start date of the view interval (e.g. the first day of the active week in the Week view, the first day of the active month in the Month view etc.)
- scheduler.date.get_{viewName}_end (start_date) - takes the start date (returned by the method above) and returns the end date of the view interval (e.g. the last day of the active week in the Week view, the last day of the active month in the Month view etc.)
- scheduler.date.add_{viewName}(date, inc) - specifies what date should be added(subtracted) to(from) the currently active date, when the user clicks on the 'Next', 'Prev' navigation buttons in the header.
Configuring the view templates
The last thing you need is to provide the templates for the header date and X-Axis scale:
- View header - scheduler.templates.{viewName}_date = function(start_date, end_date){...}
- X-Axis - scheduler.templates.{viewName}_scale_date = function(date){...}
scheduler.templates.workweek_date = scheduler.templates.week_date;
scheduler.templates.workweek_scale_date = scheduler.templates.week_scale_date;
Step-by-step example
Let's consider creating a custom view named 'workweek' that is similar to the Week view, but displays only working days of the week.

Our steps are:
- To add the view tab:
<div id="scheduler_here" class="dhx_cal_container" ...>
   <div class="dhx_cal_navline">
       ...
       <div class="dhx_cal_tab" name="workweek_tab" style="right:280px;"></div>
   </div>
</div>
- To set the label for the tab:
scheduler.locale.labels.workweek_tab = "Work week"
- To define the method that will return the start date of the view interval, i.e. Monday of the active week:
we use the week_start() method that is specified for the Week view, as the views have the same start date.scheduler.date.workweek_start = function(date) { return scheduler.date.week_start(date);// }
- To define the method that will return the end date of the view interval, i.e. Friday of the active week:
The add() method adds/subtracts the specified time interval to/from the date. See details herescheduler.date.get_workweek_end=function(start_date){ return scheduler.date.add(start_date,5,"day"); }
- To define the method that will specify, what date should be added(subtracted) to(from) the currently active date, when the user clicks on the 'Next', 'Prev' navigation buttons in the view header:
The add() method adds/subtracts the specified time interval to/from the date. See details herescheduler.date.add_workweek=function(date,inc){ return scheduler.date.add(date,inc*7,"day"); }
- To define the template for the date in the header of the view:
The template is similar to the one, used in the Week view, so we'll just re-use the default Week view template - week_datescheduler.templates.workweek_date = scheduler.templates.week_date;
- To define the template for the X-Axis of the view:
The template is similar to the one used in the Week view, so we'll just re-use the default Week view template - week_scale_datescheduler.templates.workweek_scale_date = scheduler.templates.week_scale_date;
Setting custom view as the default one
A view that will be shown in the scheduler initially is specified in the init method, i.e during the scheduler initialization.
But the templates, used by a custom view, can be not fully processed at this moment. Therefore, the initialization will fail.
To prevent such a situation and be sure that the templates of your custom view are fully ready, before the scheduler is initialized,
create custom views in a handler function of the onTemplatesReady event. This event fires only when all the templates are fully processed:
scheduler.attachEvent("onTemplatesReady",function(){
    //here you can place your code that creates a custom view
});

scheduler.init(container, date, "custom view name");