Lightbox 的操作
获取/设置控件的值
要获取/设置分区控件的值,请使用 formSection 对象,如下所示:
//获取值
const value = scheduler.formSection('description').getValue();

//设置值
scheduler.formSection('description').setValue('abc');
单击打开 Lightbox
可以通过单击打开现有的 Lightbox。为此,请使用 onClick 事件和 showLightbox 方法:
scheduler.attachEvent("onClick", function (id, e){
    scheduler.showLightbox(id);
    return true;
});
相关示例 单击打开 Lightbox
当用户在事件框上单击鼠标左键时,Lightbox 将被打开。
检查 Lightbox 是否已打开
要检查 Lightbox 是否当前已打开或已关闭,请使用由 getState 方法返回的状态对象中的 lightbox_id 属性。 如果 Lightbox 已打开,该方法将返回已打开事件的 id,否则将返回 'null' 或 'undefined':
if (scheduler.getState().lightbox_id){
    // Lightbox 已打开时的处理代码
} else {
    // Lightbox 已关闭时的处理代码
}
将事件对象属性映射到 Lightbox 的分区
要将事件对象的属性映射到 Lightbox 的分区,请执行以下操作:
- 确保数据源以 supported format 返回事件
{
   "data":[
      {
          "id":"1",
          "start_date":"2027-03-02 00:00:00",
          "end_date":"2027-03-04 00:00:00",
          "text":"Graduation ceremony",
          "type":"1",
          "location":"London"
      },
      ...
   ]
}
注意,您的数据源返回的所有属性将被添加到事件对象中,并可用于 客户端 API。
- 为将 Lightbox 控件映射到特定属性,请将事件属性的名称分配给分区的 map_to 属性:
scheduler.config.lightbox.sections=[
    {name:"description", height:70, map_to:"text", type:"textarea" , focus:true},
    {name:"locationInput", height:35, map_to:"location", type:"textarea" },
    {name:"typeSelect", map_to:"type", type:"select", options:scheduler.serverList("types")},
    {name:"time", type:"time", map_to:"auto"}
];
只有 [time] 和 [recurring] 控件是例外,它们始终映射到固定的属性 (event.start_date/event.end_date 和 event.rec_type/event.event_length/event.event_pid,分别为)。
Time 控件中的自动结束日期
要设置事件的初始持续时间并使结束日期自动改变以保持该值,请使用 [event_duration] 与 [auto_end_date] 属性:
//为 auto_end_time 参数指定事件持续时间(分钟)
scheduler.config.event_duration = 60;
scheduler.config.auto_end_date = true;
通过此配置,每当用户在 Lightbox 中更改开始事件的时间或日期时, 结束事件的时间和日期将自动改变,以使事件持续时间等于 60 分钟 (即 event_duration 选项的值)。
为 Lightbox 的控件设置默认值
要为 Lightbox 的分区设置默认值,请使用该分区对象的 default_value 属性。
例如,您添加了一个自定义分区,用于在 Lightbox 中显示事件的位置,并将其命名为 'Location'。 当用户创建新事件时,该字段将是空的。要纠正这种行为并默认显示,例如 Greenwich 天文台的地址,请按如下方式配置 Lightbox:
scheduler.config.lightbox.sections = [
    { name:"description", height:50, map_to:"text", type:"textarea", focus:true },
    { name:"location", height:43, map_to:"event_location", type:"textarea",
    default_value:"Blackheath Avenue London,Greenwich,Greater London SE10 8XJ,UK"},
    { name:"time", height:72, type:"time", map_to:"auto"}
];
注意,default_value 属性设置 Lightbox 的分区的默认值,而不是为新事件设置默认值,即新建事件只有在用户打开 Lightbox 并保存事件后才会获得指定的值。
要直接为新事件设置默认值,请使用 onEventCreated 事件:
scheduler.attachEvent("onEventCreated", function(id,e){
    scheduler.getEvent(id).location = 'Blackheath Avenue London, Greenwich...';
    scheduler.updateEvent(id); // 渲染更新后的事件
    return true;
});
更改日期时间控件的顺序以及移除时间选择器
您可以改变“Time period”部分中日期时间控件的顺序,或移除其中的一些。为此,请使用 time_format 属性:
scheduler.config.lightbox.sections= [
  {name:"description", height:130, map_to:"text", type:"textarea" , focus:true},
  {name:"time", ..., time_format:["%H:%i","%m","%d","%Y"]}
];
注意,你不能改变数据呈现的格式,只能改变数组中项目的顺序。
例如,可以按如下方式更改格式:
//默认
time_format:["%H:%i", "%m", "%d", "%Y"]
//月份在前
time_format:["%m","%d", "%Y", "%H:%i"]
//移除了年份选择器
time_format:["%H:%i", "%m", "%d"]
//不正确的示例
time_format:["%H:%i", "%M", "%d", "%Y"] //将 "%m" 改为 "%M"
只读模式
关于只读模式的详细信息,请参阅章节 Read-only Mode。
使某些事件的分区隐藏
要使某些事件的分区对特定事件隐藏,请重新定义其 set_value 方法,如下所示:
scheduler.form_blocks.textarea.set_value = function(node,value,ev){
    node.firstChild.value= value || "";
    let style = ev.some_property ? "" : "none";
    node.style.display = "style;" // 编辑区域
    node.previousSibling.style.display = "style;" //分区头
    scheduler.setLightboxSize(); // Lightbox 的正确尺寸
}
'全日事件' 选项
要在 Lightbox 中添加 'full-day event' 选项,请将 full_day 选项设置为 true。 为此,只需添加以下代码行:
scheduler.config.full_day = true;
一旦启用 full_day 选项,左侧的 Time period 部分将显示 “Full Day” 复选框。选择后,该分区的所有输入字段将被阻塞,事件持续时间将被设为整日,从当天的 0:00 开始,到次日的 0:00 结束。
Lightbox 的类型
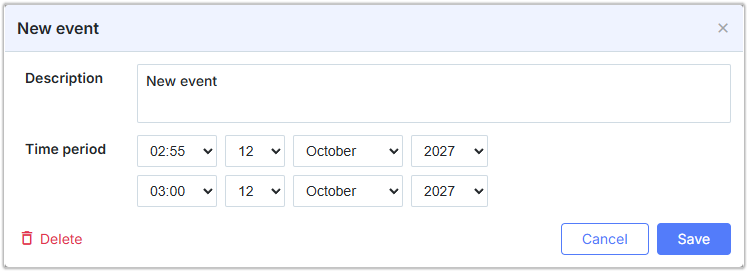
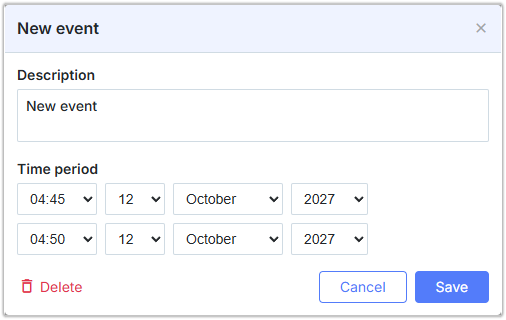
Lightbox 可以以两种类型之一呈现:
- 标准(宽);
- 短形式。
在默认皮肤中,Lightbox 只能以标准(宽)类型呈现,而在“glossy”或“classic”皮肤中可以在类型之间选择。
要设置所需的类型,请使用 wide_form 属性:
scheduler.config.wide_form = true;
Standard (wide) Lightbox:
Short form:
分区头部的按钮
可以在分区头部添加自定义按钮。要向分区头部添加按钮,请完成以下步骤:
- 在分区对象中指定 'button' 属性:
{name:"description", height:130, map_to:"text", type:"textarea", button:"help"}
- 设置按钮标签:
// 'button' 属性的值为 'help'
scheduler.locale.labels.button_help = "Help label";
- 指定按钮点击的处理程序:
scheduler.form_blocks.textarea.button_click = function(index,button,shead,sbody){
    // 任何自定义代码
}
其中:
- index - (number) 分区的索引。基于零的编号
- button - (HTMLElement) 按钮的 HTML 元素
- shead - (HTMLElement) 分区头部的 HTML 元素
- sbody - (HTMLElement) 分区主体的 HTML 元素
您可以通过下面的 CSS 类定义用于按钮的图片:
.dhx_custom_button_help{
    background-image:url(imgs/but_help.gif);
}
链接选择控件
您可以让 Lightbox 中的选择控件相互依赖。要做到这一点,请使用选择控件的 onchange 属性,如下所示:
const update_select_options = function(select, options) { // helper function
    select.options.length = 0;
    for (let i = 0; i < options.length; i++) {
        let option = options[i];
        select[i] = new Option(option.label, option.key);
    }
};

const parent_onchange = function(event) {
    const new_child_options = child_select_options[this.value];
    update_select_options(scheduler.formSection('child').control, new_child_options);
};
scheduler.attachEvent("onBeforeLightbox", function(id){
    const ev = scheduler.getEvent(id);
    if (!ev.child_id) {
        const parent_id = ev.parent_id||parent_select_options[0].key;
        const new_child_options = child_select_options[parent_id];
        update_select_options(
            scheduler.formSection('child').control, new_child_options
        );
    }
    return true;
});

scheduler.config.lightbox.sections= [
    ...
    {name:"parent", height:23, type:"select", options: parent_select_options,
     map_to:"parent_id", onchange:parent_onchange },
    {name:"child", height:23, type:"select", options: child_select_options,
     map_to:"child_id" }
    ...
];
Linking select controls in the lightbox
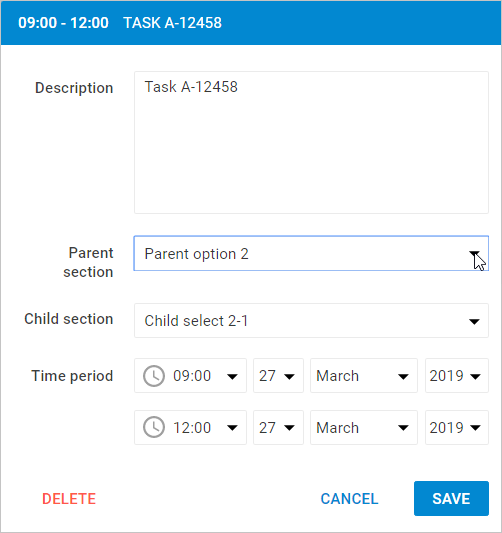
The onchange event is fired when a user changes the selected option of the parent section. The options of the child section will change accordingly.
Lightbox 分区的动态改变
有可能动态地改变 Lightbox 的分区。这意味着 Lightbox 的分区可以根据指定的配置来隐藏、阻塞或显示。
您可以通过 resetLightbox() 方法动态地更改 Lightbox 的分区。例如:
- 创建两个包含不同控件集的 Lightbox 配置数组:
const full_lightbox = [
    { name: "description", height: 200, map_to: "text", type: "textarea", focus: true},
    { name: "hidden", height: 23, map_to: "hidden", type: "textarea"},
    { name: "time", height: 72, type: "time", map_to: "auto"}
];
const restricted_lightbox = [
    { name: "description", height: 200, map_to: "text", type: "textarea", focus: true},
    { name: "time", height: 72, type: "time", map_to: "auto"}
];
- 接下来需要执行以下步骤:
-
在显示新 Lightbox 之前,调用 resetLightbox() 方法以移除当前的编辑表单控件集并生成具有另一组控件的新 Lightbox 对象。
-
通过其 id 获取事件对象,并根据该对象的条件应用相应的 Lightbox 配置。在下面的示例中,条件是通过 "restricted" 属性引入的。
scheduler.attachEvent("onBeforeLightbox", function(event_id) {
    scheduler.resetLightbox();
    const ev = scheduler.getEvent(event_id);
    scheduler.config.lightbox.sections = (ev.restricted) ?
        restricted_lightbox : full_lightbox;
    return true;
});
- 使用 'restricted' 事件属性以应用 "restricted_lightbox" 配置。否则,将显示完整 Lightbox。
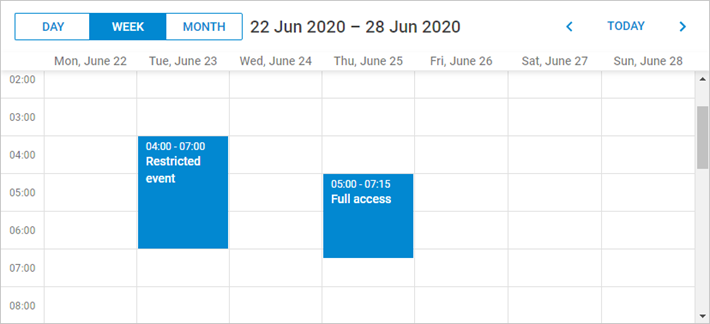
scheduler.init('scheduler_here', new Date(2027, 5, 30), "week");
scheduler.parse([
    { start_date: "2027-06-27 04:00", end_date: "2027-06-27 7:00",
        text: "Restricted event", hidden: "You won't see me", restricted: true },
    { start_date: "2027-06-29 05:00", end_date: "2027-06-29 11:00",
        text: "Full access", hidden: "Hidden text" }
]);