Radio
一组单选按钮
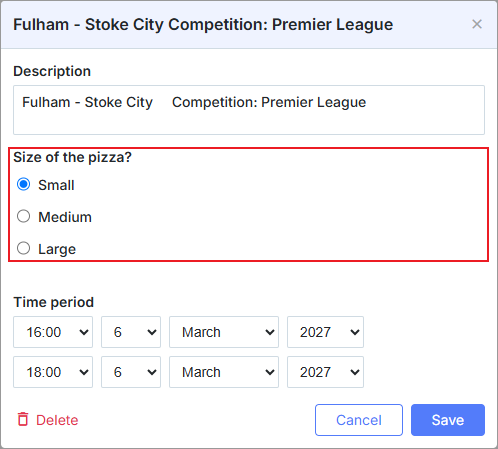
注释
启用 编辑器 扩展以在灯箱中使用此控件
scheduler.plugins({
    editors: true /*!*/
});

const priorities = [
    { key: 1, label: 'High' },
    { key: 2, label: 'Medium' },
    { key: 3, label: 'Low' }
];

scheduler.locale.labels.section_priority = 'Priority';

scheduler.config.lightbox.sections = [
    { name:"text", height:50, map_to:"text", type:"textarea", focus:true },
    { name:"priority", height:58, options:priorities,
                map_to:"priority", type:"radio", vertical:true},
    { name:"time", height:72, type:"time", map_to:"auto"}
];
初始化
将单选控件添加到灯箱,请按照以下步骤进行:
- 在页面上启用 'editors' 扩展:
scheduler.plugins({
    editors: true
});
- 将该分区添加到灯箱配置中:
scheduler.config.lightbox.sections = [
    { name:"description", ... },
    { name:"radiobutton", height:58, options:priorities,
    map_to:"priority", type:"radio", vertical:true},
    { name:"time", ...}
];
- 为该分区设置标签:
scheduler.locale.labels.section_priority = 'Priority';
属性
以下属性对于 'radio' 控件来说非常重要且常被设置(完整列表请参见此处:here):
| name | (string) 该分区的名称 |
| height | (number) 该分区的高度 |
| map_to | (string) 将映射到该分区的数据属性的名称 |
| type | (textarea,time,select,template,multiselect,radio,checkbox,combo) 该分区控件的类型 |
| options | (对象数组) 定义控件的可选项(仅对 'select'、'multiselect'、'radio'、'combo' 控件生效)。数组中的每个对象指定一个选项,并包含以下属性:
|
| vertical | (boolean) 指定单选按钮应垂直排列(true)还是水平排列(仅对 'multiselect' 和 'radio' 控件) |
用数据填充控件
通常,要为单选按钮设置值,应使用 options 参数:
scheduler.config.lightbox.sections = [
    {      name:"alert", type:"select",
        ...
        options:[
            { key: 1, label: 'High' },
            { key: 2, label: 'Medium' },
            { key: 3, label: 'Low' }
    ]},
    ...
];
在 options 参数中的项必须具有两个强制性属性:
- key - 选项的 id
- label - 选项的标签
从服务器获取单选按钮的值
要使用从服务器检索的数据设置单选按钮的值,请使用 serverList 方法:
scheduler.config.lightbox.sections = [
    {name:"description", ...},
    {name:"priority", map_to:"priority", type:"radio",
          options:scheduler.serverList("priority")},
    {name:"time", ...}
];

scheduler.load("/api/types");
对于 load 方法的数据响应,应该包含名为服务器端集合的集合,且 JSON 的格式应符合以下格式 数据格式指南:
{
   "data":[
      {
          "id":"1",
          "start_date":"2027-03-02 15:00:00",
          "end_date":"2027-03-04 16:00:00",
          "text":"Interview",
          "priority":1
      },
      {
          "id":"2",
          "start_date":"2027-03-02 17:00:00",
          "end_date":"2027-03-04 18:00:00",
          "text":"Performance review",
          "type":2
      }
   ],
   "collections": {/*!*/
      "type":[/*!*/
         {"value":1,"label":"Low"},/*!*/
         {"value":2,"label":"Medium"},/*!*/
         {"value":3,"label":"High"}/*!*/
      ]/*!*/
   }/*!*/
}
示例后端处理程序(Node.js/Express):
app.get("/api/types", async (req, res) => {
  const data = await eventsService.list();
  const collections = {
    type: [
      { value: 1, label: "Low" },
      { value: 2, label: "Medium" },
      { value: 3, label: "High" }
    ]
  };
  res.json({ data, collections });
});
注释
注意,你可以使用 updateCollection 方法来更新检索到的选项列表
单选控件的事件处理
默认情况下,dhtmlxScheduler API 并未为调度器灯箱中的单选按钮提供特定的事件处理程序。
但你可以像下面这样为灯箱内的单选控件分配一个点击处理程序:
- 在灯箱打开后获取单选元素。
scheduler.attachEvent("onLightbox", function(){
    const node = scheduler.formSection("type").node;
    const radios = node.getElementsByTagName("input");
    ...
});
- 将 onclick 事件附加到灯箱中的单选按钮:
scheduler.attachEvent("onLightbox", function(){
    ...
    for(let i = 0; i < radios.length; i++){
      radios[i].onclick = onRadioClick;
    }
});
- 最后,应该指定在单击单选按钮后将执行的函数:
function onRadioClick(event){
    let e = event || window.event,
        node = this;

    dhtmlx.message(node.value);
}
相关示例 对单选控件的事件处理
Need help?
Got a question about the documentation? Reach out to our technical support team for help and guidance. For custom component solutions, visit the Services page.