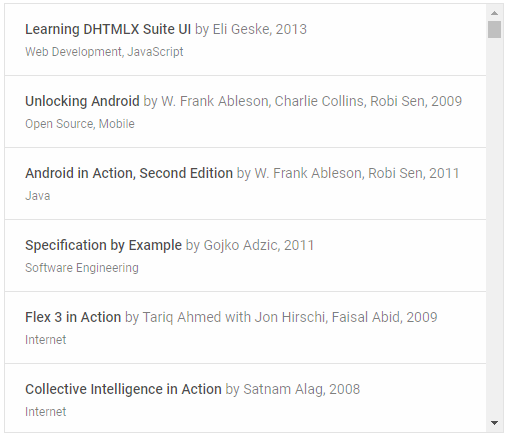
Check documentation for the latest version of dhtmlxSuite Specifying Templates DHTMLX Docs

Specifying Templates

Basic Information

Templates define the way data is rendered inside of List. You can define multiple templates and switch between them dynamically.

myList = new dhtmlXList({
    container:"data_container",
    type:{
        template:"#Package# : #Version#<br/>#Maintainer#",
        height:40
    }
});

The { Package:"a", Version:"b", Maintainer:"c"} will be rendered as:

a : b <br/> c

A template can be defined as a part of the constructor (or not) as:

myList.define("type",{
    template:"#Package# : #Version#<br/>#Maintainer#"
});

If you need to provide only a text string and don't need any extra properties, you can use the "template" property directly on the top level (i.e. don't use the type parameter):

myList = new dhtmlXList({
    container:"data_container",
    template:"#Package# : #Version#<br/>#Maintainer#"
});

Types of Templates

JS string

myList.define("type",{
    template:"#Package# : #Version#<br/>#Maintainer#"
});

Related sample:  Template from JS string

JS method

myList.define("type",{
    template:function(){ return obj.Package +"<br/>"+obj.Maintainer; }
});

Related sample:  Template from JS function

HTML container

<textarea id="template_container" rows="5" cols="60">
#Package# : #Version#
<br/>#Maintainer#</textarea>
...
myList.define("type",{
    template:"html->template_container",
})

Related sample:  Template from HTML container

HTML file

myList.define("type",{
    template:"http->../common/template.html",
})

Related sample:  Template from HTML file

Named templates

dhtmlx.Type.add(dhtmlXList,{
    name:"dataA",
    template:"#Package# : #Version#<br/>#Maintainer#",
    height:40
});
 
data = new dhtmlXList({
    container:"data_container", 
    type:"dataA"
});

Related sample:  Named templates

Templates Syntax

"#property#" - replaced with a value of the related property

myList.define("type",{
    template:"#a# - #b#"
})
// a - b

"{common.property}" - replaced with a constant value from the template

myList.define("type",{
    template:"#a# - {common.mydata}",
    mydata:25
})
// a - 25

"{common.method()}" - replaced with the result of a method call

myList.define("type",{
    template:"#a# - {common.mymethod()}",
    mymethod:function(obj){
        return obj.b.toUpperCase();
    }
})
// a - B

"#property?valueA:valueB#" - trinary operator

myList.define("type",{
    template:"#a# - #flag?exist:not exist#"
})
// a - doesn't exist

"{-obj" - replaced with #

Changing Parameters of Templates

Sometimes it can be useful to change some parameter of a template. As a result, the view will be repainted with a new configuration.

myList.customize({
    height:100
});

If you define some property in template as {common.some}, you will be able to change it any time by using the "customize" command.

Predefined Properties of Templates

myList = new dhtmlXList({
    container:"data_container",
    type:{
        template:"#Package# : #Version#<br/>#Maintainer#",
        css:"some",
        width:120,
        height:40,
        margin:5,
        padding:0,
    }
});
  • template - (string) the template definition
  • height - (number) the item height. The default value - 115;
  • width - (number) the item width. The default value - 210;
  • margin - (number) the item margin. The default value - 0;
  • padding - (number) the item padding. The default value - 0;
  • border - (number) sets the border of the item container. The default value - 1;
  • css - (string) allows applying an additional css class to the template (see details below). The default value - 'default'.

Styling of Templates

If you want apply a custom css style to the template, use the following technique:

  1. Set the CSS property of the type parameter to some value, for example 'custom'
    myList = new dhtmlXList({
        container:"data_container",
        type:{
            template:"#Package# : #Version#<br/>#Maintainer#",
            css:"custom",
        }
    });
  2. Define 2 css classes on the page with the following names (use the !important declaration to guarantee that the defined css property will be applied for sure):
    • .dhx_list_[css]_item - applied to items in the unselected state
    • .dhx_list_[css]_item_selected - applied to items in the selected state
    .dhx_list_custom_item_selected{
        font-weight:bold !important;
    }
    .dhx_list_custom_item{
        font-size:12px !important;
    }

Note, the css property has the default value - 'default'. So, you can skip step 1 and define the css classes with the following names:

  • .dhx_list_default_item - applied to items in the unselected state
  • .dhx_list_default_item_selected - applied to items in the selected state

Special Templates

In addition to a standard template, List can have an additional task-specific template defined:

  • template_edit - applied to items during the Items editing process
myList = new dhtmlXList({
    container:"data_container",
    edit:true,
    type:{
        template:"#Package# : #Version#<br/>#Maintainer#",
        template_edit:"<input class='dhx_item_editor' bind='obj.Package'>"
    }
});
Back to top