dhtmlxGantt 与 ASP.NET Core
本教程为您提供逐步指南,说明如何在服务器端使用 ASP.NET Core 来创建 Gantt。
您也可以阅读其他服务器端技术的教程:
- dhtmlxGantt 与 ASP.NET MVC
- dhtmlxGantt 与 Node.js
- dhtmlxGantt 与 Python
- dhtmlxGantt 与 PHP: Laravel
- dhtmlxGantt 与 PHP:Slim
- dhtmlxGantt 与 Salesforce LWC
- dhtmlxGantt 与 Ruby on Rails
为了与数据库进行通信的组织,本应用使用 Entity Framework Core。该应用在 Visual Studio 2022 的帮助下构建。
完整的源代码可以在 GitHub 上获取。
Step 1. Creating a project
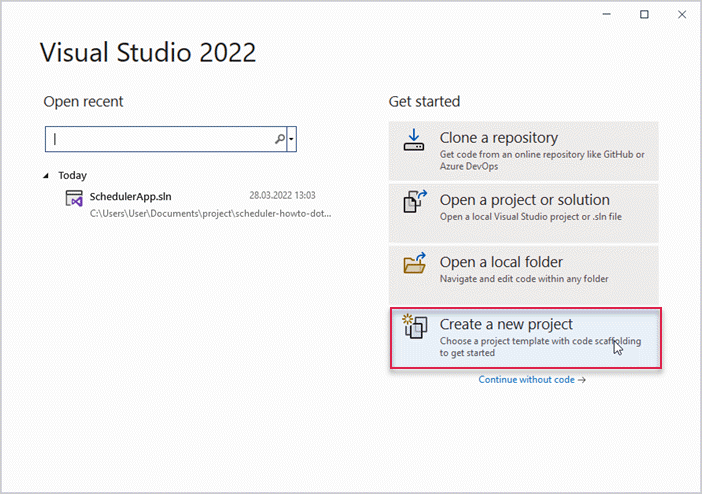
打开 Visual Studio 2022 并创建一个新项目。选择:Create a new project。
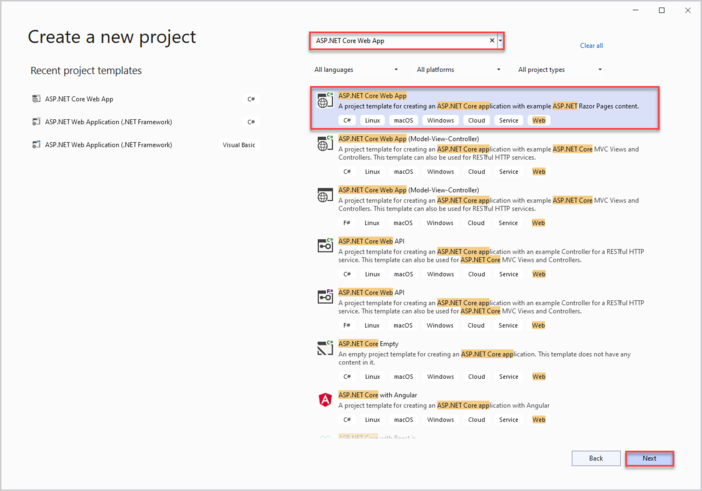
接着选择 "ASP.NET Core Web App" 并将其命名为 DHX.Gantt。
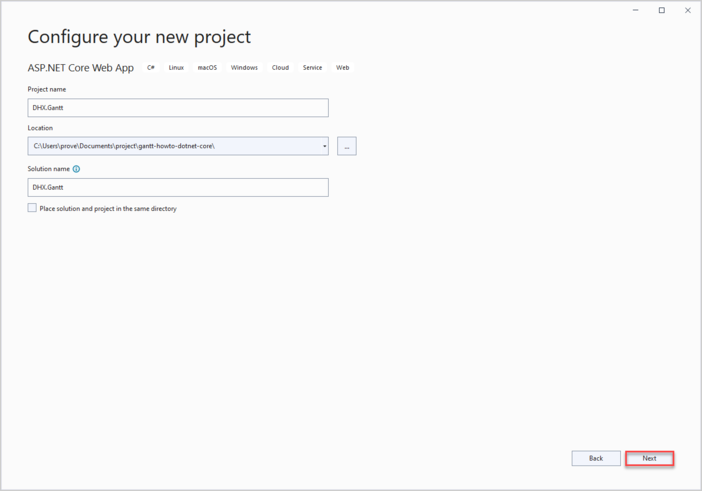
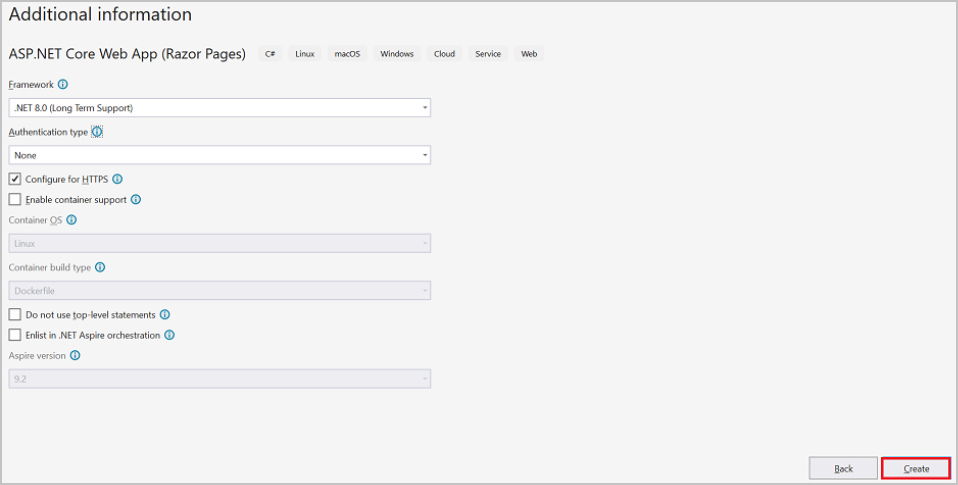
因此,您已创建一个项目,可以继续添加用于 Gantt 的标记(markup) 和脚本。
Step 2. Adding Gantt markup and JS
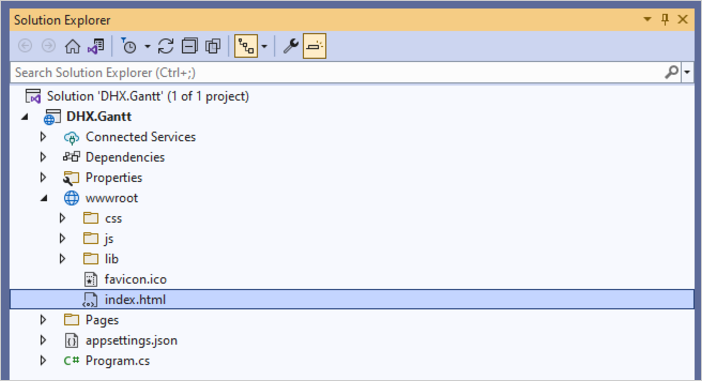
进入 wwwroot 并创建一个 index.html 文件。
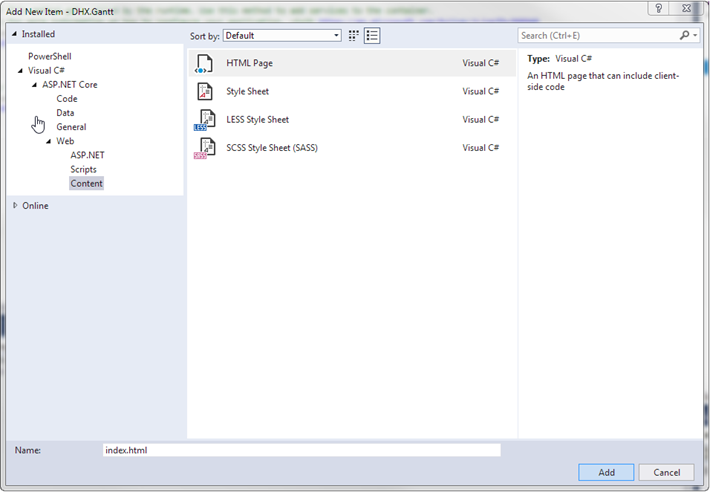
在新创建的文件中为 Gantt 图创建一个简单页面。
请注意,在本演示中 gantt 文件是来自 CDN。如果您有该组件的专业版, 您需要 手动将 gantt 文件添加到您的项目中。
<!DOCTYPE html>
<html>
<head>
    <meta name="viewport" content="width=device-width" />
    <title>Index</title>
    <link href="https://cdn.dhtmlx.com/gantt/edge/dhtmlxgantt.css" rel="stylesheet" type="text/css" />
    <link href="css/site.css" rel="stylesheet" type="text/css" />
    <script src="https://cdn.dhtmlx.com/gantt/edge/dhtmlxgantt.js"></script>
    <script>
        document.addEventListener('DOMContentLoaded', function () {
        // specifying the date format
        gantt.config.date_format = '%Y-%m-%d %H:%i';
        // initializing gantt
        gantt.init('gantt_here');

        // initiating data loading
        gantt.load('/api/data');
        // creating and configuring dataProcessor
        const dp = gantt.createDataProcessor({
          url: '/api/',
          mode: 'REST',
        });
      });
    </script>
</head>
<body>
    <div id="gantt_here" style="width: 100vw; height: 100vh"></div>
</body>
</html>
当页面加载时,除了 初始化 gantt 图表 外,还会立即执行 data loading,并设置
dataProcessor,因此用户对 gantt 图表所作的所有更改都会被保存到后端。后端尚未实现,因此稍后再看会更有意义。
接下来前往 Program.cs,让应用程序使用 index.html 页面。为此,需要将应用配置为从 wwwroot 文件夹提供静态文件。
因此需要添加 app.UseDefaultFiles() 方法。
你可以在这里找到 更多细节.
var builder = WebApplication.CreateBuilder(args);

// Add services to the container.
builder.Services.AddRazorPages();

var app = builder.Build();

// Configure the HTTP request pipeline.
if (!app.Environment.IsDevelopment())
{
    app.UseExceptionHandler("/Error");
    // The default HSTS value is 30 days.
    // You may want to change this for production scenarios,
    // see https://aka.ms/aspnetcore-hsts.
    app.UseHsts();
}

app.UseHttpsRedirection();

app.UseDefaultFiles(); /*!*/

app.UseStaticFiles();

app.UseRouting();

app.UseAuthorization();

app.MapRazorPages();

app.Run();
app.UseDefaultFiles() 方法允许提供默认文件。它会在 wwwroot 文件夹中依次查找以下文件:
- index.html
- index.htm
- default.html
- default.htm
因此,您可以选择其中任意一个,在本教程中使用的是 “index.html”。
UseDefaultFiles() 只是一个 URL 重写器,实际并不会直接提供该文件。为此您还需要添加 UseStaticFiles()。
为了让 Gantt 充满整个 body 的区域,您需要向位于 wwwroot/css 文件夹中的 site.css 文件添加以下样式:
html {
    font-size: 14px;
}

@media (min-width: 768px) {
    html {
        font-size: 16px;
    }
}

body {
    width: 100%;
    height: 100%;
    padding: 0;
    margin: 0;
}
完成后,在运行应用程序时,页面上应该会出现一个空的 gantt。请注意右上角显示的 "Invalid data" 标签,是因为还没有后端提供数据而通过 gantt.load() 调用加载数据时所致。当控制器实现后,gantt 将能够显示任务和链接。
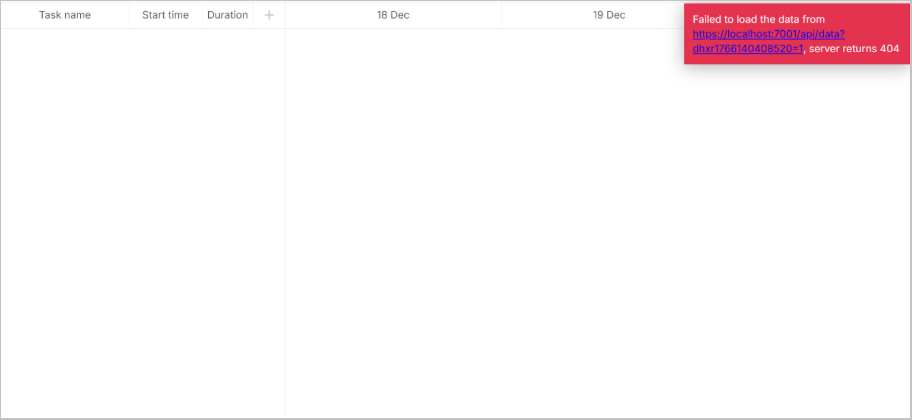
现在基本部分已经完成,接下来实现后端。让我们先实现模型类,然后再进入 WebAPI 控制器。
Step 3. Creating models and database
让我们从数据模型开始。Gantt 的数据模型包括 links 和 tasks。 从 .NET 的角度来看,dhtmlxGantt 使用的是对模型属性的非传统命名。 有时客户端模型也会包含一些用于客户端侧或后端逻辑的属性,但这些属性不应存储在数据库中。
为了解决这个问题,将使用 Data Transfer Object (DTO) 模式。将定义两类模型:
- 将与 EF Core 一起使用并在应用内使用的领域模型类
- 用于与 Web API 进行通信的 DTO 类
然后应实现两者之间的映射。
Models
在项目文件夹中创建一个名为 Models 的新文件夹。这是实现模型类和 EF 上下文的地方。
Task Model
首先,为 Tasks 创建一个类。 在 Models 文件夹中创建一个文件并命名为 Task.cs。可以通过为 Models 文件夹调用上下文菜单并选择 Add->Class 来完成。
这就是模型应有的样子:
namespace DHX.Gantt.Models
{
    public class Task
    {
        public int Id { get; set; }
        public string? Text { get; set; }
        public DateTime StartDate { get; set; }
        public int Duration { get; set; }
        public decimal Progress { get; set; }
        public int? ParentId { get; set; }
        public string? Type { get; set; }
    }
}
您可以查阅 Task 对象的所有属性列表。
Link Model
再添加一个文件,为 Links 创建一个类:
namespace DHX.Gantt.Models
{
    public class Link
    {
        public int Id { get; set; }
        public string? Type { get; set; }
        public int SourceTaskId { get; set; }
        public int TargetTaskId { get; set; }
    }
}
模型已就绪,接下来可以开始配置数据库连接。
Configuring DataBase Connection
要配置数据库连接,请按下列步骤进行:
Install Entity Framework Core
将 Entity Framework Core 用于管理应用与数据库之间的通信。让我们安装该框架:
- 在项目树中找到 DHTMLX.Gantt 的 Dependencies
- 调用上下文菜单并选择 Manage NuGet packages
- 打开 Browse 选项卡,安装 Microsoft.EntityFrameworkCore.SqlServer、Microsoft.EntityFrameworkCore 和 Microsoft.EntityFrameworkCore.Design
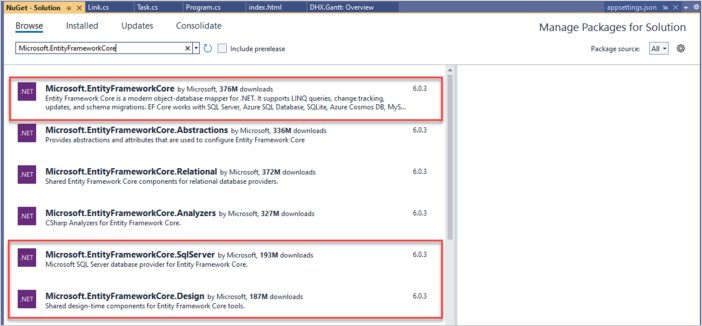
也可以使用 Package Manager 命令行:
PM> Install-Package Microsoft.EntityFrameworkCore.SqlServer
PM> Install-Package Microsoft.EntityFrameworkCore
PM> Install-Package Microsoft.EntityFrameworkCore.Design
Entity Framework Core 将用于管理应用与数据库之间的通信。
Create Entity Context
接下来,您需要定义一个数据库上下文并启用数据的加载与保存。为此创建 Context:
- 在 Models 文件夹中添加 GanttContext.cs 文件
- 在新建的文件中定义 GanttContext 类
using Microsoft.EntityFrameworkCore;

namespace DHX.Gantt.Models
{
    public class GanttContext : DbContext
    {
        public GanttContext(DbContextOptions<GanttContext> options)
           : base(options)
        {
        }
        public DbSet<Task> Tasks { get; set; } = null;
        public DbSet<Link> Links { get; set; } = null;

    }
}
Add First Records to Database
现在可以向数据库中添加记录。让我们创建一个数据库初始化程序,用于用任务填充数据库。 在 Models 文件夹中定义一个类,命名为 GanttSeeder。该类将具有 Seed() 方法,用于向数据库添加任务和链接。
using Microsoft.EntityFrameworkCore;

namespace DHX.Gantt.Models
{
    public static class GanttSeeder
    {
        public static void Seed(GanttContext context)
        {
            if (context.Tasks.Any())
            {
                return;   // DB has been seeded
            }

            using (var transaction = context.Database.BeginTransaction())
            {
               List<Task> tasks = new List<Task>()
               {
                  new Task()
                    {
                       Id = 1,
                       Text = "Project #2",
                       StartDate = DateTime.Today.AddDays(-3),
                       Duration = 18,
                       Progress = 0.4m,
                       ParentId = null
                    },
                    new Task()
                    {
                       Id = 2,
                       Text = "Task #1",
                       StartDate = DateTime.Today.AddDays(-2),
                       Duration = 8,
                       Progress = 0.6m,
                       ParentId = 1
                    },
                    new Task()
                    {
                       Id = 3,
                       Text = "Task #2",
                       StartDate = DateTime.Today.AddDays(-1),
                       Duration = 8,
                       Progress = 0.6m,
                       ParentId = 1
                    }
               };

               tasks.ForEach(s => context.Tasks.Add(s));
               context.Database.ExecuteSqlRaw("SET IDENTITY_INSERT Tasks ON;");
               context.SaveChanges();

               context.Database.ExecuteSqlRaw("SET IDENTITY_INSERT Tasks OFF;");
               List<Link> links = new List<Link>()
               {
                   new Link() {Id = 1, SourceTaskId = 1, TargetTaskId = 2, Type = "1"},
                   new Link() {Id = 2, SourceTaskId = 2, TargetTaskId = 3, Type = "0"}
               };

               links.ForEach(s => context.Links.Add(s));
               context.Database.ExecuteSqlRaw("SET IDENTITY_INSERT Links ON;");
               context.SaveChanges();
               context.Database.ExecuteSqlRaw("SET IDENTITY_INSERT Links OFF;");
               transaction.Commit();
            }
        }
    }
}
Register Database
现在您应该在 Program.cs 中注册数据库,但是首先需要数据库的连接字符串。它将存储在应用程序设置的 JSON 文件中:in a JSON file in the application settings。创建 appsettings.json 文件(如果还没有),并向数据库添加连接字符串:
{
  "ConnectionStrings": {
    "DefaultConnection": "Server="(localdb)mssqllocaldb;"
        Database=GanttDatabase;Trusted_Connection=True;"
  }
}
数据库上下文将通过 dependency injection."
将以下命名空间添加到 Program.cs:
using Microsoft.EntityFrameworkCore;
using DHX.Gantt.Models;
声明将如下所示:
var connectionString = builder.Configuration.GetConnectionString("DefaultConnection");
builder.Services.AddDbContext<GanttContext>(
    options => options.UseSqlServer(connectionString));
为了启用控制器,需要调用 services.AddControllers() 方法:
builder.Services.AddControllers();
并且调用 app.MapControllers() 来注册控制器路由:
app.MapControllers();
以下是 Program.cs 的完整代码:
using Microsoft.EntityFrameworkCore;
using DHX.Gantt.Models;

var builder = WebApplication.CreateBuilder(args);

// Add services to the container.
builder.Services.AddRazorPages();

var connectionString = builder.Configuration.GetConnectionString("DefaultConnection");
builder.Services.AddDbContext<GanttContext>(
    options => options.UseSqlServer(connectionString));

builder.Services.AddControllers();

var app = builder.Build();

// Configure the HTTP request pipeline.
if (!app.Environment.IsDevelopment())
{
    app.UseExceptionHandler("/Error");
    // The default HSTS value is 30 days.
    // You may want to change this for production scenarios,
    // see https://aka.ms/aspnetcore-hsts.
    app.UseHsts();
}

app.UseHttpsRedirection();

app.UseDefaultFiles();

app.UseStaticFiles();

app.UseRouting();

app.UseAuthorization();

app.MapRazorPages();

app.MapControllers();

app.Run();
最后,您需要在应用启动时初始化并种子数据库。通常您会想使用迁移来完成此操作,但为了简单起见这里没有使用迁移。
让我们从创建一个进行初始化的类开始。在 Models 文件夹中创建 GanttInitializerExtension.cs 文件:
namespace DHX.Gantt.Models
{
  public static class GanttInitializerExtension
  {
    public static IHost InitializeDatabase(this IHost webHost)
    {
      var serviceScopeFactory =
       (IServiceScopeFactory?)webHost.Services.GetService(typeof(IServiceScopeFactory));

      using (var scope = serviceScopeFactory!.CreateScope())
       {
          var services = scope.ServiceProvider;
          var dbContext = services.GetRequiredService<GanttContext>();
          dbContext.Database.EnsureDeleted();
          dbContext.Database.EnsureCreated();
          GanttSeeder.Seed(dbContext);
       }

       return webHost;
     }
   }
}
Next call InitializeDatabase():
app.InitializeDatabase();
如上所述,本教程中未使用迁移。相反,使用了简单的 EnsureCreated 和 seed。
当前部分完成,让我们回到 Gantt。
Define DTOs and Mapping
现在是定义将用于 Web API 的 DTO 类的时候了。让我们从 Task 的 DTO 类开始。在 Models 文件夹中创建一个文件并定义 WebApiTask.cs 类:
namespace DHX.Gantt.Models
{
    public class WebApiTask
    {
        public int id { get; set; }
        public string? text { get; set; }
        public string? start_date { get; set; }
        public int duration { get; set; }
        public decimal progress { get; set; }
        public int? parent { get; set; }
        public string? type { get; set; }
        public bool open
        {
            get { return true; }
            set { }
        }

        public static explicit operator WebApiTask(Task task)
        {
            return new WebApiTask
            {
                id = task.Id,
                text = task.Text,
                start_date = task.StartDate.ToString("yyyy-MM-dd HH:mm"),
                duration = task.Duration,
                parent = task.ParentId,
                type = task.Type,
                progress = task.Progress
            };
        }

        public static explicit operator Task(WebApiTask task)
        {
            return new Task
            {
                Id = task.id,
                Text = task.text,
                  StartDate = task.start_date != null ? DateTime.Parse(task.start_date,
                  System.Globalization.CultureInfo.InvariantCulture) : new DateTime(),
                Duration = task.duration,
                ParentId = task.parent,
                Type = task.type,
                Progress = task.progress
            };
        }
    }
}
这是用于 Link 的 DTO 类,在 Models 文件夹中新建文件 WebApiLink.cs:
namespace DHX.Gantt.Models
{
    public class WebApiLink
    {
        public int id { get; set; }
        public string? type { get; set; }
        public int source { get; set; }
        public int target { get; set; }

        public static explicit operator WebApiLink(Link link)
        {
            return new WebApiLink
            {
                id = link.Id,
                type = link.Type,
                source = link.SourceTaskId,
                target = link.TargetTaskId
            };
        }

        public static explicit operator Link(WebApiLink link)
        {
            return new Link
            {
                Id = link.id,
                Type = link.type,
                SourceTaskId = link.source,
                TargetTaskId = link.target
            };
        }
    }
}
完成此步骤后,您应该得到如下的文件夹结构:
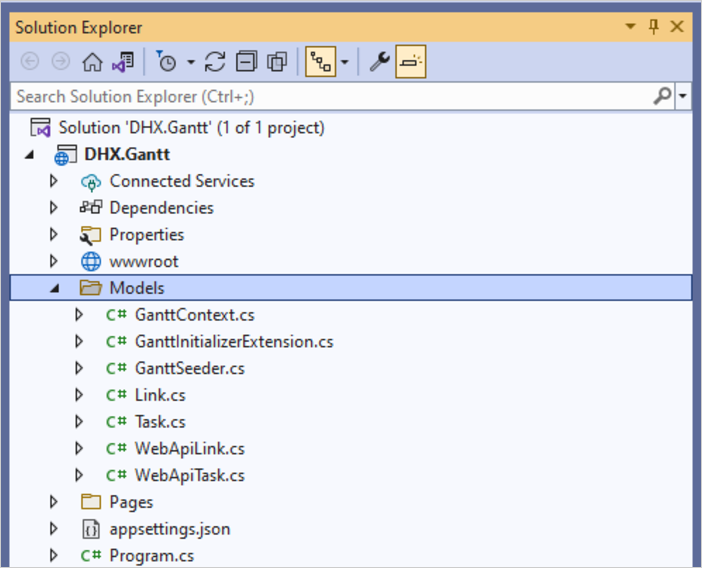
现在可以运行应用程序以检查一切是否就位。如果没有运行时错误,则说明一切正常。
Step 4. Implementing Web API
现在是实现实际 REST API 的时刻。
Adding Controllers
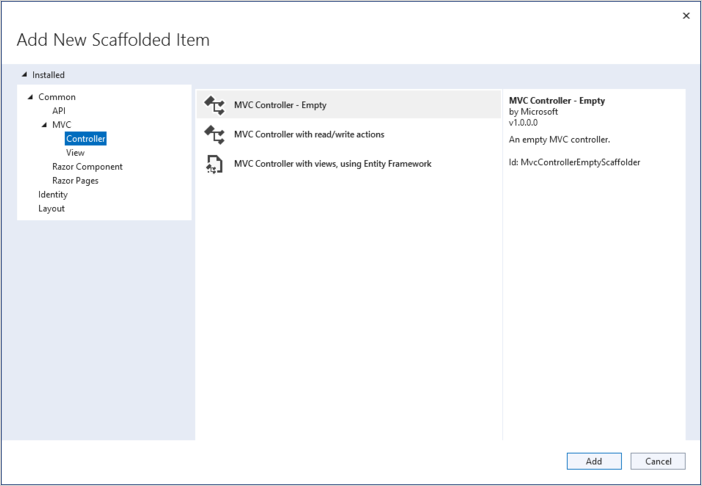
创建 Controllers 文件夹,并创建三个空的 API 控制器:一个用于 Tasks,另一个用于 Links,还有一个用于整个数据集:
Task Controller
让我们为 Tasks 创建一个控制器。它将定义 Gantt 任务的基本 CRUD 操作。
工作原理:
- 在 GET 请求中,任务从数据库加载,输出为任务的数据传输对象;
- 在 PUT/POST 请求中,来自客户端的任务以 WebAPITask 类的形式传来。它们在 dhtmlxGantt 中以这种方式表示,因此应将其转换为我们的 EntityFramework(Task 类)数据模型的格式。之后就可以将更改保存到 DatabaseContext。
using Microsoft.AspNetCore.Mvc;
using DHX.Gantt.Models;
using Microsoft.EntityFrameworkCore;

namespace DHX.Gantt.Controllers
{
    [Produces("application/json")]
    [Route("api/task")]
    public class TaskController : ControllerBase
    {
        private readonly GanttContext _context;
        public TaskController(GanttContext context)
        {
            _context = context;
        }

        // GET api/task
        [HttpGet]
        public async Task<IEnumerable<WebApiTask>> Get()
        {
            return await _context.Tasks
                .Select(t => (WebApiTask)t)
                .ToListAsync();
        }

        // GET api/task/5
        [HttpGet("{id}")]
        public async Task<ActionResult<Models.Task>> Get(int id)
        {
            var task = await _context.Tasks.FindAsync(id);

            if (task == null)
                return NotFound();

            return Ok(task);
        }

        // POST api/task
        [HttpPost]
        public async Task<IActionResult> Post(WebApiTask apiTask)
        {
            var newTask = (Models.Task)apiTask;

            await _context.Tasks.AddAsync(newTask);
            await _context.SaveChangesAsync();

            return Ok(new
            {
                tid = newTask.Id,
                action = "inserted"
            });
        }

        // PUT api/task/5
        [HttpPut("{id}")]
        public async Task<IActionResult?> Put(int id, WebApiTask apiTask)
        {
            var updatedTask = (Models.Task)apiTask;
            var dbTask = await _context.Tasks.FindAsync(id);

            if (dbTask == null)
            {
                return NotFound();
            }

            dbTask.Text = updatedTask.Text;
            dbTask.StartDate = updatedTask.StartDate;
            dbTask.Duration = updatedTask.Duration;
            dbTask.ParentId = updatedTask.ParentId;
            dbTask.Progress = updatedTask.Progress;
            dbTask.Type = updatedTask.Type;

            await _context.SaveChangesAsync();

            return Ok(new
            {
                action = "updated"
            });
        }

        // DELETE api/task/5
        [HttpDelete("{id}")]
        public async Task<IActionResult> DeleteTask(int id)
        {
            var task = await _context.Tasks.FindAsync(id);
            if (task != null)
            {
                _context.Tasks.Remove(task);
                await _context.SaveChangesAsync();
            }

            return Ok(new
            {
                action = "deleted"
            });
        }
    }
}
Link Controller
接下来您应为 Links 创建一个控制器:
using Microsoft.EntityFrameworkCore;
using Microsoft.AspNetCore.Mvc;
using DHX.Gantt.Models;

namespace DHX.Gantt.Controllers
{
    [Produces("application/json")]
    [Route("api/link")]
    public class LinkController : ControllerBase
    {
        private readonly GanttContext _context;
        public LinkController(GanttContext context)
        {
            _context = context;
        }

        // GET api/Link
        [HttpGet]
        public async Task<IEnumerable<WebApiLink>> Get()
        {
            return await _context.Links
                .Select(t => (WebApiLink)t)
                .ToListAsync();
        }

        // GET api/Link/5
        [HttpGet("{id}")]
        public async Task<ActionResult<Link>> Get(int id)
        {
            var link = await _context.Links.FindAsync(id);

            if (link == null)
                return NotFound();

            return Ok(link);
        }

        // POST api/Link
        [HttpPost]
        public async Task<IActionResult> Post(WebApiLink apiLink)
        {
            var newLink = (Link)apiLink;

            _context.Links.Add(newLink);
            await _context.SaveChangesAsync();

            return Ok(new
            {
                tid = newLink.Id,
                action = "inserted"
            });
        }

        // PUT api/Link/5
        [HttpPut("{id}")]
        public async Task<IActionResult> Put(int id, WebApiLink apiLink)
        {
            var updatedLink = (Link)apiLink;
            updatedLink.Id = id;
            _context.Entry(updatedLink).State = EntityState.Modified;


            await _context.SaveChangesAsync();

            return Ok(new
            {
                action = "updated"
            });
        }

        // DELETE api/Link/5
        [HttpDelete("{id}")]
        public async Task<IActionResult> DeleteLink(int id)
        {
            var link = await _context.Links.FindAsync(id);
            if (link != null)
            {
                _context.Links.Remove(link);
                await _context.SaveChangesAsync();
            }

            return Ok(new
            {
                action = "deleted"
            });
        }
    }
}
Data Controller
最后,您需要为数据操作创建一个控制器:
using Microsoft.AspNetCore.Mvc;
using Microsoft.EntityFrameworkCore;
using DHX.Gantt.Models;

namespace DHX.Gantt.Controllers
{
    [Produces("application/json")]
    [Route("api/data")]
    public class DataController : ControllerBase
    {
        private readonly GanttContext _context;
        public DataController(GanttContext context)
        {
            _context = context;
        }

        // GET api/data
        [HttpGet]
        public async Task<IActionResult> Get()
        {
            var tasks = await _context.Tasks
                .Select(t => (WebApiTask)t)
                .ToListAsync();

            var links = await _context.Links
                .Select(l => (WebApiLink)l)
                .ToListAsync();

            return Ok(new
            {
                tasks,
                links
            });
        }
    }
}
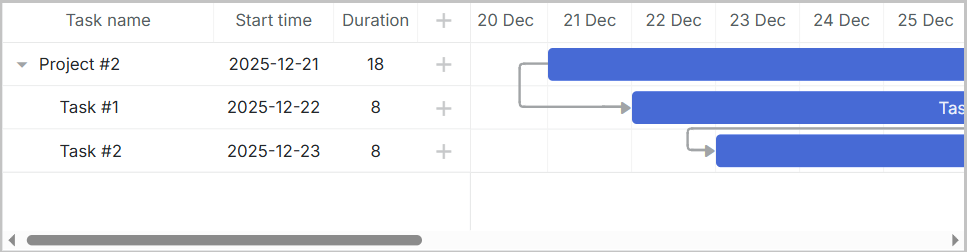
一切就绪。您可以运行应用程序,看看完整的 Gantt。
Error handling
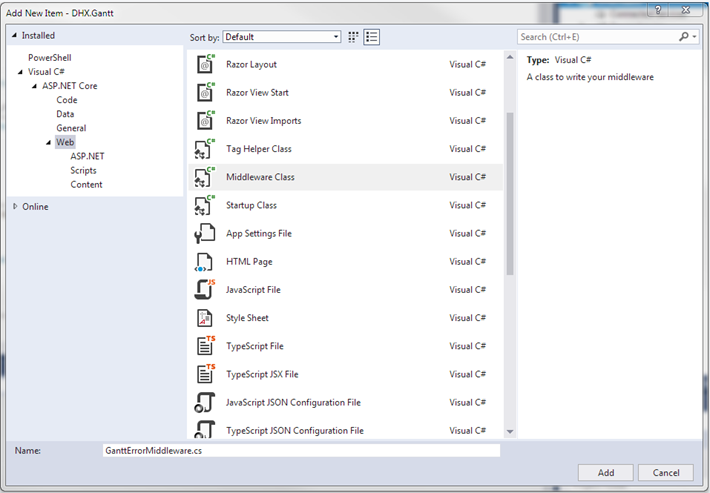
为了处理错误,您需要声明一个特殊的 中间件类", 该中间件会捕获运行时异常并写出响应。接下来将其加入应用程序请求管道。请按以下步骤进行:
- 从项目文件夹中的模板创建一个中间件类。
- 安装 ASP.NET Core 的 JSON 框架。您可以通过 NuGet 包管理器来执行此操作:
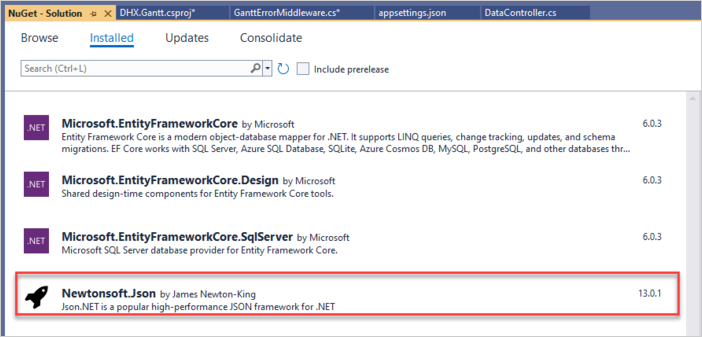
或使用 Package Manager 命令行:
PM> Install-Package NewtonSoft.JSON
- 找到 invoke 方法,并注意
_next调用。某些处理程序可能会抛出异常,因此让我们进行捕获。用try-catch块包裹_next调用,在捕获到错误时运行我们的处理程序。
public async Task Invoke(HttpContext httpContext)
{
    try
    {
        await _next(httpContext);
    }catch(Exception e)
    {
        await HandleExceptionAsync(httpContext, e);
    }
}
private static Task HandleExceptionAsync(HttpContext context, Exception exception)
{
    var result = JsonConvert.SerializeObject(new {
        action = "error"
    });
    context.Response.ContentType = "application/json";
    context.Response.StatusCode = StatusCodes.Status500InternalServerError;
    return context.Response.WriteAsync(result);
}
- 将以下命名空间添加到 GanttErrorMiddleware.cs:
using Newtonsoft.Json;
- 中间件已就绪。现在转到 Program.cs 并连接该中间件。添加以下命名空间:
using DHX.Gantt;
接着调用 app.UseGanttErrorMiddleware() 方法:
app.UseGanttErrorMiddleware();
Storing the order of tasks
用户可以在客户端的 gantt 中通过拖放重新排列任务。如果您使用此功能,应该将任务的顺序存储在数据库中。 详情请参阅 this section。
继续了解如何为 gantt 启用存储任务顺序的功能。
Reordering on the Client Side
首先在客户端启用任务的重新排序。在 index.html 中添加这些行:
gantt.config.order_branch = true;
gantt.config.order_branch_free = true;

// specifying the date format
gantt.config.date_format = "%Y-%m-%d %H:%i";
// initializing gantt
gantt.init("gantt_here");
Adding tasks order to the model
接下来,您必须修改后端以反映当前的任务顺序。向 Task 模型添加一个新的字段: SortOrder。
namespace DHX.Gantt.Models
{
    public class Task
    {
        public int Id { get; set; }
        public string? Text { get; set; }
        public DateTime StartDate { get; set; }
        public int Duration { get; set; }
        public decimal Progress { get; set; }
        public int? ParentId { get; set; }
        public string? Type { get; set; }
        public int SortOrder { get; set; } /*!*/
    }
}
Updating Controllers
您还需要更新控制器。
- 客户端应按 SortOrder 值对任务进行排序并返回。向 DataController 中添加高亮显示的行:
[HttpGet]
public async Task<IActionResult> Get()
{
    var tasks = await _context.Tasks
        .OrderBy(t => t.SortOrder) /*!*/
        .Select(t => (WebApiTask)t)
        .ToListAsync();

    var links = await _context.Links
        .Select(l => (WebApiLink)l)
        .ToListAsync();

    return Ok(new
    {
        data = tasks,
        links = links
    });
}
- 新建的任务也应获得默认值 SortOrder:
// POST api/task
[HttpPost]
public async Task<IActionResult> Post(WebApiTask apiTask)
{
    var newTask = (Models.Task)apiTask;

    newTask.SortOrder = await _context.Tasks.MaxAsync(t => t.SortOrder) + 1; /*!*/
    await _context.Tasks.AddAsync(newTask);
    await _context.SaveChangesAsync();

    return Ok(new
    {
        tid = newTask.Id,
        action = "inserted"
    });
}
- 当在客户端修改任务顺序时,sortOrder 应更新。当用户重新排序任务时,gantt 将调用 PUT 操作并提供新任务在请求的 'target' 属性中的位置信息,以及其他任务属性。
向 WebApiTask.cs 类中添加 target 字段:
public class WebApiTask
{
    public int id { get; set; }
    public string? text { get; set; }
    public string? start_date { get; set; }
    public int duration { get; set; }
    public decimal progress { get; set; }
    public int? parent { get; set; }
    public string? type { get; set; }
    public string? target { get; set; } /*!*/
    public bool open
    {
        get { return true; }
        set { }
    }
}
现在在 Task 控制器的 PUT(EditTask)操作中实现重新排序。修改 Task 控制器的 Put 操作:
// PUT api/task/5
[HttpPut("{id}")]
public async Task<IActionResult?> Put(int id, WebApiTask apiTask)
{
    var updatedTask = (Models.Task)apiTask;
    var dbTask = await _context.Tasks.FindAsync(id);

    if (dbTask == null)
    {
        return NotFound();
    }

    dbTask.Text = updatedTask.Text;
    dbTask.StartDate = updatedTask.StartDate;
    dbTask.Duration = updatedTask.Duration;
    dbTask.ParentId = updatedTask.ParentId;
    dbTask.Progress = updatedTask.Progress;
    dbTask.Type = updatedTask.Type;

    if (!string.IsNullOrEmpty(apiTask.target))                /*!*/
    {                                                         /*!*/
        // reordering occurred                                /*!*/
        await this.UpdateOrdersAsync(dbTask, apiTask.target); /*!*/
    }                                                         /*!*/

    await _context.SaveChangesAsync();

    return Ok(new
    {
        action = "updated"
    });
}
并添加用于更新任务顺序的方法:
private async Task<IActionResult> UpdateOrdersAsync(Models.Task updatedTask, string orderTarget)
{
    int adjacentTaskId;
    var nextSibling = false;

    var targetId = orderTarget;

    // adjacent task id is sent either as '{id}' or as 'next:{id}' depending
    // on whether it's the next or the previous sibling
    if (targetId.StartsWith("next:"))
    {
        targetId = targetId.Replace("next:", "");
        nextSibling = true;
    }

    if (!int.TryParse(targetId, out adjacentTaskId))
    {
        return NotFound();
    }

    var adjacentTask = await _context.Tasks.FindAsync(adjacentTaskId);
    if (adjacentTask == null)
    {
        return NotFound();
    }
    var startOrder = adjacentTask.SortOrder;

    if (nextSibling)
        startOrder++;

    updatedTask.SortOrder = startOrder;

    var updateOrders = await _context.Tasks
        .Where(t => t.Id != updatedTask.Id)
        .Where(t => t.SortOrder >= startOrder)
        .OrderBy(t => t.SortOrder)
        .ToListAsync();

    var taskList = updateOrders.ToList();
    taskList.ForEach(t => t.SortOrder++);

    return Ok(new
    {
        action = "updated"
    });
}
Application security
Gantt 不提供任何防止应用程序遭受各种威胁(如 SQL 注入、XSS、CSRF 攻击)的机制。确保应用安全的责任在实现后端的开发人员身上。请阅读对应文章中的详细信息。
XSS protection
一个简单的解决方案是在将数据发送到客户端时对文本属性进行编码。
例如,下面的代码中使用了内置的 HtmlEncoder 来对任务文本中的 HTML 值进行转义。这样数据库中将保留未修改的原始数据,但客户端将接收到安全的 task.text 值。
using System.Text.Encodings.Web;

public static explicit operator WebApiTask(Task task)
{
    return new WebApiTask
    {
        id = task.Id,
        text = HtmlEncoder.Default.Encode(task.Text != null ? task.Text : ""), /*!*/
        start_date = task.StartDate.ToString("yyyy-MM-dd HH:mm"),
        duration = task.Duration,
        parent = task.ParentId,
        type = task.Type,
        progress = task.Progress
    };
}
另一种做法是使用专门的库,例如 HtmlAgilityPack 来在保存/加载数据时完全剥离任何 HTML。
Trouble shooting
如果您完成了上述将 Gantt 与 ASP.NET Core 集成的步骤,但 Gantt 未在页面上呈现任务和链接,请查看 Troubleshooting Backend Integration Issues 文章。它描述了识别问题根源的方法。
What's next
现在您拥有一个功能完善的 gantt。您可以在 GitHub 上查看完整代码、克隆或下载,并将其用于您的项目。
您也可以查看关于 gantt 众多功能的指南(guides on the numerous features of gantt)或关于将 Gantt 与其他后端框架集成的教程(tutorials on integrating Gantt with other backend frameworks)。