Auto Scheduling
This functionality is available only in the PRO edition.
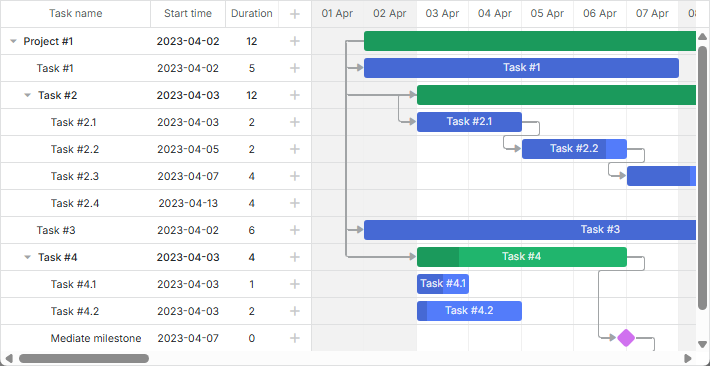
The library provides the auto_scheduling extension that gives Gantt the ability to schedule tasks automatically depending on relations between them.

For example, imagine that you have two tasks connected by a dependency link and the second task starts when the first one ends, and you need to change the schedule of the first task by moving it to a new date.
Auto scheduling makes the start date of the second task update according to the end date of the first task each time when it changes. This feature allows you to generate and maintain project schedule by specifying relations between tasks with no need to set dates of each task manually.
How to use
To use the auto scheduling functionality, you should enable the auto_scheduling plugin using the gantt.plugins method:
gantt.plugins({
    auto_scheduling: true
});
And set the enabled property of the auto_scheduling config to true:
gantt.config.auto_scheduling = {
    enabled: true
};
When auto scheduling is enabled, individual tasks still can be scheduled manually.
Forward/backward planning
Strategies of projects planning
There are two strategies of planning tasks within a project: forward and backward planning. They are defined by combinations of configuration settings:
- gantt.config.auto_scheduling.schedule_from_end - (boolean) defines the type of the planning strategy
- project_start - (Date) the start date of a project; used as a start date of tasks by default, if forward planning is applied, null by default
- project_end - (Date) the end date of a project; used for the default time of tasks, if backward planning is used, null by default
Forward planning
The forward planning of tasks is used by default, i.e. gantt.config.auto_scheduling.schedule_from_end is set to false.
// forward planning of tasks is used
gantt.config.auto_scheduling = {
    enabled: true,
    schedule_from_end: false
};
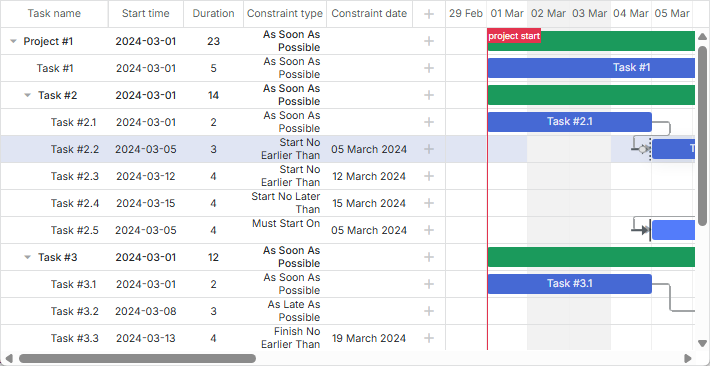
In this case planning of tasks is implemented from the start date or from the date of the earliest task. Tasks are planned as soon as possible, if there are no other constraints applied to them.
The start date of the project can be optionally set by the gantt.config.project_start config:
gantt.config.project_start = new Date(2025, 2, 1);
Auto-Schedule From Project Start & Constraints
Backward planning
It is also possible to plan tasks from the end of the project, i.e. to apply backward planning. For this you need to set the gantt.config.auto_scheduling.schedule_from_end property to true and specify the end date of the project via the gantt.config.project_end configuration option:
gantt.config.project_end = new Date(2025, 10, 1);
gantt.config.auto_scheduling = {
    enabled: true,
    schedule_from_end: true
};
In this case tasks are planned as late as possible. The last task should end on the end date of the project.
Auto-Schedule From Project End (backward)
Time constraints for tasks
dhtmlxGantt provides the possibility to set additional time constraints for tasks.
Time constraints are applicable only to tasks and milestones. Projects are not affected by them.
Setting constraints via lightbox
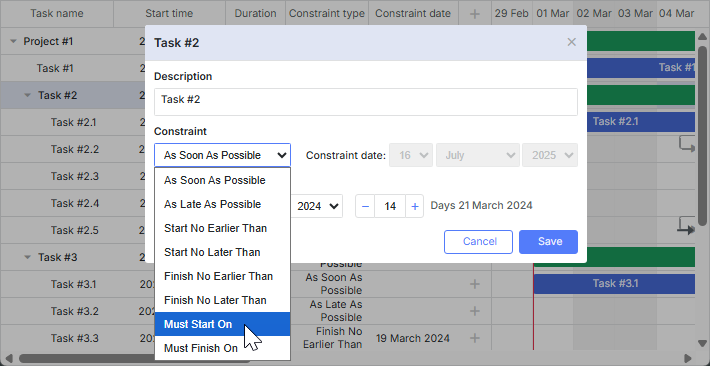
You can specify constraints for a task via the Constraint control in the lightbox of a task.

gantt.config.lightbox.sections = [
    { name: "description", height: 38, map_to: "text", type: "textarea", focus: true},
    { name: "constraint", type: "constraint" }, /*!*/
    { name: "time", type: "duration", map_to: "auto" }
];
Setting constraints via inline editors
It is also possible to specify separate columns for the type of constraint and its date in the grid and use inline editors to define constraints for tasks.

Use the constraint_type and constraint_date columns' names, correspondingly.
const constraintTypeEditor = {
    type: "select", map_to: "constraint_type", options: [
        { key: "asap", label: gantt.locale.labels.asap },
        { key: "alap", label: gantt.locale.labels.alap },
        { key: "snet", label: gantt.locale.labels.snet },
        // more options
    ]
};

const constraintDateEditor = {
    type: "date",
    map_to: "constraint_date",
    min: new Date(2025, 0, 1),
    max: new Date(2026, 0, 1)
};

gantt.config.columns = [
    { /* previous column */ },
    {
        name: "constraint_type", align: "center", width: 100,
        template: task => gantt.locale.labels[gantt.getConstraintType(task)],
        resize: true, editor: constraintTypeEditor
    },
    {
        name: "constraint_date", align: "center", width: 120, template: (task) => {
            // template logic
        },
        resize: true, editor: constraintDateEditor
    },
    { name: "add", width: 44 }
];
Auto-Schedule From Project Start & Constraints
Types of constraints
There are several types of time constraints:
- As soon as possible - If this constraint is set to an independent task and the strict mode is enabled, the task starts at the same time that the project does. If the strict mode is disabled, the task starts on the specified date.
If this constraint is set to a dependent task, the task starts as soon as its predecessor tasks end.
- As late as possible - If this constraint is set to an independent task, the task ends at the same time that the project does. If this constraint is set to a dependent task, the end of the task coincides with the start of its immediate successor task.
The other types of constraints affect tasks regardless of the their types (dependent or independent):
-
Start no earlier than - the task should start on the specified date or after it.
-
Start no later than - the task should start on the specified date or before it.
-
Finish no earlier than - the task should end on the specified date or after it.
-
Finish no later than - the task should end on the specified date or before it.
-
Must start on - the task should start exactly on the specified date.
-
Must finish on - the task should end exactly on the specified date.
By independent tasks here we mean tasks that don't have any successors or predecessors. In other words, these are tasks that don't have any links/relations that connect them or any of their parents to other tasks.
Setting lag and lead times between tasks
Lag and lead times are special values that are used to create complex relations between tasks.
Lag is a delay between tasks which are linked by a dependency. Lead is an overlap between tasks which are linked by a dependency.
There can be two types of successor tasks:
- a task that can start before its predecessor task's end (task B starts before task A is finished)
E.g.: If we set a lead equal to 1 day for the dependency link, task B will start one day before task A ends;
- a task that can't start until after some delay that follows the finish of its predecessor task (task B starts in some time after task A is finished)
E.g.: If we set a lag equal to 1 day for the dependency link, task B will start in one day after task A ends.
Lag and lead values are set in the additional property of the link object - link.lag:
- lag - any whole positive value,
- lead - a negative value of the lag.
By default, it's implied that the lag value of each dependency link is set as 0.
Editing link values from UI
Gantt doesn't provide a built-in UI for editing lag or any other properties of the link. However, you can implement it manually by following the recommendations given in the related chapter.
Related sample Edit-lag Popup
Disabling auto scheduling for specific tasks
To disable auto scheduling for a particular task and make it manually scheduled, set the auto_scheduling property of the task object to false:
const task = gantt.getTask(id);
task.auto_scheduling = false;
You can also prevent auto scheduling of a specific task using the onBeforeTaskAutoSchedule handler:
gantt.attachEvent("onBeforeTaskAutoSchedule", (task, start, link, predecessor) => {
    return !task.completed;
});
Scheduling completed tasks
By default, there is no difference in how the auto scheduling algorithm processes completed tasks (tasks which have progress value of 1) and incomplete tasks.
Optionally, you can enable the auto_scheduling.use_progress config to change this behavior:
gantt.config.auto_scheduling = {
    enabled: true,
    use_progress: true
};

gantt.init("gantt_here");
When the config is enabled, completed tasks will be excluded from the critical path and auto scheduling.
You can find more details on the API page.
API overview
The list of available methods and properties:
- auto_scheduling
- project_start
- project_end
- autoSchedule
- isUnscheduledTask
- findCycles
- isCircularLink
- getConnectedGroup
Activation
To enable auto scheduling in the Gantt chart, set the enabled property of the auto_scheduling config to true:
gantt.config.auto_scheduling = {
    enabled: true
};
Strict mode
By default, tasks are rescheduled only when a new date violates the constraint. In order to always reschedule tasks to the earliest possible date, use the property auto_scheduling.gap_behavior:
gantt.config.auto_scheduling = {
    enabled: true,
    apply_constraints: false,
    gap_behavior: "compress"
};
Note that in versions 6.1.0 - 7.1.3, the config works only when the auto_scheduling_compatibility option is enabled.
Initial auto-scheduling
The auto_scheduling.schedule_on_parse property specifies whether gantt will do auto scheduling on data loading. It's set to true by default:
gantt.config.auto_scheduling = {
    enabled: true,
    schedule_on_parse: true
};
Inheritance of project constraint
The auto_scheduling.project_constraint property defines whether the tasks without the specified constraint type should inherit the constraint type from their parent project:
gantt.config.auto_scheduling = {
    enabled: true,
    project_constraint: true
};
Recalculating the project
To recalculate the schedule of the whole project, use the autoSchedule method:
gantt.autoSchedule();
If you need to recalculate the schedule starting from a particular task, pass the id of the task as an argument to the autoSchedule method:
gantt.autoSchedule(taskId);
Checking whether a task is unscheduled
In case you need to check whether the task is unscheduled, use the isUnscheduledTask method with the task object as an argument:
const isUnscheduled = gantt.isUnscheduledTask(task);
Search for circular references
To find all circular references in the chart, make use of the findCycles method:
gantt.findCycles();
Checking whether a link is circular
If you need to check whether the link is circular, you can apply the isCircularLink method:
const isCircular = gantt.isCircularLink(link);
Getting connected tasks and links
To get the list of tasks and links a task is connected with, use the getConnectedGroup method:
gantt.getConnectedGroup(18);
// => {links:["16", "17", "18"], tasks:[18, 17, 19, 20]}
The list of events
The list of available events is given below:
- onBeforeAutoSchedule
- onAfterAutoSchedule
- onBeforeTaskAutoSchedule
- onAfterTaskAutoSchedule
- onCircularLinkError
- onAutoScheduleCircularLink
// before auto scheduling starts
gantt.attachEvent("onBeforeAutoSchedule", (taskId) => {
    // any custom logic here
    return true;
});

// after auto scheduling finishes
gantt.attachEvent("onAfterAutoSchedule", (taskId, updatedTasks) => {
    // any custom logic here
});

// before a particular task is rescheduled
gantt.attachEvent("onBeforeTaskAutoSchedule", (task, start, link, predecessor) => {
    // any custom logic here
    return true;
});

// after a particular task is rescheduled
gantt.attachEvent("onAfterTaskAutoSchedule", (task, start, link, predecessor) => {
    // any custom logic here
});

// if the circular reference has been detected and auto scheduling is not possible
gantt.attachEvent("onCircularLinkError", (link, group) => {
    // any custom logic here
});

// if circular links were found during auto scheduling
gantt.attachEvent("onAutoScheduleCircularLink", (groups) => {
    // any custom logic here
});
Version compatibility
When a user changes the date of a task by moving it with the mouse pointer or via the lightbox, the task automatically receives one of the two constraint types: either start no earlier than+%start date% or finish no later than+%end date%, depending on the chosen planning strategy.
Thus a task won't be scheduled to the earliest date if the later date is set from the UI. This may be confusing to a not prepared user especially since constraints are not displayed in the chart by default.
Starting from v9.1 you can enable displaying of constraints using the auto_scheduling.show_constraints property. The older versions require usage of the addTasklayer method to add constraints to the chart.
Auto-Schedule From Project Start & Constraints
This behavior differs from the auto scheduling logic of gantt prior to v6.1 and is considered to be correct, since it's the same way auto planning works in MS Project.
If that is not what you want, you can switch back to the pre-6.1 auto scheduling by disabling constraints in the following way:
gantt.config.auto_scheduling = {
    enabled: true,
    apply_constraints: false
};