dhtmlxScheduler 与 ASP.NET Core
本指南将带您一步步在服务器端使用 ASP.NET Core 创建 Scheduler。
您还可以参考其他服务端平台的教程:
- dhtmlxScheduler 与 ASP.NET MVC
- dhtmlxScheduler 与 Node.js 集成
- dhtmlxScheduler 与 PHP 集成教程
- dhtmlxScheduler 与 PHP:Slim
- dhtmlxScheduler 与 PHP:Laravel 集成指南
- dhtmlxScheduler 与 SalesForce LWC 集成指南
- dhtmlxScheduler 与 Ruby on Rails 集成
- dhtmlxScheduler 与 dhtmlxConnector
数据库交互通过 Entity Framework Core 实现。示例基于 Visual Studio 2022 开发。
完整源码可在 GitHub 获取。
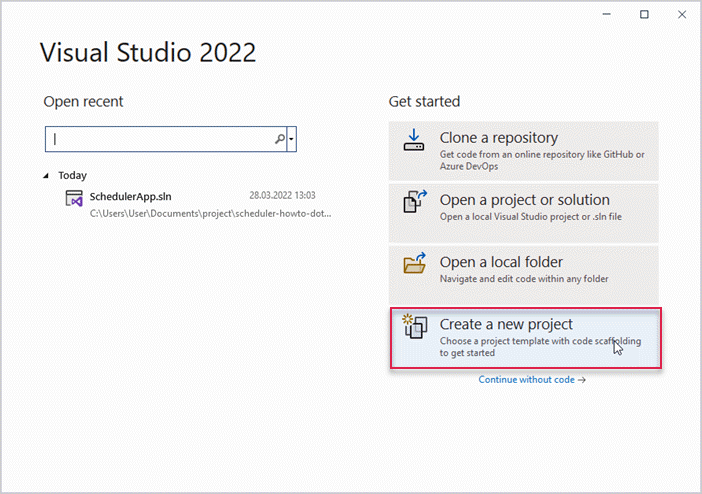
步骤 1. 创建项目
启动 Visual Studio 2022,选择“Create a new project”新建项目。
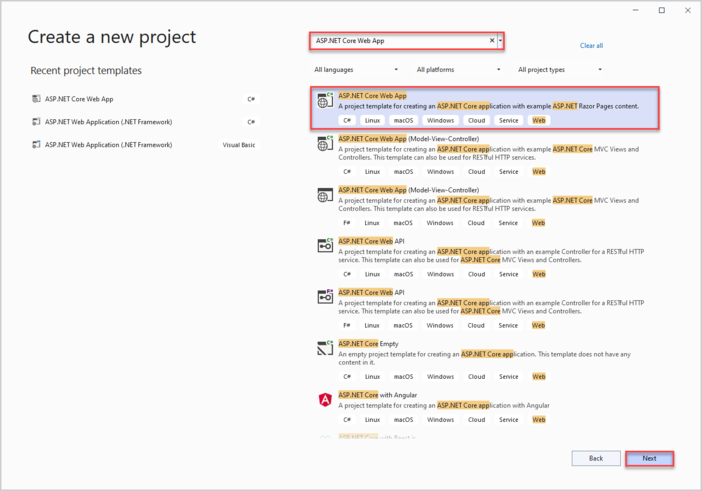
然后选择 “ASP.NET Core Web App”,项目命名为 SchedulerApp。
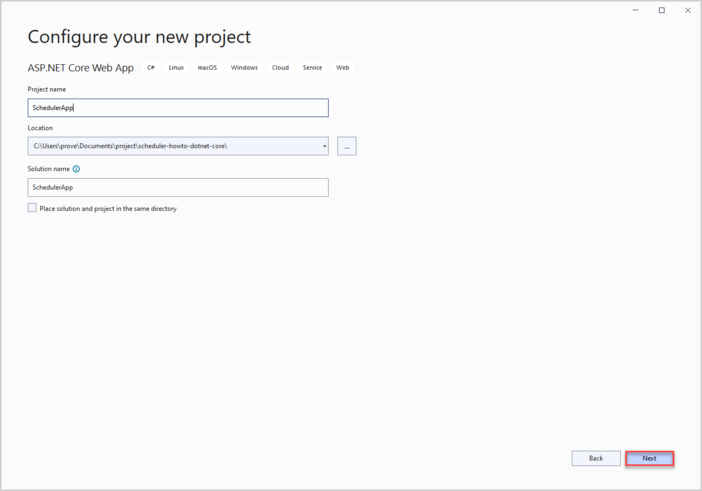
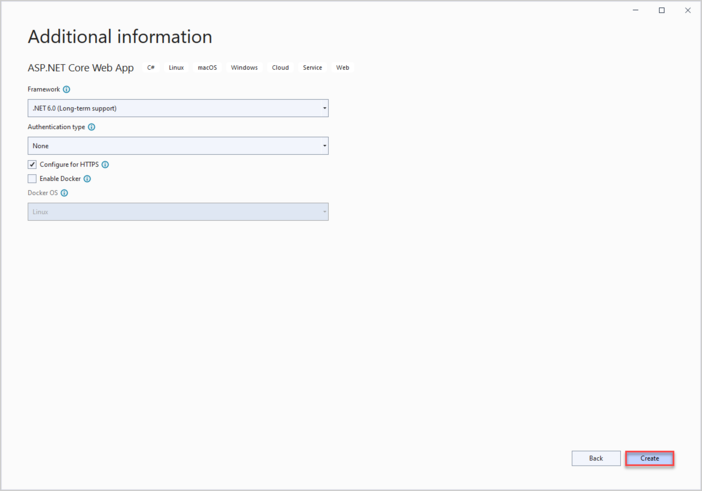
至此,项目已创建完成,接下来可以添加 Scheduler 的标记和脚本。
步骤 2. 将 Scheduler 添加到页面
进入 wwwroot 目录,新建文件 index.html。
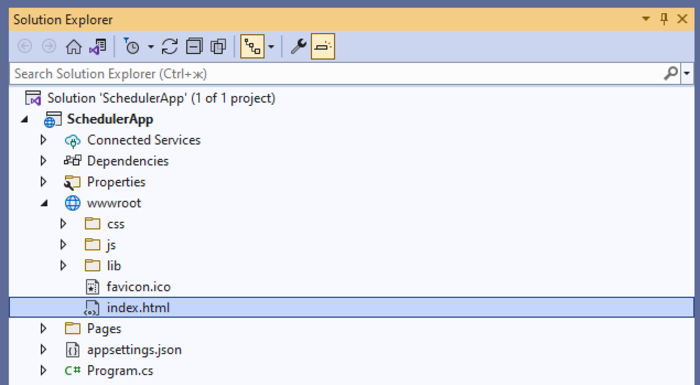
在该文件中,构建一个简单页面用于展示 scheduler。
请注意,本例中 scheduler 文件通过 CDN 加载。如果您使用的是 Professional 版本,需要 手动将 scheduler 文件添加到项目。
index.html
<!DOCTYPE html>
<html>
<head>
<title>Getting started with dhtmlxScheduler</title>
<meta charset="utf-8">
<script src="https://cdn.dhtmlx.com/scheduler/edge/dhtmlxscheduler.js"></script>
<link href="https://cdn.dhtmlx.com/scheduler/edge/dhtmlxscheduler.css"
rel="stylesheet" type="text/css" charset="utf-8">
<style>
html, body {
margin: 0px;
padding: 0px;
}
</style>
</head>
<body>
<div id="scheduler_here" class="dhx_cal_container" style='width:100%; height:100vh;'>
<div class="dhx_cal_navline">
<div class="dhx_cal_prev_button"> </div>
<div class="dhx_cal_next_button"> </div>
<div class="dhx_cal_today_button"></div>
<div class="dhx_cal_date"></div>
<div class="dhx_cal_tab" name="day_tab"></div>
<div class="dhx_cal_tab" name="week_tab"></div>
<div class="dhx_cal_tab" name="month_tab"></div>
</div>
<div class="dhx_cal_header"></div>
<div class="dhx_cal_data"></div>
</div>
<script>
scheduler.init('scheduler_here', new Date(2019, 0, 20), "week");
</script>
</body>
</html>
然后,打开 Program.cs,配置应用以通过 wwwroot 文件夹启用静态文件,从而提供 index.html 页面。
添加 app.UseDefaultFiles() 方法。
更多细节可参考 官方文档。
Program.cs
var builder = WebApplication.CreateBuilder(args);

// Add services to the container.
builder.Services.AddRazorPages();

var app = builder.Build();

// Configure the HTTP request pipeline.
if (!app.Environment.IsDevelopment())
{
    app.UseExceptionHandler("/Error");
    // The default HSTS value is 30 days.
    // You may want to change this for production scenarios,
    // see https://aka.ms/aspnetcore-hsts.
    app.UseHsts();
}

app.UseHttpsRedirection();

app.UseDefaultFiles();
app.UseStaticFiles();

app.UseRouting();

app.UseAuthorization();

app.MapRazorPages();

app.Run();
app.UseDefaultFiles() 中间件允许应用查找并提供 wwwroot 文件夹下的默认文件:
- index.html
- index.htm
- default.html
- default.htm
您可以使用以上任一文件,本教程采用 "index.html"。
请注意,UseDefaultFiles() 只会重写 URL 指向默认文件,因此还需要 UseStaticFiles() 实际提供文件。
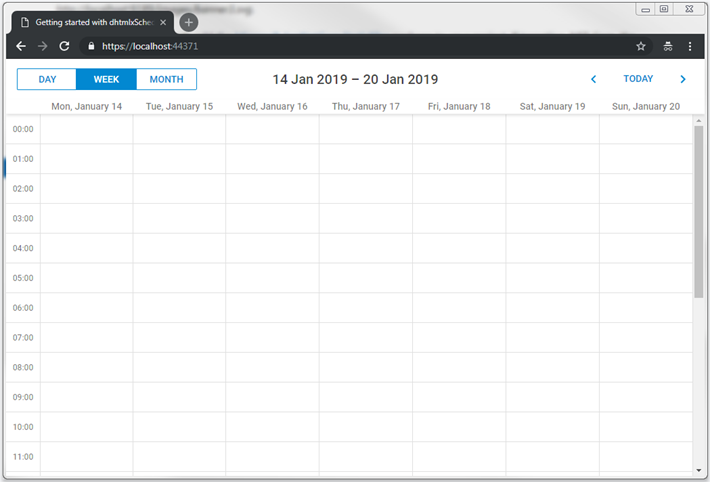
完成上述更改后,运行应用即可在页面上看到一个空的 scheduler。
接下来的步骤将指导您创建后端 API 并将 scheduler 连接到后端。
步骤 3. 创建模型和数据库
首先定义数据模型。scheduler 的事件需要有类表示。由于 dhtmlxScheduler 使用了与 .NET 规范不同的非标准属性名, 因此采用 数据传输对象(DTO) 模式。即:
- 为 EF Core 和应用内部使用定义领域模型类
- 为 Web API 通信定义 DTO 类
还需实现这些模型之间的映射。
模型
为项目添加新文件夹 Models,用于存放模型类和 EF 上下文。
事件模型
创建一个类用于表示日历事件。在 Models 文件夹下新建 SchedulerEvent.cs 文件。
模型示例:
SchedulerApp/Models/SchedulerEvent.cs
namespace SchedulerApp.Models
{
    public class SchedulerEvent
    {
        public int Id { get; set; }
        public string? Name { get; set; }
        public DateTime StartDate { get; set; }
        public DateTime EndDate { get; set; }
    }
}
请注意,scheduler 事件还可以包含其他属性,但本例只关注关键字段。
数据库上下文
首先为 ASP.NET Core 安装 Entity Framework Core。可通过 NuGet 包管理器安装:
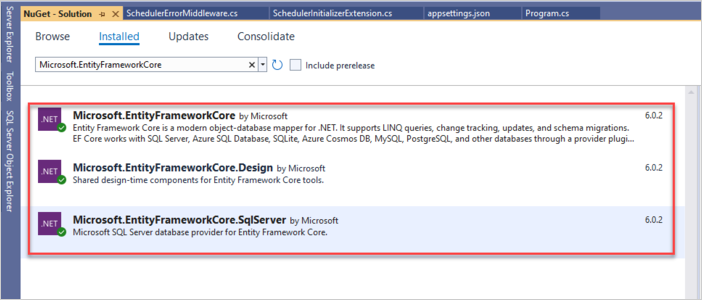
或在包管理器控制台运行以下命令:
PM> Install-Package Microsoft.EntityFrameworkCore.SqlServer
PM> Install-Package Microsoft.EntityFrameworkCore
PM> Install-Package Microsoft.EntityFrameworkCore.Design
Entity Framework Core 将负责应用与数据库之间的数据通信。
创建实体上下文
接下来,定义数据库会话并启用数据加载和保存,需创建 Context 类:
- 在 Models 文件夹下添加 SchedulerContext.cs 文件
- 数据库上下文定义如下:
SchedulerApp/Models/SchedulerContext.cs
using Microsoft.EntityFrameworkCore;

namespace SchedulerApp.Models
{
    public class SchedulerContext : DbContext
    {
        public SchedulerContext(DbContextOptions<SchedulerContext> options)
           : base(options)
        {
        }
        public DbSet<SchedulerEvent> Events { get; set; } = null!;
    }
}
向数据库添加初始记录
现在可以向数据库添加一些初始记录。创建一个数据库初始化器,用于插入示例事件。
在 Models 文件夹下添加名为 SchedulerSeeder 的类。它将包含 Seed() 方法用于插入事件。
SchedulerApp/Models/SchedulerSeeder.cs
using System;
using System.Collections.Generic;
using System.Linq;
namespace SchedulerApp.Models
{
public static class SchedulerSeeder
{
public static void Seed(SchedulerContext context)
{
if (context.Events.Any())
{
return; // DB has been seeded
}
var events = new List<SchedulerEvent>()
{
new SchedulerEvent
{
Name = "Event 1",
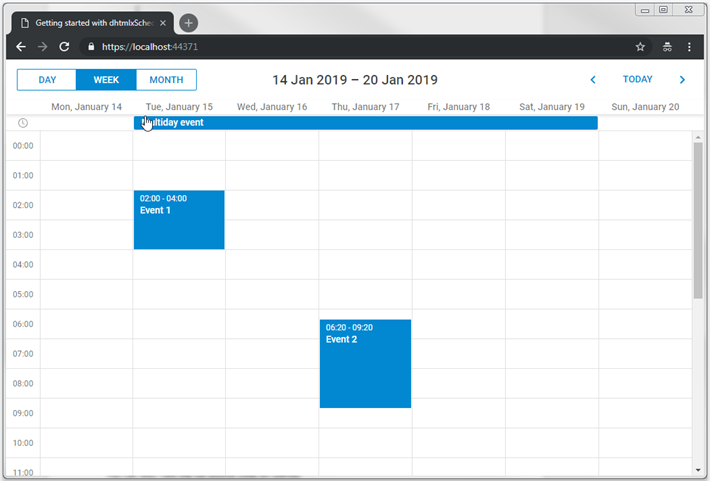
StartDate = new DateTime(2019, 1, 15, 2, 0, 0),
EndDate = new DateTime(2019, 1, 15, 4, 0, 0)
},
new SchedulerEvent()
{
Name = "Event 2",
StartDate = new DateTime(2019, 1, 17, 3, 0, 0),
EndDate = new DateTime(2019, 1, 17, 6, 0, 0)
},
new SchedulerEvent()
{
Name = "Multiday event",
StartDate = new DateTime(2019, 1, 15, 0, 0, 0),
EndDate = new DateTime(2019, 1, 20, 0, 0, 0)
}
};
events.ForEach(s => context.Events.Add(s));
context.SaveChanges();
}
}
}
注册数据库
下一步是在 Program.cs 中注册数据库。在此之前,需要准备一个连接字符串。该字符串将保存在
应用程序设置的 JSON 文件中。
如果你的项目是通过 API 模板创建的,那么该文件应该已存在于项目文件夹中。如果是使用 Empty template 创建的,则需要手动创建此文件。
创建 appsettings.json 文件(如果已存在则直接打开),并添加数据库的连接字符串:
appsettings.json
{
  "ConnectionStrings": {
    "DefaultConnection":"Server=(localdb)\\mssqllocaldb;
        Database=SchedulerDatabase;Trusted_Connection=True;"  }
}
之后,通过 依赖注入 注册数据库上下文。
在 Program.cs 文件中添加以下命名空间:
Program.cs
using Microsoft.EntityFrameworkCore;
using SchedulerApp.Models;
using Microsoft.Extensions.Configuration;
注册代码如下所示:
Program.cs
var connectionString = builder.Configuration.GetConnectionString("DefaultConnection");
builder.Services.AddDbContext<SchedulerContext>(
    options => options.UseSqlServer(connectionString));
为了启用控制器,需要调用 services.AddControllers() 方法。
Program.cs
builder.Services.AddControllers();
以下是 Program.cs 文件的完整内容:
Program.cs
using Microsoft.EntityFrameworkCore;
using SchedulerApp.Models;
using Microsoft.Extensions.Configuration;

var builder = WebApplication.CreateBuilder(args);

// Add services to the container.
builder.Services.AddRazorPages();

var connectionString = builder.Configuration.GetConnectionString("DefaultConnection");
builder.Services.AddDbContext<SchedulerContext>(
    options => options.UseSqlServer(connectionString));

builder.Services.AddControllers();

var app = builder.Build();

// Configure the HTTP request pipeline.
if (!app.Environment.IsDevelopment())
{
    app.UseExceptionHandler("/Error");
    // The default HSTS value is 30 days.
    // You may want to change this for production scenarios,
    // see https://aka.ms/aspnetcore-hsts.
    app.UseHsts();
}

app.UseHttpsRedirection();

app.UseDefaultFiles();

app.UseStaticFiles();

app.UseRouting();

app.UseAuthorization();

app.MapRazorPages();

app.MapControllers();

app.Run();
最后,需要在应用启动时初始化并填充数据库。虽然通常会使用迁移功能,但为了简化,这里省略了迁移。
首先,创建一个用于初始化的类。在 Models 文件夹下添加 SchedulerInitializerExtension.cs 文件:
Models/SchedulerInitializerExtension.cs
using Microsoft.Extensions.DependencyInjection;
using Microsoft.AspNetCore.Hosting;

namespace SchedulerApp.Models
{
 public static class SchedulerInitializerExtension
   {
    public static IHost InitializeDatabase(this IHost webHost)
     {
      var serviceScopeFactory =
      (IServiceScopeFactory?)webHost.Services.GetService(typeof(IServiceScopeFactory));

        using (var scope = serviceScopeFactory!.CreateScope())
        {
           var services = scope.ServiceProvider;
           var dbContext = services.GetRequiredService<SchedulerContext>();
           dbContext.Database.EnsureDeleted();
           dbContext.Database.EnsureCreated();
           SchedulerSeeder.Seed(dbContext);
        }

        return webHost;
     }
   }
}
然后,调用 InitializeDatabase() 方法:
Program.cs
app.InitializeDatabase();
至此,这部分内容完成;接下来,将关注 Scheduler 的实现。
定义 DTO 与映射
现在需要为 Web API 定义 DTO 类。首先为 SchedulerEvent 定义 DTO 类。在 Models 文件夹下创建文件并定义 WebAPIEvent.cs 类:
Models/WebApiEvent.cs
using System;

namespace SchedulerApp.Models
{
    public class WebAPIEvent
    {
        public int id { get; set; }
        public string? text { get; set; }
        public string? start_date { get; set; }
        public string? end_date { get; set; }

        public static explicit operator WebAPIEvent(SchedulerEvent ev)
        {
            return new WebAPIEvent
            {
                id = ev.Id,
                text = ev.Name,
                start_date = ev.StartDate.ToString("yyyy-MM-dd HH:mm"),
                end_date = ev.EndDate.ToString("yyyy-MM-dd HH:mm")
            };
        }

        public static explicit operator SchedulerEvent(WebAPIEvent ev)
        {
            return new SchedulerEvent
            {
                Id = ev.id,
                Name = ev.text,
                StartDate = ev.start_date != null ? DateTime.Parse(ev.start_date,
                  System.Globalization.CultureInfo.InvariantCulture) : new DateTime(),
                EndDate = ev.end_date != null ? DateTime.Parse(ev.end_date,
                  System.Globalization.CultureInfo.InvariantCulture) : new DateTime()
            };
        }
    }
}
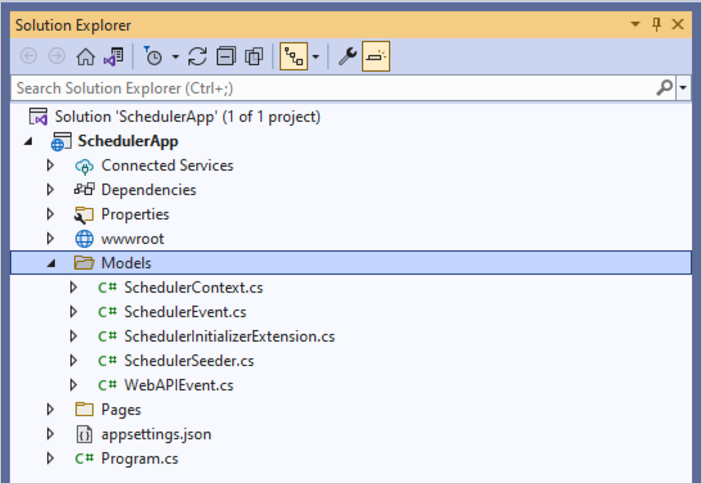
完成后,文件夹结构应如下所示:
此时,可以运行应用程序以验证所有内容设置是否正确。如果没有出现运行时错误,则说明配置成功。
第4步. 实现 Web API
接下来是实现 REST API。
添加 API 控制器
创建 Controllers 文件夹,并添加一个空的事件 API 控制器:
Controllers/EventsController.cs
using System.Collections.Generic;
using System.Linq;
using Microsoft.AspNetCore.Mvc;
using SchedulerApp.Models;

namespace SchedulerApp.Controllers
{
    [Route("api/[controller]")]
    [ApiController]
    public class EventsController : ControllerBase
    {
        private readonly SchedulerContext _context;
        public EventsController(SchedulerContext context)
        {
            _context = context;
        }

        // GET api/events
        [HttpGet]
        public IEnumerable<WebAPIEvent> Get()
        {
            return _context.Events
                .ToList()
                .Select(e => (WebAPIEvent)e);
        }

        // GET api/events/5
        [HttpGet("{id}")]
        public SchedulerEvent? Get(int id)
        {
            return _context
                .Events
                .Find(id);
        }

        // POST api/events
        [HttpPost]
        public ObjectResult Post([FromForm] WebAPIEvent apiEvent)
        {
            var newEvent = (SchedulerEvent)apiEvent;

            _context.Events.Add(newEvent);
            _context.SaveChanges();

            return Ok(new
            {
                tid = newEvent.Id,
                action = "inserted"
            });
        }

        // PUT api/events/5
        [HttpPut("{id}")]
        public ObjectResult? Put(int id, [FromForm] WebAPIEvent apiEvent)
        {
            var updatedEvent = (SchedulerEvent)apiEvent;
            var dbEvent = _context.Events.Find(id);
            if (dbEvent == null)
            {
                return null;
            }
            dbEvent.Name = updatedEvent.Name;
            dbEvent.StartDate = updatedEvent.StartDate;
            dbEvent.EndDate = updatedEvent.EndDate;
            _context.SaveChanges();

            return Ok(new
            {
                action = "updated"
            });
        }

        // DELETE api/events/5
        [HttpDelete("{id}")]
        public ObjectResult DeleteEvent(int id)
        {
            var e = _context.Events.Find(id);
            if (e != null)
            {
            _context.Events.Remove(e);
            _context.SaveChanges();
            }

            return Ok(new
            {
                action = "deleted"
            });
        }

    }
}
配置客户端
Web API 准备好后,返回 HTML 页面并配置 scheduler 以与其配合使用:
wwwroot/index.html
scheduler.config.date_format = "%Y-%m-%d %H:%i";
scheduler.init("scheduler_here", new Date(2019, 0, 20), "week");

// load data from backend
scheduler.load("/api/events", "json");
// connect backend to scheduler
var dp = scheduler.createDataProcessor("/api/events");
dp.init(scheduler);
// set data exchange mode
dp.setTransactionMode("REST");
现在一切就绪。运行应用程序后,将显示一个功能完整的 Scheduler。
动态加载
目前,每次 scheduler 调用 GET 操作时,都会获取整个事件表。虽然一开始这样没问题,但随着应用使用时间变长,传输的数据量会显著增加。
实现动态加载后,scheduler 只会获取所需范围内的事件。
在客户端,通过 scheduler.setLoadMode 方法启用动态加载:
wwwroot/index.html
scheduler.setLoadMode("day");
// load data from backend
scheduler.load("/api/events", "json");
此后,scheduler 会在 GET 请求中添加 from 和 to 日期参数,后端即可只返回指定日期范围内的事件。
后端只需在 GET 操作中接收这些参数并按需过滤事件:
Controllers/EventsController.cs
// GET api/events
[HttpGet]
public IEnumerable<WebAPIEvent> Get([FromQuery] DateTime from, [FromQuery] DateTime to)
{
    return _context.Events
        .Where(e => e.StartDate < to && e.EndDate >= from)
        .ToList()
        .Select(e => (WebAPIEvent)e);
}
循环事件
如果需要支持循环事件(例如“每天重复事件”),只需在 scheduler 页面启用相应扩展:
scheduler.plugins({
    recurring: true
});
更新模型
模型需要更新以正确处理重复事件的信息:
Models/SchedulerEvent.cs
using System;

namespace SchedulerApp.Models
{
    public class SchedulerEvent
    {
        public int Id { get; set; }
        public string? Name { get; set; }
        public DateTime StartDate { get; set; }
        public DateTime EndDate { get; set; }

        public int EventPID { get; set; }         public string? RecType { get; set; }         public long EventLength { get; set; }
    }
}
同样,数据传输对象也应按如下方式进行更新:
Models/WebAPIEvent.cs
using System;
using System.Text.Encodings.Web;

namespace SchedulerApp.Models
{
    public class WebAPIEvent
    {
        public int id { get; set; }
        public string? text { get; set; }
        public string? start_date { get; set; }
        public string? end_date { get; set; }

        public int? event_pid { get; set; }         public string? rec_type { get; set; }         public long? event_length { get; set; }
        public static explicit operator WebAPIEvent(SchedulerEvent ev)
        {
            return new WebAPIEvent
            {
                id = ev.Id,
                text = HtmlEncoder.Default.Encode(ev.Name != null ? ev.Name : ""),
                start_date = ev.StartDate.ToString("yyyy-MM-dd HH:mm"),
                end_date = ev.EndDate.ToString("yyyy-MM-dd HH:mm"),
                event_pid  = ev.EventPID,
                rec_type = ev.RecType,
                event_length = ev.EventLength
            };
        }

        public static explicit operator SchedulerEvent(WebAPIEvent ev)
        {
            return new SchedulerEvent
            {
                Id = ev.id,
                Name = ev.text,
                StartDate = ev.start_date != null ? DateTime.Parse(ev.start_date,
                  System.Globalization.CultureInfo.InvariantCulture) : new DateTime(),
                EndDate = ev.end_date != null ? DateTime.Parse(ev.end_date,
                  System.Globalization.CultureInfo.InvariantCulture) : new DateTime(),
    ///
                EventPID = ev.event_pid != null ? ev.event_pid.Value : 0,
                EventLength = ev.event_length != null ? ev.event_length.Value : 0,
                RecType = ev.rec_type
            };
        }
    }
}
更新 API 控制器
PUT、POST 和 DELETE 操作需要调整,以正确管理与重复事件相关的特殊情况,详细说明请见 handling recurring events。
首先是 POST 操作。当需要从重复系列中删除单个事件时,需要添加一条新的数据库记录。在这种情况下,客户端会调用 insert 操作:
Controllers/EventsController.cs
// POST api/events
[HttpPost]
public ObjectResult Post([FromForm] WebAPIEvent apiEvent)
{
   var newEvent = (SchedulerEvent)apiEvent;

   _context.Events.Add(newEvent);
   _context.SaveChanges();

  // delete a single occurrence from a recurring series
  var resultAction = "inserted";   if(newEvent.RecType == "none")   {
     resultAction = "deleted";   }

  return Ok(new
  {
     tid = newEvent.Id,
     action = resultAction   });
}
对于 PUT 操作,重要的是要更新所有模型属性。此外,当修改重复事件系列时,必须删除该系列的所有已修改事件:
Controllers/EventsController.cs
// PUT api/events/5
[HttpPut("{id}")]
public ObjectResult? Put(int id, [FromForm] WebAPIEvent apiEvent)
{
    var updatedEvent = (SchedulerEvent)apiEvent;
    var dbEvent = _context.Events.Find(id);
    if (dbEvent == null)
    {
        return null;
    }
    dbEvent.Name = updatedEvent.Name;
    dbEvent.StartDate = updatedEvent.StartDate;
    dbEvent.EndDate = updatedEvent.EndDate;
    dbEvent.EventPID = updatedEvent.EventPID;
    dbEvent.RecType = updatedEvent.RecType;
    dbEvent.EventLength = updatedEvent.EventLength;

    if (!string.IsNullOrEmpty(updatedEvent.RecType) && updatedEvent.RecType != "none")
    {
     //all modified occurrences must be deleted when we update a recurring series
     //https://docs.dhtmlx.com/scheduler/server_integration.html#recurringevents

        _context.Events.RemoveRange(
            _context.Events.Where(e => e.EventPID == id)
        );
    }

    _context.SaveChanges();

    return Ok(new
    {
        action = "updated"
    });
}
最后,DELETE 操作需要处理两种情况:
- 如果要删除的事件有非空的
event_pid,则表示要删除的是重复系列的某个已修改实例。此时不应直接删除记录,而是要将其rec_type更新为 'none',以便调度器跳过此事件。 - 如果删除整个重复系列,则还应删除该系列的所有已修改实例。
Controllers/EventsController.cs
[HttpDelete("{id}")]
public ObjectResult DeleteEvent(int id)
{
  var e = _context.Events.Find(id);
  if (e != null)
  {
   //some logic specific to recurring events support
   //https://docs.dhtmlx.com/scheduler/server_integration.html#recurringevents

     if (e.EventPID != default(int))
     {
        // deleting a modified occurrence from a recurring series
        // If an event with the event_pid value was deleted, it should be updated
        // with rec_type==none instead of deleting.

        e.RecType = "none";
     }
     else
     {
      //if a recurring series deleted, delete all modified occurrences of the series
      if (!string.IsNullOrEmpty(e.RecType) && e.RecType != "none")
       {
    //all modified occurrences must be deleted when we update recurring series
    //https://docs.dhtmlx.com/scheduler/server_integration.html#recurringevents
         _context.Events.RemoveRange(
            _context.Events.Where(ev => ev.EventPID == id)
        );
       }

        _context.Events.Remove(e);
     }

     _context.SaveChanges();
  }

  return Ok(new
  {
     action = "deleted"
  });
}
解析重复系列
重复事件在数据库中作为一条记录保存,Scheduler 会在客户端将其拆分为各个单独的事件实例。如果需要在服务端解析并获取各个事件的日期,可以使用 dhtmlxScheduler 针对 ASP.NET Core 的重复事件解析辅助库。
该库可在 GitHub 获取。
错误处理
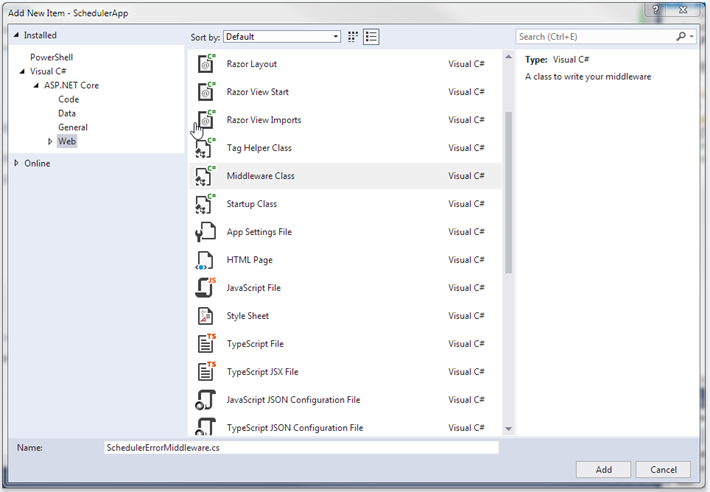
为了有效管理错误,应创建一个中间件类。该中间件用于捕获运行时异常并对响应进行格式化。创建完成后,需要将其添加到应用的请求管道中。步骤如下:
1. 在项目文件夹中创建一个中间件类(可使用模板)。
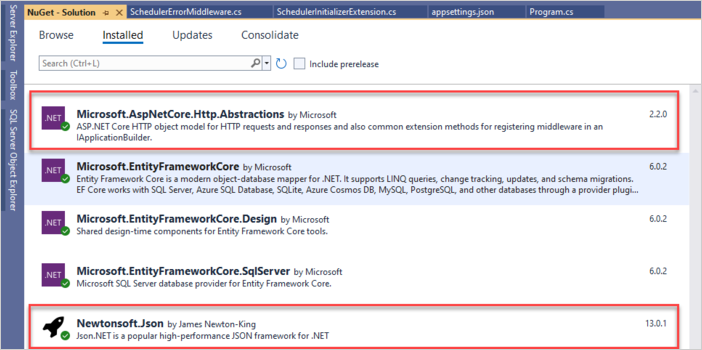
需要为 ASP.NET Core 安装 JSON 框架和用于处理 HTTP 请求与响应的 HTTP 抽象包。可通过 NuGet 包管理器安装:
或者在包管理器控制台运行以下命令:
PM> Install-Package Microsoft.AspNetCore.Http.Abstractions
PM> Install-Package Microsoft.Newtonsoft.Json
2. 找到中间件类中的 Invoke 方法,注意对 _next 的调用。由于部分处理程序可能抛出异常,应将 _next 调用放入 try-catch 块中,并通过专门的处理函数处理异常。
SchedulerErrorMiddleware.cs
public async Task Invoke(HttpContext httpContext)
{
  try
    {
       await _next(httpContext);
    }catch (Exception ex)
    {
        await HandleExceptionAsync(httpContext, ex);
    }
}

private static Task HandleExceptionAsync(HttpContext context, Exception exception)
{
   var result = JsonConvert.SerializeObject(new{
       action = "error"
   });
   context.Response.ContentType = "application/json";
   context.Response.StatusCode = StatusCodes.Status500InternalServerError;
   return context.Response.WriteAsync(result);
}
在 SchedulerErrorMiddleware.cs 文件中添加如下命名空间:
SchedulerErrorMiddleware.cs
using Newtonsoft.Json;
3. 中间件准备好后,打开 Program.cs 并引入如下命名空间:
Program.cs
using SchedulerApp;然后调用 app.UseSchedulerErrorMiddleware(),将中间件加入请求管道:
Program.cs
app.UseSchedulerErrorMiddleware();
应用安全
Scheduler 本身不提供对 SQL 注入、XSS 或 CSRF 等常见安全威胁的内置防护。确保应用安全是后端开发者的责任。详细内容可参考专门的文章。
XSS 防护
防止 XSS 的一种简单方式是在将文本属性发送到客户端之前对其进行编码。例如,下面的示例使用内置的 HtmlEncoder 对事件文本中的 HTML 字符进行转义。这样既保证数据库中的数据原样存储,又能向客户端提供安全内容:
Models/WebAPIEvent.cs
using System.Text.Encodings.Web;

public static explicit operator WebAPIEvent(SchedulerEvent ev)
{
  return new WebAPIEvent
    {
      id = ev.Id,
      text = HtmlEncoder.Default.Encode(ev.Name != null ? ev.Name : ""),
      start_date = ev.StartDate.ToString("yyyy-MM-dd HH:mm"),
      end_date = ev.EndDate.ToString("yyyy-MM-dd HH:mm")
    };
}
或者,也可以使用如 HtmlAgilityPack 这样的专用库,在保存或加载数据时彻底去除 HTML 标签。
故障排查
如果已经完成了 Scheduler 与 ASP.NET Core 的集成步骤,但页面上未能正确渲染事件,请参阅 后端集成问题排查指南 文章,了解常见问题的诊断和解决方法。
后续步骤
至此,Scheduler 应已可以正常运行。完整源码可在 GitHub 获取,方便克隆或下载以支持您的项目开发。
更多资源包括 Scheduler 各项功能的指南 以及 与其他后端框架集成的教程。
返回顶部