Timeline 视图
此视图仅包含在 Scheduler PRO 版本中。
Timeline 视图以水平方式显示事件,将不同的时间线并排从左到右排列。

初始化
要将 Timeline 视图添加到调度器,请按照以下步骤操作:
- 在页面上启用 Timeline 扩展:
- Timeline - 用于 'Bar' 和 'Cell' 模式
- Timeline, Treetimeline - 用于 'Tree' 模式
- Timeline, Daytimeline - 用于 'Days' 模式
scheduler.plugins({
    timeline: true,
    treetimeline: true,
    daytimeline: true
});
- 在调度器的标记中添加视图的标签:
<div id="scheduler_here" class="dhx_cal_container" ...>
    <div class="dhx_cal_navline">
       ...
       <div class="dhx_cal_tab" name="timeline_tab"></div>
    </div>
    ...
</div>
- 为标签设置显示文本:
//'timeline_tab' 指的是我们 div 的 name
scheduler.locale.labels.timeline_tab ="Timeline";
- 调用 createTimelineView 方法:
scheduler.createTimelineView({
     name:"timeline",
     x_unit:"minute", // X 轴的度量单位
     x_date:"%H:%i",  // X 轴显示的日期格式
     x_step:30,       // X 轴每步的单位数
     x_size:24,       // X 轴上显示的 'x_step' 总数
     x_start:16,      // X 轴的偏移量,以 'x_unit' 为单位
     x_length:48,     // 每次滚动的 'x_step' 数量
     y_unit:          // Y 轴上显示的分区
        [{key:1, label:"Section A"},
         {key:2, label:"Section B"},
         {key:3, label:"Section C"},
         {key:4, label:"Section D"}],
     y_property:"section_id", // 数据映射到分区的属性
     render:"bar"             // 视图模式
});
当使用 'Days' 模式时,时间刻度必须正好覆盖一天。如果配置的时间段更短或更长,时间线将无法正确渲染。
时间刻度配置示例
虽然 createTimelineView 方法包含许多参数,但实际配置非常简单。
以下是一个示例:时间刻度从 09:00 到 15:00,步长为 30 分钟,按天滚动。

{
    x_unit:"minute",// 刻度单位为分钟
    x_step:30,  // 步长为 30 分钟,例如 09:00 - 09:30
    x_size:12,  // 09:00 到 15:00 之间有 12 个 30 分钟区间
                // 15 - 9 = 6 小时 = 360 分钟 = 360/30 = 12
    x_start:18, // 刻度从 09:00 开始,即距 00:00 有 9 小时
                // 9 小时 = 540 分钟 = 540/30 = 18 个 'x_step'
    x_length:48,// 滚动一天:1 天 = 24 小时 = 1440 分钟 = 1440/30 = 48 个 'x_step'
    ...
}
Timeline 视图配置
所有名称包含 (timeline)_some 的模板函数应在创建视图后定义,因为这些函数是由 timeline 构造器动态分配的,并会被 createTimelineView 调用覆盖。
设置 Timeline 视图的起始日期
例如,以下是设置 Timeline 视图起始日期的方法。
任何视图的起始日期由 scheduler.date[<viewName> +"_start"] 函数控制。要调整时间线刻度的第一天,请在调用 scheduler.createTimelineView() 之后重写 scheduler.date.timeline_start 函数:
// 配置周从星期一开始
scheduler.config.start_on_monday = true;

// 创建 timeline 视图
scheduler.createTimelineView({
    name: "timeline",
    render: "tree",
    days: 7,
    folder_dy: 20,
    x_unit: "day",
    x_date: "%D %j %F",
    x_step: 1,
    x_size: 7,
    x_start: 0,
    x_length: 7,
    y_unit:[],
    y_property: "section_id"
});

// 创建后重写起始日期函数
scheduler.date.timeline_start = scheduler.date.week_start;

// 初始化调度器
scheduler.init("timeline_tree", new Date(), "timeline");
Timeline 对象 API
有多种方法可与 Timeline 视图交互。
创建 timeline 视图
首先,在调度器中创建一个 timeline 实例:
scheduler.createTimelineView({
    name:'timeline',
    ...
});

var timeline = scheduler.matrix.timeline;
创建后,可以使用以下方法。
获取 timeline 视图
要获取 timeline 视图对象,请使用 getView 方法。它接受视图名称作为参数。如果未传递参数,则返回当前视图。
var timeline = scheduler.getView();
timeline.x_size = 8;
scheduler.setCurrentView();
设置刻度范围
使用 setRange() 方法定义刻度范围。需要两个参数:
- startDate - (Date) 范围的开始日期
- endDate - (Date) 范围的结束日期
timeline.setRange(startDate, endDate);
指定左侧面板的列
左侧面板的内容可通过两种方式设置。
默认情况下,它只包含一列。分区标签来自 y_unit 对象的 label 属性,你可以通过 timeline_scale_label 模板自定义。
要定义多列,请在 createTimelineView 方法中使用 columns 属性:
scheduler.createTimelineView({
  name:    "timeline",
  x_unit:    "minute",
  x_date:    "%H:%i",
  x_step:    30,
  x_size: 24,
  x_start: 16,
  x_length:    48,
  y_unit:    sections,
  event_dy: "full",
  y_property:    "section_id",
  render:"bar",
  columns: [
    { label: "Room #",  width: 70, template: function(obj){ return obj.room_no; } },
    { label: "Type",  width: 90, template: function(obj){ return obj.room_type; } },
    { label: "Status",  width: 90, template: function(obj){ return obj.room_status; } }
  ]
});
每个列对象可以包含以下属性:
- label -
string- 可选,列标题 - width -
number- 可选,列宽度 - template -
function- 接收分区对象的单元格模板函数
滚动到指定位置/日期/分区
此功能仅在 Timeline ��启用横向滚动时有效。
要滚动到特定位置,请使用 scrollTo() 方法。它支持多种参数类型:
- 通过传递 Date 对象滚动到指定日期:
timeline.scrollTo(new Date());
- 通过传递像素值滚动到指定位置:
timeline.scrollTo(500);
- 通过传递包含 date 和 section 键的对象,同时横向和纵向滚动到指定分区和日期:
timeline.scrollTo({date:new Date(), section:4});
- 通过传递包含 left 和 top 像素值的对象,横向和纵向滚动到指定位置:
timeline.scrollTo({left:300, top:500});
获取指定位置的坐标
- 要获取时间刻度上某个日期的 X 坐标,使用 posFromDate() 并传递 Date 参数:
var left = timeline.posFromDate(new Date());
如果日期超出刻度范围,此方法返回 0 或最大 X 坐标。
- 要获取某行的 Y 坐标,使用 getSectionTop() 并传递分区编号:
var top = timeline.getSectionTop(section.key);
如果未找到该行,则返回 -1。
- 要根据 timeline 上的坐标查找对应的 Date 和 Section,使用 resolvePosition() 并传递对�象
(left: number, top: number):
const position = timeline.resolvePosition({top: 120, left: 400});
- 要根据时间刻度上的
left坐标获取Date,使用 dateFromPos():
const date = timeline.dateFromPos(300);
- 要获取某个事件的
top坐标,使用 getEventTop() 并传递事件对象:
const top = timeline.getEventTop(scheduler.getEvent(event.id));
获取滚动条位置
要获取当前滚动条的位置,调用 timeline.getScrollPosition(),返回一个包含滚动坐标的对象:
var timeline = scheduler.getView();
timeline.getScrollPosition(); // { left: 0, top: 0 }
返回对象包括:
- left - (number) 横向滚动位置
- top - (number) 纵向滚动位置
你也可以使用 onScroll 事件监听滚动变化,该事件会接收新的 left 和 top 值:
var timeline = scheduler.getView();
timeline.attachEvent("onScroll", function(left, top){});
获取分配给某个分区的事件
要获取分配给指定分区的事件数组,使用 timeline.selectEvents() 并传递配置对象:
{
    section: string|number,
    date: Date,
    selectNested: boolean
}
其中:
- section - 分区 id
- date - 可选,筛选与指定日期列重叠的事件
- selectNested - 可选,若为 true 且分区为树状时间线文件夹,则选择所有嵌套分区的事件
此方法返回事件对象数组。
var timeline = scheduler.getView();

var events = timeline.selectEvents({
    section: section.key,
    date: date,
    selectNested: true
});
动态修改属性
所有 timeline 对象都存储在 scheduler.matrix 对象中。 你可以通过名称访问任何 timeline 视图并更新属性。更改后需要刷新调度器才能生效:
scheduler.getView('timeline').x_size = 12;
scheduler.setCurrentView(); // 重新绘制调度器
这里的 'timeline' 与在 createTimelineView 方法中指定的名称一致:
scheduler.createTimelineView({
    name:'timeline',
    ...
});
动态更改分区
当需要在时间线视图中动态更新单位列表时,推荐使用 serverList 和 updateCollection 方法。
数据加载
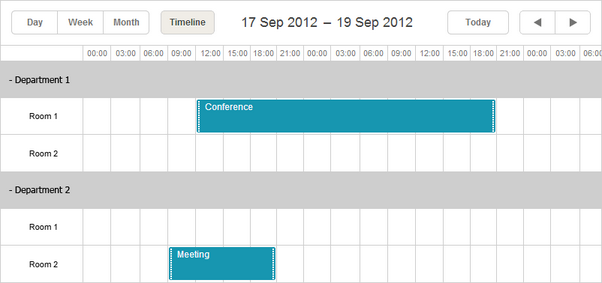
与 Day、Month 或 Year 等简单视图不同,多资源视图(如 Units 和 Timeline)要求每个数据项都包含一个额外的必填字段:
- y_property - (string) 指定用于将事件分配到特定分区的数据属性。
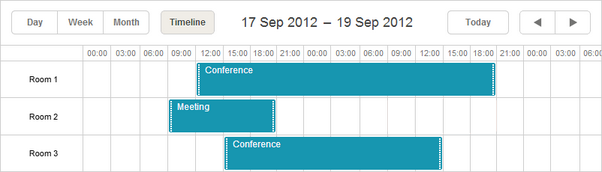
scheduler.createTimelineView({
name:"timeline",
...
y_unit:
[{key:1, label:"Room 1"},
{key:2, label:"Room 2"},
{key:3, label:"Room 3"}],
y_property:"room_id",
});
scheduler.init('scheduler_here');
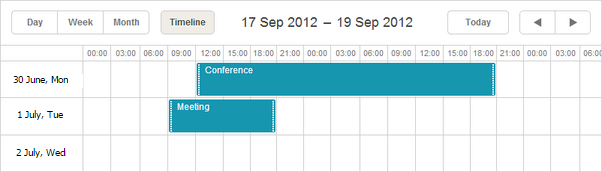
scheduler.parse([
{text:"Conference", start_date:"17/09/2012 12:00", end_date:"18/09/2012 21:00",
room_id:"1"},
{text:"Meeting", start_date:"17/09/2012 09:00", end_date:"17/09/2012 21:00",
room_id:"2"},
{text:"Conference", start_date:"17/09/2012 15:00", end_date:"18/09/2012 15:00",
room_id:"3"}
]);
事件分配到多个分区
调度器支持将事件同时分配到多个分区。
启用此功能的方法:
- 在页面中引入 Multisection 扩展
- 设置 multisection 属性为 true
- (可选)添加 "Multiselect" 扩展,为调度器提供方便的 Multiselect 控件,便于切换分区
<script src="codebase/dhtmlxscheduler.js"></script>
<link rel="stylesheet" href="codebase/dhtmlxscheduler.css" type="text/css">

<script>
    scheduler.plugins({
        multisection: true, /*!*/
        multiselect: true,
        timeline: true
    });
    scheduler.config.multisection = true; /*!*/
    scheduler.init('scheduler_here');
</script>
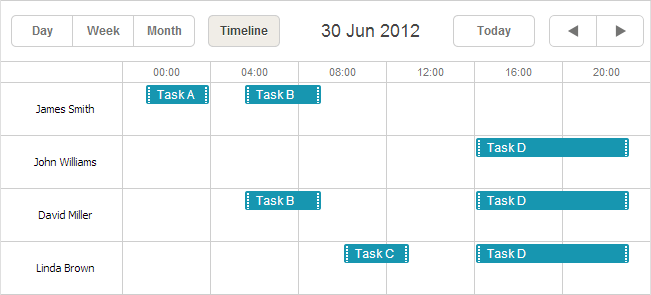
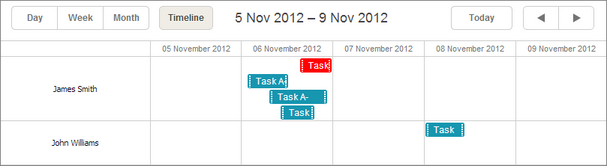
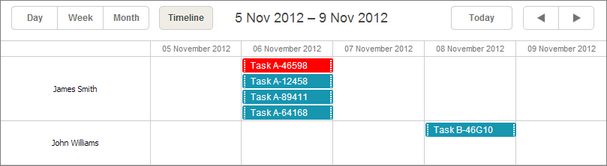
设置完成后,可以在事件相关的数据属性中列出多个分区(默认以逗号分隔,详见 section_delimiter),事件会显示在所有这些分区中:
scheduler.createTimelineView({
    name: "timeline",
    y_unit: [
        {key: 1, label: "James Smith"},
        {key: 2, label: "John Williams"},
        {key: 3, label: "David Miller"},
        {key: 4, label: "Linda Brown"}],
    y_property: "section_id", /*!*/
    ...
});
scheduler.init('scheduler_here', new Date(2012, 5, 30), "timeline");

scheduler.parse([
    { id:1, text:"Task A", section_id:'1',         ...},/*!*/
    { id:2, text:"Task B", section_id:'1,3',     ...},/*!*/
    { id:3, text:"Task C", section_id:'4',         ...},/*!*/
    { id:4, text:"Task D", section_id:'2,3,4',     ...}/*!*/
]);
Multisection events in Timeline and Units view
视图模式
时间线视图提供四种不同的模式:
- Bar
- Cell(默认)
- Tree
- Days
可以通过 render 参数选择所需模式:
scheduler.createTimelineView({
    name: "timeline",
    render: "bar"
});
"Days"模式说明
使用 Days 模式时,请注意以下几点:
- 时间刻度应精确覆盖一天。如果配置的时间段更短或更长,时间线可能无法正确渲染:
scheduler.createTimelineView({
    name:"timeline",
    render:"days",
    days:7,
    // 时间刻度配置为覆盖 1 天 /*!*/
    x_unit:"minute", /*!*/
    x_date:"%H:%i",  /*!*/
    x_step:30,       /*!*/
    x_size:24,       /*!*/
    x_start:16       /*!*/
});
- 此模式不支持 阻止和标记功能
- Y 轴标签的格式由 scale_label 模板控制:
scheduler.templates.timeline_scale_label = function(key, label, section){
    // 使用与 Day 视图相同的标签
    return scheduler.templates.day_date(label);
};
- 要调整显示区间的起始日期,请使用 scheduler.date.(timeline_name)_start 函数:
scheduler.date.timeline_start = function (date) {
    date = scheduler.date.week_start(date);
    date = scheduler.date.add(date, config.x_step*config.x_start, config.x_unit);
    return date;
};
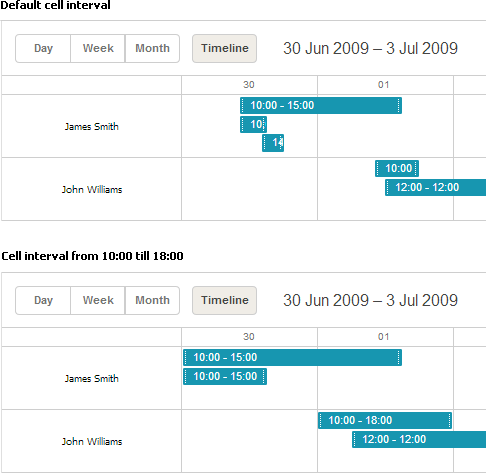
视图单元格的时间区间
默认情况下,视图中的每个单元格覆盖一天,事件也据此放置。要自定义此区间,例如仅关注工作时间并排除无关时间,可以采用以下方法之一:
- 使用 first_hour 和 last_hour 参数:
// 单元格区间限定为 10:00 到 18:00 的白天时间
scheduler.createTimelineView({
    name:"timeline",
    first_hour:10,
    last_hour:18
});
Changing the time interval for the view cells
- 使用 ignore_(viewName) 函数,其中 viewName 为通过 createTimelineView 创建的时间线视图的 name 选项。 该函数接收单元格日期作为输入,并对需要排除的小时返回 'true':
// 单元格区间限定为 10:00 到 18:00 的白天时间
scheduler.ignore_timeline = function(date){   // "timeline" 为视图名称
    // 排除非工作时间
    if (date.getHours() < 10 || date.getHours() > 18) return true;
};
关于 ignore_(viewName) 方法的更多信息详见 뷰의 X축에서 시간 단위 숨기기 部分。
Hiding hours in the scale of Timeline view
请注意,忽略的区间不能等于或大于时间线设置的总区间。
例如,如果时间线覆盖全天,而你尝试用 ignore_(viewName) 函数忽略整天,则不会达到预期效果。调度器仍会显示该天,但不会渲染刻度或事件。
要完全排除此类区间,需要在 scheduler._click.dhx_cal_next_button 函数中动态调整 x_length 设置。例如,要在时间线中完全跳过周末,可以这样做:
scheduler._click.dhx_cal_next_button = function(dummy,step){
  var mode = scheduler.getState().mode;
  var minDate = scheduler.getState().min_date;
  var formFunc = scheduler.date.date_to_str("%D");

  // 跳过周末
  if(mode=='timeline'){
  if((formFunc(minDate)=='Fri' && step!=-1) || (formFunc(minDate)=='Mon' && step==-1))
      scheduler.matrix['timeline'].x_length = 24*3;
    else
      scheduler.matrix['timeline'].x_length = 24;
  }
 scheduler.setCurrentView(scheduler.date.add(
 scheduler.date[scheduler._mode+"_start"](scheduler._date),(step||1),scheduler._mode));
};
Related sample Ignoring weekends
"Bar"和"Cell"模式下 Y 轴分区数据
在"Bar"和"Cell"模式下,通过 y_unit 参数定义 Y 轴的值:
scheduler.createTimelineView({
    name:"timeline",
    ...
    y_unit:[
        {key:1, label:"James Smith"},
        {key:2, label:"John Williams"},
        {key:3, label:"David Miller"},
        {key:4, label:"Linda Brown"}
    ]
});
每个 y_unit 项必须包含以下两个必需属性:
- key - 项目的唯一标识
- label - 项目的文本标签
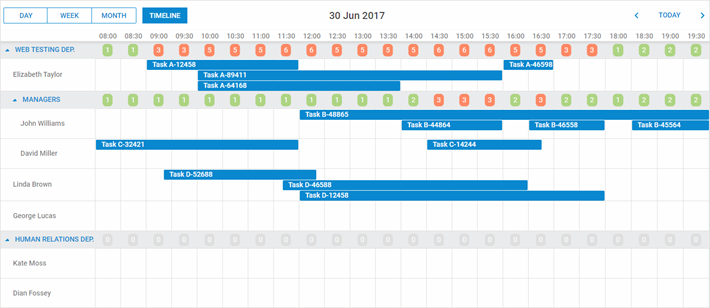
"Tree"模式下 Y 轴分区数据
"Tree"模式允许将项目分组到多级文件夹中,这不仅提升了组织性,还可以将事件分配到任意层级的整个文件夹。
设置"Tree"时间线时,使用与"Bar"和"Cell"模式相同的 y_unit 参数,但可包含额外属性:
scheduler.createTimelineView({
    name:   "timeline",
    render:"tree",
    ...
    y_unit:[
        {key:"production", label:"Production Department", children:[
            {key:"p1", label:"Managers", children:[
                {key:"pm1", label:"John Williams"},
                {key:"pm2", label:"David Miller"}
            ]},
            {key:"p2", label:"Linda Brown"},
            {key:"p3", label:"George Lucas"}
        ]},
        {key:"sales", label:"Sales and Marketing", children:[
            {key:"s1", label:"Kate Moss"},
            {key:"s2", label:"Dian Fossey"}
        ]}
    ]
});
y_unit 项包括:
- 两个必需属性:
- key - 项目 id
- label - 项目标签
- 两个可选属性:
- open - 分区是否初始展开
- children - 包含嵌套项对象的数组
"Days"模式下 Y 轴分区数据
对于"Days"模式,使用 days 参数指定 Y 轴显示的天数:
scheduler.createTimelineView({
    name:"timeline",
    ...
    days:7 // Y 轴显示的天数
});
从服务器加载 Y 轴分区数据
要从服务器加载 Y 轴分区,使用:
- 客户端 - serverList 方法:
scheduler.createTimelineView({
    name:"timeline",
    ...
    y_unit:scheduler.serverList("sections"),
});
此处,serverList 获取名为 'sections' 的选项列表。
- 服务器端
load 方法的响应应包含带有服务器列表名称的集合,格式为 데이터 포맷 예시 中描述的 JSON 格式。
或者,也可以使用 OptionsConnector 连接器:
<?php
    include('connector-php/codebase/scheduler_connector.php');// 引入文件

    $res="mysql_connect(""localhost","root","");// 连接数据库服务器
    mysql_select_db("sampleDB");// 选择数据库

    $list = new OptionsConnector($res, $dbtype);
    $list->render_table("types","type_id","type_id(value),name(label)");

    $scheduler = new schedulerConnector($res, $dbtype);
    // 分配与客户端相同的名称 - 'sections'
    $scheduler->set_options("sections", $list);
    $scheduler->render_table("events","id","start_date,end_date,text,type_id");
?>

响应应遵循 JSON 格式,并包含由 serverList 引用的"collections"对象。
也可以不使用 dhtmlxConnector 手动创建集合。此时,如需更新集合,请使用 updateCollection 方法:
scheduler.updateCollection("sections", new_sections_array);
Loading Units sections from the server
动态添加/删除分区
要动态添加或删除分区,可以使用以下方法:
scheduler.createTimelineView({
    name:   "timeline",
    render:"tree",
    ...
    y_unit:[
        {key:"production", label:"Production Department", children:[
            {key:"p1", label:"Managers", children:[
                {key:"pm1", label:"John Williams"},
                {key:"pm2", label:"David Miller"}
            ]},
            {key:"p2", label:"Linda Brown"},
            {key:"p3", label:"George Lucas"}
        ]},
        {key:"sales", label:"Sales and Marketing", children:[
            {key:"s1", label:"Kate Moss"},
            {key:"s2", label:"Dian Fossey"}
        ]}
    ]
});
scheduler.addSection( {key:"pm3", label:"James Smith"}, "p1");
scheduler.addSection( {key:"s3", label:"Alex White"}, "sales");
scheduler.deleteSection("p3");
addSection 和 deleteSection 方法需调度器处于"Tree"时间线模式。
第二 X 轴
可以在默认 X 轴上方添加第二条 X 轴,用于对主刻度的时间区间进行分组。
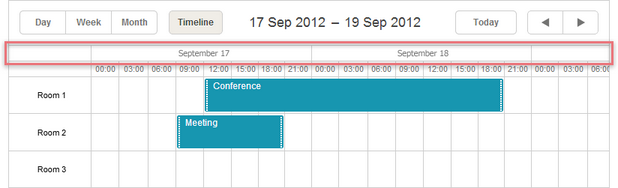
要添加此第二刻度,使用 second_scale 参数:
 scheduler.createTimelineView({
    name:    "timeline",
    ...
    second_scale:{
        x_unit: "day", // 轴的单位(默认为 'minute')
        x_date: "%F %d" // 显示的日期格式(如 "July 01")
    }
});
事件填充单元格
如需让事件无论持续时间如何都填满整个单元格宽度,请启用 round_position 参数:
scheduler.createTimelineView({
    name:"timeline",
    render:"bar",
    ...
    round_position:true
});
round_position:false(默认)效果:
round_position:true 效果:
事件排序
默认情况下,时间线视图中的事件按开始日期排序。若需自定义排序规则,可为 sort 参数提供函数。
该函数接收相邻事件对并返回:
- 1 表示第一个事件排在第二个之前
- -1 表示第二个事件排在第一个之前
- 0 表示两者相等
scheduler.createTimelineView({
    name:   "timeline",
    render:"bar",
    ...
    sort:function(a, b){
        if (a.text.length > b.text.length) {
            // a 排在 b 前
            return -1;
        } else if(a.text.length < b.text.length) {
            return 1;
        } else{
            return +a.start_date > +b.start_date ? 1 : -1;
        }
    }
});
横向滚动
时间线视图支持横向滚动,可无需导航按钮浏览天、周或月。
要启用横向滚动,在 createTimelineView 方法中设置 scrollable 属性。还可以配置 column_width 和 scroll_position,如下所示:
scheduler.createTimelineView({
    name: "timeline",
    x_unit:    "minute",
    x_date:    "%H:%i",
    x_step:    30,
    x_size: 24*7,
    x_start: 16,
    x_length: 48,
    y_unit:    sections,
    y_property:    "section_id",
    render: "bar",
    scrollable: true, /*!*/
    column_width: 70, /*!*/
    scroll_position:new Date(2018, 0, 15) /*!*/
});
- scrollable - (boolean) 启用横向滚动;默认为 false。为 false 或未定义时,列会缩小以适应时间线宽度。为 true 时,列不会缩小到 column_width 以下,如有需要会显示滚动条。
- column_width - (number) 可选,设置时间线日期列的最小��宽度,默认 100。
- scroll_position - (Date) 可选,设置时间线初始滚动位置,接受与
timeline.scrollTo()相同的输入。
启用 scrollable 时,时间线视图默认启用 智能渲染,仅渲染可见的行、列和事件,提升性能,其他内容随滚动动态加载。
Horizontal scroll for Timeline view
请注意,时间线滚动不是无限的,时间范围有限。如需切换区间,仍需使用导航控件。
自动滚动配置
在靠近时间线视口边缘移动或调整事件大小时,自动滚动会默认激活。
可通过 createTimelineView 方法中的 autoscroll 对象自定义自动滚动�的灵敏度和速度:
scheduler.createTimelineView({
    name:"timeline",
    ...
    autoscroll: {            /*!*/
        range_x: 200,         /*!*/
        range_y: 100,         /*!*/
        speed_x: 20,          /*!*/
        speed_y: 10            /*!*/
    }                        /*!*/
});
- range_x - (number) 触发横向自动滚动的视口边缘距离
- range_y - (number) 触发纵向自动滚动的视口边缘距离
- speed_x - (number) 横向自动滚动速度
- speed_y - (number) 纵向自动滚动速度
分区列的表头
默认情况下,分区列上方的表头为空。可通过 locale 对象添加标签,如下:
scheduler.locale.labels.<timelineName>_scale_header = "Label";
将 <timelineName> 替换为 createTimelineView 中的时间线视图名称。例如:
scheduler.locale.labels.timeline_scale_header = "Users";
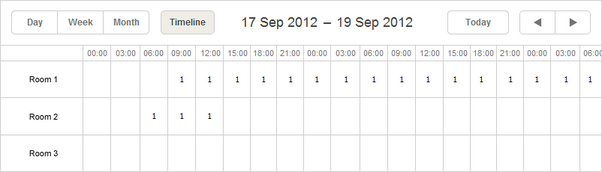
单元格自定义内容
可以在时间线单元格中显示自定义内容,不仅限于 Cell 模式,例如:
还可以为所有时间线模式定义单元格内容模板。
Display labels in timeline cells
为特定时间线启用此功能时,在用 createTimelineView 创建时间线时设置 cell_template 属性:
scheduler.createTimelineView({
    cell_template: true,
    ...
});
启用后,会调用指定模板。例如,以下示例在"tree"时间线模式下显示每个日期的事件数:
<style>
    .dhx_matrix_cell div.load-marker{
        position: absolute;
        width: 40%;
        height: 25px;
        transform: translate(70%, 20%);
        line-height: 25px;
        text-align: center;
        border-radius: 7px;
        color: white;
    }
    .load-marker-no{
        background: #e0e0e0;
    }
    .load-marker-light{
        background: #aed581;
    }
    .load-marker-high{
        background: #ff8a65;
    }

</style>

scheduler.templates.timeline_cell_value = function (evs, date, section){
    if(section.children){
        var timeline = scheduler.getView();

        var events = timeline.selectEvents({
            section: section.key,
            date: date,
            selectNested: true
        });

        var className = "";
        if(!events.length){
            className = "load-marker-no";
        }else if(events.length < 3){
            className = "load-marker-light";
        }else{
            className = "load-marker-high";
        }

        return "<div className='load-marker "+className+"'>"+
            events.length
        +"</div>";

    }

    return "";
};
Display labels in timeline cells
更改分区高度
默认情况下,分区和事件的高度由 createTimelineView 中的 dy 和 event_dy 设置控制。
如果分区对象包含 height 属性,其值将覆盖 dy 设置:
scheduler.createTimelineView({
    name:    "timeline",
    ...
    y_unit:    [
        {key: 1, label: "Room 1", height: 60},
        {key: 2, label: "Room 2", height: 60},
        {key: 3, label: "Room 3", height: 120},
        {key: 4, label: "Room 4", height: 900},
    ],
调度器初始化后,也可以动态更改 height 属性。