How to start with Optimus
This guide gives you step-by-step instructions on how to create a simple application with lightweight JavaScript UI Framework.
The guide will teach you how to create your own views on the base of DHTMLX Optimus using DHTMLX Suite. You will also learn how to implement exchange of data between the views and components from any point of the application.
The complete source code is available on GitHub. You can check the step-by-step changes by switching between the branches with the related names.
For more information about working with the components of DHTMLX Suite, see DHTMLX documentation. The detailed information on DHTMLX Optimus is presented here.
So, let's get started!
Configure the environment
Preparing the environment
In this tutorial we'll work with the environment that we've already configured using webpack.
The whole project structure will be as follows:
optimus_demo_guide
|── build/
└── src/
   |── assets/
   |── static/
   |── views/
   |── index.html
   └── index.js
- root directory - contains files with configurations of the project and environment
- build/ folder - contains scripts for running webpack
- src/ folder - includes sources for the application's functioning
- src/index.js - the entry point of the application
- views/ folder - stores files with views. We recommend to have a single view per file.
Adding the dependencies
To begin with, download the initial project from GitHub. After unzipping the project, you should install the dependencies in the package.json file with the following command:
npm install
To run the project on the local server, use:
npm start
This video can help you to install Optimus and start the development of your web app.
Step 1. Initialize an application
The full code for Step 1 is available on GitHub.
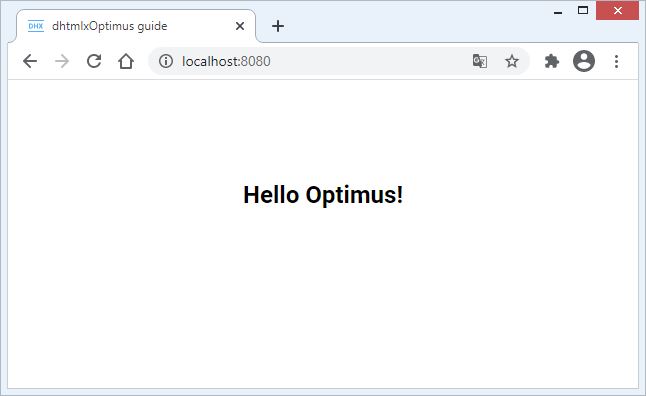
After running the project on the local server and opening http://localhost:8080/ in your browser, you will see the following result:
Let's consider how we've initialized our starter application:
1. First, we've created a new index.html file in the src folder and defined a container to render our app there:
<!DOCTYPE html>
<html lang="en">
    <head>
        <title>dhtmlxOptimus guide</title>
    </head>
    <body>
        <!-- Create a container with the unique id -->
        <section id="app" class="main__container"></section>
    </body>
</html>
2. Next, we've created an index.js file - the entry point of the app.
// import css styles
import "./assets/css/index.css";
// import the App class from the "dhx-optimus" library
import { App } from "dhx-optimus";

export class MyApp extends App {}
Here we've created the MyApp class that will render our application. The MyApp class is inherited from the App class.
For details about css styles used for the app, see the index.css file.
3. After that, we've added our first View with a simple text. For that, we've created the TopLayout.js file in the views folder.
We recommend that you use the capital letter at the beginning of the name of the file that have a view => TopLayout.js. This is the common practice.
// import the View class from the "dhx-optimus" library
import { View } from "dhx-optimus";

export class TopLayout extends View {
    init() {
        return `<h1>Hello Optimus!</h1>`;
    }
}
As you can see, we've created the TopLayout class that is inherited from the View class. To define the initial view, we've returned an HTML element in the init() method.
4. Then, to render the just created view, we've included the view into the index.js file and rendered it via the show() method:
import "./assets/css/index.css";

import { App } from "dhx-optimus";
import { TopLayout } from "./views/TopLayout";

export class MyApp extends App {
    init() {
        this.show(null, TopLayout);
    }
}
You can find more details on API methods here.
5. Finally, we've initialized our application via updating the code of the index.html file with the following:
<!DOCTYPE html>
<html lang="en">
    <head>
        <title>dhtmlxOptimus guide</title>
        <!-- Suite -->
        <script type="text/javascript" src="https://cdn.dhtmlx.com/suite/edge/suite.js"></script>
        <link rel="stylesheet" href="https://cdn.dhtmlx.com/suite/edge/suite.css" />
        <!-- App -->
        <script type="text/javascript" src="./app.js"></script>
        <link rel="stylesheet" href="./app.css" />
    </head>
    <body>
        <section id="app" class="main__container"></section>
        <script>
            const app = new optimusguide.MyApp();
            app.render("#app");
        </script>
    </body>
</html>
Everything is pretty straightforward here:
- we've included a free version of DHTMLX from our CDN. It is necessary to include files of DHTMLX Suite as dependencies for correct work of DHTMLX Optimus;
- we've included the app.js and app.css files to configure webpack;
- we've initialized the app via the render() method that takes the ID of the container as a parameter.
Here you are! Now, you can move forward and add the code from the further steps into the code of the initial project that we've just explored.
Step 2. Add views using DHTMLX Suite
The full code for Step 2 is available on GitHub.
Let's move on and create several views using widgets of the DHTMLX Suite library. We'll also explore the global event bus that we'll apply to switch between the created views.
Adding the Toolbar view
Firstly, we'll create the view on the base of the DHTMLX Toolbar widget because we need the toolbar to switch between the views in our app. For that, create the ToolbarView.js file in the views folder and fill it with the following code:
import { View } from "dhx-optimus";

export class ToolbarView extends View {
    init() {
        this.toolbar = new dhx.Toolbar(null, {
            css: "toolbar",
            data: [
                {
                    type: "spacer",
                },
                {
                    id: "first",
                    value: "First",
                    group: "views",
                },
                {
                    id: "second",
                    value: "Second",
                    group: "views",
                },
                {
                    id: "third",
                    value: "Third",
                    group: "views",
                },
                {
                    type: "spacer",
                },
            ],
        });

        return this.toolbar;
    }
}
The code is quite simple:
- We've configured DHTMLX Toolbar in the init() method. The method returns the toolbar as a view.
- Note, that when using DHTMLX widgets as a view, the container where the component will be rendered must be specified to
null.
Adding the child view
Now, you should create a child view. The component will render the current id of the button selected in the toolbar. Navigate to the views folder and create the EmptyView.js file with the following content:
import { View } from "dhx-optimus";

export class EmptyView extends View {
    init() {
        return `
        <div className="empty__container">
            This is the ${this.params.content || "empty"} view
        </div>`;
    }
}
The child component will get the id via params.
Rendering views
To render the created EmptyView and ToolbarView views, update the Toplayout.js file with the following code:
import { View } from "dhx-optimus";

import { ToolbarView } from "./ToolbarView";
import { EmptyView } from "./EmptyView";

export class TopLayout extends View {
    init() {
        return (this.layout = new dhx.Layout(null, {
            rows: [
                {
                    id: "toolbar",
                    height: "content",
                    init: cell => this.show(cell, ToolbarView),
                },
                {
                    id: "content",
                    init: cell => this.show(cell, EmptyView),
                },
            ],
        }));
    }
}
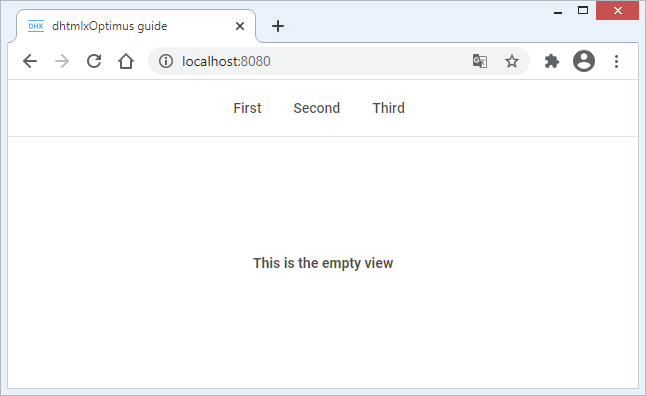
In the above code we've returned Layout as a view and placed the EmptyView and ToolbarView views into the cells of the layout.
To render the views, the show() method is called. For details about rendering of the components of the DHTMLX Suite library, see the documentation.
But, if you've already run your app, you can notice that nothing happens when switching the buttons in the toolbar. To solve this problem, we need to add global events.
Adding the global event bus
Adding global events is the best way to implement exchanging of data between the components.
Open the ToolbarView.js file and apply the ready() method to add the click event handler of the toolbar.
import { View } from "dhx-optimus";

export class ToolbarView extends View {
    init() {
        ...
    }

    ready() {
        this.toolbar.events.on("click", id => {
            this.fire("viewChange", [id]);
        });
    }
}
We've defined the global viewChange event inside the click event via the fire() method. The logic is the following: whenever the user clicks the button in the toolbar, the viewChange event will fire.
Now, we need to update the TopLayout view where we'll listen to the viewChange event:
import { View } from "dhx-optimus";

import { ToolbarView } from "./ToolbarView";
import { EmptyView } from "./EmptyView";

export class TopLayout extends View {
    init() {
        ...
    }

    ready() {
        // initialize the global event handler
        this.on("viewChange", id => {
            this.show(this.layout.getCell("content"), EmptyView, { content: id });
        });
    }
}
As you can see from the above code, we've initialized the global viewChange event handler.
Now, we'll follow the changes in the global event bus. Each time the user clicks the button in the toolbar, the show() method will re-render the EmptyView view and pass the id of the selected button to it.
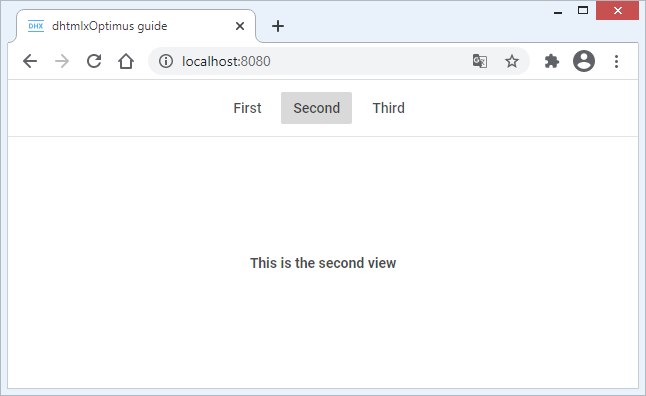
Let's take a look at the result:
After clicking on the "Second" button you should see the view, as in:
You can also learn more details about how to:
- pass parameters to child components;
- use global event bus;
- work with the DHTMLX Suite library in views.
Step 3. Define the global state of the app
The step teaches how to define the global state of the app and observe changes made in the app.
The full code for Step 3 is available on GitHub.
For now, you've become familiar with how to pass data to child components and explored how to use the global event bus.
It's time to find out more about the dhx-optimus-store state manager that allows you to save the state of the app and to get the state asynchronously after its changing from any point of the app.
If you haven't installed dhx-optimus-store yet, then navigate to the root directory and run the following command:
npm i dhx-optimus-store
After that, we need to initialize the state manager in the application. Open the index.js file and update its code, as in:
import "./assets/css/index.css";

import { App } from "dhx-optimus";
// import the state manager from "dhx-optimus-store"
import Store from "dhx-optimus-store";

import { TopLayout } from "./views/TopLayout";

// define the initial state of the app
const initialState = {
    active: "first",
};

export class MyApp extends App {
    init() {
        // initialize a global store
        this.store = new Store(initialState);
        // assign the "store" key to the public "params" property
        this.params.store = this.store;
        // get the current state of the global store
        this.state = this.store.getState();

        this.show(null, TopLayout);

        this.subscribe();
    }

    subscribe() {
        this.on("viewChange", id => {
            this.state.active = id;
        });
    }
}
Let's consider the above described code in detail:
- to define the initial state of the app we've created the initialState constant. It takes an object with a key:value pair as a parameter. The active property, that is key, is just one of the state of the app, thus you can add or create more states if needed.
- we've initialized the global store in the public property of the store class that takes initialState as a parameter. We've also assigned the store key to the public params property to be able to get the value of the global store in any point of the app via
this.params.store.getState(). But such a way doesn't provide the ability to observe the changes of the app's state operatively. Thus, we are going to apply the observe() method below. - the current state of the global store is assigned to the public state property via the getState() method.
We use the global event bus to change the state of the app. When the user clicks the button in the toolbar, the global viewChange event will be called and the id of the selected button will be passed to the active property as a new state of the app.
To improve our application and make it possible to asynchronously observe the changes made to the global store from any point of the application, we should add the observe() method into the ToolbarView and TopLayout views.
The updated ToolbarView.js file will contain the following code:
import { View } from "dhx-optimus";

export class ToolbarView extends View {
    init() { ... }

    ready() {
        this.observe(
            state => state.active,
            active => {
                this.toolbar.select(active);
            }
        );

        this.toolbar.events.on("click", id => {
            this.fire("viewChange", [id]);
        });
    }
}
The observe() method is added. Now, after the active state of the app changes, the select method of the toolbar will set the actual state of the toolbar.
The updated TopLayout.js file will look like this:
import { View } from "dhx-optimus";

import { ToolbarView } from "./ToolbarView";
import { EmptyView } from "./EmptyView";

export class TopLayout extends View {
    init() {
        return (this.layout = new dhx.Layout(null, {
            rows: [
                {
                    id: "toolbar",
                    height: "content",
                    init: cell => this.show(cell, ToolbarView),
                },
                {
                    id: "content"
                },
            ],
        }));
    }

    ready() {
        this.observe(
            state => state.active,
            active => {
              this.show(this.layout.getCell("content"), EmptyView, {content: active});
            }
        );
    }
}
The above code sample shows that we won't render the default view in the "content" cell on initialization of the layout anymore. Instead, the observe() method will show the initial state of the active property. In our case, we've specified the active property to "first".
Let's run the application now. You will see that the first view is active by default:
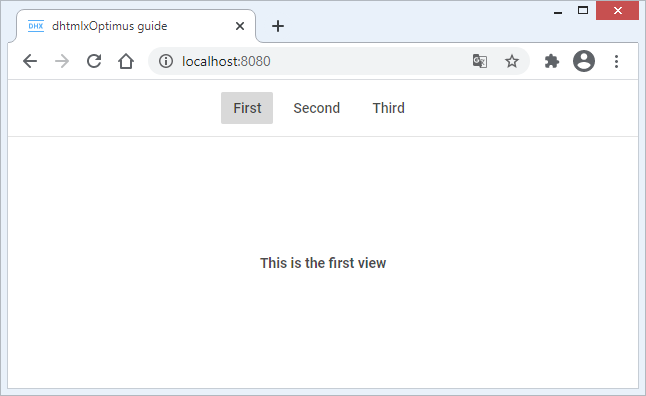
It means, that the id of the button that should be active by default is passed to the state manager on initialization of the application.
Step 4. Add DHTMLX components: DataView, Chart, Grid
The step shows how to add DHTMLX widgets into your application.
The full code for Step 4 is available on GitHub.
It's time to go deeper.
On this step we are going to make our app more complicated by adding the DHTMLX widgets such as DataView, Chart, Grid into it. Let's follow the steps described below:
1. Firstly, we should delete the EmptyView.js file as we no longer need the EmptyView class.
2. Then, navigate to the src/assets folder and create a new data.js file to save the initial data of the app. For instance:
export const data = [
    {
        name: "Theo Fisher",
        post: "Head of department",
        phone: "(405) 632-1372",
        mail: "tfisher@gmail.com",
        birthday: "09.12.1987",
        start: "04.02.2018",
    },
    {
        name: "Francesca Saunders",
        post: "Attending physician",
        phone: "(402) 371-6736",
        mail: "fsaunders@gmail.com",
        birthday: "25.05.1997",
        start: "12.09.2019",
    },
    {
        name: "Jenson Brown",
        post: "Fellow",
        phone: "(346) 622-8633",
        mail: "jbrown@gmail.com",
        birthday: "03.10.1970",
        start: "06.02.1998",
    },
// more options
];
In practice, you can get the data by sending AJAX request to the server.
3. After that, we'll initialize DHTMLX DataCollection in the MyApp class to simplify exchanging of data between the DHTMLX widgets.
...
import { data } from "./assets/data/data";
...

export class MyApp extends App {
    init() {
        ...
        this.persons = new dhx.DataCollection();
        this.persons.parse(data);

        this.show(null, TopLayout, { persons: this.persons });
        ...
    }

    subscribe() {
        ...
    }
}
- We've initialized DataCollection in the public persons property.
- To parse data in the data collection we've used the parse() method. But you can use other methods of loading data when working with the server. For instance, you can apply the load() method.
- We've passed the data collection to the TopLayout view as a third parameter of the show() method.
4. Now, create the views/content folder. We are going to create the DataView, Chart, and Grid views there:
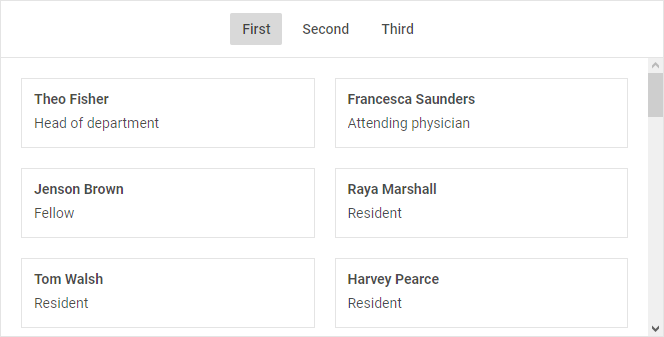
- create the DataView.js file and add the DataView view there by using the DataView widget of Suite:
import { View } from "dhx-optimus";

export class DataView extends View {
    init() {
        return new dhx.DataView(null, {
            data: this.params.dataCollection,
            itemsInRow: 2,
            gap: 20,
            template: ({ name, post }) => `
                <div className="personal-card">
                    <div className="personal-card__container">
                        <h3>${name}</h3>
                        <p>${post}</p>
                    </div>
                </div>
            `,
        });
    }
}
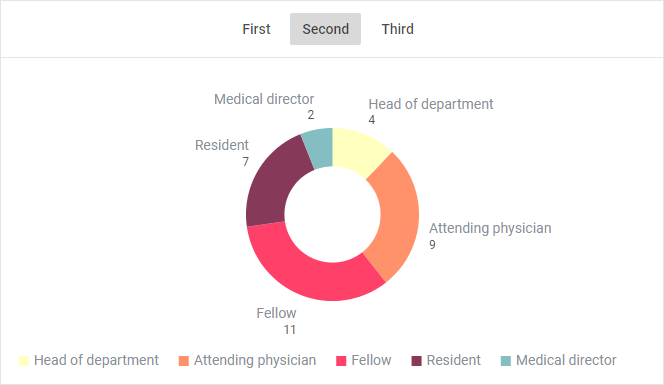
- create the ChartView.js file and add the Chart view there by using the Chart widget of Suite:
import { View } from "dhx-optimus";
import { getChartStatistic } from "../../utils/helpers";

export class ChartView extends View {
    init() {
        return new dhx.Chart(null, {
            css: "chart",
            type: "donut",
            series: [
                {
                    value: "value",
                    color: "color",
                    text: "post",
                },
            ],
            legend: {
                values: {
                    id: "id",
                    text: "post",
                    color: "color",
                },
                halign: "center",
                valign: "bottom",
            },
            data: getChartStatistic(this.params.dataCollection.serialize()),
        });
    }
}
The getChartStatistic function is used to prepare the data for Chart. For details on the function, see the utils/helpers.js file.
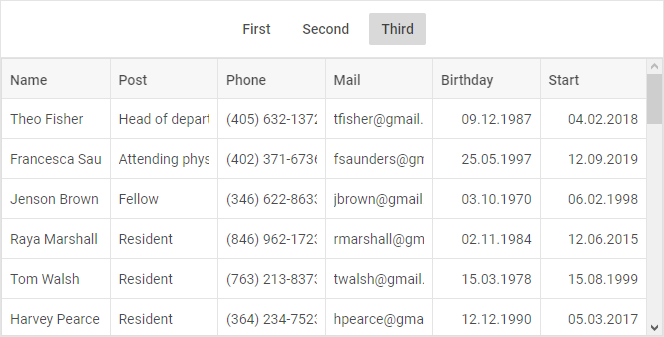
- create the GridView.js file and add the Grid view there by using the Grid widget of Suite:
import { View } from "dhx-optimus";

export class GridView extends View {
    init() {
        return new dhx.Grid(null, {
            columns: [
                { id: "name", header: [{ text: "Name" }] },
                { id: "post", header: [{ text: "Post" }] },
                { id: "phone", header: [{ text: "Phone" }] },
                { id: "mail", header: [{ text: "Mail" }] },
                { id: "birthday", header: [{ text: "Birthday" }], type: "date" },
                { id: "start", header: [{ text: "Start" }], type: "date" },
            ],
            autoWidth: true,
            data: this.params.dataCollection,
        });
    }
}
As you can see from the above code snippets, we've initialized the data for these three widgets via passing them a parameter from the parent component via the params property.
- finally, we need to render the widgets. Each widget will be rendered on the page depending on the button selected in the toolbar. Open the TopLayout.js file and update its code with the following:
import { View } from "dhx-optimus";

import { ToolbarView } from "./ToolbarView";
import { DataView } from "./content/DataView";
import { ChartView } from "./content/ChartView";
import { GridView } from "./content/GridView";

export class TopLayout extends View {
    init() {
        return (this.layout = new dhx.Layout(null, {
            rows: [
                {
                    id: "toolbar",
                    height: "content",
                    init: cell => this.show(cell, ToolbarView),
                },
                {
                    id: "content"
                },
            ],
        }));
    }

    ready() {
        this.observe(
            state => state.active,
            active => {
                switch (active) {
                    case "first":
                        this.show(this.layout.getCell("content"), DataView, {
                            dataCollection: this.params.persons,
                        });
                        break;
                    case "second":
                        this.show(this.layout.getCell("content"), ChartView, {
                            dataCollection: this.params.persons,
                        });
                        break;
                    case "third":
                        this.show(this.layout.getCell("content"), GridView, {
                            dataCollection: this.params.persons,
                        });
                        break;
                }
            }
        );
    }
}
As a result, when the active state is changed, the related component will be rendered on the page.
Once you are done with it, run the application now. You will see the DataView widget on the first page:
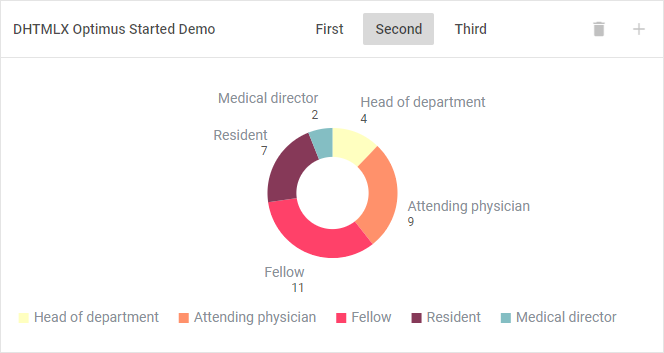
the Chart widget on the second page:
and the Grid widget on the third page:
Step 5. Provide editing data
The step describes how to work with the widgets of the DHTMLX Suite library. You can skip the step if your goal is just to learn the possibilities of DHTMLX Optimus.
The full code for Step 5 is available on GitHub.
In the previous steps we have configured the logic for exchanging of data between the components and for asynchronously observing the data changes. However, the widgets are still static.
Let's add dynamics into the app and make it possible to add and remove data:
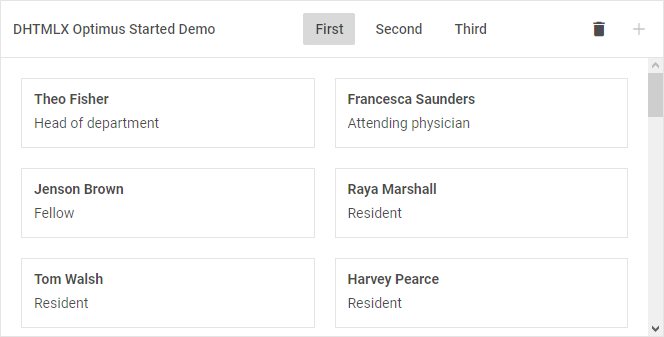
1. Firstly, we need to expand the ToolbarView class by adding the "Remove" and "Add" buttons, as in:
import { View } from "dhx-optimus";

export class ToolbarView extends View {
    init() {
        return (this.toolbar = new dhx.Toolbar(null, {
            css: "toolbar",
            data: [
                {
                    type: "title",
                    value: "DHTMLX Optimus Started Demo",
                },
                {
                    type: "spacer",
                },
                {
                    id: "first",
                    value: "First",
                    group: "views",
                },
                {
                    id: "second",
                    value: "Second",
                    group: "views",
                },
                {
                    id: "third",
                    value: "Third",
                    group: "views",
                },
                {
                    type: "spacer",
                },
                {
                    id: "remove",
                    icon: "dxi dxi-delete",
                    circle: true,
                },
                {
                    id: "add",
                    icon: "dxi dxi-plus",
                    circle: true,
                },
            ],
        }));
    }
}
We also need to add the "removeItem" and "addItem" global events to the ready() method. We should also expand the observe() method in order the new buttons to be active only for the desired views:
import { View } from "dhx-optimus";

export class ToolbarView extends View {
    init() {
        ...
    }
    ready() {
        this.actionButtons = ["remove", "add"];

        this.observe(
            state => state.active,
            active => {
                this.showActionButtons();

                switch (active) {
                    case "second":
                        this.hideActionButtons();
                        break;

                    case "first":
                        this.toolbar.disable("add");
                        break;
                }

                this.toolbar.select(active);
            }
        );

        this.toolbar.events.on("click", id => {
            switch (id) {
                case "first":
                case "second":
                case "third":
                    this.fire("viewChange", [id]);
                    break;
                case "remove":
                    this.fire("removeItem", []);
                    break;
                case "add":
                    this.fire("addItem", []);
                    break;
            }
        });
    }

    hideActionButtons() {
        this.toolbar.disable(this.actionButtons);
    }

    showActionButtons() {
        this.toolbar.enable(this.actionButtons);
    }
}
2. Next, we'll expand the DataView class by adding a handler to the "removeItem" event, as in:
import { View } from "dhx-optimus";

export class DataView extends View {
    init() {
        return (this.dataView = new dhx.DataView(null, {
            keyNavigation: true,
            data: this.params.dataCollection,
            itemsInRow: 2,
            gap: 20,
            template: ({ name, post }) => `
                <div className="personal-card">
                    <div className="personal-card__container">
                        <h3>${name}</h3>
                        <p>${post}</p>
                    </div>
                </div>
            `,
        }));
    }

    ready() {
        this.on("removeItem", () => {
            const selected = this.dataView.selection.getItem();
            if (selected) {
                this.dataView.data.remove(selected.id);
            }
        });
    }
}
When the "removeItem" event triggers, the card will be removed if it exists.
3. After that, we'll expand the GridView class by adding the ability to edit the grid via setting the editable: true configuration property of Grid. We'll also enable selection in Grid via the selection: "row" configuration option. The code will look like this:
import { View } from "dhx-optimus";
import { emptyItem } from "../../assets/data/data";

export class GridView extends View {
    init() {
        const postUniq = this.params.dataCollection
            .map(item => {
                return item.post;
            })
            .filter((value, index, self) => {
                return self.indexOf(value) === index;
            });

        this.grid = new dhx.Grid(null, {
            columns: [
                { id: "name", header: [{ text: "Name" }] },
                { id: "post", header: [{ text: "Post" }], editorType: "select",
                    options: postUniq },
                { id: "phone", header: [{ text: "Phone" }] },
                { id: "mail", header: [{ text: "Mail" }] },
                { id: "birthday", header: [{ text: "Birthday" }], type: "date",
                    dateFormat: "%d.%m.%Y" },
                { id: "start", header: [{ text: "Start" }], type: "date",
                    dateFormat: "%d.%m.%Y" },
            ],
            autoWidth: true,
            selection: "row",
            editable: true,
            data: this.params.dataCollection,
        });

        return this.grid;
    }
}
And we will add handlers to the "removeItem" and "addItem" global events.
...
export class GridView extends View {
  init() {
    ...
    this.on("removeItem", () => {
      const selected = this.grid.selection.getCell();
      if (selected) {
        this.grid.data.remove(selected.row.id);
      }
    });

    this.on("addItem", () => {
      const selected = this.grid.selection.getCell();
      if (selected) {
        this.grid.data.add({ ...emptyItem }, this.grid.data.getIndex(selected.row.id) + 1);
      } else {
        this.grid.data.add({ ...emptyItem }, 0);
      }
    });
    ...
  }
}
4. You should also update the src/assets/data/data.js file by adding the following code there:
...
export const emptyItem = {
    name: "",
    post: "",
    phone: "",
    mail: "",
    birthday: "",
    start: "",
};
That's all. Open http://localhost:8080/ and you'll see the dataview like the one shown here:
Click the second button to see the chart view, as in:
To see the grid view, click the third button. You can try to edit a cell in the grid by double-click on the cell.
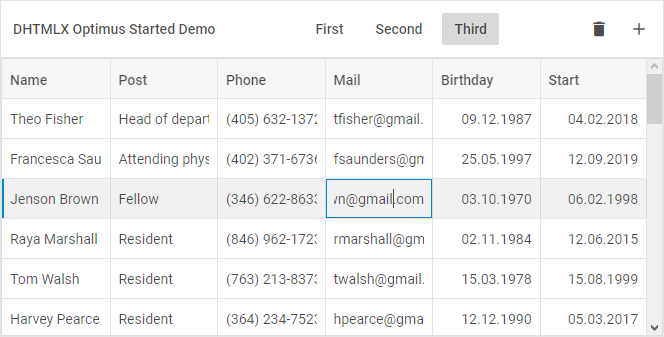
You could also note, that changing data in one of the widgets will change the data in the other widgets.
What's next
We hope you have learned how to build the DHTMLX-based app with DHTMLX Optimus and seen how to build your own views, to exchange and get data from any point of the app using the global event bus and state manager.
You can find the initial code on GitHub, clone or download it and use it for your projects.
For details about API methods of DHTMLX Optimus, see the documentation.
Check more demos build with Optimus: