Template
HTML 콘텐츠를 담는 컨테이너입니다.
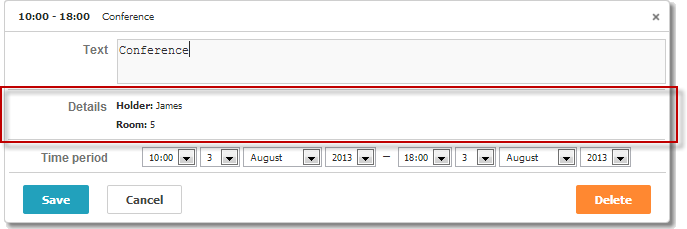
scheduler.locale.labels.section_template = 'Details';// 섹션의 이름을 설정합니다

scheduler.config.lightbox.sections = [
    { name:"text", height:50, map_to:"text", type:"textarea", focus:true},
    { name:"template", height: 40, type:"template", map_to:"my_template"},
    { name:"time", height:72, type:"time", map_to:"auto"}
];
scheduler.attachEvent("onEventCreated", function(id, e) {
    var ev = scheduler.getEvent(id);
    ev.my_template = "<b>Holder:</b>"+ ev.holder+"

<b>Room:</b>"+ ev.room;
});
초기화
Template 컨트롤을 라이트박스에 포함하려면 다음 단계가 필요합니다:
- 섹션을 라이트박스 설정에 추가:
scheduler.config.lightbox.sections = [
    { name:"text", ... },
       { name:"template", height: 40, type:"template", map_to:"my_template"},
    { name:"time", ...}
];
- 섹션의 레이블 정의:
scheduler.locale.labels.section_template = 'Details';
- 이벤트를 이용해 컨트롤의 내용을 제공 (예: @onBeforeLightbox 이벤트):
scheduler.attachEvent("onBeforeLightbox", function(id) {
    var ev = scheduler.getEvent(id);
    ev.my_template = "<b>Holder:</b>"+ ev.holder+"

<b>Room:</b>"+ ev.room;
    return true;
});
속성
'template' 컨트롤에 자주 설정되는 주요 속성들입니다 (전체 목록은 여기에서 확인할 수 있습니다):
| name | (string) 섹션의 이름 |
| height | (number) 섹션의 높이 |
| map_to | (string) 이 섹션에 매핑되는 데이터 속성명 |
| type | (textarea,time,select,template,multiselect,radio,checkbox,combo) 섹션에서 사용되는 컨트롤의 유형 |
Need help?
Got a question about the documentation? Reach out to our technical support team for help and guidance. For custom component solutions, visit the Services page.