Multiselect
여러 개의 체크 박스로 구성된 컨트롤입니다.
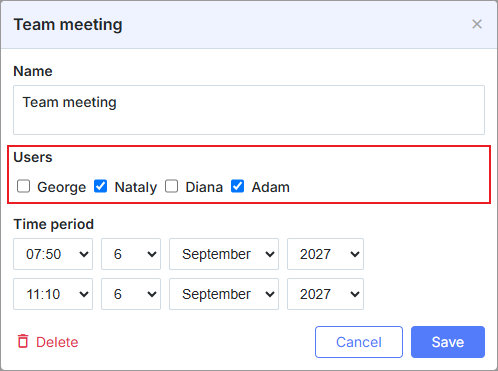
라이트박스에서 컨트롤을 사용하려면 다중 선택 확장을 활성화하십시오.
scheduler.plugins({
    multiselect: true /*!*/
});

scheduler.locale.labels.section_userselect = "참여자";

scheduler.config.lightbox.sections = [
    { name:"description", height:50, map_to:"text", type:"textarea", focus:true },
    { name:"userselect", height:22, map_to:"user_id", type:"multiselect",
    options: scheduler.serverList("users"), vertical:"false" },
    { name:"time", height:72, type:"time", map_to:"auto"}
];
Initialization
다중 선택 컨트롤을 라이트박스에 추가하려면 아래 절차를 따르세요:
- 페이지에서 'multiselect' 확장을 활성화합니다:
scheduler.plugins({
    multiselect: true
});
- 라이트박스 구성에 섹션을 추가합니다:
scheduler.config.lightbox.sections = [
    { name:"description", ... },
    { name:"userselect", height:22, map_to:"user_id", type:"multiselect",
    options: scheduler.serverList("user_id"), vertical:false },
    { name:"time", ...}
];
- 섹션의 레이블을 설정합니다:
scheduler.locale.labels.section_userselect = "참여자";
Properties
다음 속성은 주로 다중 선택 컨트롤에 대해 중요하고 일반적으로 설정됩니다(전체 목록은 여기를 참조하세요):
| name | (string) 섹션의 이름 |
| height | (number) 섹션의 높이 |
| map_to | (string) 섹션에 매핑될 데이터 속성의 이름 |
| type | (textarea,time,select,template,multiselect,radio,checkbox,combo) 섹션 컨트롤의 유형 |
| options | (array of objects) 컨트롤의 선택 옵션을 정의합니다 (선택, 다중 선택, 라디오, 콤보 컨트롤에 해당). 배열의 각 객체는 단일 옵션을 정의하며 다음 속성을 가집니다:
|
| script_url | (string) 다중 선택의 옵션을 로드하는 서버 측 스크립트의 경로. 동적 모드에서만 사용. 선택적 |
| vertical | (boolean) 다중 선택 버튼을 수직(true)으로 배치할지 수평(다중 선택 및 라디오 컨트롤에 해당)으로 배치할지 설정 |
| delimiter | (string) 다중 선택 값들을 구분하는 구분자를 지정합니다. 이 속성이 설정되지 않으면 section_delimiter 구성이 적용됩니다 |
데이터로 컨트롤 채우기
일반적으로 다중 선택 버튼의 값을 설정하려면 options 매개변수를 사용해야 합니다:
scheduler.config.lightbox.sections = [
    {   name:"userselect", type:"multiselect",
        ...
        options:[
            { key: 1, label: 'George' },
            { key: 2, label: 'Nataly' },
            { key: 3, label: 'Diana' },
            { key: 4, label: 'Adam' }
    ]},
    ...
];
options 매개변수의 항목은 2개의 필수 속성을 가져야 합니다:
- key - 옵션의 ID
- label - 옵션의 레이블
서버에서 체크 박스 채우기
서버에서 체크박스 값을 가져오려면 serverList 메서드를 사용해야 합니다:
scheduler.config.lightbox.sections = [
    {name:"description", ...},
    { name:"userselect", height:22, map_to:"user_id", type:"multiselect",
    options: scheduler.serverList("users"), vertical:"false" },
    {name:"time", ...}
];

scheduler.load("api/data");
여기서 api/data는 Scheduler에 로드된 이벤트를 반환하는 서버 측 스크립트이며, 다중 선택 버튼 값의 컬렉션도 함께 제공합니다. 데이터 형식 예시는 데이터 형식 가이드에서 확인할 수 있습니다:
//응답
{
   "data":[
      {
          "id":"1",
          "start_date":"2019-03-02 00:00:00",
          "end_date":"2019-03-04 00:00:00",
          "text":"dblclick me!",
          "user_id":"1,2"
      },
      {
          "id":"2",
          "start_date":"2019-03-09 00:00:00",
          "end_date":"2019-03-11 00:00:00",
          "text":"and me!",
          "user_id":"2,3"
      }
   ],
   "collections": {
      "users":[
         {"value":"1","label":"Lisa"},
         {"value":"2","label":"Bob"},
         {"value":"3","label":"Mike"}
      ]
   }
}
참고로, updateCollection 메서드를 사용하여 가져오는 옵션 목록을 업데이트할 수 있습니다
const oldOptions = scheduler.serverList("users").slice();
scheduler.updateCollection("users", [
         {"value":"4","label":"John"},
         {"value":"5","label":"Paul"},
         {"value":"6","label":"Ringo"},
         {"value":"7","label":"George"}
]);
Dynamic loading
정적 모드에서는 모든 이벤트 매개변수 옵션이 데이터베이스에 개별 필드로 저장되며, 이후 자신만의 로직을 구축하는 데 이 필드를 사용할 수 있습니다. 이는 추가적인 가능성을 제공하지만, 모든 옵션을 로드하기 위해 더 많은 쿼리를 수행해야 합니다.
동적 모드에서는 추가 저장이 전혀 필요하지 않습니다. 옵션은 필요할 때 로드됩니다. 이는 쿼리 수를 줄이지만 어떤 로직을 구축하는 것도 불가능하게 만듭니다.
서버 측에서는 다음과 유사한 코드가 필요합니다:
동적 모드를 활성화하려면, options와 함께 script_url 속성을 사용해야 합니다:
scheduler.config.lightbox.sections = [
    {name:"userselect", height:22, map_to:"user_id", type:"multiselect",
    options: scheduler.serverList("user_id"),
    script_url:'api/options'},
    ...
];
여기서 api/options는 다음과 같은 JSON을 반환합니다:
[
    {"value":"1","label":"Lisa"},
    {"value":"2","label":"Bob"},
    {"value":"3","label":"Mike"}
]