迷你日历(日期选择器)
迷你日历(日期选择器)是一种特殊扩展,提供在页面的 HTML 容器中呈现小型月份视图的能力。
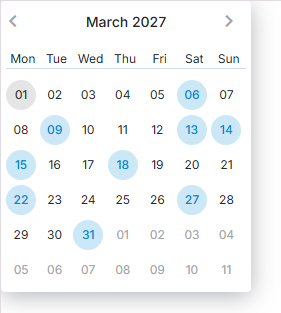
要在应用中使用迷你日历,请在页面上包含 minical 扩展。
在页眉中
要将迷你日历(日期选择器)放入调度程序的页眉中(如下图所示),请按以下步骤操作:
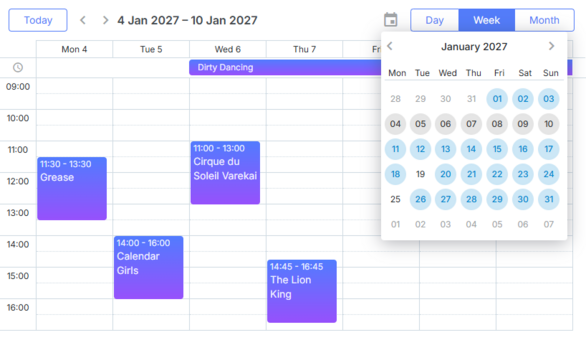
- 在页面上包含扩展文件:
scheduler.plugins({
    minical: true
});
- 为迷你日历指定容器并将其添加到调度程序标记中:
<div className="dhx_cal_navline">
...
<div className="dhx_cal_date"></div>
<div className="dhx_minical_icon" id="dhx_minical_icon"
onclick="show_minical()"> </div>
</div>
- 提供初始化(renderCalendar 方法)和销毁(destroyCalendar 方法)迷你日历的逻辑:
function show_minical(){
    if (scheduler.isCalendarVisible()){
        scheduler.destroyCalendar();
    } else {
        scheduler.renderCalendar({
            position:"dhx_minical_icon",
            date:scheduler._date,
            navigation:true,
            handler:function(date,calendar){
                scheduler.setCurrentView(date);
                scheduler.destroyCalendar()
            }
        });
    }
}
在页眉中(第三方日期选择器)
在本节中,我们将演示如何将第三方迷你日历(日期选择器)添加到调度程序的页眉中。
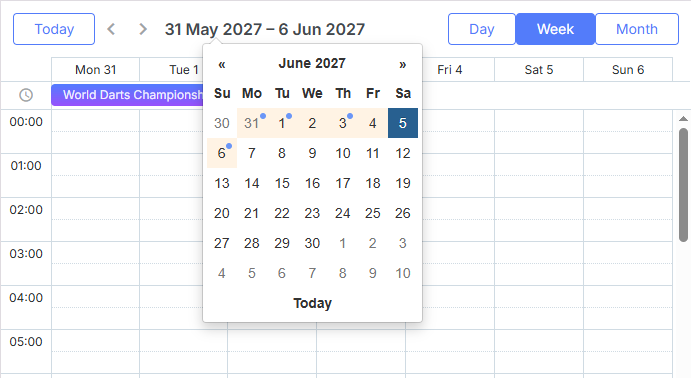
相关示例 3rd party Mini Calendar in the header
在我们的示例中,我们将基于 jQuery 和 Bootstrap Datepicker 添加一个迷你日历。如果你使用其他库,需要修改代码,但总体思路应保持不变:
- 在单击日历头部时显示日期选择器
首先,需要在调度程序头部定义迷你日历(或其他控件)的 DIV 容器。 如果使用 [markup initialization method],可以像下面这样做:
<div id="scheduler_here" className="dhx_cal_container" style={{width: '100%', height: '100%'}}>
<div className="dhx_cal_navline">
<div className="dhx_cal_prev_button"> </div>
<div className="dhx_cal_next_button"> </div>
<div className="dhx_cal_today_button"></div>
<div className="dhx_cal_date"></div>
{/*- HERE */}
<div className="input-group date" style={{display: 'none'}}>
<input type="text" className="form-control"/>
<div className="dhx_minical_icon input-group-addon" id="dhx_minical_icon"> </div>
</div>
{/*- end HERE */}
如果你使用 header config,则需要在其中添加 一个自定义元素 :
scheduler.config.header = [
"day",
"week",
"month",
{html:'<div className="input-group date" style={{display: 'none'}}>'+
'<input type="text" className="form-control"/>'+
'<div className="dhx_minical_icon input-group-addon" id="dhx_minical_icon"> </div>'+
'</div>'},
"date",
"prev",
"today",
"next"
];
scheduler.init("scheduler_here");
为了在单击调度程序导航面板中的日期时显示日期选择器,我们在调度程序就绪时初始化点击事件:
scheduler.attachEvent("onSchedulerReady", function(){

    const $node = $('#scheduler_here .input-group.date').datepicker({
        autoclose: true,
        todayHighlight: true,
        todayBtn: "linked",
       });

       $("#scheduler_here").delegate(".dhx_cal_date", "click", function () {
           $node.datepicker("show");
       });

       $node.datepicker().on("show", function () {
        $node.datepicker("update", scheduler.getState().date);

           // 将弹出层居中显示在日期标签下方
        centerDatepicker($(".dhx_cal_date"));
    });
    ...

});
centerDatepicker 是我们实现的辅助函数,用于在必要位置呈现下拉日期选择器:
    ...
    function centerDatepicker(referenceElement) {

        if (!$('.datepicker-dropdown').is(':visible')) {
            return;
           }
        // 将弹出层居中显示在日期标签下方
        let offset = $(".dhx_cal_date").offset();
        let width = $(".dhx_cal_date").width();
        let popupWidth = $(".datepicker-dropdown").width();
        $(".datepicker-dropdown").css({
            top: offset.bottom + "px",
            left: (width - popupWidth) / 2 + "px"
        });
    }
- 当用户在日期选择器中单击日期时,将调度程序切换到所选日期
一旦按需显示日期选择器,我们需要在日历中选择日期时更改调度程序的日期:
    $node.datepicker().on("changeDate", function () {
        scheduler.setCurrentView($node.datepicker("getDate"));
    });
- 在日期选择器中高亮当前日期
要高亮显示在调度程序中当前显示的日期选择器日期,我们使用一个简单的 css 类:
.datepicker table .scheduler-date{
    background-color: #fff3e4;
}
所有在调度程序中当前可见的日期单元格都会获得此类:
    function fillDatepicker(scheduler) {
          // 重置高亮事件和活动日期
          ...
          $(".datepicker-dropdown").find("[data-date]").removeClass("scheduler-date");

          // 高亮调度器日期
          const visibleDates = getVisibleDates(scheduler);
          visibleDates.forEach(function (date) {
            $(".datepicker-dropdown").find(
                "[data-date='" + date + "']"
            ).addClass("scheduler-date");
          });
          ...
    }
要获取当前可见的日期,可以使用 scheduler.getState:
    function getVisibleDates(scheduler) {
        const minVisible = scheduler.getState().min_date;
        const maxVisible = scheduler.getState().max_date;

        let current = minVisible;
        let result = [];
        while (current.valueOf() < maxVisible.valueOf()) {
            let currentUTC = Date.UTC(
                current.getFullYear(),current.getMonth(),current.getDate()
            );
            result.push(currentUTC.valueOf());

            current = scheduler.date.add(current, 1, "day");
          }
         return result;
    }
- 在日期选择器中高亮带有事件的日期
接下来,我们希望日期选择器高亮显示在调度程序中指定事件的日期。 为此,我们使用与上一步相同的方法添加一个 css 类:
.datepicker table .has-event::after {
    content: " ";
    width: 6px;
    height: 6px;
    position: absolute;
    background-color: #6b96f7;
    border-radius: 4px;
}
如上所示,我们高亮显示包含事件的迷你日历日期。
要在用户将光标悬停在日期上时显示该日期的事件数量提示,需要获取日期选择器当前显示月份中的事件:
    function getVisibleEvents(calendarDate, scheduler) {
          const min = scheduler.date.month_start(new Date(calendarDate));
          const max = scheduler.date.add(calendarDate, 1, "month");
          min = scheduler.date.week_start(min);
          if(scheduler.date.week_start(new Date(max)) < max){
             max = scheduler.date.week_start(new Date(max));
             max = scheduler.date.add(max, 1, "week");
          }
          const events = scheduler.getEvents(min, max);
          let days = {};

          events.forEach(function (event) {
             let eventDate = event.start_date;
             while(eventDate < event.end_date){
                   let day = Date.UTC(
                     eventDate.getFullYear(),
                     eventDate.getMonth(),
                    eventDate.getDate()
                   );

            if (!days[day.valueOf()]) {
                     days[day.valueOf()] = 0;
                   }
                   days[day.valueOf()]++;
                   eventDate = scheduler.date.add(eventDate, 1, "day");
                   eventDate = scheduler.date.day_start(eventDate);
             }
          });

          let result = [];
          for (let i in days) {
             result.push({ timestamp: i, count: days[i] });
          }
          return result;
       }
在上面的示例中,我们从调度程序获取事件信息。这意味着我们只能高亮显示已加载到调度程序中的事件。当使用动态加载时,这种方法并不特别好,因为在某一时刻只有一小部分事件会被加载到调度程序中。
另一种方法是从服务器请求事件数据。
当我们获得包含事件时间戳以及每个单元格的事件数量的数据后,我们可以用这些信息填充日期选择器,如下所示:
    function fillDatepicker(scheduler) {
        // 重置高亮事件和活动日期
        $(".datepicker-dropdown").find("[data-date]").removeClass("has-event");
        $(".datepicker-dropdown").find("[data-date]").removeAttr("title");
        ...

        // 高亮事件
        const eventCells = getVisibleEvents($node.datepicker("getDate"), scheduler);
        eventCells.forEach(function (cellEvents) {
            $(".datepicker-dropdown").find(
                "[data-date='" + cellEvents.timestamp + "']"
            ).addClass("has-event");
            $(".datepicker-dropdown").find(
                "[data-date='" + cellEvents.timestamp + "']"
            ).attr("title", cellEvents.count + " events");
          });
    }
- 将显示的日期标签与调度程序中的活动日期同步
最后,我们需要在窗口大小变化时重新居中日期选择器,并在用户在日期选择器中更改当前日期时应用高亮:
    $(window).on('resize', function () {
        setTimeout(function(){
            centerDatepicker($(".dhx_cal_date"));
        }, 10);
    });
    $node.datepicker().on("changeDate", function () {
          scheduler.setCurrentView($node.datepicker("getDate"));
       });
    $node.datepicker().on("changeMonth", function () {
          refreshDatepicker(scheduler);
    });
    $node.datepicker().on("changeYear", function () {
        refreshDatepicker(scheduler);
    });
    $node.datepicker().on("changeDecade", function () {
        refreshDatepicker(scheduler);
    });
    $node.datepicker().on("changeCentury", function () {
        refreshDatepicker(scheduler);
    });
    function refreshDatepicker(scheduler) {
        // 使用 timeout 以确保在日期选择器弹窗更新后执行
        setTimeout(function () {
            fillDatepicker(scheduler);
        });
    }
如果你使用一个单独的元素来显示调度程序的活动日期,你需要捕获调度程序的 onViewChange 事件,并从那里更新日期标签:
scheduler.attachEvent("onViewChange", function (newMode , newDate){
    const state = scheduler.getState();
    const minDate = state.min_date;
    const maxDate = state.max_date;
    const dateToStr = scheduler.date.str_to_date("%d-%m-%Y");

    $(dateHeader).html(dateToStr(minDate) + " - " + dateToStr(minDate));
});
请注意,我们在代码示例中没有使用此处理程序,因为我们依赖调度程序内置的日期头,该头会自动更新。只有在 隐藏默认日期头,或需要在多个位置显示活动日期时,才需要使用这种代码。
在灯箱中
迷你日历(日期选择器)可以在灯箱中用于选择“开始”和“结束”日期。
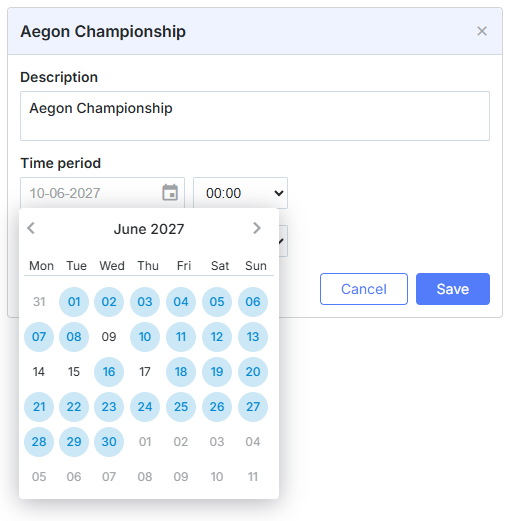
要将迷你日历放置在灯箱中,请按照以下步骤:
- 在页面上启用扩展:
scheduler.plugins({
    minical: true
});
- 将 time 部分的 type 设置为 calendar_time(而不是 time):
//默认灯箱定义
scheduler.config.lightbox.sections= [
  {name:"description", height:200, map_to:"text", type:"textarea", focus:true},
  {name:"time", height:72, type:"time", map_to:"auto"}
];
//将 type:"time" -> type:"calendar_time"
scheduler.config.lightbox.sections = [
  {name:"description", height:200, map_to:"text", type:"textarea", focus:true},
  {name:"time", height:72, type:"calendar_time", map_to:"auto" }
];
调度程序之外
迷你日历(日期选择器)可以放置在页面的任意位置。
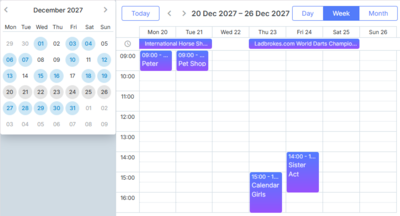
要将迷你日历放在调度程序之外的某个 HTML 容器中,请执行以下步骤:
- 在页面上启用扩展:
scheduler.plugins({
    minical: true
});
- 指定页面上迷你日历的容器:
<div id="scheduler_here" className="dhx_cal_container" ...>
...
</div>

<div style='float: left; padding:10px;'>
        <div id="cal_here" style='width:250px;'></div>
</div>
- 调用 renderCalendar 方法在页面上呈现迷你日历:
const calendar = scheduler.renderCalendar({
    container:"cal_here",
    navigation:true,
    handler:function(date){
        scheduler.setCurrentView(date, scheduler._mode);
    }
});
模板与样式
模板
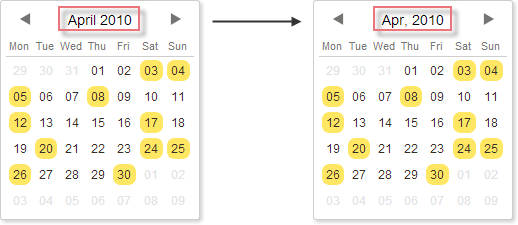
要自定义在迷你日历(日期选择器)中显示的日期格式,您可以使用本文中列出的多种模板,详见文章 [Mini Calendar Templates]。
scheduler.templates.calendar_month = scheduler.date.date_to_str("%M, %Y");
scheduler.init('scheduler_here',new Date(2019,2,1),"day");
...
const calendar = scheduler.renderCalendar({..});
CSS 类
要自定义迷你日历(日期选择器)中日期的外观,您可以重新定义以下 CSS 类:
| CSS class | Applied to |
|---|---|
| .dhx_cal_container.dhx_mini_calendar .dhx_month_head | a day's cell |
| .dhx_cal_container.dhx_mini_calendar .dhx_month_head.dhx_year_event | a day's cell with the assigned event(s) |
| .dhx_cal_container.dhx_mini_calendar .dhx_now .dhx_month_head | a day's cell with the current date |
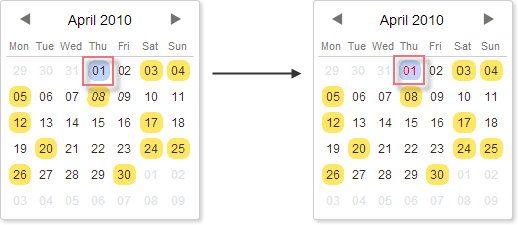
| .dhx_cal_container.dhx_mini_calendar .dhx_calendar_click | a day's cell with the currently active date |
<style>
.dhx_cal_container.dhx_mini_calendar .dhx_calendar_click{
    color:red;
}
</style>
<script>
    const calendar = scheduler.renderCalendar({...});
</script>
Marking days with the markCalendar() method
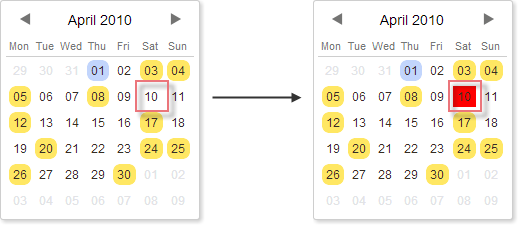
要为某一天分配自定义 CSS 类,您可以使用 markCalendar 方法:
<style>
.my_style{
    background: red !important;
}
</style>
<script>
    const calendar = scheduler.renderCalendar({...});
     ...
    scheduler.markCalendar(calendar, new Date(2019,3,1), "my_style");
</script>
API
| destroyCalendar | 销毁之前创建的迷你日历 |
| isCalendarVisible | 检查日历当前是否在调度程序中打开 |
| linkCalendar | 确保当调度器的活动日期变化时,迷你日历的活动日期也会更新 |
| markCalendar | 为指定日期应用一个 CSS 类 |
| renderCalendar | 创建一个迷你日历 |
| unmarkCalendar | 从指定日期移除一个 CSS 类 |
| updateCalendar | 在迷你日历中显示指定日期 |
事件处理
迷你日历提供用于常见用户操作的回调,例如切换可见月份、悬停在日期上以及点击日期。这些回调可以在配置对象的 events 属性中指定:
const dateToStr = (date) => date ? scheduler.templates.format_date(date) : null;
const calendar = scheduler.renderCalendar({
    container: "cal_here",
    navigation: true,
    events: {
        onBeforeMonthChange: function(oldDate, newDate) {
            scheduler.message(`Before change from ${dateToStr(oldDate)}
                to ${dateToStr(newDate)}`);
            return true;
        },
        onMonthChange: function(oldDate, newDate) {
            scheduler.message(`Changed from ${dateToStr(oldDate)}
                to ${dateToStr(newDate)}`);
        },
        onDateClick: function(date, e) {
            scheduler.setCurrentView(date);
            scheduler.message(`Selected date ${dateToStr(date)}`);
        },
        onDateMouseOver: function(date, e){
            scheduler.message(`Mouse over ${dateToStr(date)}`)

        }
    }
});