dhtmlxGantt 与 dhtmlxConnector
本教程将指导你如何在网页上搭建一个简单的甘特图,并实现将任务保存和更新到服务器端数据库的功能。
本文重点介绍如何使用 dhtmlxConnector 构建甘特图。 如果你更倾向于使用其他服务器端技术,可以参考以下针对不同集成方式的教程:
- dhtmlxGantt 与 PHP:Laravel 集成教程
- dhtmlxGantt 与 PHP:Slim3
- dhtmlxGantt 与 Python 集成
- dhtmlxGantt 与 Node.js 集成指南
- dhtmlxGantt 与 ASP.NET MVC
- dhtmlxGantt 与 Salesforce LWC 集成
- dhtmlxGantt 与 Ruby on Rails 集成
Related sample: Basic initialization
步骤 1. 下载 dhtmlxGantt 包
首先,将该库包下载到你的电脑上。
 请按照以下步骤操作:
- 如果尚未下载,请点击 这里 下载 dhtmlxGantt 包。
- 将下载得到的包解压到本地 Web 服务器的根目录下。解压后文件会被放在以包名命名的文件夹中(如 dhtmlxGantt)。
步骤 2. 引入 dhtmlxGantt 代码文件
接下来,在 HTML 文件中引入 dhtmlxGantt 的代码文件,从而可以使用该库的功能。 需要引入的 dhtmlxGantt 代码文件有:
- dhtmlxgantt.js
- dhtmlxgantt.css
请按照以下步骤操作:- 在 'dhtmlxGantt' 文件夹内创建一个 HTML 文件,例如命名为 'myGantt.html'。
- 在 myGantt.html 中引入 dhtmlxGantt 的代码文件(两个文件都在 'codebase' 文件夹中)。
myGantt.html
<!DOCTYPE html>
<html>
<head>
   <title>How to Start with dhtmlxGantt</title>
   <script src="codebase/dhtmlxgantt.js"></script>      <link href="codebase/dhtmlxgantt.css" rel="stylesheet">   </head>
<body>
    //your code will be here
</body>
</html>
步骤 3. 初始化 dhtmlxGantt
然后,创建一个 DIV 容器,并在其中初始化 dhtmlxGantt。
请注意,dhtmlxGantt 是一个静态对象,每个页面只能实例化一次。
你可以通过 dhtmlxGantt 或 gantt 来引用该实例。
请按照以下步骤操作:- 在 myGantt.html 文件中添加一个 DIV 容器。
- 使用
gantt.init("gantt_here")初始化 dhtmlxGantt。该方法参数为甘特图渲染的 HTML 容器的 ID。
myGantt.html
<!DOCTYPE html> <html> <head> <title>How to Start with dhtmlxGantt</title> <script src="codebase/dhtmlxgantt.js"></script> <link href="codebase/dhtmlxgantt.css" rel="stylesheet"> </head> <body> <div id="gantt_here" style='width:1000px; height:400px;'></div> <script type="text/javascript">
gantt.init("gantt_here");</script> </body> </html>
如果你使用全屏模式,请添加如下 CSS 以保证显示正常:
<style type="text/css" media="screen">    html, body{
        margin:0px;
        padding:0px;
        height:100%;
        overflow:hidden;
    }
</style>
步骤 4. 向甘特图加载数据
现在,我们将用一个示例数据源为甘特图填充数据。这里以内联对象作为数据源。
加载数据时,使用 parse 方法,并将数据源作为参数传入。
对象属性说明如下:
- data - 包含任务数据
- id - (string, number) 任务唯一标识。
- start_date - (Date) 任务计划开始时间。
- text - (string) 任务描述。
- progress - (number) 任务完成度,取值 0~1。
- duration - (number) 任务持续时间,单位为当前时间刻度。
- parent - (number) 父任务 ID(如有)。
- links - 定义任务之间的依赖关系
- id-(string, number) 依赖关系唯一标识。
- source-(number) 源任务 ID。
- target-(number) 目标任务 ID。
- type-(string) 依赖类型:0 - '完成到开始',1 - '开始到开始',2 - '完成到完成'。
请按照以下步骤操作:- 在 myGantt.html 文件中声明 'tasks' 变量:
myGantt.html
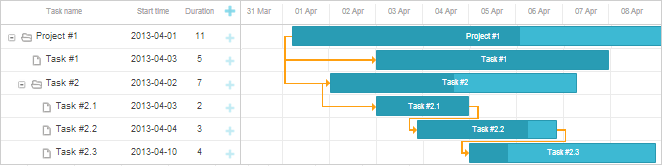
var tasks = {
    data:[
        {id:1, text:"Project #1",start_date:"01-04-2013", duration:11,
        progress: 0.6, open: true},
        {id:2, text:"Task #1",   start_date:"03-04-2013", duration:5,
        progress: 1,   open: true, parent:1},
        {id:3, text:"Task #2",   start_date:"02-04-2013", duration:7,
        progress: 0.5, open: true, parent:1},
        {id:4, text:"Task #2.1", start_date:"03-04-2013", duration:2,
        progress: 1,   open: true, parent:3},
        {id:5, text:"Task #2.2", start_date:"04-04-2013", duration:3,
        progress: 0.8, open: true, parent:3},
        {id:6, text:"Task #2.3", start_date:"05-04-2013", duration:4,
        progress: 0.2, open: true, parent:3}
    ],
    links:[
        {id:1, source:1, target:2, type:"1"},
        {id:2, source:1, target:3, type:"1"},
        {id:3, source:3, target:4, type:"1"},
        {id:4, source:4, target:5, type:"0"},
        {id:5, source:5, target:6, type:"0"}
    ]
};
- 在
gantt.init("gantt_here")之后,添加gantt.parse(tasks)命令:
myGantt.html
gantt.init("gantt_here");
gantt.parse (tasks);
Related sample: Basic initialization
步骤 5. 创建数据库
本步骤及后续步骤适用于需要从数据库加载数据而非使用内联数据的场景。
接下来,需建立两个表,用于存储任务和依赖关系。
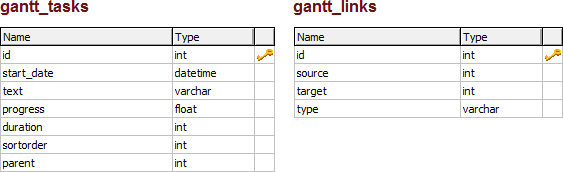
sortorder 字段仅在从数据库加载数据时使用,用于确定同级任务的顺序。
请按照以下步骤操作:- 创建名为 gantt 的新数据库。
- 运行以下 SQL 代码,创建 gantt_tasks 和 gantt_links 表:
CREATE TABLE `gantt_links` (
  `id` int(11) NOT NULL AUTO_INCREMENT,
  `source` int(11) NOT NULL,
  `target` int(11) NOT NULL,
  `type` varchar(1) NOT NULL,
  PRIMARY KEY (`id`)
);

CREATE TABLE `gantt_tasks` (
  `id` int(11) NOT NULL AUTO_INCREMENT,
  `text` varchar(255) NOT NULL,
  `start_date` datetime NOT NULL,
  `duration` int(11) NOT NULL DEFAULT 0,
  `progress` float NOT NULL DEFAULT 0,
  `sortorder` int(11) NOT NULL DEFAULT 0,
  `parent` int(11) NOT NULL,
  PRIMARY KEY (`id`)
);
为确保任务即使某些字段为空也能正常保存,请在 myGantt.html 文件中添加如下代码:
myGantt.html
gantt.attachEvent("onBeforeTaskAdd", function(id,task){
    task.sortorder = 0;
    return true;
});
步骤 6. 从数据库加载数据
接下来的两个步骤将使用 PHP 进行前后端集成。
如果你使用其他平台,请参阅 数据加载 文章,获取自定义服务器脚本的实现方法。
现在,我们将实现从数据库加载数据到甘特图。使用 load 方法,该方法接收一个指向数据源的 URL。
对于数据库访问,该 URL 指向负责服务器端逻辑的 PHP 文件。
这里我们使用 PHP 和 dhtmlxConnector 库,简化 dhtmlxGantt 的服务器端集成。
请按照以下步骤操作:- 在 'dhtmlxGantt' 文件夹内创建一个 PHP 文件,例如 data.php。
- 编辑 data.php,添加以下服务器端代码:
data.php
<?php

include ('codebase/connector/gantt_connector.php');

$res = new PDO("mysql:host=localhost;dbname=gantt", "root", "");

$gantt = new JSONGanttConnector($res);
$gantt->render_links("gantt_links","id","source,target,type");
$gantt->render_table(
    "gantt_tasks",
    "id",
    "start_date,duration,text,progress,sortorder,parent"
);
?>
- 在 myGantt.html 文件中,将
gantt.config.date_format属性设置为 "%Y-%m-%d %H:%i",以保证日期格式与 dhtmlxGantt 的格式一致。
myGantt.html
gantt.config.date_format = "%Y-%m-%d %H:%i"; gantt.init("gantt_here");
- 调用
gantt.load('data.php'),即可将数据库中的数据加载到甘特图中。
myGantt.html
gantt.config.date_format = "%Y-%m-%d %H:%i";
gantt.init("gantt_here");
gantt.load('data.php');//loads data to Gantt from the database
映射数据库列
请注意,在 $connector->render_table 方法中,列的顺序非常重要。列表中的前三列始终对应客户端任务对象的 start_date/duration/text 或 start_date/end_date/text 属性,无论你使用的列名是什么。具体映射逻辑如下所述。
如果在配置中指定了 'duration',第二列会被分配给 task.duration:
$gantt->render_table("gantt_tasks","id","Start,duration,Name,progress,parent","");
或者,使用别名:
$gantt->render_table("gantt_tasks","id","Start,Length(duration),Name,progress,parent","");
// JS: task.start_date, task.duration, task.text, task.progress, task.parent
如果使用了不同的列名,第二列将会映射到 end_date 属性:
$gantt->render_table("gantt_tasks","id","Start,End,Name,progress,parent","");
// JS: task.start_date, task.end_date, task.text, task.progress, task.parent
映射其他列
所有其他列都将直接按照它们的名称进行映射,不做修改:
$gantt->render_table("gantt_tasks","id","start_date,duration,text,custom,parent","");
// JS: task.start_date, task.duration, task.text, task.custom, task.parent
也可以为其他列使用别名:
$gantt->render_table("gantt_tasks","id",
    "start_date,duration,text,custom_column(customProperty),parent","");
// JS: task.start_date, task.duration, task.text, task.customProperty, task.parent
第七步:更新数据库中的数据
接下来,需要确保在甘特图中所做的更改能够保存回数据库。为此,将使用 dataProcessor 辅助库。该过程包括初始化 DataProcessor 并将其链接到 dhtmlxGantt 实例。
操作步骤如下:- 打开 myGantt.html 文件,并使用
dataProcessor("data.php")命令创建一个新的 dhtmlxDataProcessor 实例。 - 使用
dp.init(gantt)将 dhtmlxDataProcessor 对象连接到 dhtmlxGantt 实例。
myGantt.html
gantt.init("gantt_here");
gantt.load('data.php');

var dp=new gantt.dataProcessor("data.php");  dp.init(gantt);
错误日志记录
如果一切设置无误但仍有问题,可以启用 Gantt 的日志功能来帮助定位问题。
首先,确保包含 HTML 文件的目录有写入权限。然后,在 data.php 文件中添加以下代码:
data.php
$gantt = new JSONGanttConnector($res);

$gantt->enable_log("log.txt");
之后可以检查 log.txt 文件,查看日志信息。
下一步?
就是这样!现在已经有了一个可以从数据库加载数据并将修改保存回数据库的基本甘特图。 你可以根据具体需求对其进行调整和扩展。
如需进一步指导,建议阅读以下文章:
Back to top