Data loading and export
You can populate DHTMLX Spreadsheet with a prepared dataset that can include both cell data and styles. The component supports two ways to load data:
- load from an external file
- load from a local source
The component also supports export of data into an Excel file.
Preparing data
DHTMLX Spreadsheet expects data in JSON format.
It can be a simple array with cell objects. Use this way if you need to create a data set for only one sheet.
const data = [
    { cell: "A1", value: "Country" },
    { cell: "B1", value: "Product" },
    { cell: "C1", value: "Price" },
    { cell: "D1", value: "Amount" },
    { cell: "E1", value: "Total Price" },

    { cell: "A2", value: "Ecuador" },
    { cell: "B2", value: "Banana" },
    { cell: "C2", value: 6.68, format:"currency" },
    { cell: "D2", value: 430, format:"percent" },
    // "myFormat" is the id of a custom format
    { cell: "E2", value: 2872.4, format:"myFormat" },

    // add drop-down lists to cells
    { cell: "A9", value: "Turkey", editor: {type: "select", options: ["Turkey","India","USA","Italy"]} },
    { cell: "B9", value: "", editor: {type: "select", options: "B2:B8" } },

    // more cell objects
];
Or it can be an object with data to be loaded into several sheets at once. For example:
const data = {
    sheets: [
        {
            name: "sheet 1",
            id: "sheet_1",
            data: [
                { cell: "A1", value: "Country" },
                { cell: "B1", value: "Product" },
                // more data
            ],
            merged: [
                // merge cells A1 and B1
                { from: { column: 0, row: 0 }, to: { column: 1, row: 0 } },
                // merge cells A2, A3, A4, and A5
                { from: { column: 0, row: 1 }, to: { column: 0, row: 4 } },
            ]
        },
        {
            name: "sheet 2",
            id: "sheet_2",
            data: [
                { cell: "A1", value: "Country" },
                { cell: "B1", value: "Product" },
                // more data
            ]
        },
        // more sheet objects
    ]
};
Check the full lists of available properties for these two ways in the API reference.
The ability to load merged cells is available only if you prepare data in a sheet object.
Setting styles for cells
You may need to define the cell styling in the data set. In this case the data should be an object with separate properties that describe data objects and CSS classes applied to particular cells.
Set a CSS class for a cell with the css property.
const styledData = {
    styles: {
        someclass: {
            background: "#F2F2F2",
            color: "#F57C00"
        }
    },
    data: [
        { cell: "A1", value: "Country" },
        { cell: "B1", value: "Product" },
        { cell: "C1", value: "Price" },
        { cell: "D1", value: "Amount" },
        { cell: "E1", value: "Total Price" },

        { cell: "A2", value: "Ecuador" },
        { cell: "B2", value: "Banana" },
        { cell: "C2", value: 6.68, css: "someclass" },
        { cell: "D2", value: 430, css: "someclass" },
        { cell: "E2", value: 2872.4 }
    ],
}
Setting the locked state for a cell
If you want to specify locked cells in a data set, use the locked property of a cell and set it to true:
const dataset = [
    { cell: "a1", value: "Country", locked: true }, //locks a cell
    { cell: "b1", value: "Product", locked: true },

    { cell: "a2", value: "Ecuador" },
    { cell: "b2", value: "Banana" },

    { cell: "a3", value: "Belarus" },
    { cell: "b3", value: "Apple" },
    // more cells
];
Check the full list of available cell properties in the API reference.
The locked state is a part of the spreadsheet data. It is included into the object returned by the serialize() method, even if a locked cell is empty, and it is kept when data is exported into an Excel file and imported back.
Related sample: Spreadsheet. Locked cells
Adding a link into a cell
You can specify a link for a cell right in a data set. To do this, set the link property as an object and provide the necessary settings:
text- (optional) the text of a linkhref- (required) the URL that defines the link destination
Here's what it looks like in a data set:
const dataset = [
    { cell: "a1", value: "Country"}, //locks a cell
    { cell: "b1", value: "Product"},

    { cell: "a2", value: "Ecuador"},
    {
        cell: "b2",
        value: "Banana",
        link:{
            href:"http://localhost:8080/"
        }
    },
    // more cells
];
Note that you should not use the value property of the cell object and the text property of the link object at the same time, since they are mutually exclusive.
Related sample: Spreadsheet. Import and export to JSON
External data loading
Loading JSON data
By default, Spreadsheet expects data in JSON format. To load data from an external source, use the load() method. It takes the URL of the file with data as a parameter:
var spreadsheet = new dhx.Spreadsheet("spreadsheet");
spreadsheet.load("../common/data.json");
Related sample: Spreadsheet. Load Data
If you need to let users import a JSON file into the spreadsheet through the File Explorer, read Loading JSON files.
Loading CSV data
You can also load data in CSV format. For this, you need to call the load() method and pass the name of the format ("csv") as the second parameter:
var spreadsheet = new dhx.Spreadsheet("spreadsheet");
spreadsheet.load("../common/data.csv", "csv");
Related sample: Spreadsheet. CSV Load
Loading Excel file (.xlsx)
You can load a file in Excel format with the .xlsx extension into a spreadsheet. There are corresponding controls in the Toolbar and Menu in the user interface:
- Menu: File -> Import as..-> Microsoft Excel(.xlsx)
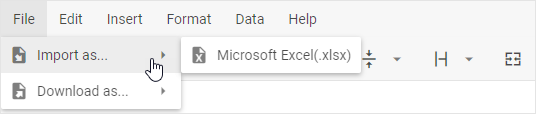
- Toolbar: Import -> Microsoft Excel(.xlsx)

How to import data
Note that the import feature does not work in Internet Explorer.
DHTMLX Spreadsheet uses the WebAssembly-based library Excel2Json to import data from Excel. To load Excel data into Spreadsheet, you need to:
- install the Excel2Json library
- specify the importModulePath option in the Spreadsheet configuration and set the path to the worker.js file in one of two ways:
- by providing a local path to the file on your computer, like:
"../libs/excel2json/1.0/worker.js" - by providing a link to the file from CDN:
"https://cdn.dhtmlx.com/libs/excel2json/1.0/worker.js"
- by providing a local path to the file on your computer, like:
var spreadsheet = new dhx.Spreadsheet(document.body, {
    importModulePath: "../libs/excel2json/1.0/worker.js"
});
Related sample: Spreadsheet. Custom Import Export Path
To load data from an Excel file, pass a string with the type of the extension ("xlsx") as the second parameter of the load() method :
// .xlsx only
spreadsheet.load("../common/data.xlsx", "xlsx");
Note that the component supports import from Excel files with the .xlsx extension only.
Along with cell values, import restores the cell styles, the number formats, the merged cells, the links, the data validation lists (as drop-down editors), and the locked state of cells.
Related sample: Spreadsheet. Import Xlsx
You can also export data from a spreadsheet into an Excel file, if needed.
Processing after-loading code
The component makes an AJAX call and expects the remote URL to provide valid data. Data loading is asynchronous, so you need to wrap any after-loading code into a promise:
spreadsheet.load("/some/data").then(function(){
   // do something
});
Loading from local source
To load data from a local source, make use of the parse() method. Pass a predefined data set as a parameter of this method:
const spreadsheet = new dhx.Spreadsheet("spreadsheet");
spreadsheet.parse(data);
Related sample: Spreadsheet. Custom Cells Count
For details on how to load multiple sheets into the spreadsheet, see the Work with Sheets article.
Saving and restoring state
To save the current state of a spreadsheet, use the serialize() method. It converts the spreadsheet into a JSON object with the sheets, styles, and formats attributes. Besides cell values, the saved state includes the applied styles and number formats, the merged cells, the frozen columns and rows, the locked cells, and the custom sizes and visibility of columns and rows.
// saving state of the spreadsheet1
var state = spreadsheet1.serialize();
Then you can parse the data stored in the saved state array to a different spreadsheet. For example:
// creating a new spreadsheet
var spreadsheet2 = new dhx.Spreadsheet(document.body);
// parsing the state of the spreadsheet1 into spreadsheet2
spreadsheet2.parse(state);
Exporting data
Export into Excel
DHTMLX Spreadsheet can export data from a spreadsheet into an Excel file. There are corresponding controls in the Toolbar and Menu in the user interface:
- Menu: File -> Download as..-> Microsoft Excel(.xlsx)
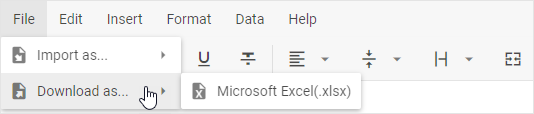
- Toolbar: Export -> Microsoft Excel(.xlsx)

How to export data
Note that the export feature does not work in Internet Explorer.
The library uses the WebAssembly-based library Json2Excel to export data to Excel. Export is processed in the worker.js file of the Json2Excel library (the default link is https://cdn.dhtmlx.com/libs/json2excel/next/worker.js?vx). You can use either the public export server or a local export server. To export files, you need to:
- specify the exportModulePath option in the Spreadsheet configuration and set the path to the worker.js file:
- if you use the public export server, you don't need to specify the link to it, since it is used by default
- if you use your own export server, you need to:
- install the Json2Excel library
- use
"../libs/json2excel/x.x/worker.js?vx"for a specific version (replacex.xwith the version deployed on your server)
var spreadsheet = new dhx.Spreadsheet(document.body, {
    exportModulePath: "../libs/json2excel/x.x/worker.js?vx" // the path to the export module, if a local export server is used
});
Related sample: Spreadsheet. Custom Import Export Path
Once you've adjusted the required sources, you can use the related xlsx() API method of the Export object to export data of the component, as in:
spreadsheet.export.xlsx();
Related sample: Spreadsheet. Export Xlsx
Besides cell values, an exported file keeps the styles applied to cells, the number formats, the merged cells, the frozen columns and rows, the links added into cells, the drop-down editors (as Excel data validation), and the locked state of cells. All of them are restored when the file is imported back into Spreadsheet.
Please note that the component supports export to Excel files with the .xlsx extension only.
How to set a custom name for an exported file
By default, the name for an exported file is "data". You can provide your own name for an exported file. For this, you need to pass a custom name as a parameter of the xlsx() method, as in:
spreadsheet.export.xlsx("MyData");
Related sample: Spreadsheet. Export Xlsx
Check the steps of importing data from an Excel file into Spreadsheet.
Export into JSON
From v4.3, the library can also export data from a spreadsheet into a JSON file. Use the json() method of the Export object for this purpose:
spreadsheet.export.json();
Related sample: Spreadsheet. Export/import JSON