How to start
This tutorial guides you through the steps to get a fully functional DHTMLX Spreadsheet on a page. The component is especially effective for managing large amounts of data when you need to save the results of calculations and reproduce them.
Step 1. Including source files
Start by creating an HTML file named index.html. Then include Spreadsheet source files in it. The detailed description of the DHTMLX Spreadsheet package is given here.
There are two necessary files:
- the JS file of DHTMLX Spreadsheet
- the CSS file of DHTMLX Spreadsheet
and
- the link to the Google Fonts source file for the correct rendering of fonts.
<!DOCTYPE html>
<html>
<head>
    <title>How to Start with DHTMLX Spreadsheet</title>
    <script src="codebase/spreadsheet.js"></script>

    <link href="codebase/spreadsheet.css" rel="stylesheet">
    <link href="https://fonts.googleapis.com/css?family=Roboto:400,500" rel="stylesheet">
</head>
<body>
    <script>
    // your code will be here
    </script>
</body>
</html>
Installing Spreadsheet via npm or yarn
You can import JavaScript Spreadsheet into your project using the yarn or npm package manager.
Installing trial Spreadsheet via npm or yarn
If you want to use the trial version of Spreadsheet, download the trial Spreadsheet package and follow the steps in the README file. Note that the trial Spreadsheet is available for 30 days only.
Installing PRO Spreadsheet via npm or yarn
You can access the DHTMLX private npm directly in the Client's Area by generating your login and password for npm. A detailed installation guide is also available there. Note that access to the private npm is available only while your proprietary Spreadsheet license is active.
Step 2. Creating Spreadsheet
Now you are ready to add Spreadsheet to the page. First, create a DIV container and place DHTMLX Spreadsheet into it. Your steps are:
- to specify a DIV container in the index.html file
- to initialize DHTMLX Spreadsheet using the
dhx.Spreadsheetconstructor
As parameters, the constructor function takes the HTML container to place Spreadsheet into and the Spreadsheet configuration object.
<!DOCTYPE html>
<html>
<head>
    <title>How to Start with DHTMLX Spreadsheet</title>
    <script src="codebase/spreadsheet.js"></script>

    <link href="codebase/spreadsheet.css" rel="stylesheet">
    <link href="https://fonts.googleapis.com/css?family=Roboto:400,500" rel="stylesheet">
</head>
<body>
    <div id="spreadsheet_container"></div>
    <script>
        const spreadsheet = new dhx.Spreadsheet("spreadsheet", {
            //config options
        });
    </script>
</body>
</html>
Step 3. Setting Spreadsheet configuration
Next you can specify additional configuration options you want the Spreadsheet component to have when initialized besides the default ones.
You can adjust the look and feel of Spreadsheet with several options, for example: toolbarBlocks, rowsCount, and colsCount. Check the details.
const spreadsheet = new dhx.Spreadsheet("spreadsheet", {
    toolbarBlocks: ["columns", "rows", "clear"],
    rowsCount: 10,
    colsCount: 10
});
The configuration of DHTMLX Spreadsheet is quite flexible, so you can change it at any time. Read the related guide to go into the basics of configuring Spreadsheet.
Step 4. Loading data into Spreadsheet
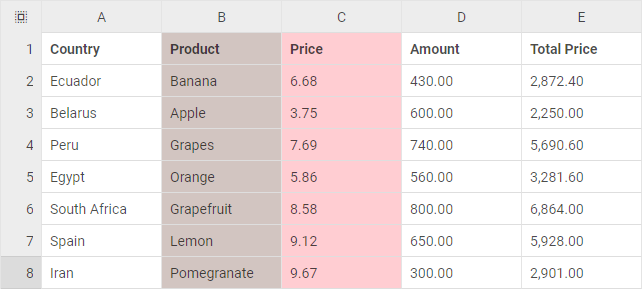
The last step is to populate Spreadsheet with data. DHTMLX Spreadsheet takes data in JSON format. Besides data you can pass necessary styles in a dataset. While loading inline data, you need to use the parse() method and pass an object with data to it as in the example below:
const data = [
    { "cell": "a1", "value": "Country" },
    { "cell": "b1", "value": "Product" },
    { "cell": "c1", "value": "Price" },
    { "cell": "d1", "value": "Amount" },
    { "cell": "e1", "value": "Total Price" },

    { "cell": "a2", "value": "Ecuador" },
    { "cell": "b2", "value": "Banana" },
    { "cell": "c2", "value": 6.68 },
    { "cell": "d2", "value": 430 },
    { "cell": "e2", "value": 2872.4 },

    { "cell": "a3", "value": "Belarus" },
    { "cell": "b3", "value": "Apple" },
    { "cell": "c3", "value": 3.75 },
    { "cell": "d3", "value": 600 },
    { "cell": "e3", "value": 2250 }
]

// initializing spreadsheet
const spreadsheet = new dhx.Spreadsheet("spreadsheet", {
    //config
});
// loading data into spreadsheet
spreadsheet.parse(data);
Related sample: Spreadsheet. Custom Cells Count
What's next
That's all. In four steps you get a handy tool for working with tabular data. Now you can start working with your data or keep exploring DHTMLX Spreadsheet.