Radio
라디오 버튼 그룹
노트
라이트박스에서 이 컨트롤을 사용하려면 editors 확장 기능이 활성화되어 있는지 확인하세요.
scheduler.plugins({
editors: true /*!*/
});
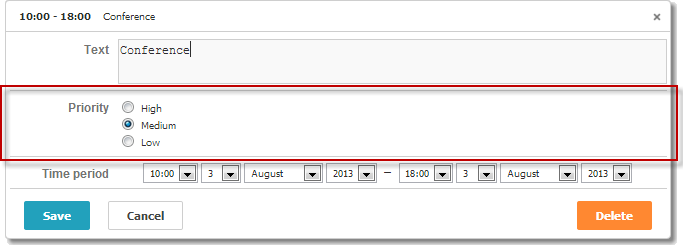
var priorities = [
{ key: 1, label: 'High' },
{ key: 2, label: 'Medium' },
{ key: 3, label: 'Low' }
];
scheduler.locale.labels.section_priority = 'Priority';
scheduler.config.lightbox.sections = [
{ name:"text", height:50, map_to:"text", type:"textarea", focus:true },
{ name:"priority", height:58, options:priorities,
map_to:"priority", type:"radio", vertical:true},
{ name:"time", height:72, type:"time", map_to:"auto"}
];
초기화
라이트박스에 Radio 컨트롤을 포함하려면 다음 단계를 따르세요:
- 페이지에서 'editors' 확장 기능을 활성화하세요:
scheduler.plugins({
    editors: true
});
- 라이트박스 설정에 radio 섹션을 추가하세요:
scheduler.config.lightbox.sections = [
    { name:"description", ... },
    { name:"radiobutton", height:58, options:priorities,
    map_to:"priority", type:"radio", vertical:true},
    { name:"time", ...}
];
- 섹션의 라벨을 정의하세요:
scheduler.locale.labels.section_priority = 'Priority';
속성
'radio' 컨트롤에 일반적으로 설정하는 주요 속성은 아래와 같습니다 (전체 목록은 여기에서 확인하세요):
| name | (string) 섹션의 이름 |
| height | (number) 섹션의 높이 |
| map_to | (string) 이 섹션이 매핑되는 데이터 속성 이름 |
| type | (textarea,time,select,template,multiselect,radio,checkbox,combo) 섹션의 컨트롤 타입 |
| options | (array of objects) 컨트롤의 선택 옵션을 정의합니다 ('select', 'multiselect', 'radio', 'combo' 컨트롤에서 사용). 각 객체는 하나의 옵션을 나타내며 다음을 포함합니다:
|
| vertical | (boolean) 라디오 버튼이 수직(true) 또는 수평으로 정렬될지 결정합니다 ('multiselect', 'radio' 컨트롤에 적용) |
컨트롤에 데이터 채우기
일반적으로 라디오 버튼의 값은 options 파라미터를 사용해 설정합니다:
scheduler.config.lightbox.sections =
    {      name:"alert", type:"select",
        ...
        options:[
            { key: 1, label: 'High' },
            { key: 2, label: 'Medium' },
            { key: 3, label: 'Low' }
    ]},
    ...
];
options 배열의 각 항목에는 두 가지 필수 속성이 포함되어야 합니다:
- key - 옵션의 ID
- label - 옵션의 표시 텍스트
서버에서 라디오 버튼 값 가져오기
서버에서 데이터를 받아 라디오 버튼을 채우려면 serverList 메서드를 사용하세요:
scheduler.config.lightbox.sections = [
    {name:"description", ...},
    {name:"priority", map_to:"priority", type:"radio",
          options:scheduler.serverList("priority")},
    {name:"time", ...}
];

scheduler.load("./data/types.php");
load 메서드에 대한 서버 응답에는 서버 리스트 이름과 일치하는 컬렉션이 포함되어야 하며, 이 예시와 같이 JSON 형식이어야 합니다:
{
   "data":[
      {
          "id":"1",
          "start_date":"2019-03-02 15:00:00",
          "end_date":"2019-03-04 16:00:00",
          "text":"Interview",
          "priority":1
      },
      {
          "id":"2",
          "start_date":"2019-03-02 17:00:00",
          "end_date":"2019-03-04 18:00:00",
          "text":"Performance review",
          "type":2
      }
   ],
   "collections": {/*!*/
      "type":[/*!*/
         {"value":1,"label":"Low"},/*!*/
         {"value":2,"label":"Medium"},/*!*/
         {"value":3,"label":"High"}/*!*/
      ]/*!*/
   }/*!*/
}
PHP Connector 라이브러리를 사용하는 경우, 서버 측 코드는 다음과 같이 작성할 수 있습니다:
//types.php
<?php
    require_once('../../../../connector-php/codebase/scheduler_connector.php');
    include ('../../common/config.php');

    $list = new JSONOptionsConnector($res, $dbtype);
    $list->render_table("types","typeid","typeid(value),name(label)");

    $scheduler = new JSONSchedulerConnector($res, $dbtype);
    $scheduler->set_options("type", $list);
    $scheduler->render_table(
        "tevents",
        "event_id",
        "start_date,end_date,event_name,type"
    );
?>
노트
updateCollection 메서드를 사용하여 가져온 옵션 목록을 새로 고칠 수 있다는 점을 참고하세요.
Radio 컨트롤의 이벤트 처리
dhtmlxScheduler API는 Scheduler 라이트박스 내의 라디오 버튼에 대해 별도의 내장 이벤트 핸들러를 제공하지 않습니다.
하지만, 아래와 같이 Lightbox Radio 컨트롤에 클릭 핸들러를 추가할 수 있습니다:
- 라이트박스가 열릴 때 라디오 요소에 접근합니다.
scheduler.attachEvent("onLightbox", function(){
    var node = scheduler.formSection("type").node;
    var radios = node.getElementsByTagName("input");
    ...
});
- Lightbox의 각 라디오 버튼에 onclick 이벤트를 등록합니다.
scheduler.attachEvent("onLightbox", function(){
    ...
    for(var i = 0; i < radios.length; i++){
      radios[i].onclick = onRadioClick;
    }
});
- 라디오 버튼 클릭 시 실행될 함수를 정의합니다.
function onRadioClick(event){
    var e = event || window.event,
        node = this;

    dhtmlx.message(node.value);
}
Related sample Event handling for the Radio Control
Need help?
Got a question about the documentation? Reach out to our technical support team for help and guidance. For custom component solutions, visit the Services page.