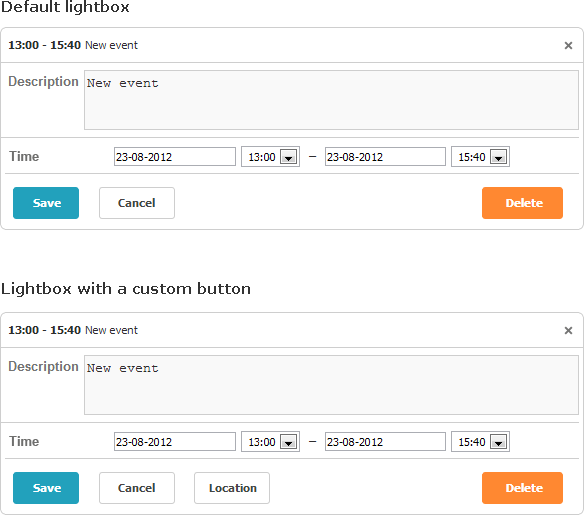
라이트박스의 버튼 변경하기
라이트박스의 기본 버튼을 커스터마이즈할 수 있습니다.

이 버튼들이 관리되는 컬렉션부터 살펴보겠습니다.
기본적으로 라이트박스에는 3개의 버튼('Save', 'Cancel', 'Delete')이 포함되어 있으며, 이는 @buttons_left 및 @buttons_right 구성 옵션을 통해 제어됩니다.
scheduler.config.buttons_left = ["dhx_save_btn", "dhx_cancel_btn"];
scheduler.config.buttons_right = ["dhx_delete_btn"];
기본 버튼 세트를 수정하려면 아래 단계를 따르세요:
1 . buttons_left 또는 buttons_right 배열에 새 항목을 추가합니다:
scheduler.config.buttons_left = ["dhx_save_btn","dhx_cancel_btn","locate_button"];
2 . 버튼 라벨을 다음과 같이 정의합니다:
scheduler.locale.labels["locate_button"] = "Location";
3 . {buttonName}_set 셀렉터를 사용하여 버튼 색상을 커스터마이즈할 수 있습니다. 예시:
.dhx_save_btn_set{
    background-color:#4CAF50;
}
Related sample: Custom Color for Buttons
4 . 버튼에 아이콘을 지정하거나 스타일을 적용하려면 아래와 같이 CSS 클래스를 지정하세요:
.locate_button
{
    background-image:url('../../codebase/imgs/location.gif');
    background-position: -2px 0px;
    width:20px;
}
5 . 버튼 클릭을 처리하려면 @onLightboxButton 핸들러를 구현하세요. 예시:
scheduler.attachEvent("onLightboxButton", function(button_id, node, e){
    if(button_id == "locate_button"){
        alert("Location!");
    }
});