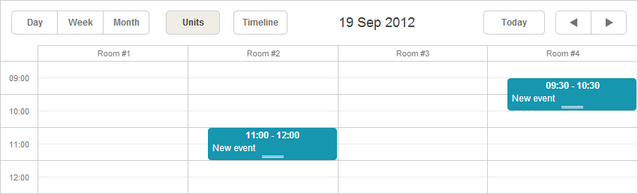
Units View
이 뷰는 Scheduler PRO 버전에서만 사용할 수 있습니다.
Units 뷰는 X축을 단순히 시간 기준이 아닌, 이벤트의 특정 속성을 기준으로 구성합니다.
초기화
스케줄러에 Units 뷰를 추가하려면 다음 단계를 따르세요:
- 페이지에서 Units 확장 기능을 활성화하세요:
scheduler.plugins({
    units: true
});
- 스케줄러 마크업에 뷰의 탭을 추가하세요:
<div id="scheduler_here" class="dhx_cal_container" ...>
    <div class="dhx_cal_navline">
       ...
       <div class="dhx_cal_tab" name="unit_tab"></div>
    </div>
    ...
</div>
- 탭의 라벨을 설정하세요:
//'unit_tab'은 div의 이름입니다
scheduler.locale.labels.unit_tab = "Unit"
- createUnitsView 메서드를 사용하여 뷰를 생성하세요:
scheduler.createUnitsView({
    name:"unit",
    property:"unit_id", // 유닛에 매핑할 이벤트 속성
    list:[              // 뷰에 표시할 유닛 정의
        {key:1, label:"Section A"},
        {key:2, label:"Section B"},
        {key:3, label:"Section C"}
    ]
});
뷰에 데이터 로딩하기
Day, Month, Year와 같은 표준 뷰와 달리, Units와 Timeline과 같은 다중 리소스 뷰는 이벤트에 추가 필드가 반드시 필요합니다:
- property - (string) 이벤트를 특정 유닛에 할당할 때 사용하는 데이터 속성의 이름
scheduler.createUnitsView({
    name:"unit",
    property:"unit_id",
    list:[
        {key:1, label:"Section A"},
        {key:2, label:"Section B"},
        {key:3, label:"Section C"}
    ]
});

scheduler.init('scheduler_here');
scheduler.parse([
    {id:1, text:"Task1", start_date:"2019-09-17 12:00", end_date:"2019-09-18 21:00",
    unit_id:"1"},
     {id:2, text:"Task2", start_date:"2019-09-17 09:00", end_date:"2019-09-17 21:00",
    unit_id:"3"},
     {id:3, text:"Task3", start_date:"2019-09-17 15:00", end_date:"2019-09-18 15:00",
    unit_id:"2"}
]);
이벤트는 unit_id 값과 list.key가 일치할 때 해당 유닛에 할당됩니다.
섹션 동적 변경
Units 뷰에서 유닛 목록을 동적으로 갱신하려면 serverList 및 updateCollection 메서드를 사용할 수 있습니다.
여러 날에 걸친 유닛 표시
여러 날에 걸친 유닛을 표시하려면 days 파라미터를 사용하세요:
scheduler.createUnitsView({
    name:"week_unit",
    property:"section_id",
    list:sections,
    days:3 /*!*/
});
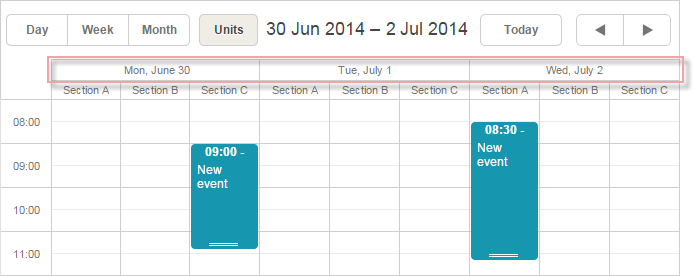
이렇게 하면 두 번째 수평 스케일에 날짜가 표시됩니다.
두 번째 스케일의 포맷을 변경하려면 scheduler.templates[name+"_second_scale_date"] 템플릿을 사용하세요:
scheduler.templates.units_second_scale_date = function(date) {
    return scheduler.templates.week_scale_date(date);
};
참고사항
- 첫 번째 스케일은 scale_text_template로 정의합니다. 높이는 scale_height로 조정할 수 있습니다.
- 두 번째 수평 스케일에서 불필요한 시간 단위를 숨기려면 "뷰의 X축에서 시간 단위 숨기기"의 방법을 참고하세요.
- size 및 step 파라미터는 멀티데이 유닛에 적용되지 않습니다.
- PDF 내보내기는 신규 서비스에서만 지원되며, 구버전 내보내기 도구에서는 지원되지 않습니다.
- 표시 구간의 시작 요일을 변경하려면 scheduler.date.(units_name)_start 함수를 사용하세요:
scheduler.date.units_start = function (date) {
    return scheduler.date.week_start(date);
};
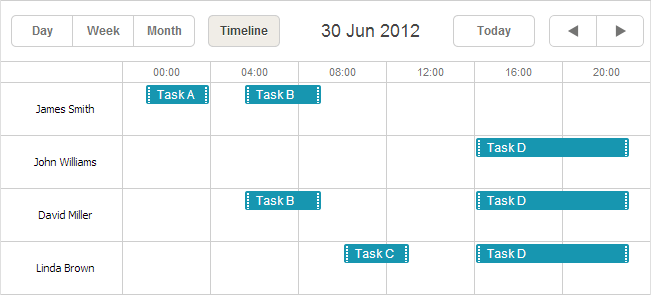
여러 유닛에 이벤트 할당
버전 4.1부터 이벤트를 여러 유닛에 동시에 할당할 수 있습니다.
이 기능을 활성화하려면:
- Multisection 확장 기능을 페이지에서 활성화하세요
- multisection 속성을 true로 설정하세요
- (선택) 섹션 전환을 쉽게 하려면 "multiselect" 확장 기능을 활성화하고 "Multiselect" 컨트롤을 사용하세요
<script src="codebase/dhtmlxscheduler.js"></script>
<link rel="stylesheet" href="codebase/dhtmlxscheduler.css" type="text/css">

<script>
    scheduler.plugins({
        multisection: true, /*!*/
        multiselect: true,
        units: true
    });
    scheduler.config.multisection = true; /*!*/
    scheduler.init('scheduler_here');
</script>
이후, 이벤트의 관련 속성에 여러 섹션(기본적으로 콤마로 구분, section_delimiter 참고)을 지정하면 해당 이벤트가 모든 유닛에 표시됩니다:
scheduler.createUnitsView({
    name: "unit",
    list: [
        {key: 1, label: "James Smith"},
        {key: 2, label: "John Williams"},
        {key: 3, label: "David Miller"},
        {key: 4, label: "Linda Brown"}],
    property: "section_id", /*!*/
    ...
});
scheduler.init('scheduler_here', new Date(2019, 5, 30), "unit");

scheduler.parse([
    { id:1, text:"Task A", section_id:'1',         ...},/*!*/
    { id:2, text:"Task B", section_id:'1,3',     ...},/*!*/
    { id:3, text:"Task C", section_id:'4',         ...},/*!*/
    { id:4, text:"Task D", section_id:'2,3,4',     ...}/*!*/
]);
Multisection events in Timeline and Units view
X축 섹션 데이터
X축에 표시되는 값은 list 파라미터로 설정합니다:
scheduler.createUnitsView({
    name:"unit",
    ...
    list:[
        {key:1, label:"Section A"},
        {key:2, label:"Section B"},
        {key:3, label:"Section C"}
    ]
});
list의 각 항목에는 두 가지 필수 속성이 있어야 합니다:
- key - 고유 식별자
- label - 화면에 표시될 이름
서버에서 X축 섹션 데이터 불러오기
서버에서 섹션 데이터를 불러오려면 다음을 사용하세요:
- 클라이언트 측: serverList 메서드
scheduler.createUnitsView({
    name:"unit",
    property:"type_id",
    list:scheduler.serverList("units"),
    size:20,
    step:1
});
여기서 serverList가 'units'라는 리스트를 반환합니다.
- 서버 측
load 메서드의 응답에 server list 이름의 컬렉션이 포함되어야 하며, JSON 형식은 다음과 같습니다:
{
   "data":[
      {
          "id":"1",
          "start_date":"2019-03-02 15:00:00",
          "end_date":"2019-03-04 16:00:00",
          "text":"Team meeting",
          "type_id":"1"
      },
      {
          "id":"2",
          "start_date":"2019-03-02 17:00:00",
          "end_date":"2019-03-04 18:00:00",
          "text":"Strategy meeting",
          "type_id":"2"
      }
   ],
   "collections": {/*!*/
      "units":[/*!*/
         {"value":"1","label":"Conference room 1"},/*!*/
         {"value":"2","label":"Conference room 2"},/*!*/
         {"value":"3","label":"Conference room 3"}/*!*/
      ]/*!*/
   }/*!*/
}
또는 OptionsConnector 커넥터를 사용할 수 있습니다:
<?php
    include('connector-php/codebase/scheduler_connector.php');//파일 포함

    $res="mysql_connect(""localhost","root","");//DB 서버 연결
    mysql_select_db("sampleDB");//DB 연결. 'sampleDB'는 DB 이름

    $list = new OptionsConnector($res, $dbtype);
    $list->render_table("types","type_id","type_id(value),name(label)");

    $scheduler = new schedulerConnector($res, $dbtype);
    //클라이언트와 동일한 이름('units')을 사용합니다
    $scheduler->set_options("units", $list);
    $scheduler->render_table("events","id","start_date,end_date,text,type_id");
?>

dhtmlxConnector를 사용하지 않고 컬렉션을 직접 생성할 수도 있습니다. 이 경우 updateCollection 메서드로 컬렉션을 갱신하세요:
scheduler.updateCollection("units", new_sections_array);
Loading Units sections from the server
Units 스크롤
유닛이 많을 경우 size 및 step 속성으로 수평 스크롤을 활성화할 수 있습니다:
scheduler.createUnitsView({
    name:"unit",
    ...
    size:10, // 한 번에 표시할 유닛 수
    step:5   // 한 번에 스크롤할 유닛 수
});

Horizontal scrolling sections in Units view
유닛에 속하지 않는 이벤트 건너뛰기
기본적으로 유닛에 매칭되지 않는 이벤트는 첫 번째 유닛에 표시됩니다. 3.0 버전부터는 이런 이벤트를 아예 건너뛸 수 있습니다.
이를 활성화하려면 skip_incorrect 속성을 설정하세요:
scheduler.createUnitsView({
    name:"unit",
    ...
    skip_incorrect:true
});