작업 유형
이 기능은 PRO 에디션에서만 사용할 수 있습니다.
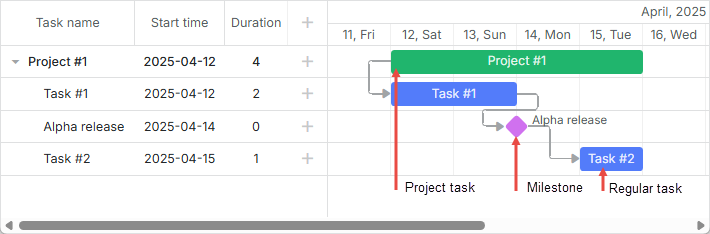
Gantt 차트에서 표시할 수 있는 세 가지 기본 작업 유형이 있습니다(사용자 정의 유형을 생성할 수도 있습니다):
작업 유형을 지정하려면 데이터 항목 내에서 type 속성을 사용하세요 (값은 types 객체와 일치해야 합니다):
데이터 세트에서 작업 유형 지정
var data = {
    task:[
        {id:1, text:"Project #1",    type:"project",    open:true},   /*!*/
        {id:2, text:"Task #1",          start_date:"12-04-2020", duration:3, parent:1},
        {id:3, text:"Alpha release", type:"milestone",   parent:1, /*!*/
            start_date:"14-04-2020"},                                                /*!*/
        {id:4, text:"Task #2",          start_date:"17-04-2020", duration:3, parent:1}],
    links:[]
};
일반 작업
기본적으로 dhtmlxGantt는 일반 작업(**type="task"**인 작업)을 생성합니다.
일반 작업 지정
var data = {
    tasks:[{id:2, text:"Task #1", start_date:"12-04-2020", duration:3}],  /*!*/
    links:[]
};
//또는
var data = {
     tasks:[{id:2, text:"Task #1", start_date:"12-04-2020", duration:3, /*!*/
            type:"task"}],  /*!*/
    links:[]
};
**type="task"**로 지정된 작업의 특징은 다음과 같습니다:
- 하나의 부모와 여러 개의 자식 작업을 가질 수 있습니다.
- 드래그 및 크기 조정이 가능합니다.
- 자식 작업에 따라 자동으로 조정되지 않습니다. 자식 작업을 이동해도 부모 작업의 기간이나 진행률에는 영향을 주지 않습니다.
- 상위 프로젝트에 표시될 수 있습니다. 자세히 보기
- 타임라인에서 숨길 수 있습니다. 자세히 보기
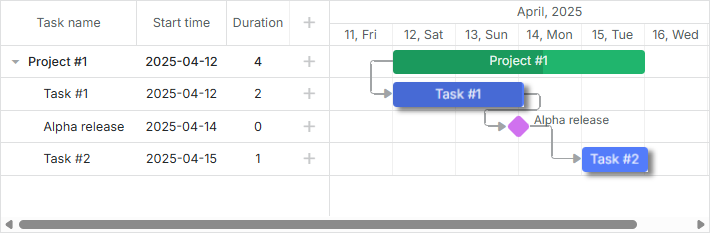
프로젝트 작업
프로젝트 작업은 가장 이른 자식 작업의 시작부터 가장 늦은 자식 작업의 종료까지의 기간을 가집니다.
프로젝트 작업과 일반 작업의 주요 차이점은, 프로젝트 작업의 기간이 자식 작업에 따라 결정되고, 이에 따라 자동으로 업데이트된다는 점입니다.

프로젝트 작업 지정
var data = {
    tasks:[
        {id:1, text:"Project #1",    type:"project",    open:true}, /*!*/
        {id:2, text:"Task #1",       start_date:"12-04-2020", duration:3, parent:1},
        {id:3, text:"Alpha release", type:"milestone",   parent:1,
            start_date:"14-04-2020"}],
    links:[]
};
**type="project"**로 지정된 작업의 특징은 다음과 같습니다:
- 하나의 부모와 여러 개의 자식 작업을 가질 수 있습니다.
- drag_project를 통해 명시적으로 드래그 앤 드롭을 활성화하지 않는 한 드래그 및 크기 조정이 불가능합니다.
- 자식 작업에 따라 기간이 결정되며, 자식 작업을 이동하면 프로젝트 작업의 기간이 업데이트됩니다.
- start_date, end_date, duration 속성을 무시합니다.
- 자식 작업이 없으면 드래그할 수 없습니다.
- 프로젝트의 progress는 기본적으로 수동으로 설정되며, 하위 작업의 진행률을 자동으로 반영하지 않습니다. 자동 계산을 위해서는 커스텀 코드가 필요합니다. 예시 보기
프로젝트 작업 추가를 활성화하려면 Milestones를 참고하세요. 마일스톤 생성을 활성화하면 프로젝트 작업도 추가할 수 있습니다.
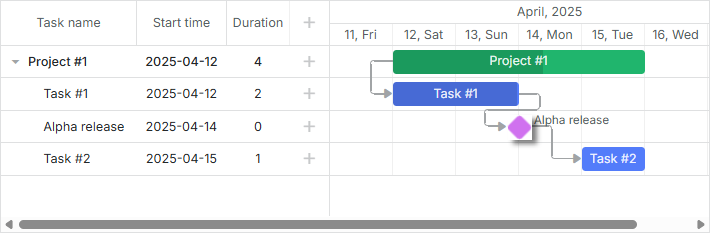
마일스톤
마일스톤은 기간이 0인 작업으로, 프로젝트의 주요 날짜를 강조할 때 사용됩니다(자세히 보기).
마일스톤 지정
var data = {
    tasks:[
        {id:1, text:"Project #1",    type:"project",    open:true},
        {id:2, text:"Task #1",       start_date:"12-04-2020", duration:3, parent:1},
        {id:3, text:"Alpha release", type:"milestone",   parent:1, /*!*/
            start_date:"14-04-2020"}],/*!*/
    links:[]
};
**type="milestone"**로 지정된 작업의 특징은 다음과 같습니다:
- 하나의 부모와 여러 개의 자식 작업을 가질 수 있습니다.
- 드래그 및 크기 조정이 불가능합니다.
- 항상 기간이 0입니다.
- end_date, duration, progress 속성을 무시합니다.
- 상위 프로젝트에 표시될 수 있습니다. 자세히 보기
- 타임라인에서 숨길 수 있습니다. 자세히 보기
마일스톤 생성을 활성화하는 방법은 Milestones를 참고하세요.
작업 유형별 개별 라이트박스
각 작업 유형마다 고유한 속성이 있으므로, 세부 입력 폼(라이트박스)을 유형별로 개별 구성할 수 있습니다. 구성 정보는 lightbox 객체에 저장됩니다.
다음이 포함됩니다:
- gantt.config.lightbox.sections - 일반 작업용
- gantt.config.lightbox.project_sections - 프로젝트 작업용
- gantt.config.lightbox.milestone_sections - 마일스톤�용
기본 구성 예시는 다음과 같습니다:
gantt.config.lightbox.sections = [
    {name: "description", height: 70, map_to: "text", type: "textarea", focus: true},
    {name: "time", type: "duration", map_to: "auto"}
];
gantt.config.lightbox.project_sections= [
    {name: "description", height: 70, map_to: "text", type: "textarea", focus: true},
    {name: "type", type: "typeselect", map_to: "type"},
    {name: "time", type: "duration", readonly: true, map_to: "auto"}
];
gantt.config.lightbox.milestone_sections= [
    {name: "description", height: 70, map_to: "text", type: "textarea", focus: true},
    {name: "type", type: "typeselect", map_to: "type"},
    {name: "time", type: "duration", single_date: true, map_to: "auto"}
];
작업 유형이 선택 컨트롤에서 변경되면 라이트박스도 자동으로 새로운 구성에 맞게 동적으로 업데이트됩니다.
사용자 정의 작업 유형을 생성하고 해당 라이트박스 구조도 정의할 수 있습니다.
라이트박스 구성에 대한 자세한 내용은 편집 폼 구성하기 챕터를 참고하세요.
사용자 정의 유형 생성
모든 작업 유형은 types 객체에 정의되어 있습니다.
사용자 정의 작업 유형을 추가하려면 일반적으로 다음 단계를 따릅니다:
- types 객체에 새 항목을 추가합니다.
- 새 유형에 필요한 설정을 정의합니다.
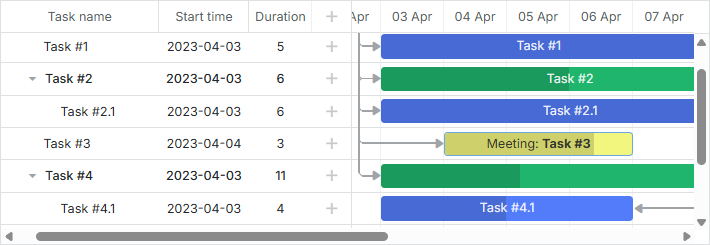
예를 들어, 일반 작업처럼 동작하지만 고유한 색상과 라이트박스 입력을 가진 meeting이라는 새 유형을 추가하려면:
meeting이라는 새 유형과 해당 라이트박스를 다음과 같이 정의할 수 있습니다:
- types 객체에 새 유형을 추가합니다:
gantt.config.types.meeting = "type_id";
여기서 "meeting"은 코드 가독성을 위한 프로그래밍 이름입니다. "type_id"는 데이터베이스 및 types 객체에 저장되는 고유 식별자입니다.
- "typeselect" 컨트롤에서 새 유형의 라벨을 지정합니다:
gantt.locale.labels.type_meeting = "Meeting";
- 새 유형의 라이트박스 구조를 정의합니다:
gantt.config.lightbox.meeting_sections = [
    {name:"title", height:20, map_to:"text", type:"textarea", focus:true},
    {name:"details", height:70, map_to: "details", type: "textarea"},
    {name:"type", type:"typeselect", map_to:"type"},
    {name:"time", height:72, type:"time", map_to:"auto"}
];
gantt.locale.labels.section_title = "Subject";
gantt.locale.labels.section_details = "Details";
- 새 유형의 스타일을 정의하고 task_class 템플릿으로 적용합니다:
.meeting_task{
    border:2px solid #BFC518;
    color:#6ba8e3;
    background: #F2F67E;
}
.meeting_task .gantt_task_progress{
    background:#D9DF29;
}
gantt.templates.task_class = function(start, end, task){
    if(task.type == gantt.config.types.meeting){
        return "meeting_task";
    }
    return "";
};
- task_text 템플릿을 사용해 "meeting" 작업의 텍스트를 커스터마이즈합니다:
gantt.templates.task_text = function(start, end, task){
    if(task.type == gantt.config.types.meeting){
        return "Meeting: <b>" + task.text + "</b>";
    }
    return task.text;
};
작업 유형의 커스텀 표시
기존 작업 유형의 표시 방식을 변경하려면 type_renderers 옵션을 사용하세요. 이를 통해 작업 유형이 페이지에 렌더링되는 방식을 제어하는 함수를 오버라이드할 수 있습니다.

gantt.config.type_renderers["project"]=function(task, defaultRender){
    var main_el = document.createElement("div");
    main_el.setAttribute(gantt.config.task_attribute, task.id);
    var size = gantt.getTaskPosition(task);
    main_el.innerHTML = [
        "<div className='project-left'></div>",
        "<div className='project-right'></div>"
    ].join('');
    main_el.className = "custom-project";

    main_el.style.left = size.left + "px";
    main_el.style.top = size.top + 7 + "px";
    main_el.style.width = size.width + "px";

    return main_el;
};