데이터 로딩
dhtmlxGantt는 정보를 로드할 때 두 가지 데이터 형식을 지원합니다:
Gantt 차트에 데이터를 채우려면 parse 또는 load 메서드 중 하나를 사용할 수 있습니다.
gantt.init("gantt_here");
gantt.load("tasks.json");
Related sample: Basic initialization
잘못된 데이터를 Gantt에 제공하면 트리 구조가 순환 구조로 변할 수 있으며, 이는 cyclic reference error를 발생시킬 수 있습니다.
객체에서 데이터 로딩
데이터를 객체에서 직접 로드하려면 parse 메서드를 사용하세요:
Loading from an inline data source
var data = {
  tasks:[
     {id:1, text:"Project #1", start_date:"01-04-2020", duration:18},
     {id:2, text:"Task #1", start_date:"02-04-2020", duration:8, parent:1},
     {id:3, text:"Task #2", start_date:"11-04-2020", duration:8, parent:1}
   ]
};
gantt.init("gantt_here");
gantt.parse(data);
Related sample: Basic initialization
데이터 객체에 "start_date"와 "end_date"가 모두 포함되어 있고 날짜 값이 날짜 부분만 포함(예: 01-12-2021, 시간 없음)되어 있다면 추가 설정이 필요할 수 있습니다. 자세한 내용은 Task end date display & Inclusive end dates를 참고하세요.
서버에서 데이터 로딩
클라이언트 측
서버에서 데이터를 가져오려면 load 메서드를 사용할 수 있습니다:
gantt.html
gantt.init("gantt_here");
gantt.load("data.json");
load 메서드는 지정된 URL로 AJAX 요청을 보내고, 지원되는 형식 중 하나로 된 응답 데이터를 기대합니다. 예를 들어:
data.json
{
  "tasks":[
     {"id":1, "text":"Project #1", "start_date":"01-04-2020", "duration":18},
     {"id":2, "text":"Task #1", "start_date":"02-04-2020","duration":8, "parent":1},
     {"id":3, "text":"Task #2", "start_date":"11-04-2020","duration":8, "parent":1}
  ],
  "links":[
     {"id":1, "source":1, "target":2, "type":"1"},
     {"id":2, "source":2, "target":3, "type":"0"}
  ]
}
두 번째 인자로 "json", "xml" 또는 "oldxml"과 같이 형식을 지정할 수 있습니다.
gantt.load("data.xml", "xml");
서버 측
서버에서는 데이터가 담긴 정적 파일이나, 데이터 소스에서 정보를 수집해 응답으로 보내는 스크립트가 있을 수 있습니다. 서버 측 설정은 사용하는 프레임워크에 따라 다릅니다.
다양한 플랫폼에서의 자세한 설정 방법과 코드 예제는 Server-Side Integration를 참고하세요.
예를 들어, Node.js를 사용할 경우, Gantt가 AJAX 데이터 요청을 보내는 URL을 처리하는 서버 라우트를 설정할 수 있습니다.
gantt.load("/data");
이 라우트는 다음과 같은 JSON 응답을 생성합니다:
app.get("/data", function(req, res){
    db.query("SELECT * FROM gantt_tasks", function(err, rows){
        if (err) console.log(err);
        db.query("SELECT * FROM gantt_links", function(err, links){
            if (err) console.log(err);
            for (var i = 0; i < rows.length; i++){
                rows[i].start_date = rows[i].start_date.format("YYYY-MM-DD");
                rows[i].open = true;
            }

            res.send({ tasks:rows, links : links });
        });
    });
});
지원되는 모든 데이터 형식은 지원되는 데이터 형식에서 확인할 수 있습니다.
작업 날짜 로딩
작업 일정 정의
데이터에서 작업의 일정을 지정하는 방법은 세 가지가 있습니다:
- start_date + duration
- start_date + end_date
- duration + end_date
제공되지 않은 속성은 나머지 두 개의 값으로 계산됩니다.
Related sample: Backward planning
end_date는 duration보다 우선합니다. 세 가지 속성이 모두 있으면 Gantt는 duration을 무시하고 시작일과 종료일로 기간을 계산합니다. 예시:
{
    "id":"20", "text":"Project #2",
    "start_date":"01-04-2025",
    "duration":3,
    "end_date":"05-04-2025",
    "order":10,"progress":0.4,
    "type": "project", "open": true
}

// 위 작업은 실제로 시작일과 종료일로 계산된 기간으로 로드됩니다:
{
    "id":"20", "text":"Project #2",
    "start_date":"01-04-2025",
    "duration":4,
    "end_date":"05-04-2025",
    "order":10,"progress":0.4,
    "type": "project", "open": true
}
ISO 날짜 형식 사용
Gantt는 ISO 날짜 형식을 지원합니다. 이를 활성화하려면 날짜를 파싱하고 포맷하는 함수를 오버라이드해야 합니다:
gantt.templates.parse_date = function(date) {
    return new Date(date);
};
gantt.templates.format_date = function(date) {
    return date.toISOString();
};
날짜 형식 동적 변경
날짜 형식을 동적으로 변경하려면 parse_date 템플릿을 다음과 같이 업데이트하세요:
var cfg = gantt.config;
var strToDate = gantt.date.str_to_date(cfg.date_format, cfg.server_utc);

gantt.templates.parse_date = function(date){
    return strToDate (date);
};
작업 종료일 표시 및 포함 종료일
이 섹션에서는 작업의 종료일을 올바르게 저장하고 표시하는 방법을 설명합니다.
먼저, 작업 날짜를 다룰 때 자주 발생하는 두 가지 시나리오를 살펴보겠습니다:
시나리오 1
- 작업 기간이 전체 일(day) 단위로 측정됨 (duration_unit="day")
- 작업 데이터에 시작일과 종료일이 "%Y-%m-%d" 또는 "%d-%m-%Y" 형식(시간 없음)으로 포함됨
dhtmlxGantt가 작업 종료일을 해석하고 저장하는 방식 때문에 결과가 예상과 다를 수 있습니다.
예시:
gantt.parse({ tasks: [
    {
        id: 1,
        text: "Task 1",
        start_date: "22-12-2021",
        end_date: "22-12-2021"
    }
]}, links:[]);

console.log(gantt.getTask(1).end_date);
// 2021년 12월 22일 00:00:00

console.log(gantt.getTask(1).duration);
// 0
이 경우, 시작일과 종료일이 동일한 시점을 가리키므로 작업 기간은 0이 됩니다.
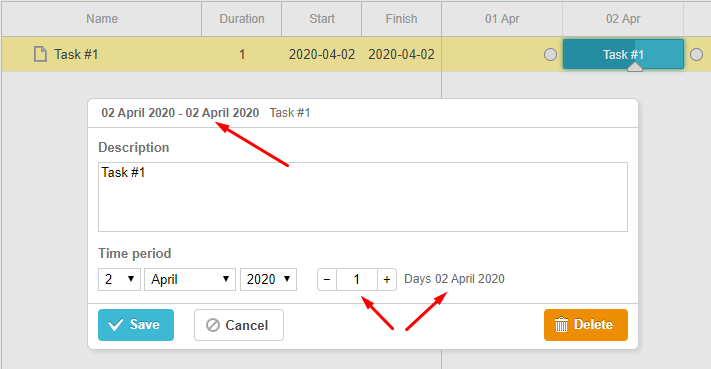
시나리오 2
- 종료일이 그리드에 표시됨
- 종료일 형식에 시간이 포함되어 있지 않음
gantt.config.columns = [
    {name: "text", label: "Name", tree: true, width: 200, resize: true},
    {name: "duration", label: "Duration", width:80, align: "center", resize: true},
    {name: "start_date", label: "Start", width:80, align: "center", resize: true},
    {name: "end_date", label: "Finish", width:80, align: "center", resize: true}
];

gantt.init("gantt_here");

gantt.parse({ tasks: [
    {
        id: 1,
        text: "Task 1",
        start_date: "02-04-2020",
        end_date: "02-04-2020"
    }
]}, links:[]);
여기서 Finish(종료일)는 4월 3일로 표시되지만, 실제로 작업은 4월 2일 종료 시점에 끝납니다.

아래에서는 Gantt가 종료일을 어떻게 저장하는지에 대해 설명합니다.
Gantt의 종료일 저장 방식
시간 부분이 명시되지 않아도(duration_unit = "day"), dhtmlxGantt는 항상 날짜를 JavaScript Date 객체로 저장하며, 시간 정보가 포함됩니다.
종료일의 포맷은 다음과 같습니다:
- 초와 밀리초는 항상 0입니다(Gantt는 1분 미만 단위를 지원하지 않음)
- 종료일은 마지막 활성 일(또는 시) 직후의 시작을 나타냅니다. 예시:
- 4월 2일에 시작해 1일 동안 진행되는 작업은 시작일과 종료일이 "02-04-2022 00:00:00 - 03-04-2022 00:00:00"이 됩니다. 종료일은 4월 3일 시작을 가리킵니다.
- 4월 2일 13:00에 시작해 1시간짜리 작업은 "02-04-2022 13:00:00 - 02-04-2022 14:00:00"이 됩니다. 종료일은 다음 시간의 시작을 가리킵니다.
종료일을 시간 없이 표시하면 혼란스러울 수 있습니다. 시나리오 2의 예시에서는 날짜가 "02-04-2022 - 03-04-2022"로 보여 1일 작업이 2일짜리로 보일 수 있습니다.
이것이 기본 동작이며, 혼란스러울 수 있지만 이를 조정할 수 있는 설정 옵션이 있으며, 다음 섹션에서 다룹니다.
기본 동작을 어떻게 조정할 수 있나요?
1) 가장 먼저 피해야 할 것은 gantt에 저장된 실제 작업 날짜를 변경하는 것입니다.
예를 들어, gantt에 로드되는 작업 날짜를 수정하여 종료일을 02-04-2022 23:59:59로 설정할 수 있지만, 이 방법은 작업 기간 계산 및 자동 스케줄링과 충돌이 발생할 수 있으므로 권장하지 않습니다.
대신, 다음과 같은 방법을 사용하는 것이 좋습니다:
2a) gantt에서 작업 종료일의 표시 형식을 조정하고 싶다면(예: 종료일을 작업 기간에 포함시키고 싶을 때) task_end_date 템플릿을 재정의할 수 있습니다.
예를 들어, 2020년 4월 2일에 시작해서 1일 동안 진행되는 작업이 있다고 가정하고, 템플릿이 종료일에 어떻게 영향을 미치는지 살펴보겠습니다.
기본적으로 작업의 종료일은 2020년 4월 3일(03-04-2020 00:00:00)로 표시됩니다:
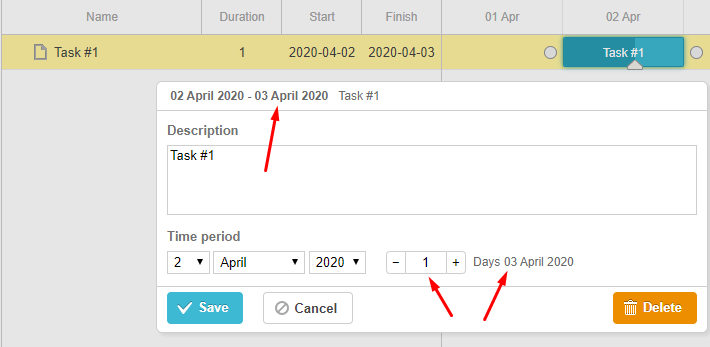
하지만 task_end_date 템플릿을 사용하면 동일한 작업이 2020년 4월 2일에 종료되는 것으로 표시됩니다:
코드는 다음과 같습니다:
// columns 설정 재정의
gantt.config.columns = [
  {name: "wbs", label: "#", width: 60, align: "center", template: gantt.getWBSCode},
  {name: "text", label: "Name", tree: true, width: 200, resize: true},
  {name: "start_date", label: "Start", width:80, align: "center", resize: true},
  {name: "end_date", label: "Finish", width:80, align: "center", resize: true},
  {name:"add"}
];

// 템플릿 재정의
gantt.templates.task_end_date = function(date){
   return gantt.templates.task_date(new Date(date.valueOf() - 1));
};

var gridDateToStr = gantt.date.date_to_str("%Y-%m-%d");
gantt.templates.grid_date_format = function(date, column){
   if(column === "end_date"){
     return gridDateToStr(new Date(date.valueOf() - 1));
   }else{
     return gridDateToStr(date);
   }
}
gantt.init("gantt_here");
이 방법을 사용하면 그리드, 라이트박스 헤더 등 종료일이 표시되는 모든 곳에서 작업 종료일이 변경됩니다.
inclusive end dates format을 사용하고 있고, 그리드에서 inline editing과 함께 사용하려면, 종료일을 포함하는 커스텀 에디터를 만들어야 합니다. 예시는 다음과 같습니다:
// 종료일 포함 에디터
// 기본 에디터를 사용하되 set_value/get_value 메서드만 오버라이드
var dateEditor = gantt.config.editor_types.date;
gantt.config.editor_types.end_date = gantt.mixin({
    set_value: function(value, id, column, node){
        var correctedValue = gantt.date.add(value, -1, "day");
        return dateEditor.set_value.apply(this, [correctedValue, id, column, node]);
    },
    get_value: function(id, column, node) {
        var selectedValue = dateEditor.get_value.apply(this, [id, column, node]);
        return gantt.date.add(selectedValue, 1, "day");
    },
}, dateEditor);

var textEditor = {type: "text", map_to: "text"};
var startDateEditor = {type: "date", map_to: "start_date"};
var endDateEditor = {type: "end_date", map_to: "end_date"};
var durationEditor = {type: "number", map_to: "duration", min:0, max: 100};

gantt.config.columns = [
    {name: "text", label: "Name", tree: true, width: 200, editor: textEditor,
        resize: true},
    {name: "duration", label: "Duration", width:80, align: "center",
        editor: durationEditor, resize: true},
    {name: "start_date", label: "Start", width:140, align: "center",
        editor: startDateEditor, resize: true},
    {name: "end_date", label: "Finish", width:140, align: "center",
        editor: endDateEditor, resize: true}
];

// 라이트박스 및 그리드 템플릿을 작업 종료일을 포함하는 형식으로 표시
gantt.templates.task_end_date = function(date){
    return gantt.templates.task_date(new Date(date.valueOf() - 1));
};

var gridDateToStr = gantt.date.date_to_str("%Y-%m-%d");
gantt.templates.grid_date_format = function(date, column){
    if(column === "end_date"){
        return gridDateToStr(new Date(date.valueOf() - 1));
    }else{
        return gridDateToStr(date);
    }
}
Related sample: Inclusive end date editor
2b) 애플리케이션의 다른 부분에서 종료일이 "포함" 형식(예: 2020년 4월 2일에 시작해서 1일 동안 진행되는 작업이 start_date: "02-04-2022", end_date: "02-04-2022"로 저장되는 경우)이 필요하다면, 종료일을 추가로 처리해야 합니다:
- gantt에 데이터를 로드하기 전에 종료일에 하루를 더해줍니다.
- gantt에서 변경 사항을 데이터 저장소로 저장하기 전에 종료일에서 하루를 빼줍니다.
데이터 속성
Gantt 차트의 데이터 소스는 두 가지 주요 정보를 포함하는 객체입니다:
- tasks - 작업 항목들
- links - 의존성 링크들
작업 객체 속성
작업 객체 속성의 전체 목록은 Task properties 문서에서 확인할 수 있습니다.
JSON 및 XML 데이터의 기본 날짜 형식은 "%d-%m-%Y %H:%i" 입니다(자세한 내용은 날짜 형식 명세 참조).
이 형식을 변경하려면 date_format 설정 옵션을 사용하세요.
gantt.config.date_format="%Y-%m-%d";
gantt.init("gantt_here");
Gantt에 로드된 후 start_date와 end_date 속성은 Date 객체로 파싱됩니다.
사용하는 날짜 형식이 date_format 설정에서 지원되지 않는 경우, parse_date 템플릿을 사용하여 직접 파싱할 수 있습니다.
링크 객체 속성
링크 객체 속성의 전체 목록은 Link properties 문서에서 확인할 수 있습니다.
커스텀 속성
필수 속성에만 국한되지 않고, 데이터 항목에 원하는 모든 커스텀 속성을 추가할 수 있습니다. 추가 속성은 문자열로 파싱되어 클라이언트 측에 전달되며, 필요에 따라 사용할 수 있습니다.
커스텀 속성이 포함된 데이터 예시는 여기에서 확인할 수 있습니다.
데이터베이스 구조
데이터베이스를 사용할 경우, 작업과 링크를 위한 별도의 테이블 두 개를 사용하는 것이 권장됩니다.
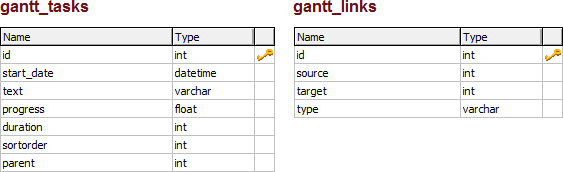
작업과 링크를 Gantt 차트에 로드하기 위한 일반적인 데이터베이스 구조는 다음과 같습니다:
- gantt_tasks 테이블 - gantt 작업을 저장
- id - (string,number) 작업 id
- start_date - (Date) 작업 시작 예정일
- text - (string) 작업 설명
- progress - (number) 0~1, 작업 완료율
- duration - (number) 현재 시간 단위의 작업 기간
- parent - (number) 상위 작업의 id
- type - (string) 선택적, 작업 유형
- readonly - (boolean) 선택적, 작업을 읽기 전용으로 표시
- editable - (boolean) 선택적, 작업을 편집 가능으로 표시
- gantt_links 테이블 - gantt 의존성 링크 저장
- id - (string,number) 링크 id
- source - (number) 출발 작업의 id
- target - (number) 대상 작업의 id
- type - (string) 의존성 유형:
- 0 - 'finish_to_start'
- 1 - 'start_to_start'
- 2 - 'finish_to_finish'
- 3 - 'start_to_finish'
- lag - (number) 선택적, 작업 지연
- readonly - (boolean) 선택적, 링크를 읽기 전용으로 표시
- editable - (boolean) 선택적, 링크를 편집 가능으로 표시
다음 SQL을 사용하여 두 개의 테이블을 생성할 수 있습니다:
CREATE TABLE `gantt_links` (
  `id` int(11) NOT NULL AUTO_INCREMENT,
  `source` int(11) NOT NULL,
  `target` int(11) NOT NULL,
  `type` varchar(1) NOT NULL,
  PRIMARY KEY (`id`)
)
CREATE TABLE `gantt_tasks` (
  `id` int(11) NOT NULL AUTO_INCREMENT,
  `text` varchar(255) NOT NULL,
  `start_date` datetime NOT NULL,
  `duration` int(11) NOT NULL,
  `progress` float NOT NULL,
  `sortorder` int(11) NOT NULL,
  `parent` int(11) NOT NULL,
  PRIMARY KEY (`id`)
)
이벤트 흐름
로드 메서드와 관련된 이벤트 흐름은 다음과 같습니다:
gantt.parse():
- event onBeforeParse
- event onTaskLoading
- event onParse
- gantt.render()
gantt.load()
- event onLoadStart
- gantt.parse()
- event onLoadEnd
gantt.refreshData():
- event onBeforeDataRender
- event onBeforeTaskDisplay
- event onDataRender
gantt.render():
- event onBeforeGanttRender
- gantt.refreshData()
- event onGanttRender