Tasks Coloring
작업 색상 지정은 특정 작업을 강조하여 주목도를 높이고, 작업을 더 쉽게 구분할 수 있도록 도와줍니다.
작업 스타일을 사용자 정의하는 방법에는 여러 가지가 있습니다:
작업 템플릿 재정의하기
템플릿을 사용해 작업의 스타일을 커스터마이즈하려면 task_class 템플릿을 사용합니다. 예를 들어, 작업의 우선순위에 따라 색상을 지정하려면 아래와 같이 코드를 작성할 수 있습니다:
Coloring tasks depending on their priority
<style>

    /* high */
    .gantt_task_line.high {
        --dhx-gantt-task-background: #d96c49;
        --dhx-gantt-task-color: #fff;
    }

    /* medium */
    .gantt_task_line.medium {
        --dhx-gantt-task-background: #f57730;
        --dhx-gantt-task-color: #fff;
    }

    /* low */
    .gantt_task_line.low {
        --dhx-gantt-task-background: #fff;
        --dhx-gantt-task-color: #fff;
    }

</style>
gantt.templates.task_class  = function(start, end, task){
    switch (task.priority){
        case "1":
            return "high";
            break;
        case "2":
            return "medium";
            break;
        case "3":
            return "low";
            break;
    }
};
작업의 다른 부분을 스타일링하려면 타임라인 영역의 템플릿 문서에 나열된 템플릿을 참고하세요.
링크에도 유사한 방법을 적용할 수 있습니다. 자세한 내용은 여기에서 확인할 수 있습니다.
작업 객체 속성에 스타일 지정하기
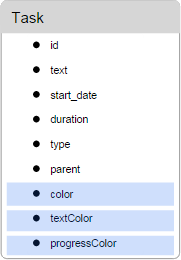
작업의 외관을 사용자 정의하려면 작업 데이터 객체에 최대 세 개의 특수 속성을 추가할 수 있습니다:
- color - 작업 바의 배경색을 지정
- textColor - 작업 바 내부 텍스트의 색상을 지정 (type이 "milestone"인 작업에는 적용되지 않음)
- progressColor - 진행률 바의 색상을 지정 (기본적으로 진행률 바는 작업 색상보다 약간 더 어두운 색상으로, 'background-color: rgb(54, 54, 54); opacity: 0.2'로 스타일링됨)
이 속성들은 특별히 처리됩니다. Gantt는 해당 속성이 작업에 존재할 경우 자동으로 값을 적용하며, 그렇지 않은 경우 기본 색상이 사용됩니다.
Setting the task's color in the data object
var tasks = {
  data:[
     {id:1, text:"Project #1", start_date:"01-04-2013", duration:18, color:"red"},
     {id:2, text:"Task #1", start_date:"02-04-2013",
        duration:8, color:"blue", parent:1},
     {id:3, text:"Task #2", start_date:"11-04-2013",
        duration:8, color:"blue", parent:1}
   ]
};
gantt.init("gantt_here");
gantt.parse(tasks);

gantt.getTask(1).color = "red";
Related sample: Specify inline colors for Tasks and Links
color 속성을 사용하여 커스텀 색상을 지정하면 인라인 스타일이 적용되어 다른 스타일을 덮어씁니다. 즉, 주경로(critical path) 강조나 기타 커스텀 배경/텍스트 색상 스타일이 적용되지 않습니다.
작업을 주경로로 표시하려면 다음 CSS를 사용할 수 있습니다:
.gantt_critical_task {
  --dhx-gantt-task-background: #e63030 !important;
}
Related sample: Coloring critical tasks and links
이러한 속성 중 하나라도 작업에 설정되면, 해당 작업에는 "gantt_task_inline_color" 클래스가 추가됩니다.
이 클래스는 예를 들어 ".gantt_task_line.gantt_task_inline_color" 선택자를 사용하여 다른 스타일을 덮어쓰는 데 사용할 수 있습니다:
.gantt_task_line.gantt_task_inline_color .gantt_task_progress {
    background-color: rgb(54, 54, 54);
    opacity: 0.2;
}
이 속성들은 아래와 같이 모든 유효한 CSS 색상 형식을 지원합니다:
task.color = "#FF0000";
task.color = "red";
task.color = "rgb(255,0,0)";
링크에도 유사한 접근법을 사용할 수 있습니다. 자세한 내용은 여기에서 확인할 수 있습니다.
데이터로 색상 불러오기
작업 색상이 백엔드 데이터에서 오거나, 색상이 작업에 할당된 단계 또는 리소스에 연결되어 하드코딩할 수 없는 경우, 데이터에서 동적으로 스타일을 생성하는 것이 유용합니다.
예를 들어, 작업에 할당할 수 있는 사용자 목록이 있고 각 사용자마다 지정된 색상이 있다고 가정해보겠습니다:
[
    {"key":1, "label":"John", "backgroundColor":"#03A9F4", "textColor":"#FFF"},
    {"key":2, "label":"Mike", "backgroundColor":"#f57730", "textColor":"#FFF"},
    {"key":3, "label":"Anna", "backgroundColor":"#e157de", "textColor":"#FFF"},
    {"key":4, "label":"Bill", "backgroundColor":"#78909C", "textColor":"#FFF"},
    {"key":7, "label":"Floe", "backgroundColor":"#8D6E63", "textColor":"#FFF"}
]
이 경우, 사용자와 색상은 별도로 관리되며, gantt는 미리 사용자 ID나 색상을 알지 못합니다.
이를 처리하는 방법은 다음과 같습니다:
- 이 컬렉션에 대해 명명된 serverList를 정의합니다:
gantt.serverList("people");
옵션을 페이지에 로드합니다. gantt 데이터 포맷 사용 또는 커스텀 XHR 요청을 사용할 수 있습니다.
옵션이 로드된 후, 데이터에서 CSS 스타일을 동적으로 생성합니다:
gantt.attachEvent("onLoadEnd", function(){
    // 스타일 요소에 임의의 id 사용
    var styleId = "dynamicGanttStyles";

    // 색상이 있는 옵션을 다시 로드할 경우 기존 스타일 요소 재사용

    var element = document.getElementById(styleId);
    if(!element){
        element = document.createElement("style");
        element.id = styleId;
        document.querySelector("head").appendChild(element);
    }
    var html = [];
    var resources = gantt.serverList("people");

    // 각 옵션에 대한 CSS 스타일을 생성하여 스타일 요소에 삽입

    resources.forEach(function(r){
        if(r.backgroundColor && r.textColor){
            html.push(".gantt_task_line.gantt_resource_" + r.key + "{" +
                "--dhx-gantt-task-background:"+r.backgroundColor+"; " +
                "--dhx-gantt-task-color:"+r.textColor+"; " +
            "}");

        }
    });
    element.innerHTML = html.join("");
});
resource datastore를 사용하는 경우, 리소스 ID로 r.key 대신 r.id를 사용하세요.
- 이후, task_class 템플릿을 사용하여 생성된 클래스를 작업에 할당할 수 있습니다:
gantt.templates.task_class = function (start, end, task) {
    var css = [];

    if(task.owner_id){
        css.push("gantt_resource_" + task.owner_id);
    }

    return css.join(" ");
};
Related sample: Assigning owners to tasks
Back to top