툴팁 (v6.0)
The article refers to dhtmlxScheduler 6.0 or earlier versions. If you use dhtmlxScheduler 7.0+, see details here.
이 문서는 dhtmlxScheduler 6.0 또는 그 이전 버전을 다룹니다. dhtmlxScheduler 7.0+를 사용 중인 경우 자세한 내용은 여기를 참조하시기 바랍니다.
이벤트에 대한 툴팁을 표시하려면 페이지에서 한 번만 Tooltip 확장을 활성화해야 합니다.
scheduler.plugins({
    tooltip: true;
});
그 후에는 기본 설정으로 툴팁이 표시됩니다.
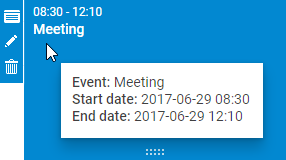
툴팁을 구성하려면 다음 API를 사용합니다:
메서드
- hide() - 툴팁을 숨깁니다
- show(event,text) - 지정된 콘텐츠를 사용하여 브라우저 이벤트 위치에 툴팁을 표시합니다. 이 메서드는 두 개의 매개변수를 받습니다:
- event - 브라우저 이벤트
- text - 툴팁 콘텐츠로, 툴팁 요소의 innerHTML에 추가됩니다
tooltip.hide();
tooltip.show(event, text);
설정 속성
- className - 툴팁에 적용될 CSS 클래스의 이름
- timeout_to_display - 툴팁이 이벤트에 대해 표시되기 전의 밀리초 단위 지연 시간(기본값 50)
- timeout_to_hide - 툴팁이 사라지기 전의 밀리초 단위 지연 시간(기본값 50)
- delta_x - 커서 위치의 오른쪽 오프셋(양수일 때)으로 기본값 15
- delta_y - 커서 위치의 위쪽 오프셋(양수일 때)으로 기본값 -20
scheduler.config.className = 'dhtmlXTooltip tooltip';
scheduler.config.timeout_to_display = 50;
scheduler.config.timeout_to_hide = 50;
scheduler.config.delta_x = 15;
scheduler.config.delta_y = -20;
템플릿
- tooltip_text - 툴팁의 텍스트를 지정합니다
- tooltip_date_format - 툴팁에 표시될 시작일과 종료일의 형식을 지정합니다
const format = scheduler.date.date_to_str("%Y-%m-%d %H:%i");
scheduler.templates.tooltip_text = function(start,end,event) {
    return "<b>Event:</b> "+event.text+"

<b>Start date:</b> "+
    format(start)+"

<b>End date:</b> "+format(end);
};
Need help?
Got a question about the documentation? Reach out to our technical support team for help and guidance. For custom component solutions, visit the Services page.